Forced ventilation is designed to provide a comfortable microclimate in the bathroom. High humidity and sudden temperature changes lead to the formation of condensation and the development of pathogens. Before connecting a bathroom fan to a switch, you should evaluate the operating conditions and select a model of suitable power.
Choosing a fan for the bathroom
Household models have small dimensions and low power compared to units for industrial purposes.
According to the design and method of intake of the air mixture, they are divided into 2 types:
- Axial.
- Radial.
The first are equipped with blades that capture air and direct it parallel to the central axis of the device. Radial fans have a special impeller. It is designed to change the direction of atmospheric flow.
Axial models are the most common in everyday life. Their installation does not require special skills or technical training. Fans are classified according to the type of installation: duct and overhead.
The first option is characterized by higher performance and low noise. Such models are mounted in air ducts. In a private house you can install any type of fan, but in a city apartment - only an overhead fan.
When choosing a suitable device you should consider:
- Noise level.
- Power.
- Bearing type.
- Moisture protection class.
The performance rating and noise level are indicated in the supplied user manual and printed on the packaging. Depending on the size of the bathroom, it is recommended to purchase a device with a capacity of 50-250 m³/h. The noise level that is comfortable for human hearing is in the range of 25-30 dB. Since the fan will have to operate in conditions of high humidity and sudden temperature fluctuations, it is advisable to give preference to a model with a protection class of at least IP44.
Criterias of choice
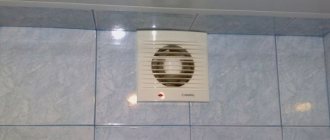
The most effective way to ensure proper ventilation is to purchase and install an electric forced-air fan. Typically, wall-mounted axial fans of various capacities are purchased for such purposes.
Wall-mounted axial fan for forced air supply
When choosing such a device, you need to pay attention to:
- Security system. The fan is a household electrical appliance, and the bathroom is an enclosed space with a high degree of humidity, so the device must have the maximum degree of protection of the housing from water and steam.
- Noise insulation. The noise level of the device should be minimal so as not to irritate people living in the apartment. If necessary, you can install a special noise suppressor and supplement it with noise-insulating materials that are placed inside the fan.
- The power of the ventilation device must correspond to the dimensions of the bathroom and the number of occupants. If the power is insufficient, the meaning of this system will simply be lost, since it will not be able to fully perform its functions.
Requirements for forced-air fans
- The noise level in a small room should be no more than 35 - 40 dB.
- The ventilation system must create a regular air change at least 5–8 times per hour and comply with SNiP standards.
- The exhaust device must have a check valve if the air will be discharged only through one branch duct.
- The housing must have a waterproof class of at least IP34.
- The 36 V motor will allow the device to operate quite silently.
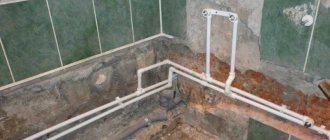
Installation features
The fan is connected to a two-wire wire. First, remove the front panel from the device. A groove is laid from the distribution panel to the ventilation hole. It must be strictly vertical or horizontal, without inclined lines.
The groove for laying electrical wiring is located no closer than 10 cm to the doorway. The cable is fixed with alabaster or cement mortar. The power supply line can be run inside the corrugated pipe.
The fan terminals are marked in English:
- L - phase.
- N - zero core.
- T - for connecting the signal wire. Used in models with a timer.
The veins vary in color. Zero is blue, the phase is in brown or white insulation. They must be correctly connected to the fan terminals and check the reliability of the contact. There are 4 holes for screws or self-tapping screws on the device body. Fastening elements are included in the delivery set. The fan can also be mounted on tiles without drilling. Silicone glue is suitable for this. You can use liquid nails.
On the wall
The device is applied to the surface. Use a pencil or marker to mark the drilling locations. An impact drill or hammer drill is suitable for forming mounting holes. It is necessary to use drills with pobedite tip. After drilling holes of the required depth, plastic dowels are driven into them.
The hood is inserted into the vent and secured with the supplied screws. Then you can start connecting the device. The scheme depends on the characteristics and functionality of the model.
Algorithm for wall mounting without drilling:
- The surface of the wall at the attachment point is cleaned.
- Silicone glue or liquid nails are applied along the contour
- The device is applied to the opening of the ventilation duct.
- To check the horizontal level, use a level.
- The fan is fixed with tape for 2-3 hours.
The final stage is to supply power and return the decorative panel to its place.
On the ceiling
A suspended or suspended ceiling system is suitable for installing an exhaust fan in a bathroom. This placement is rarely used in private homes, where the air duct can be led into the attic. In such a building, it is advisable to install a powerful duct device, which ensures rapid renewal of the atmospheric mixture in large rooms.
With a suspended or suspended ceiling system, the task becomes somewhat more complicated. Often the space for installing an exhaust fan in the bathroom is laid out at the design stage of the house. The ventilation grille or cooler is attached to the plasterboard panel with butterfly dowels.
The device is fixed on the polyvinyl chloride film using a pre-installed rigid base. When a suspended ceiling is installed, communications are pulled through a pre-prepared hole or carried along the base surface and hidden with a cable channel.
Varieties and characteristics
The ERA model is the most popular in our market. Let's look at it in more detail.
Other mechanisms and models with a timer from Vents, Ballu, Electrolux are connected in a similar way.
Here are the technical specifications and detailed data for all popular models:
Electrolux EAFM-100THERA SB D100 OptimaVents 100 KDomovent 100 CERA D 100 E 100SCBallu Green EnergyERA D 100 4C ETVents 100 Quiet
Connecting a fan without a timer
This connection option is considered the simplest from a technical point of view. The switch is placed in front of the entrance to the bathroom or indoors. It is advisable to install it away from plumbing equipment, where splashes on electrical contacts are prevented.
Plastic axial fans do not have a terminal output for connecting a ground loop. Everything is limited to phase switching with a neutral conductor. Connections are made in a distribution panel or socket box up to 60 mm deep.
To a separate switch
This is the most common connection option.
You will need to perform the following wiring connections:
- the neutral conductors of the ventilation unit and the electrical network are connected and insulated;
- the hood and switch phases are paired in the same way;
- The phase conductor of the electrical network is connected to the input terminal of the switch.
An important condition is the connection of the ground loop.
To the switch shared with the light
It is convenient when the ventilation unit starts at the same time as the lighting fixtures are turned on. The most practical option is to combine it with a two- or three-key switch. A socket box is installed in the corresponding hole. Electrical switching is carried out in it.
The input terminal is connected to the phase conductor of the power supply network. The output contact closes to the phase of the climate control unit. After connection, it is necessary to check the reliability of the connection and the integrity of the insulation. Then the working mechanism is fixed in the socket box and the cover with keys is installed.
Connecting a fan with a timer
Units equipped with a timer are easy to use.
The operating principle of such a device is as follows:
- The fan starts in parallel with the lighting.
- After the light turns off, the unit rotates for a user-specified time, removing exhaust air from the room.
- Then it turns off automatically.
To ensure full functioning of the device, 4 cores are used:
- phase from the distribution panel;
- electrical wire connected to the light bulb;
- ground loop;
- zero core;
For self-installation, it is recommended to purchase a surface-mounted device with the necessary set of built-in sensors - humidity, motion, etc.
To a single-key switch
You can turn on lighting and ventilation with one button, but with a slight delay in starting the climate control unit. Some models are equipped with an electronic timer. Such devices provide the ability to select a functional mode. Their switch is implemented in the form of 3 pin contacts. Two of them are closed with a jumper - a special jumper. One mode is called "toilet". To activate it, the upper and middle contacts are closed.
The meaning of this mode is that when power is applied, the motor of the ventilation unit starts immediately. The second mode is called “bathroom”. The light turns on immediately after pressing the switch key, and the cooler starts working with a set delay. In this mode, the unit will start only if the time interval between turning the lighting on and off is at least 90 seconds.
To two-button switch
When connecting an exhaust unit to a two-key switch, the phase is interrupted at one of the contacts. This method of electrical switching allows you to turn on ventilation and lighting separately. The neutral and phase conductors of the power supply system are closed at the corresponding outputs of the terminal block of the device. The control phase is located on one of the switch keys. It is connected to the timer contact of the exhaust device.
The operation of the unit is controlled and the operating mode is set through it. This wire is color coded brown. You can use the green-yellow wire, which is not used for this type of connection, which is responsible for grounding. In this case it does not start on the cooler. To connect the exhaust unit to a two-button switch, it is recommended to use a three-core power cable. This will allow for separate or paired operation of lighting and ventilation.
Air exchange in rooms
For a long time, the use of natural ventilation was considered the most optimal way to ensure air exchange. Until now, most houses use precisely this principle, since the system is characterized by simplicity of design and does not require energy to move air volumes.
The air exchange system solves a number of important problems:
- supply of fresh atmospheric air;
- removal of products of incomplete combustion of household gas;
- elimination of unpleasant odors;
- removal of carbon dioxide;
- reduction of indoor temperature;
- Humidity regulation.
The movement of street air into rooms occurs due to the difference in pressure in the rooms and outside the house. When the windows are open, the movement of air masses increases significantly - this is how ventilation occurs.
Natural ventilation was developed through the widespread use of windows with wooden frames. The window openings had a sufficient number of slots to ensure a change in the required air volumes. The situation became significantly more complicated with the advent and widespread use of double-glazed windows, the design of which provides for the use of highly effective seals. Once the window opening has become sealed, it no longer allows outside air to pass through, which can completely disrupt the operation of the ventilation.
More expensive models of modern windows are equipped with special valves for ventilation. However, the cost of such designs encourages buyers to abandon advanced models and give preference to cheaper ones.
As a result, the first to suffer are the rooms in which ventilation outlets are located according to the project:
- Kitchen. It is especially important here to remove household gas combustion products if the house is gasified. The health and safety of a person’s stay indoors during the cooking process depends on this. The operation of the four burners of a gas stove requires the exchange of at least ninety cubic meters of air per hour. An exhaust fan cannot always cope with this volume, but properly selected exhaust ventilation will certainly solve the problem.
- Bathroom. Using large volumes of water creates increased humidity. Ineffective ventilation not only reduces the usability of the bathroom, but also contributes to the appearance of mold, which actively multiplies in a warm and humid environment.
- Toilet. This requires increased air exchange to ensure freshness.
In addition, good operation of ventilation ducts ensures the removal of air from living rooms, since street air masses first pass through them, and only then enter the air ducts of the kitchen, bathroom and toilet.
There is another problem that negatively affects air exchange. Over a long period of operation, ventilation ducts accumulate on their walls a significant amount of grease, dust, soot and other contaminants. The nearest air duct outlet in the apartment can be cleaned yourself, but the vertical ducts are inaccessible.
We recommend that you read: Calculating the area of air ducts and fittings
In addition, residents do not have the right to maintain them themselves—cleaning can only be done by an organization entrusted with the operation of the building. Many companies ignore this issue, which is why ventilation ducts remain uncleaned for decades. As a result, you can often encounter difficulty in air removal even with the windows open.
The problem of poor quality air exchange can be solved by switching to forced ventilation. The easiest way is to install conventional fans in the standard air duct openings.
Connection errors
Electrical safety regulations prohibit installing a switch inside the bathroom. In apartment buildings with an improved layout with large bathrooms, you can install electrical devices near the entrance away from the plumbing equipment. A common mistake is laying a cable without a corrugated insulating channel.
The rules also indicate that connections without appropriate protection are prohibited in areas of high humidity. Due to leakage currents, false alarms of RCDs are regularly observed. Contact of water condensation on electrical contacts will lead to rapid equipment failure. Only devices powered by extra-low voltage may be installed in the bathroom.
The exhaust unit must not be connected to the internal wiring of lamps located in the bathroom. For the ventilation device to function correctly, voltage must be constantly supplied to its control board. A common mistake is the use of various remote sensors. It is not recommended to place them in the bathroom without moisture protection.
Rules for removing the device
The first stage of work on replacing or cleaning the fan begins with removing the device. To do this you need to do the following:
- Remove the fan grille, which is usually attached with four self-tapping screws, less often with glue.
Fan with grille removed
- Carefully remove the device (the electricity should already be turned off) and disconnect it from the electrical network - as a rule, in the bathroom it is connected to the light switch.
- Disassemble the device by removing the impeller secured to the shaft using a collet clamp - to do this, simply unscrew the fastening nut clockwise.
- Remove the electric motor of the equipment - to do this, turn the fan face down and disconnect the wires from the terminals. The motor is usually secured with 2 screws and can be easily removed.
When removing the engine, it must be supported. If you are disassembling a recently used device, it is advisable to wear gloves. Although it is easier to wait a while, letting the engine cool down.
Removing the electric motor