At first glance, it may seem that installing pipes in a bathroom yourself is a very difficult task. In fact, this is far from the case. Today, modern technologies have simplified this process to very simple manipulations that are accessible to everyone.
Today, in most cases, bathroom piping is made from polymer pipes - polypropylene for water supply, PVC for sewerage
Design
Without a project, laying pipes will be more expensive, will take more time, and is fraught with errors during the work. The project must take into account the following factors:
- interior space layout;
- number of plumbing fixtures;
- pipe layout diagram;
- the amount of plumbing equipment on the cold water/hot water supply lines;
- presence, location of a water heater, heated towel rail, water heated floor;
- pipe material, method of connecting them;
- design, quality of bathroom interior.
In apartments of standard multi-storey buildings, there are several options for planning bathrooms:
- combined near the kitchen;
Communication diagram with one riser for the kitchen and bathroom. - combined separately from the kitchen;
Combined bathroom with independent riser. - separate near the kitchen;
Separate bathroom with common riser. - separate from the kitchen.
In a separate bathroom, the risers usually run inside the toilet and enter the bathroom through the wall.
In the first and third cases, the pipes are changed in the bathroom, toilet, and kitchen. In the fourth option, cold water/hot water supply risers and sewers usually run in the toilet, and only from there do communications enter the bathroom. The second option is the most convenient for major repairs - all the risers are inside the combined bathroom.
In a combined bathroom, all pipes are collected inside one room.
Then you need to take into account the number of plumbing fixtures indoors:
- bathroom – washbasin, bath and/or shower, washing machine;
- combined bathroom - a toilet and bidet are added to the above.
More plumbing fixtures fit inside the combined bathroom.
In addition, an instantaneous or storage water heater can be placed in the bathroom, and water heated floor contours are often laid under the floor covering.
The heated towel rail in the bathroom serves as room heating. This device can be connected to a central heating system with a separate riser, or to a hot water supply system.
Even in a small room, there can be a washing machine under the sink inside the bathroom.
Attention: Some electrical appliances (bidet or toilet lid, lighting, shower stall) require an additional cable. Others (water heater, washing machine) have an outlet.
Read more: Basics of proper bathroom wiring.
Features of metal structures
Today, laying pipes in the bathroom practically does not involve cast iron and galvanized water supply and drainage systems. The reason for this is the complexity of installation of structures. However, sewer lines made of cast iron are distinguished by good noise insulation and high wear resistance compared to products made of polymers.
Galvanized steel water supply structures are completely inferior to their plastic counterparts. They are susceptible to corrosion during prolonged and intensive use. In addition, a common problem with such products is the formation of plaque inside the pipe.
Metal pipes are inferior to plastic ones, since the latter are not subject to corrosion
Metal products can only be connected using a welding machine, which is not always possible at home.
Plumbing
There are two standard wiring diagrams for cold water/hot water supply systems in an apartment and a country house:
- sequential - one cold water pipe, one hot water pipe is stretched from the riser to the farthest consumer, all plumbing fixtures are connected to it with tees, the latter with a tap;
Sequential circuit. - collector (parallel) - installation of cold water and hot water pipes from the riser to each plumbing fixture separately.
Connecting consumers to the water supply through the collector.
The first option is more economical due to lower pipe consumption. Hiding the water supply in the wall is much easier, and the labor intensity of rough finishing is reduced. The disadvantage is that the entire line is disconnected when repairing any plumbing fixture inside it, since the shut-off valves are located immediately after the riser. And also great sensitivity to peak consumption, for example, you are taking a shower, and someone decided to wash the dishes in the kitchen, before going to the toilet, the pressure in the shower will drop significantly.
In the second option, immediately after the meter, a collector is mounted on the cold water line, similar to a “comb” fitting on the hot water line. The two lower pipes go to the farthest mixer or device, the next two pipes are mounted on the walls above the previous ones, and so on until the consumer closest to the riser. This will avoid crossing communication routes with each other.
The advantage of the scheme is to turn off one device as needed while maintaining water supply to the others. Less sensitive to peak demand. The disadvantages are the increased consumption of materials, increased labor intensity of hidden wiring, and the cumbersome nature of the collector water supply system.
In apartments with gas instantaneous water heaters (“boiler” in popular parlance), a sequential wiring diagram is usually used. There is no particular point here in the DHW collector, since in this case it will not be possible to get rid of sensitivity to peak water consumption, because all the hot water will pass through a narrow pipe (usually 15 mm) inside the column or double-circuit boiler.
Each water supply line uses the following number of plumbing fixtures, starting from the riser:
- non-return valve – prevents self-priming from the adjacent line in the event of an emergency shutdown of water supply;
Check Valve. - shut-off valves - usually a lever-type ball valve with a long service life;
Ball valve - leakage protection valve – automatically shuts off the line in emergency situations;
Such a valve requires water leakage sensors, a controller, and a network connection. - coarse filter (GO) – filters out mechanical impurities;
Coarse water filter. - water flow meter - installed according to the requirements of the cold water/hot water supply supplier;
Water meter. - fine filter – increases the service life of mixers;
Fine filter. - pressure reducer – relevant for apartments with pressure above 4 bar;
Pressure reducer. - collector - the number of pipes depends on the number of consumers in the apartment.
Collector.
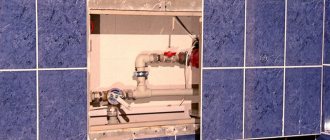
From this list, 4 devices are considered mandatory - a tap, a meter, a GO filter and a check valve. All this equipment is mounted near the riser and takes up a lot of space. An inspection hatch is installed to provide access to metering devices, shut-off valves and other devices.
To reduce the dimensions of the circuit, some of these devices can be built into each other. For example, a reducer with a check valve, a GO filter with a reducer, and so on.
The technology for laying out cold/hot water supply lines for an apartment step by step looks like this:
- dismantling the existing wiring - pipes are removed up to the shut-off valves on the risers;
- marking - it is recommended to use laser plane builders and levels;
Marking cavities for laying pipes. - gating – angle grinder channels are cut in the enclosing structures, structural material is knocked out to form cavities, taking into account the laid routes;
Grooves on the walls for laying pipes. - installation of water sockets - fittings are attached to special strips, which are, in turn, installed on dowel nails;
Installation of water sockets. - assembly of water supply loops - in the above sequence, the meter, filters, manifold, reducer, check valve are twisted together (which thread seal to use);
Counter assembly. - system assembly - the circuits twisted at the previous stage are mounted at the place of operation;
- pipe preparation - pieces of the designed length are cut from the coil, thermal insulation is put on them;
- installation of pipes - one edge is connected to the collector, every 0.5 m is fixed to the wall with special holders, the second edge is connected to the water outlets.
Pipe installation.
Attention: The standard connection of water pipes to the outlet is considered to be cold water on the right, hot water on the left.
Before sealing the pipeline inside wall cavities and partitions, it is necessary to perform pressure testing of cold water/hot water supply systems. To do this, plugs are screwed onto the sockets and pressure is applied to the pipes for 15 - 30 minutes.
Temporary plug for water sockets.
Pipes can only leak if there is mechanical damage to the structural material. Therefore, during crimping, only the connection points with the fittings are checked - at the point of connection to the manifold and socket, plus all the threads in the upper loop between plumbing fixtures.
Sewage installation
Do-it-yourself sewer installation is much easier than installing water lines. The main nuances of the internal drainage system are:
- slope to the riser 2 cm vertically per 1 m length;
- the use of gray socket pipes for internal sewerage;
- direction of the sockets from the riser;
- pipe diameter 110 mm for the toilet, 50 mm for horizontal lines, vertical sections;
- the use of oblique tees with a 45° upper branch pipe in the middle of the main line, a 90° branch for connecting the plumbing fixture farthest from the riser;
- use of 45° bends to bend the sewer at one horizontal level.
Sewer pipes are laid from the riser cross towards the toilet, sink and other plumbing fixtures in stages:
- installation of a 110 mm section to the toilet;
- installation of a tee with a transition to a diameter of 50 mm;
Transition of the drainage system from a diameter of 110 mm to 50 mm. - distribution of the utility system along the wall to the farthest consumer.
Depending on the location of the riser, household and plumbing fixtures, and the layout of the bathroom, the pipes can go in one direction or diverge in different directions. This changes the type of fittings and their number for assembling horizontal lines.
The electrical cable is embedded in the wall higher than the water supply and drainage system. This reduces the likelihood of a short circuit due to a break in the sewer system or cold water/hot water pipes.
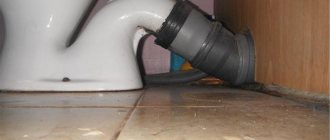
By analogy with water sockets, the sockets of sewer pipes and fittings can be embedded in walls. All plumbing drains are connected to tees, bends through pipes, corrugations with a diameter of 40 mm only after siphons with hydraulic seals.
The exceptions are toilets, urinals, and bidets, in the bodies of which siphons are structurally built-in.
To prevent sewer odor, corrugated or rigid pipes are connected to the fittings of the internal sewerage system through rubber cuffs with a “ruff”.
Which material to choose?
You can choose different pipes for laying water pipes, but experts most often recommend practical modern solutions:
- Polypropylene. Such parts can withstand pressure up to 25 atmospheres, are durable and do not corrode. Polypropylene pipes are suitable for both cold and hot water. Diffusion welding is used to connect elements, resulting in reliable permanent joints.
- Metal-plastic. Each part is a two-layer structure, with plastic inside and metal outside. The products can be used for cold and hot water supply. The pipes bend well, which reduces the number of connections. Compression or pressure fittings are used to make joints.
To lay a water supply system, you will need pipes complete with adapters, tees, angles, couplings and shut-off valves
The sewer line is most often made of PVC pipes. Polyvinyl chloride is sufficiently rigid, which makes it possible to use it when installing risers. To connect the elements, a socket design with a seal is used.
The low weight of PVC pipes greatly facilitates their installation. For sewer installation, elements of two main sizes are used: with a diameter of 50 and 110 mm.
Heated towel rail
A mandatory attribute inside the bathroom is a heated towel rail. In standard apartment buildings, a separate heating riser is usually installed for this plumbing product. This is the most difficult pipe installation option for a number of reasons:
- the riser comes out of the lower ceiling and enters the upper slab;
- for hidden wiring, you will either have to make a false panel from plasterboard, or chisel reinforced concrete slabs to mount bends and cut grooves in the walls.
Less often, the specified device crashes into the hot water supply system, then there is no problem with hidden pipes to water outlets.
There are electric modifications of the heated towel rail that work even when the heating of the house is turned off. They are installed after laying the tiles, and an electrical outlet is installed for connection.
Water heated floor
It is possible to connect the circuits of a water heated floor to the central heating line only in one case - if the apartment has only one riser for this purpose, from which the supply and return lines are extended to all registers in the premises. In other options, for a warm water floor, either a separate boiler is installed, or a heat exchanger is used that heats the water using the thermal energy of the centralized heating system.
For TP circuits, a collector wiring diagram is always used. Pipes are installed before pouring the screed, only in walk-through areas of the bathroom. They have no effect under the bathtub, cabinets, shower stall, or washing machine.
Heat exchanger for water TP.
Due to the bulkiness of collector units with heat exchangers, most users use electric-type heated floors (IR, heating cable, cassette modifications).
Prevention of unpleasant odors
Often unpleasant odors come from the sewer system. To avoid this, when installing plumbing in the bathroom, you should follow the following rules:
- lay the sewer system using wide pipes. Because in products of small diameter the pressure often changes, which is the first cause of the appearance of an unpleasant odor. But in wide products, during the movement of liquid, an air cushion is created, blocking the escape of odors to the surface;
- be sure to clean the pipes in a timely manner;
- Stagnation of waste and water at the site of the siphon can lead to rotting and the appearance of an unpleasant odor. Therefore, the siphon should be constantly cleaned of various wastes and liquids;
- Another reason is faulty ventilation. Stagnant air in the room can lead to the development of fungus and mold. Therefore, you need to monitor the operation of the ventilation and eliminate any malfunctions.
Wide pipes should be used for the bathroom drainage system
Hidden communications wiring
There are four ways to conceal communications in a bathroom:
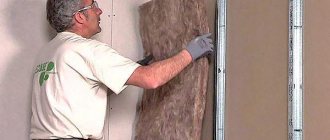
- box - plasterboard or gypsum plasterboard sheet fixed to a profile frame, covering part of the supporting structure (walls, partitions) where the pipes pass;
Piping in the box. - false panel - the entire wall is covered with plasterboard, again, on a lathing made of galvanized profile; PVC panels on a frame made of bars are less commonly used;
Disguising utility networks with a false panel. - cavity in the wall - after marking the water supply and sewerage routes, you need to trench a concrete or brick wall, lay pipes inside the resulting channels, cover it all with putty;
Laying pipes in grooves. - laying in a screed - pipes are laid on the lower floor and filled with concrete, semi-dry screed.
Pipes for screed.
Comparative characteristics of these technologies are given in the table below:
| Characteristics | Hidden installation type | |||
| box | false panel | grooves | screed | |
| usable volume of the room | decreases slightly | decreases much | does not change | is decreasing |
| labor intensity of work | low | average | very high | high |
| interior quality | average | high | ||
| access to communications | through the inspection hatch | – | – | |
| compatibility with installations | + | – | ||
| presence of wet processes | – | + | ||
| turnkey delivery | 1 day | 2 days | 2 – 3 days | a week |
Boxes reduce the quality of interior design, but convenient niches and steps appear for placing accessories and storing bath accessories. Behind the false panels you can hide any number of pipes, a boiler and other equipment. But, to attach wall cabinets and shelves, you will have to install additional racks made of galvanized profiles.
Outdoor installation of engineering systems
In Soviet times, open wiring of engineering systems was considered the standard. Even to the bathtub faucet, the pipes approached from the outside of the wall cladding, forming an inconvenient, unsightly gap between the side of the bowl and the enclosing structure. This method makes it much easier to bypass intersecting water supply and sewer lines.
Currently, water outlets are used, that is, cold water/hot water supply pipes laid in grooves. With sewerage, everything is much more complicated due to the too large diameter of communications. Therefore, a combined method is used here:
- behind the bathtub the pipes are laid in an open manner;
- the risers are closed with boxes, inside which additional plumbing equipment is installed - a meter, a manifold, filters, a reducer, a valve, shut-off valves, a boiler;
Riser box. - hanging plumbing installations are covered with plasterboard sheets by default;
- For the washing machine, bidet, and toilet, single water sockets are installed for cold water only;
Water socket for washing machine. - Double water sockets are installed for the bathtub faucet, washbasin, and shower cabin;
Double water socket. - Sewer pipes for sinks are often installed hidden; for bathtubs and showers they are laid openly.
Hidden sewer installation.
To connect mixers with hot water/hot water outlets, flexible open wiring is used - hoses. The washing machine drain is connected to a special fitting on any tee of a plumbing fixture.