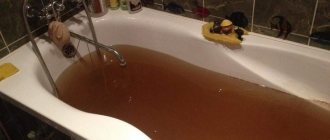
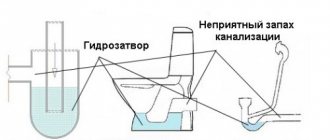
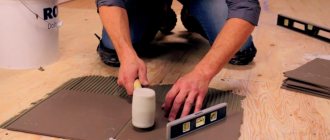
If the siphon under the sink is leaking, then this is a problem that needs to be addressed immediately. Otherwise, there is a high probability of flooding of the living space located on the lower floors. A siphon is a plumbing element designed to prevent air from entering a room from the sewer system.
This device is installed under the bathtub, washbasin and kitchen sink. The principle of operation of the siphon is that the water in its body prevents sewer gases from escaping from the pipeline. That is why the air in the kitchen and bathrooms is always clean and fresh. The appearance of moisture on the floor and an unpleasant odor from the sink indicate that the drainage system is leaking.
There may be several reasons for this phenomenon. Despite the fact that the drain system has a rather complex structure, you can fix it yourself, without resorting to the services of on-call technicians. Plus, when the sewer is leaking, every minute counts. Let's consider what to do if a leaking siphon is detected.
Where to start fixing a leak
Standard situation - it was discovered that a pipe is leaking: what to do in such cases? The first step is to determine exactly where the pipe is leaking. If a sink, washbasin or bathtub drain is leaking, the cause of this phenomenon is usually a poor-quality connection of the drain hole, siphon and entrance to the pipe.
In this case, to fix the problem, you will need to tighten all the threaded connections through which the sewer pipe flows. Sometimes it helps to replace the gaskets at these joints.
Trust the work to professionals
Installation and maintenance of plumbing is a specific job that requires knowledge of theory and practical skills. The Plumber Service employs experienced specialists who regularly improve their skills. We understand what to do when a drain pipe leaks, an overflow leaks, or a faucet drips. By entrusting plumbing maintenance to specialists, you save significantly and get high-quality results.
By ordering a service from us, you will receive a guarantee for the work performed. Give us a call and we will quickly fix any plumbing problems. By entrusting repairs to professionals, you will not have to be distracted from work and other important matters.
If a pipe leaks at the connection
Using the caulking method for cast iron pipelines
If leaks are detected at the junction of cast-iron sewer pipes, you should prepare for a rather complex procedure for eliminating the problem (read: “How to repair a crack in a cast-iron sewer pipe - reliable and proven methods”). In this case, much depends on the quality of the docking work.
If caulking is carried out with lead, the procedure is as follows:
- Clean the joint area until clean metal appears.
- Caulk the gap using lead cones. This is done with a blunt chisel, since in this case it is quite easy to seal the gap with soft lead.
What to do if the pipe in the toilet is leaking:
- Clean the joint from the old mortar using a narrow chisel and hammer. You need to act carefully so as not to damage the pipe.
- After removing the old seal, the gap must be thoroughly cleaned.
- For new driving, use tarred strands and an aqueous solution of cement in a ratio of 10:1 to water. Before driving, the strands are treated with a special substance, which includes cement and asbestos in a ratio of 7:3. While kneading, add a little water: the finished solution should be like plasticine.
Repairing leaks at pipe joints using cement
What to do if a pipe is leaking, and the only possible materials available are cement?
In such a situation, work is carried out as follows:
- The pipe junction area is cleaned, with the obligatory removal of the old seal. To avoid damaging the pipes, it is better to refrain from using heavy tools.
- Next, you need to get a wide gauze bandage. Cement is mixed with water to form a slurry. A bandage is immersed in the resulting solution.
- The same cement mortar is used to treat the joint between the pipes, and then wrap a bandage there.
- The hardening of the seal usually lasts for two hours, after which it can be sanded and painted.
In cases where a leak was detected directly on the pipe body, a completely different algorithm of actions will be required.
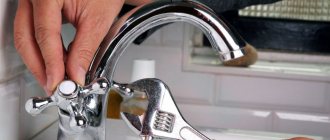
The kitchen faucet is leaking, how to fix it yourself
To repair a plumbing fixture in the kitchen yourself, prepare the following tools and materials:
- A knife with a sharp tip.
- Adjustable and hex wrench.
- Screwdrivers.
- Consumables: new cartridges, rubber gaskets, taps - axle boxes.
- Technical aerosol WD 40, if metal elements are stuck to each other.
It doesn't matter what type of faucet is installed in your kitchen. Its repair should begin with shutting off the water supply and draining its remains into the sink
Next, we proceed to repairs, according to the design features of the plumbing fixture.
Single lever kitchen faucet repair
Single lever faucets fail due to:
- Cracks and chips formed on the body.
- Cartridges clogged.
- Wear of gaskets.
- Aerators clogged.
Dealing with these breakdowns is quite easy. If the leak appears for other reasons, it is necessary to act in a certain sequence - slowly and carefully:
- Remove the decorative plug from the faucet body using a screwdriver or a sharp knife.
- In the resulting hole we will see a screw that connects the adjusting rod and the lever.
- Unscrew it with a hex wrench.
- Remove the lever from the body and unscrew the decorative casing. If the parts are not stuck to each other, you can do this by hand. Otherwise, use WD 40 prepared in advance.
- There is a clamping nut under the decorative casing. Carefully unscrew it with an adjustable wrench.
- If the ball device is disassembled, there will be a sealing collar under the nut. It will need to be carefully inspected for defects, tears and degree of contamination. We take out the ball and inspect its surface. It should be clean and even. Next, remove the support springs and seals. If they are in poor condition, then this is what leads to leakage.
- When disassembling the mixer with a cartridge, it is removed and subjected to a thorough inspection.
- Failed parts are replaced with new ones.
- We assemble the tap in reverse order.
Attention: when carrying out repair work, do not tighten the nuts too tightly, as this will lead to deformation of the seals and disruption of the correct operation of the device. https://www.youtube.com/embed/uzZ_QSNs8E8
Repair of a two-valve mixer
If a two-valve faucet is installed in the kitchen, the principle of repair work is as follows:
- Remove the decorative plug on the flywheel in the valve.
- Using a screwdriver, unscrew the screw that secures the flywheel.
- We remove the flywheel. In front of us there will be a crane - an axle box.
- We unscrew it counterclockwise and inspect it for defects.
- If the gasket of a worm-type axlebox is damaged, replace it with a new one. If you have a crane with an axle box with ceramic discs, they are completely replaced.
- We assemble the product in reverse order.
Eliminating the causes of leaking plumbing fixtures on your own is quite easy and simple. But faucet leakage is not the only problem with faucet malfunction.
Other faucet breakdowns and fault prevention
In almost all cities and towns, the quality of water in taps leaves much to be desired. Because of this, dirt appears on the aerator over time. When there is too much scale on the inside of the aerator, the water pressure decreases. The problem can be solved quite easily by replacing the aerator. It can be unscrewed quite easily with an adjustable wrench or by tapping a hammer on the surface.
If the faucet is leaking due to a crack formed in it, only a complete change of plumbing will help. Silicone sealant can fix the leak for a short time.
To extend the life of your kitchen faucet, it is recommended to use water filters, use appliances carefully, do not tighten the valves too much, and constantly monitor the condition of the plumbing.
You can fix plumbing leaks in the kitchen quickly with your own hands. To do this, you will need to prepare consumables and the necessary tools, carefully familiarize yourself with the sequence of work and stock up on free time.
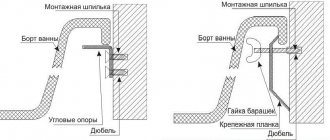
Installing the bandage
If a pipe in the bathroom is leaking, a temporary solution to the problem is to install a bandage. Before this, you need to determine what type of damage you will have to deal with (fistula or leakage), and where exactly it is located.
The rubber band is applied as follows:
- A rubber gasket is installed in the emergency section of the pipe.
- After pressing tightly to the pipe, fixation with a clamp is applied.
You can easily purchase a clamp in a store, but it happens that you don’t have it at hand at the right time. In this case, you can make the clamp yourself, or use wire, a harness, rope or hose instead.
The bandage rubber can be an old rubber boot, from which the boot is cut off. The same goes for a rubber hose and a bicycle tube. The width of the bandage is made depending on the diameter of the pipe being repaired.
Using a wooden wedge in the bathroom
There are situations when a high-pressure leak occurs, but there is no possibility of shutting off the water: how can you prevent the pipe from leaking? A bandage usually doesn’t help in such a situation either.
If the leak is caused by a fistula, it can be eliminated using a small wooden peg in the form of a wedge. The size of its tip is made the same as the resulting hole in the pipeline.
The peg with its sharp end is inserted into the fistula, after which it is hammered in with a hammer. This temporary measure allows you to gain time needed to call emergency services.
Recommendations for the operation and prevention of siphon leaks
The siphon, like many other household items, needs maintenance. It must be disassembled and cleaned at least once a year. At the same time as cleaning, it is recommended to check the parts for scuffs and other damage. Also at this moment it is worth changing the gaskets or lubricating the old ones with sealant.
It is very important to assemble the siphon without allowing bevels, both during initial installation and after disassembly for cleaning. If you plan not to use plumbing in the house for a long time, then add any vegetable oil to the drain. This will protect the rubber parts from drying out, and will serve as an additional barrier against unpleasant odors in the home when all the water has evaporated.
It is important to remember that to prevent contamination of the siphon, you should not pour food waste, tea leaves, or even just dirty water into the sink, as the water will go away, and all other impurities will remain on the walls of the structure and, at best, will lead to the need for quick cleaning. Before you pour anything with foreign particles into the sink (everything except water, including even ordinary soup), you need to install a special strainer that will protect the siphon from waste. The stuck particles are removed from the strainer and thrown into the trash.
By the way, when pouring out a fatty liquid, it is worth considering that fat can also settle and accumulate on the walls of the siphon. This can be partly saved by special chemical mixtures for cleaning drain pipes. They, of course, will not replace a full cleaning procedure, but they will allow you to perform it a little less often. The main thing when using such household chemicals is to carefully read and follow the instructions on the packaging, otherwise the procedure may not have any effect.
Sealing a pipe in a toilet
A leak in a pipe can also be eliminated with an adhesive bandage.
The procedure in this case is as follows:
- The water in the pipe is shut off by a valve.
- You will need a hairdryer to dry the damaged area.
- The selection of dense flexible sealing material of the required dimensions is carried out. It can be rubber, plastic, fiberglass, etc.
- To glue the fabricated patch to the leak site, you will need epoxy glue.
When using fiberglass, the cut piece should be enough to wrap the pipe at least 5-6 times. The width of the bandage should exceed the diameter of the pipe by at least one and a half times. It is more convenient to apply glue to the bandage with a brush or spatula.
After wrapping the bandage fabric around the pipeline, it is secured with a tie or clamp until it dries completely. The glue usually dries within 24-72 hours. The air temperature must be at least + 15 degrees.
Sink Drain Cover Repair
As a rule, the drain in our sinks is closed with a regular plastic stopper, which prevents any debris and food waste from entering the pipe.
However, in the USA and Europe there are often sinks where the drain is closed with a special lifting lid. It opens by pressing the lever located next to the faucet valves.
This is what the mechanism for lifting the sink drain cover looks like. The lid lift level can be adjusted within a fairly wide range.
- To adjust, unscrew the screw and move the lever.
- To adjust, squeeze the clamp and move the lever.
- Sink.
- Drain cover.
- Hinge nut.
- Articulated lever.
- Lifting lever.
- Adjustment screw.
- Lift arm clamp.
- Spring clamp.
An example of a typical sink drain, equipped with a lever that allows you to conveniently lift the lid.
The mechanism that lifts the lid is usually mounted behind the sink. The lifting lever is connected to the adjustment screw by means of a corresponding clamp. In this case, the lifting arm is controlled by a hinged arm via a spring. Pressing the hinged lever allows the drain cover to lift.
The lifting height can be controlled using an adjustment screw. If you loosen it, just move the clamp up or down and select the position of the cover that you need, after which the screw will lock.
Sometimes the lid is attached directly to the hinged arm, and sometimes it just sits on the drain.
Sink drain covers come in many different types.
- Rotate and lift the cover to remove it.
- Pull the hinge lever and lift the cover.
- Lift the hinge arm and remove the cover.
- Tilt and rotate when lifting.
- Iron cover.
- Pad.
- Articulated lever.
If the cover is not fixed in any way, then it can be simply removed for cleaning.
Some lids have a special hook that connects it to the hinged arm. To remove such a cover, just twist it.
In other models, the lever passes directly through the cover itself, so it can only be removed by unscrewing the pivot arm retaining nut and pulling the lever out of the cover. When you tighten the nut back, do not forget to use sealing mastic or tape.
Adjusting the Sink Drain Cover
As we already described in the previous article, many sinks use special lift-up lids rather than regular plug-in lids.
Lifting such a cover is very simple - just press the lever located next to the mixer valves. The process of raising and lowering the lid is carried out through a spring mechanism hidden under the sink.
Chrome plated drain cover with lever for the sink.
The so-called plunger mechanisms have become widespread, when the lever rotates on a hinge and, thereby, moves the lifting lever up or down. At the end of this lifting arm is a weight that closes the drain.
Lever design of the drain cover.
- Pad.
- A cover located on the drain of an overflow pipe.
- Tension spring.
- The lid is closed.
- The lid is open.
- Overflow.
- Pad.
- Thread for changing the location of the lever.
- Lifting lever.
- First nut.
- Bath wall.
- Plastic element with nuts.
- Second nut.
- Overflow pipe.
- Drain.
- Plunger.
- Plastic element with thread.
- Drain hole.
- Nuts.
- A plunger seat that, when blocked, shuts off the water.
- To the trap that is under the floor.
Part of the mechanism for lifting the drain cover located under the sink.
As a rule, the weight should completely cover the drain. However, if water still flows out, it means that the hole for the weight is very clogged. Cleaning it is not difficult at all.
If a metal pipe is leaking
It often happens that a pipe in the bathroom leaks: what should you do to avoid flooding the apartment and the neighbors below?
In this case, proceed as follows:
- The first step is to shut off the water supply.
- Cut off the damaged section of the pipeline using a hacksaw or grinder. The cut is made with an indentation of 30 cm in both directions.
- Unscrew the threaded connection of the pipeline adjacent to the damage site.
- Threading is carried out on the cut off fixed end of the pipe. It is convenient to use a gas wrench to hold the end of the pipe.
- The coupling is screwed onto the threaded end.
- A measurement is made of how long the new pipe should be, taking into account the threaded section.
- To make the insert, use a pipe of exactly the same diameter as the old one. The manufactured segment must be equipped with threads at both ends.
- To connect the new section to the pipeline, a coupling is used, which can be held using a pipe wrench.
Before screwing on the coupling, it is necessary to seal the threaded sections of the section using flax, sealing putty, or a special tape-fuser. In addition to repairing metal pipelines, leaks on pipes made of other materials can be repaired in the same way. If it is not clear what to do if a pipe is leaking, it is best to turn to professional plumbers for help.
Causes of leakage
Steel pipes are not resistant to rusting and oxidation due to the constant circulation of water inside and the deposition of air condensate and moisture outside. Polyethylene is more resistant to the onslaught of aggressive substances from the outside, but leaks in the heating system also occur for certain reasons:
- Incorrect selection of material, improper use. For example, polyethylene and polypropylene are not suitable as heating and sewer pipes.
- Savings, because people make mistakes when buying cheap polypropylene pipes for cold water. You can expect them to swell, deform, or burst when high temperatures are applied at any time.
Metal products for the heating system also do not last forever. The walls become thinner over the years and become corroded. Leaks appear on threads, fittings, section joints, and even sections of pipeline.
Constant contact of a hot pipe with cold air from the outside sooner or later leads to the accumulation of condensation or the formation of rust, injury due to constant humidity.
Plastic ones are unstable to mechanical damage or are made of low-quality material, when they begin to ooze and leak long before the end of their service life.
The weakest points of the heating system are the joints and spans. City residents should know how to quickly install a new part in the event of a leak, apply a patch to the damaged heating section, in order to successfully carry out dismantling and not flood the neighbors.