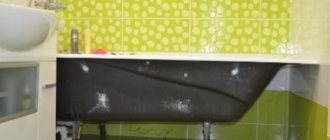
To install tiles on a wooden bathroom floor, you should learn more about the properties of the materials used. Wood expands under conditions of temperature changes and increased humidity levels; this factor has a destructive effect on ceramic cladding. The tiles are not elastic; for this reason, the coating is deformed, and water gets into the floor structure through cracks. As a result, fungus may form on the wooden base, which will significantly reduce the service life of the joist.
Is it possible to lay tiles on a wooden floor?
To cover a wooden base with ceramic tiles, the wood will have to be subjected to high-quality processing. First of all, the materials are incompatible due to radically different material properties. You can get to know him better in the table below.
| Property | Ceramics | Tree |
| Lifetime | Durable and stable material, destroyed only under heavy mechanical stress | Subject to various types of destructive processes, service life is noticeably shorter than that of ceramics |
| Moisture resistance | Does not change its composition and thickness under the influence of moisture | If there is an excess of moisture, wood greatly increases in size; if there is not enough moisture, it can dry out. |
| Application of glue | Any glue is suitable | It is recommended to avoid water-repellent glue, as it blocks the flow of oxygen to the wood surface, resulting in a shorter lifespan of the wood. |
Is it possible to lay tiles on a wooden floor? Yes, but very carefully. Combining ceramics and a wooden base is possible, but this process requires meticulous preparation and complex installation. Before moving on to the main type of work, the wood must be subjected to special treatment, protected with a waterproofing layer and all holes and cracks sealed.
Why is it undesirable to combine ceramics and wood?
Tiles and wood are materials with opposite properties. The low strength characteristics of wood are due to the fact that it is a completely natural material that requires a constant flow of oxygen and insulation from moisture.
It is important to ensure that the wooden covering is completely immobile so that the ceramic slab does not crack during installation. Otherwise, you will have to start the repair again.
Under the influence of moisture, a wooden structure can increase in size or dry out without moisture at all. When laying tiles, the main task of the master is to create a damping layer to ensure constant access of air and the required amount of moisture to the wooden base.
If the wood does not “breathe”, after a while it will begin to rot or become infected with fungus.
Specifics of wooden buildings
It is advisable to plan the installation of the floor in the bathroom at the design stage. When performing calculations, it is necessary to take into account the additional loads on the floors exerted by the pressure of a bathtub filled with water (especially if you plan to install a jacuzzi). It is necessary to lay wooden beams with smaller spacing and use beams with a larger cross-section.
Advice! When installing a floor in the bathroom of a wooden house, it is recommended to increase the thickness of the wooden floors by about 25%.
Any floor is a multi-layer coating; in a wooden structure, it usually consists of:
- rough flooring made of boards;
- screeds made of concrete or dry leveling layer;
- fine finishing.
Therefore, even at the first stage of construction, it is necessary to lower the beams by at least 20 cm. In this case, the floor in the bathroom will be on the same level as the floor in other rooms. If the beams are not lowered, then the flooring in the bathroom will be higher in level.
Advice! It is advisable to “sink” the floor in the bathroom a little, that is, make it a little lower in level than the flooring in the rest of the rooms. Thanks to this, if a leak occurs, water will not immediately rush into the rooms.
Features of installation on wood
Key points to pay attention to when laying ceramic tiles on a wooden floor:
- First of all, it is necessary to provide the wood with access to oxygen so that the material does not begin to rot and does not change in size, which can cause the tiles to crack.
- The base must be stationary so that the tiles lie flat and firmly.
- Loads must be evenly distributed over the entire surface, otherwise the materials will crack during installation.
Creating an insulating layer
The rigidity of the screed or tile adhesive is much higher than that of the wood used as a base. Therefore, between the tile and the floor there is a layer that compensates for the movements of the wood, and also forms a waterproofing layer.
When using a special multifunctional film, the shock-absorbing layer should be placed with the hard side against the tiles, and the elastic side against the boards. For them to breathe, the material must allow steam and air to pass through, but block the penetration of moisture.
Waterproofing can be rolled or liquid.
- The solid material is rolled out onto the floor and secured with tape.
- Drying oil or latex impregnation is applied to the wooden surface and the painting mesh is immediately laid.
USEFUL INFORMATION: How to repair an old wooden floor: options, price
A damper against wood movement can be an elastic adhesive backing onto which the tiles are attached.
Preparation of tools and materials
Materials for laying tiles on wood:
- Glue.
- Water.
- Drawing materials.
- Grout for tiles.
- Materials for screed.
- Sealant.
Tools for laying tiles on wood:
- Bucket for diluting glue.
- Grinder or ceramic knife for cutting tiles.
- Crosses for tiles.
- Spatula or trowel.
- Notched trowel.
Preparing the base
Laying tiles should begin with preparatory work. Wood requires additional processing so that the tiles do not crack or deteriorate during installation. Not only the quality of the floor, but also its aesthetic appearance will depend on the quality of preparation of the base.
When processing wood, you should strictly follow all instructions in order to save yourself from the need for repeated repairs. After installing the wood, at least two years must pass (the shrinkage period lasts approximately this long) before you can begin laying ceramic tiles.
Checking the condition of the coating
The first thing you should take care of is checking the condition of the coating. If the installation of wood was completed a long time ago, after some time the material could begin to rot or dry out. It will be impossible to lay tiles on surfaces covered with a layer of fungi, mold and other bacteria.
Good condition of the base
Ceramic tiles can only be laid on a substrate in good condition. If no visible defects were found or you got rid of them in time, you can move on to the next stage of repair. First you need to remove the wooden base, and then carefully check the beams and joists for damage.
The distance between the lags should not exceed 50 cm, otherwise the material will not withstand the weight of the ceramic tiles.
The joists are in good condition, but the decking is damaged.
Checking the condition of the lag is very simple. The wooden base will have to be completely disassembled to provide access to hidden parts. It is better to replace damaged flooring with cracks, swelling or fungus with a new one, since restoring the old one will be problematic.
The condition depends on their evenness. Balance disappears if the logs sag under the weight of damage. To ensure the strength of the base, the space between the logs is filled with expanded clay, which repels moisture well and does not cause the boards to rot. A layer of thermal insulation is placed on top to protect the wood from overheating.
Poor floor condition
If the condition of the floor is unsatisfactory, the base will have to be replaced or damaged areas removed using a machine. What signs can be used to judge the unsatisfactory condition of the floor:
- The presence of fungus, mold and other bacteria. Infestation of wood causes it to become softer and open.
- The appearance of wood-boring beetles provokes the destruction of wood.
- Some areas began to rot. You can test the wood for strength in the following way: stick an awl into a certain area. If it fits easily without visible effort, the damaged elements should be removed as quickly as possible, otherwise laying tiles on such a surface will be impossible.
If the condition of the floor is unsatisfactory, it is necessary to remove all damaged elements and treat the wood with a special antiseptic solution to prevent the appearance of new destructive bacteria.
An additional layer of waterproofing may be required.
Antiseptic treatment
Antiseptic treatment is necessary to protect the tree from fungus and bacteria. To achieve maximum results, you should reapply the product (up to 5 times) as soon as the first part dries. The most popular antiseptic is hot drying oil. The next layer can be applied only after the surface is no longer sticky from the previous one.
The antiseptic properties of drying oil directly depend on its temperature. During application, it should be as hot as possible in order to destroy harmful bacteria as quickly and effectively as possible.
Installation on strong joists
If after the inspection it was decided to remove the floor to the joists, you need to use another method of installation with your own hands:
- Rip off the decorative floor covering, the finished floor, which can be chipboard, plywood or boards. And then, using a nail puller, remove the finished floor nailed to the joists;
- This is followed by treating the boards with a moisture-proofing compound, an antiseptic, or a combination preparation that combines these functions. Choose deep penetration compounds, apply them in several layers so that they are absorbed 1-3 cm into the wood;
- Level the floor, install beacons or bars to control it;
- Lay or thermal insulation; experienced finishers recommend using fine-grained expanded clay, as this option is optimal in terms of price and quality;
- We fix the floor board perpendicular to the joists with a gap of 3-5 mm, use polyurethane foam to seal the cracks, joints, and corners;
- Install a waterproofing layer, which can be used as a film, bitumen-based roll material or polymer mastics;
- Next, you can lay moisture-resistant drywall, as described in the previous section.
Leveling the surface
After the antiseptic has dried, you can proceed to leveling the working surface. The wood should be cleaned of old varnish, paint and other coatings. Professional craftsmen offer three convenient ways to remove old coating:
- Exposure to hot air. A hair dryer set to a temperature of more than 200 degrees is suitable for this purpose. As soon as the paint and varnish begin to swell, they can be removed with a construction spatula. The main thing is not to overheat the wood so that it does not deteriorate.
- Mechanical cleaning with a spatula or sandpaper takes a lot of time, but is suitable for beginners.
- The use of chemicals quickly and effectively removes old coating, but is not cheap.
After leveling the surface of the board, you should inspect it again for damage.
Plywood or chipboard
Before you begin repair work, you should familiarize yourself with the tips on how to lay a wooden floor made of DSP correctly:
- Before laying the tiles, it is necessary to secure the DSP sheets. The joints of the plywood should not coincide with the joints of the joists, otherwise the wooden base will fail under the influence of the weight of the ceramic tiles. The suitable distance for plywood sheets is 25-30 cm.
- All seams must be treated with a special solution and then sanded well.
- Apply the adhesive solution to the surface of the plywood and the tile itself on the back side.
- The level of the tiles should be determined using a building level.
The main advantage of DSP is the ability to create a perfectly flat surface. A rough base will be required.
Moisture-resistant drywall
Moisture-resistant drywall requires special preparation. The material is quite fragile, so before laying the tiles you will need to construct special guide strips, the distance between which should not be less than half a meter. Otherwise, the tiles will begin to sag and damage the base.
On both sides, drywall is treated with a primer solution to increase strength.
Dry screed
Dry screed is suitable for moisture-resistant plasterboard and fiberboard panels. It should not be used in rooms with high humidity: bathrooms, kitchens, since expanded clay absorbs air well. Dry screed is prepared from various types of dry materials: expanded clay (has good characteristics), perlite, vermiculite.
Main advantages:
- Does not require drying.
- Production speed is about two days.
- It retains heat well, which is provided by expanded clay.
- High level of sound insulation.
Wet screed
Wet screed is prepared from cement-sand mortar. It dries out in about 2-3 days, during which time all repair work will have to be postponed. Fiberglass and glue can be added to the wet screed mixture to increase the strength and elasticity of the cement mortar.
It is important to fill the screed with an even compound to facilitate the process of laying the tiles.
Sealing cracks and joints
Laying an insulating layer allows you to seal all the cracks and joints. It is better to choose non-hygroscopic materials to prevent moisture from appearing and further weakening of the wood, as well as to protect the material from infection by fungus and bacteria. The material should be lightweight to prevent the material from sagging.
The most suitable option is extruded polypropylene foam of synthetic origin or mineral wool. The material is not cheap and does not allow air to pass through well, otherwise its properties correspond to the type of repair work. The insulation is laid on top of the waterproofing layer.
Material Compatibility
Wood and ceramic tiles have different physical characteristics. Boards change linear dimensions with changes in moisture and temperature, and ceramics are almost unable to expand and contract when environmental conditions change.
The tile transmits heat well. Wood acts as a heat insulator. The tile is resistant to moisture and waterproof. Lumber is quickly destroyed by water. In addition, they are susceptible to the development of fungus even when treated with an antiseptic.
A subfloor made of wood also has a number of other features that complicate the process of laying tiles. Deflection of the base is possible. In this case, the tile may detach from the adhesive. Often the glue peels off along with the tile.
Laying tiles often does not eliminate creaking floorboards. The difference in the hardness of the wooden floor and the hardened tile adhesive also contributes to the peeling of ceramics. To eliminate the problem, it is recommended to manufacture an intermediate layer, which can be:
- dry screed;
- leveling screed;
- self-leveling floor, etc.
To compensate for the difference in the characteristics of wood and tiles, special adhesive compositions that are characterized by increased elasticity are suitable.
Choosing the right adhesive
It is equally important to choose the right glue. Preference should be given to glue, which is prepared from a dry construction mixture. Main types of tile adhesive:
- Leveling. Copes well with uneven surfaces up to 5 mm deep. Contacts well with moisture.
- Elastic. Suitable for laying tiles on non-solid materials - wood, plywood, drywall. Can be used for heated floors.
- Heat resistant. Suitable for heated floors.
We also recommend watching - Ceresit tile adhesive: varieties and features
Self-leveling floor
For wood, dry self-leveling mixtures compatible with it are selected. They do not contain casein, a substance that destroys the structure of wood, and contain fiber additives to improve adhesion.
- The perimeter is preliminarily covered with damper tape to the height of the fill and tiles.
- The prepared mixture is applied to a thoroughly cleaned floor. Layer thickness – 2.5–5 mm.
- While the composition is liquid, air bubbles are removed from it using needle rollers.
The tiles are laid on such a base in the same way as on a regular screed.
Laying technology
After the wooden covering is ready, you can proceed to the actual laying of the tiles. Technology for laying porcelain stoneware on a wooden floor:
Lay the tiles on the floor without using adhesive to see if there is enough material and how it will look better.
- Most likely you will have to do some trimming. For this purpose, it is better to use a tile cutter, a ceramic knife or a diamond-coated grinder.
- You should start laying tiles from the center. This area should be illuminated as much as possible, since usually the central area is not covered by furniture and interior items, and is therefore visible to prying eyes.
- To lay the tiles evenly, you should make special marks on the floor. To begin with, draw diagonals from opposite corners and find the point of their intersection. Through this point, divide the floor into 4 equal sections.
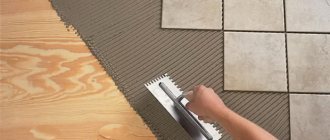
- Dilute the glue, strictly following the instructions. Using a spatula, apply it to the floor and to the back of the tiles.
- Gently press the tile, tapping it with the handle of a spatula for strength. The size of the spatula should be selected in accordance with the dimensions of the tile, for a large one - 0.8 mm, for a small one - smaller.
- Lay whole pieces of tile first, starting from the middle. Leave undercuts on edges and in blind areas covered by furniture.
- To ensure that the tiles are laid in even rows, small crosses must be installed at the joints. If you don't have them, you can use regular matches. It is important to control the laying of tiles using a building level.
- If any part of the tile begins to “sink”, you need to carefully remove it with a spatula, add the missing mortar and lay it again.
Before the glue has completely dried, use a damp sponge or cloth to carefully remove any remaining glue.
Insulation and heated floors
In a private cottage with wooden floors, it is important to insulate the floor of the lower level and the ceiling of the second floor to reduce heat loss. Insulation is usually installed between the subfloor and tongue and groove boards. However, if additional insulation of load-bearing structures is necessary, the heat insulator can be placed both under sheet materials and under screeds.
The main condition is the use of high-density insulation, that is, XPS or EPU. They do not wrinkle when residents walk and heavy plumbing fixtures (bathtub, shower, toilet, washing machine) are installed on the tiles.
To ensure the highest comfort for users, heated floor systems are installed in the bathrooms. For the case under consideration - tiles on top of a wooden floor - the only heating option is an electric roll-up system with a thin cable.
The electric heated floor is laid on top of the waterproofing and embedded in the adhesive directly under the tiles.
Final processing
Until the adhesive solution has completely set, the tiles can be adjusted and leveled. The final appearance of the floor will be achieved after applying grout - a special solution that will fix the result and prevent oxygen from softening the glue.
For light-colored tiles, it is better to choose transparent or matching grout so that the two colors do not contrast with each other.
When the grout dries, its excess can be removed with a damp cloth or sponge. It is better not to walk on the floor for some time and protect it from mechanical stress so that the materials fit properly.
Laminate
Moisture-resistant laminate is a good choice for the bathroom. Its design can perfectly imitate a valuable type of wood, making it look rich and presentable.
Regular laminate, despite its strength, cannot be used in the bathroom - it will quickly deform and rot.
Don't forget about markings
Advice from the experts
Some tips from experts on laying tiles on a wooden floor:
- If you decide to lay ceramic tiles on a wooden base, wait until at least two years have passed since its installation, since minor movements of the base are still occurring at this time. Otherwise, the tiles may crack during installation.
- The safest way to heat drying oil is to keep it in a container directly above the stove. It is worth preparing a piece of tarpaulin in advance to extinguish the flame if necessary.
- To improve the adhesion of the adhesive to the tiles, apply furrows in different directions.
- The glue dries very quickly, so it is advisable to dilute it for laying each square meter separately.
Wood and ceramics are materials that do not get along well with each other. But, following some recommendations, even a novice master can easily lay ceramic tiles on a wooden base, without the help of a professional. If you are not sure that you can do it yourself, we recommend watching a video on how to lay ceramics on wood.
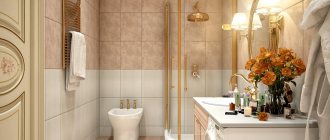
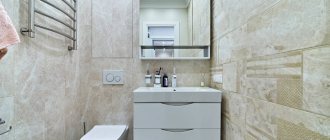
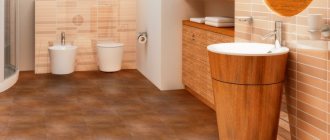
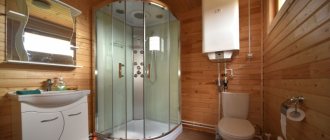
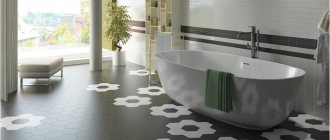
What should be the flooring in the bathroom?
Almost any good quality wooden floor has a universal character; it can be installed in any residential building, be it a house or an apartment, a cottage or a guest house, except for a bathroom. Putting a simple wooden covering in a bathroom means it will rot in a few months. Therefore, it is necessary to change the structure of the floor, for example, lay an additional layer of plastic or ceramic on a waterproof base, or use a material for a wooden floor that is not susceptible to the destructive effects of water.
But, before laying decorative tiles or any other floor finishing option, it is worth considering some specific qualities of the wooden base:
- It will be necessary to strengthen the floorboards, which sag under the weight of a person, even if plywood or OSB sheets are placed on top of them. The deflection may not be noticeable during daily use, but it becomes obvious the first time you try to lay hard tiles;
- A wood base is not the best option for a floor; in addition to the fact that it needs to be protected from rotting, the structure of the material can change in size even with the slightest change in humidity, not to mention the fact that wooden floors can simply arch in the humid atmosphere of the bathroom ;
- All of the above is a serious problem that has to be solved. For example, when arranging a bathroom in a wooden house where there are no concrete floors, the floorboards lying on the beams are, at best, protected by a layer of basalt thermal insulation. In such conditions, it is not enough to put a waterproofing layer; you will need to carry out a whole range of protective measures.
Therefore, no matter what material you plan to put on a wooden base, the bathroom floor must be protected from water by all available means, namely:
- Lay a double layer of waterproofing;
- Thermally insulate wooden parts from sources of water vapor;
- Provide high-quality ventilation for the subfloor, with air intake from the nearest dry room.
If you simply lay down a decorative coating with waterproofing, then due to the water vapor accumulating in the space around the wooden floorboards, even under the waterproofing layer, the wood will rot and rot.
Advice! Instead of ventilation ducts, several kilograms of powder with good absorption of water vapor can be placed under wooden floors. This will help remove most of the water and protect the insulation from waterlogging.
It is the leakage of water vapor through the corner seams that causes rapid failure of the insulation. Paired with an absorber, you can safely put crushed expanded clay or even mineral wool. All this will make wooden floors not only durable, but also safe.
Oddly enough, there is another way to preserve wood, for example, by installing a heating system in the base of the floor. Any heated floor on a wooden base in the bathroom can be used not only for heating, but also for drying some of the condensation and remaining water on the surface of the floorboards.