There is an absolutely correct opinion that tiling a bathroom requires special skill. So, it is better to trust facing work to experienced craftsmen, especially in cases where tight deadlines have been set. It is also known that if you follow fairly simple rules for laying tiles, choose the right tiles, consumables and appropriate tools, it is quite possible to do the tiling yourself.
It is especially important that bathroom tiles have sufficient resistance to water, steam, and high temperatures. You can first familiarize yourself with the rules for carrying out work using video and photographic materials posted on repair and construction websites, where the entire process of laying tiles is described in detail.
Why make a screen under the bathroom?
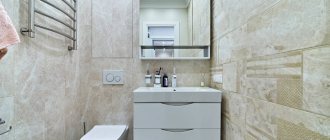
The walls and floor in the bathroom are tiled, and the plumbing is installed in its place and connected to communications. Everything looks great. The only problem that spoils the view is the space under the bathtub from its side down.
In order for the interior of the room to look harmonious and complete, it is necessary to somehow close the bathhouse itself and the pipes connected to it.
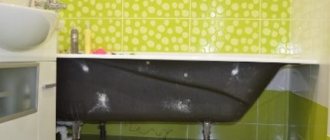
The main purpose of the decorative screen under the bathtub is to hide the unpresentable-looking legs and outer side of the bathtub from the eyes of the owners
If the bathing plumbing is made of acrylic or plastic, then in most cases it looks quite decent from the outside. On the contrary, cast iron or steel products do not please the eye. They must be decorated from the outside, otherwise the bathroom will not look too neat.
Housewives often store detergents and other household essentials under the bathroom. It is advisable to cover all this, as well as communications, with a decorative screen.
A screen like this is a great way to hide what is unnecessary and not too beautiful to look at. All these jars, bottles, rags and pipelines will be securely hidden behind it from people’s view.
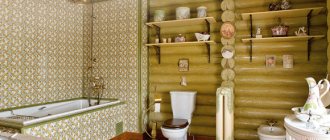
If the bathroom is tiled, then it is recommended to make the screen under the bathtub from it as well. This way the design of this room can be decorated in a single, complete style.
The main thing when installing this decor is not to forget about the need to have access to communications. You will need to make a hatch in the screen, through which in case of leaks you can get to the pipes for repair.
Possible design options
Bathtubs vary in shape, material and functionality. But the methods of decorating the space underneath them using tiles are the same in all cases. It is necessary to make a reliable base for the tile, and then glue it according to all the rules and rub the seams.
When installing a decorative partition, you must remember the need for a niche for the feet, and also do not forget about the hatch, which facilitates access to sewer pipes
Structurally, screens under the bathroom can be:
- with hinged or sliding doors;
- removable or permanent;
- with retractable drawers, designs with or without shelves;
- deaf and with a niche at the bottom for feet.
The easiest way to lay tiles is under the side of the bathtub. When using it, you do not have to waste effort on carefully aligning the new edge.
It is enough to lay the top row of tiles under the side of the bathhouse or vertically flush with it. An additional plus is that the frame and rough surface for gluing ceramics in this case will also be easier to make.
If you decide to use ceramic tiles to line a niche under the bathroom, then the easiest way is to make a blank solid screen out of it without any frills. However, in case of blockages and leaks, it will not allow access to communications. It will need to be torn down and then re-decorated. It’s difficult to call such a decision thoughtful.
A blank tiled screen is easy to install and looks elegant, but if the bathtub siphon gets clogged or the pipes under it burst, then this decor will have to be destroyed without the possibility of restoration
A more practical option is with an inspection door or window. When installing such a screen, a technological hole is provided, closed with a plastic hatch or a removable panel the size of one tile. It turns out both presentable and practical.
Screens with sliding or swinging doors made of tiles are extremely difficult to make. The tile must be glued to a strong and undistorted base. But in the case of openable and closed door leaves, this is impossible to achieve. The tile will inevitably fall off from such a surface.
The bathtub is often used for bathing babies and washing clothes. At the same time, you have to stand close to her. If there is no niche made near the floor or the screen does not have a downward slope downwards from the edge of the bowl, then there will be nowhere to put your feet in this situation.
Standing nearby, you will have to bend deeper, unnecessarily straining your back. When decorating a bathtub, be sure to provide a recess for the feet.
Primer of walls
The primer can be used not only before laying tiles, but also before applying plaster and putty. The use of a primer promotes better adhesion of the layers of material to each other.
When choosing a material, you should pay attention to the presence of auxiliary components: antifungal solutions, moisture-resistant additives.
Modern bathroom: 135 photos of design ideas, current combinations and DIY design options
Tiles for the bathroom on the walls - step-by-step installation instructions. Basics and tips for masters (130 photos + video)
Bathroom design - from classic to modern and loft, examples of design and technological innovations in bathroom equipment. ( Photo and video )
Choosing ceramics for a bathtub panel
Ceramic tiles with glaze are impervious to moisture and durable. It is easy to maintain and install. Its only drawback is the fragility of the glazed layer; it easily cracks when struck. But if you don’t throw heavy objects at the tiles, then this problem is not so relevant and significant.
The markings on the box allow you to quickly navigate the assortment of ceramic tiles; for a screen in the bathroom, a cheap wall-mounted one that is not frost-resistant will suffice
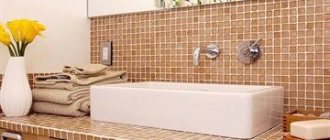
The dimensions of most baths are modest. It is recommended to choose small or medium sized tiles for decorating the space underneath. Large slabs will have to be cut, which means extra residue and potential losses from cracking of the glaze due to inaccurate cutting.
You can also use mosaics to cover the screen. However, laying out a pattern from small elements is time-consuming and labor-intensive. It’s easier to choose ready-made mosaic modules in the form of sheets of fiberglass mesh with ceramics already glued to it. They will simply need to be cut out and fixed to a partition made of plasterboard or brick.
How to lay tiles on walls and floors: methods for cutting tiles
Having decided to lay tiles yourself, you will also have to familiarize yourself with the methods of cutting them, since situations where the tile fits perfectly in size and fits without adjustment are extremely rare. The most common tools used for this purpose are:
- An electric tile cutter is a quick and easy way to make a quality cut. The tool is designed in such a way that water gets into the place that is subject to cutting. This allows you to improve the quality of the resulting elements;
- A manual tile cutter is the most popular option because it is much easier and cheaper to purchase than any other. In order to cut off part of an element, appropriate markings are made on the tile, after which, using a tile cutter and physical effort, the unnecessary part is cut off;
- A roller glass cutter is not a very popular option, which, however, can sometimes still be found. This tool is much more suitable for working with gypsum tiles, but often simply cannot cope with ceramics;
- A grinder is another way to cut tiles. The advantage of this option is accessibility, but the disadvantage is that the cut is not very smooth and clean.
In order to cut ceramic tiles efficiently, you should use a tile cutter or grinder
Of course, when choosing a method for cutting tiles, you have to build on the available tools and capabilities. It is not always possible to purchase a special tool, but it is important to understand that in some cases it is better to spend additional money in advance than to later receive an unaesthetic coating, which will be difficult to notice from a financial point of view.
Nuances of gluing tiles
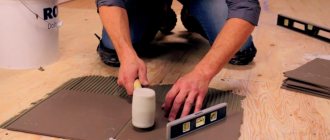
The final cladding of the partition formed under the bathtub is done using tile adhesive or liquid nails. The first option is applied to the back side of the tile with a notched trowel, and the second option is applied from a tube at several points along the perimeter and in its center.
The first tile of the tile is glued in one of the upper corners and leveled using a level, the rest will be placed next to it
To prevent the tiles from floating to the sides, plastic crosses are inserted between them, allowing you to accurately control the size of the seams between the tiles. The latter, after completion of the cladding, are subject to mandatory grouting. Otherwise, water will get under the ceramic through them, which will sooner or later lead to its falling off.
Construction of a removable screen
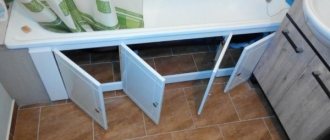
In addition to rigidly fixed structures, to decorate the space under the bathroom, make a removable panel.
To create a mobile screen you will need:
- OSB;
- tile;
- furniture legs adjustable in height;
- slats 20x40 mm to create a frame for supports.
First, a piece is cut from the OSB sheet with such dimensions as to completely cover the side of the bathtub. Only they make it slightly smaller in height, about five centimeters. The feet should fit freely into this gap from below. After cutting, the frame is stuffed onto the OSB, and the legs are attached to it.
The base of the removable screen for a bathtub with tiled cladding is made of oriented strand boards, which, due to their internal structure, are durable and resistant to moisture
Tile tiles are glued onto a wood base using standard technology using sealants and grout mixtures. After grouting the seams, the resulting screen can be placed against the bathtub and the legs can be adjusted so that it stands level in its place.
By twisting the supports, its upper edge must be pressed against the side of the bath from below, then this decorative panel will stand motionless.
Grout
grouting tile joints
To clean, you need to use grout. For wall tiles, a special option is used without adding sand. But it’s worth adding latex to it. Many people replace it with water, but this should not be done, as the desired effect will not be achieved. This additive not only makes the cleaning process easier, but also increases durability. Before work, you need to prepare the mixture. It contains 50 percent grout and 50 percent additive. Before working, the mixture should be left for a few minutes. It is necessary to use as much mixture as necessary for the full scope of work. A special rubber trowel is used to apply the grout. It is installed at an angle. This method allows you to more competently distribute the mixture along the seams. After all the work has been completed, you can begin the finishing touches.
Bathtub cladding of complex shapes
If the bathhouse has curved contours, then a regular screen with tiles cannot be installed on it. The plasterboard base can be made of any shape. But then it’s unlikely to be possible to glue large ceramic tiles to it. Ceramics does not bend, it can only be broken.
However, it is quite possible to cover a screen with a complex configuration with arched outlines using mosaics. Its small pieces are ideal for this purpose. It is not afraid of moisture and will last in the bathroom for many years.
Mosaics can be used to cover a bathtub with any contours; it allows you to easily follow all its curves and bulges
For cladding a bathhouse or jacuzzi, both mosaics in the form of individual pieces and ready-made modules on a flexible mesh are suitable. The first method is labor-intensive and long. It is much easier to use modules with mosaic elements already pasted under a given pattern. With their help you can easily follow the contour of the bowl.
In addition to tiling, there are various options for decorating the space under the bathroom. One of the original methods is a mirror screen. Alternative methods for creating a screen and technologies for their implementation are described in this article.
Tile with floral pattern
This model is used for floor coverings. In addition to the original ornament, the design of which is carried out according to the attached diagram, the material has sufficient strength and module thickness.
Using this variation of bathroom tiles allows you to create styles such as high-tech, Provence, and Memphis.