Concrete walls began to be used in apartment interiors relatively recently. Some people don’t like this style initially, and they won’t even talk about the possibility of using it instead of boring painting and wallpapering.
But many perceive this style as an extraordinary solution that can create a wonderful backdrop for creating a fairly cozy living room, a fashionable bedroom and a multifunctional bathroom. At the same time, the texture of concrete goes well with many finishing materials.
Advantages and disadvantages
First, let's define the main advantages of choosing a font from this material:
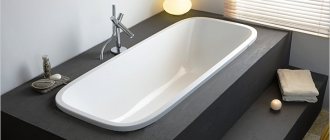
Exclusive style. A concrete bathtub looks very original, especially if the rest of the interior is made in the same style.
This bowl will attract the attention of all visitors to your plumbing unit. Durability. The upel will serve you for many years, since good concrete is a very durable material. And over the years it only becomes harder.
In the first 2 weeks of hardening, it gains 50% of its maximum strength. The rest will be collected over the next 10 years.
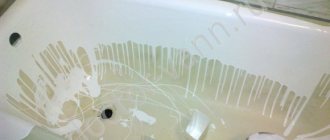
Easy to care for. To clean the bathtub, you can use almost any product that is used to wash tiles. In most cases, simply rinsing with water and wiping the coating with a sponge and soapy water is sufficient.
But it was not without its drawbacks:
Difficulty of manufacturing. Creating a concrete bathtub with your own hands is a rather lengthy and complex process. Which requires careful planning and following all the rules that we will describe below.
Limited forms. Concrete bathtubs are usually made rectangular, since round shapes are not at all easy to make.
Therefore, if you want a fancy font with different curves, you will have to tinker a lot, or make your choice in favor of a different material.
Benefits of concrete for the bathroom
The main reasons why concrete is chosen as a material for bathrooms in an apartment are:
- Smooth surface;
- strength and long service life;
- practical in cleaning;
- does not absorb water, thereby preventing the development of fungi and microorganisms.
The concrete ceiling in the bathroom is covered with waterproofing to avoid mold. Such deep-penetrating compounds combine with the surface and flow into all cracks. In addition to the ceiling, part of the walls that border it are treated. Concrete walls are often tiled. The quality of the tile laying will allow it to be laid with minimal seams, and with proper grouting, the wall will look like a monolith.
How to make a concrete font with your own hands?
Preparatory stage
First you need to decide on the type of concrete you will use.
The choice depends on whether you plan to cover the surface of the bowl or leave it concrete.
In the first case, you can save a little and just use a good cement-sand mixture with water-repellent properties, without mixing additional additives.
It is not so important here that the surface is very smooth. Anyway, it will be covered on top with tiles or mosaics.
It is best to use the following proportions: for 1 part of cement grade M350 and higher - 3 parts of sifted sand.
In the second case, it is imperative to use concrete with additional plasticizers , which will make it more elastic and allow you to achieve a better quality surface.
Also, before carrying out work, you need to thoroughly clean the future installation site from construction debris and dust. And additionally prime all surfaces that will come into contact with concrete for better adhesion (adhesion).
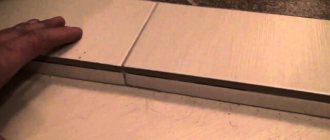
Formwork and frame
Step 1. Before erecting the formwork, it is important not to forget to carry out communications. It is necessary to plan where the drain and overflow will be located and immediately install sewer pipes there. The holes must be tightly sealed with plugs to prevent concrete from getting in during pouring. You can make such plugs from planed wooden blocks. It would be better if they were 15 - 20 cm long, so it will be easier to pull them out.
If you are planning to make not just a font, but a Jacuzzi out of concrete with your own hands. It is necessary to provide in advance the holes for the nozzles and where the pumping system will be located. And so - the manufacturing principle is identical.
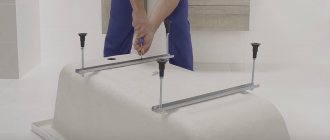
Step 2. Now you need to make a frame from metal reinforcement with a diameter of 6 - 8 mm . It is better to install the vertical rods first. To do this, holes are drilled in the floor with a drill of the appropriate diameter, and reinforcement is inserted into them. Then, horizontal elements are tied to the vertical elements using wire.
It is not recommended to use the floor surface as the bottom of the font. You also need to make a frame for it and then fill it with the mixture. Since the bathroom floor may have microcracks through which water will penetrate.
Step 3. The final stage is the construction of formwork. For this you should use smooth wooden slabs. They come off better when the concrete sets, and also do not leave marks on the surface that would need to be rubbed down later.
Fill
Before carrying out work, you need to check again whether the frame elements are well secured, whether there are any cracks in the sides of the formwork, and whether the drain plugs are pressed tightly. If everything is good, you can start pouring concrete.
Step 1. The first solution must be made more liquid so that when pouring it inside the formwork, the composition will spread better and fill all the cavities of the future bottom of the bowl. The consistency should be similar to sour cream .
Step 2. When you see that the bottom level is completely filled, you can mix a mixture of standard thickness and begin casting the sides.
It is very important not to take long breaks and fill everything at once. This will help avoid the formation of layers and possible leaks.
Step 3. To better distribute the mixture inside the formwork and get rid of possible air accumulations, it is necessary to create vibration . If you don’t have a vibrating machine, you can use a regular hammer and tap it on the sides.
Step 4. It is better to leave the future bath for 4-5 days until the concrete hardens. Of course, it won't gain all its strength yet, but that's even better. In this state, it is easier to clean up any irregularities that have arisen and round the sides. To do this, you can use regular sandpaper or a sanding machine.
If you are making a loft-style bath and want to enjoy the look of cold concrete, you need to sand it very carefully and cover it with a special impregnation for stone . It will improve waterproofing properties.
Facing
A concrete font can also be covered with various materials; let’s look at the main ones.
Ceramic tile
Everything is simple here, the sides and bottom of the bathtub are tiled. This method is the fastest and easiest, but there is one thing. If you have rounded elements, it will be impossible to cover them with tiles.
Therefore, this option is more applicable for rectangular models. There are no special nuances here. The surface of the bathtub is primed and the tiles are attached with tile adhesive. The only thing you should pay special attention to is the grouting compound. It must have maximum water-repellent properties.
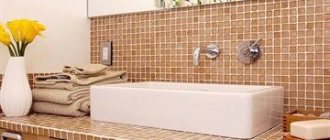
Mosaic
Mosaic cladding is carried out according to the same principles as tiles. But this solution has a big advantage over the previous one - it can be used even if the shape of the font is round.
Acrylic pouring
If you plan to cover the surface of the bathtub with liquid acrylic, it must first be plastered with plastic, moisture-resistant putty.
Putty can only be applied to the surface using a reinforcing mesh. This will increase its strength, which is important, since it will take on heavy loads.
Acrylic is mixed with a hardener in the proportions specified in the instructions for the specific composition. The resulting mass is carefully poured onto the sides.
Features of using concrete walls in interior design
Concrete goes well with natural materials: wood, stone
The concrete surface has always been perceived as a structure prepared for finishing.
The industrialization of design solutions in recent times has made it possible to create a fashionable style that uses untreated concrete walls and ceilings, which are a fashionable option for decorating rooms.
When designing an interior in this style, it is necessary to take into account the following features:
- the surface created should be as smooth as possible;
- to prevent dust formation, such surfaces must be treated with impregnating dust-removing compounds;
- there is the possibility of using decoration in sections in combination with various finishing materials;
- a concrete surface can be recreated not with real concrete, but with a finishing material that replicates its texture and color.
This option for finishing the room is not only combined with classic finishing solutions, but also fits perfectly into interiors created in industrial styles: high-tech, minimalism, fusion and others.
Design photo
We have prepared for you a selection of pictures of interesting concrete baths.
Background of the game
After turning off the Brain Burner installation, the path to the center of the zone becomes open. But the zone itself is very unstable; maps of the area are of little help, since the location of the anomalies is constantly changing. The Ukrainian government decides to completely take control of the zone. The SBU is sending five helicopters to the zone to scout out the location of air anomalies. So that the main groups of military personnel move along already relatively safe routes.
But during the operation, the zone changes again and all the helicopters, having encountered anomalies, crash in different parts of the territory. The investigation into the failure of the operation is entrusted to Major Degtyarev, a former stalker with considerable experience.
Anomalies on Zaton:
- Dredger (northeast): springboard - gravitational anomaly.
- Burnt out farm (north) frying - thermal anomaly.
- Caves under the burnt farm (north): crater - gravitational anomaly, soda - chemical anomaly, comet - thermal anomaly.
- Anomaly "Circus" (south): frying - thermal anomaly.
- Marsh (west): springboard - gravitational anomaly, acid fog - chemical anomaly.
- Iron Forest (southwest): Electra is an electrical anomaly.
- Anomaly "Claw" (south): radiation; springboard, funnel, carousel - gravitational anomaly.
- Anomaly "Scar" (southeast): psi radiation; electra - electrical anomaly.
- Anomaly "Cauldron" (northeast): frying - thermal anomaly.
- Sosnodub (southwest): soda is a chemical anomaly.
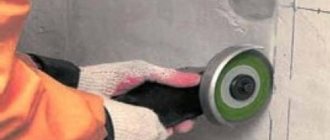
Preparing the surface for laying tiles
Laying ceramic, tile or other tiles requires mandatory preliminary preparation of the surface. This process is divided into several stages: assessing the condition of the existing surface, dismantling the old coating, leveling, putty, finishing, priming, waterproofing. Depending on the condition of the walls, some stages may be omitted or, on the contrary, new ones may be added.
Initial diagnostics include an assessment of the general condition of the walls, the strength of the old coating, and calculation of the required material. The next stage is cleaning the surface from old tiles, plaster, wallpaper, whitewash, paint, etc. The third stage is leveling the walls. Then comes the finishing treatment (putty + priming) and waterproofing.
Before you begin, you need to prepare the tools that you may need:
- hammer, hammer drill (for removing old coating from a concrete base);
- level, plumb line, beacons (for leveling walls);
- brushes, rollers, trowels, spatulas, sandpaper, grater, tape measure;
- special clothing (glasses, rubber gloves, etc.).
Before starting work, it is necessary to close the existing plumbing fixtures (bathtub, shower stall, sink) to prevent fragments of old tiles and other construction debris from getting on it.
How to eliminate severe wall deformation
To level the plane of the wall you need to:
- Mark the surface using cords stretched diagonally. Align them using a hydraulic or laser level, and maintain the perpendicular position of adjacent partitions. If the angle deviates from 90°, the installation of the bathtub becomes more complicated; gaps remain between the sides and walls, through which water floods the floor covering of the room.
- Install metal or wood profiles that touch the cords. A gypsum solution is used to hold the slats in place; after the mixture has hardened, the cords are removed.
- Fill the space between the profiles with cement mixture, which is applied with a trowel and smoothed with a spatula. The thickness of the applied layer depends on the composition of the solution (information is indicated by the manufacturer on the packaging). If the holes in the walls are very deep, then it is possible to partially restore the surfaces using brickwork or cut gypsum blocks.
When eliminating deformations, the laying of pipes or electrical wiring in the body of the wall is taken into account. Deep faults are pre-treated with a primer, and a synthetic reinforcing mesh is placed in the layer of leveling material. The extra spacer prevents the surface from breaking down along with the finish. The mesh is pressed into the cement mortar with a spatula or trowel, and then covered with subsequent layers of finishing material.
Plot
The main character of the game is Major Degtyarev, sent by the Ukrainian Security Service. His main tasks are to find and investigate all the fallen helicopters. Two helicopters are shot down by an unknown electrical charge of enormous power. Another contains information about three evacuation points that may have surviving pilots.
In parallel with the main task, the hero completes secondary ones, which he receives from stalkers, traders and gang leaders. During the investigation, Degtyarev learns about a certain “Product No. 62”, which actually shot down the helicopters. This discovery leads the major to the Pripyat 1 overpass, which leads to the ghost town of Pripyat itself.