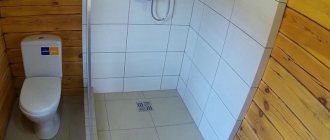
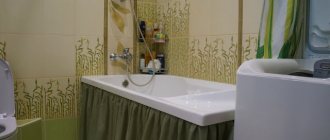
Warm floors are popular systems used in different rooms. The most relevant is a heated floor in a bathroom where ceramic tiles are used as a floor covering, since the material is considered cold and uncomfortable for walking on barefoot. For this purpose, different systems can be selected, and the question most often arises is which underfloor heating is better, water or electric. Each variety has its own characteristics, so before choosing, you should decide on a specific option. Each type is considered quite simple to create, so you can do the work yourself.
Types of floor heating systems
There are two main types of TP:
- Electric. From the name it is clear that such a heating complex operates using electricity.
- Water, in which liquid circulating through pipes acts as a heat source.
The principle of their operation is almost identical: a thermal circuit is mounted under the floor covering or in the thickness of the screed, which during operation warms up the overlying layers of the floor cake, as well as the air masses above it. Of course, not everything is so simple and each type has its own characteristics, installation subtleties, advantages and disadvantages. Let's look at them in more detail below.
Installing a thermostat
The device must be installed first. To do this, you need to immediately decide on its location and cut a channel for the metal hose in the wall. Insert a temperature sensor into the metal hose, plug the end that will be under the screed layer, and secure it to the mounting grid. A metal hose is necessary in case of replacing the temperature sensor. Connect the temperature sensor to the thermostat.
Electric or water
Electrical kits are thermal cables or mats that, during operation, warm the floor and room to a predetermined temperature. This type of system is in demand in almost all regions of our country due to its impressive range of various advantages.
Table 1 . Electric TP for the bathroom: pros and cons
| № | Pros of ETP | Disadvantages of ETP |
| 1) | Compatible with all types of bases (concrete screed, prefabricated wood flooring, chipboard, OSB). | When developing a plan, special attention is paid to stationary objects under which overheating zones may form. |
| 2) | Autonomy from centralized heating systems. The result is uninterrupted operation. | High level of electricity consumption. |
| 3) | Possibility of choosing the type of electric heating depending on the facing material in the bathroom. For porcelain tiles - cable TP, for laminate, plank flooring and vinyl tiles - infrared mat or low-temperature "soft heat" cable. | Difficulties in working with frequent interruptions in electricity supplies and the need to purchase uninterruptible power supplies (generators, batteries). |
| 4) | There is no need to purchase or install heat generators (boiler equipment, heat pumps, etc.). | Repairing the cable most often requires complete dismantling of the floor covering. |
| 5) | Variable power - selected based on the characteristics of the room, taking into account the table of correction factors provided by heating circuit manufacturers. | Electromagnetic radiation generated during the operation of the system can negatively affect the health of older people. |
| 6) | The thickness of the floor cake is from 1 cm (depending on the type of ETP used). | |
| 7) | Can be used as a main or additional heating system. | |
 | Efficient heating even with 55% floor coverage | |
| 9) | Availability of automatic control and security system (overheat protection, RCD, etc.). | |
| 10) | Low noise level. Cable TP is characterized by a barely audible hum. | |
| 11) | Some types are characterized by simple installation with a minimum of time and financial costs. | |
| 12) | Local repairs of individual sections or segments of the floor are allowed. | |
| 13) | Service life – from 10 years or more. |
The costs of purchasing and installing electric heating for sanitary facilities are relatively low. For example, for a bathroom with an area of 8 m², the cost of a turnkey cable floor is about 20-35 thousand rubles (at 2020 prices for Moscow and Moscow Region). It can be installed in apartments, private houses (including wooden ones), hotels, boarding houses and other commercial organizations.
Note that an electric heated floor in a bathroom may not be too expensive if it is used not constantly, but periodically, for several hours a day. Operating costs can also be reduced by:
- using a two- or three-tariff grid;
- reducing the heating temperature by 1-2 °C;
- installation of programmable thermostats, various automatic control controllers.
- automatic shutdown at night and when no one is home.
Manufacturers offer three basic types of ETP: cable, rod and film. They differ not only in characteristics, but also in installation technology.
Water heated floors are the most popular type in the private sector. Since the system is quite cumbersome and multi-component, it is rarely installed exclusively for the bathroom, but rather in conjunction with other rooms.
Water heated floor (WHF) includes the following components:
- Pipelines and components for them.
- Main mixing unit.
- Thermal energy generator.
Pipes are used to form contours along which the coolant (water, antifreeze, etc.) subsequently circulates. In this case, the channels can be:
- metal, that is, made of copper, stainless steel (corrugated pipe);
- plastic, for the production of which polymer masses are used - polypropylene, cross-linked polyethylene, metal-plastic.
The choice of pipelines is most often influenced not only by price indicators, but also by personal preferences. Any of the above materials is perfect for installing water heated floors. Especially considering the fact that the recommended coolant temperature is from +40 to +60 °C.
For the control and normal functioning of the system, a collector and mixing complex will be required, including:
- metal or thermoplastic manifold;
- circulation pump;
- a variety of fittings, valves, sensors and much more.
Of course, dealers have both completely ready-made kits and components for individual configuration on sale.
Boiler equipment is used as a heat source in the HTP: gas, solid or liquid fuel, electric, combined. The type of boiler is determined based on the main parameter – fuel availability. For example, for apartments, owners try to choose between gas and electric installations. Let us remind you that it is not recommended to connect water underfloor heating to a centralized heating system or hot water supply for apartments located above the second floor. In any case, careful calculation and approval by the governing bodies is necessary.
For private homes, in addition to classic solutions, there are alternative ones from Aeg, Vaillant and other major manufacturers. These are heat pumps, solar collectors, etc. The source of heat for them is the bowels of the earth, air, etc.
Despite the assurances of well-known component manufacturers, water heating is not full of advantages. It also has disadvantages. Here is a comparison table.
Table 2 . Water TP for the bathroom: advantages and disadvantages
| № | Pros of ETP | Disadvantages of ETP |
| 1) | When installed correctly, the ETP is compatible with any type of rigid base (mineral, organic, composite). | Expensive equipment, labor-intensive installation. |
| 2) | It is allowed to lay any types of decorative finishing coatings over the HTP: parquet, laminate, linoleum, tiles, carpet, etc. | Local repairs are impossible without partial dismantling of the floor “pie” |
| 3) | A wide selection of all kinds of heat generators, as well as security systems. | Due to the need to install insulation and screeds, the total thickness of the floor starts from 3.5 cm. |
| 4) | High energy efficiency in the presence of automation systems, a decrease in coolant temperature by 2-5 degrees and the use of economical boiler equipment (energy saving classes according to ELD 2010/30/EU A+++, A+, A, B+). | Periodically, servicing of some elements of the HTP (boilers, pumps, etc.) is required. |
| 5) | Use as a main or additional heating complex. | |
| 6) | If you have a heat generator, you will be independent from central heating systems. | |
| 7) | There are two main methods of installing the system: wet and dry (using mounting sheets made of polystyrene foam, metal, chipboard sheets, etc.). | |
| Operational safety. | |
| 9) | Low noise level during operation. | |
| 10) | Low cost during operation, especially when using cheap thermal energy (from hot water supply systems, centralized heating or natural gas). | |
| 11) | There are no areas of probable overheating under stationary objects, which is especially important when installing heated floors in the bathroom. | |
| 12) | Service life - more than 20 years. |
Thus, the system has many more advantages than disadvantages. And here both the quality of components and compliance with the rules during the installation process play an important role. The ETP is installed for more than one year, so it is not worth saving on components or specialists.
If underfloor heating is done only in the bathroom, then there is only one choice - electric models. Water heated floors are usually made for the entire house (floor) or apartment; it is much more economical, but not all apartments can install it.
Requirements for the foundation
Regardless of what kind of heated floor will be created in the toilet or bathroom, it is important that the base meets certain conditions and requirements:
- evenness of the base, since differences exceeding 10 mm are not allowed, so most often it is necessary to create a concrete screed;
- the presence of a high-quality waterproofing layer;
- laying thermal insulation materials that prevent heat loss;
- the presence of reinforcing stacks that ensure reliable and high-quality fastening of pipes or other structural elements.
Thus, it does not matter whether I want to get an electric or water heated floor, it is necessary to carry out the preparatory steps to obtain the ideal base for the planned work.
Laying insulation
High quality leveling of the floor
Waterproofing device
Use reinforcing mesh
Installation of electric heated floor
Electric cable heating is recommended for installation under tiles and porcelain stoneware.
It operates thanks to conductive heating elements that convert electricity into heat. For uniform heating, the cable is laid under a concrete layer up to 8 cm thick. If you plan to install a heated floor in the bathroom under laminate or vinyl tiles, then it is better to use low-temperature self-regulating cables from Devi, Daewoo, etc. For simplicity, they are called soft heat systems and they are laid not under the screed, but in special mounting sheets with insulation or under a layer of tile adhesive.
Manufacturers are not limited to wire coils. In practice, there are two basic options for the heating system:
- One- and two-core sectional (zonal) cables, less often - more expensive self-regulating ones, enclosed in heat-resistant insulation.
- Thermal mats , which consist of a synthetic mesh on which turns of a thin self-regulating heating cable are securely fixed.
Heating circuits are formed from multi-meter wires of the first type on a rigid base. They are distinguished by high reliability, moderate cost, maintaining a constant power level, and the ability to cut to a given length. The weak point of electric floors is safety. In the bathroom there is a high risk of water getting on the surface of the cable, so you should take precautions already at the installation stage. In particular:
- ensure the correct distance between circuits (to avoid overheating and cold spots);
- eliminate possible overlap of turns;
- check the connection of all system elements;
- purchase a thermostat with an automatic shutdown function when overheating;
- take care of grounding and protecting the wire from mechanical influences.
Thermal mats, despite their higher price, are in demand. Their main advantages are ease of installation and a good level of electrical safety. Thanks to the latter, even in the event of local overheating or damage, only the defective section is switched off, and not the entire circuit. In addition, the range of manufactured products is extensive. You can find heating mats on sale:
- on a glued or stretchable mesh, which facilitates installation in bathrooms with complex geometry or an abundance of stationary objects (showers, cabinets, floor sanitaryware, etc.);
- divided into zones of different power, which provides floating heating intensity;
- and so on.
In addition to the cable, the kit includes thermostatic regulators, floor temperature sensors, mounting tape and some other components (controllers, corrugated tubes, chronothermostats, etc.). Of course, we are talking about high-quality products from well-known manufacturers (Electrolux, Rehau, etc.) .
We'll tell you how to install a classic cable ETP in sanitary facilities with your own hands step by step.
Design
An example of designing an ETP in special programs/
Includes the formation of a circuit layout diagram taking into account the characteristics of the cable, the installation location of the temperature sensor and regulator, and connection points. Recommended parameters for the drawing (average):
- the minimum interval between turns is 6 cm;
- the distance from the extreme contour to the enclosing structures (walls, columns, risers, pipelines, etc.) is 5–20 cm;
- The cable bending radius is 5–6 times its diameter.
As a rule, the characteristics of thermal cables vary, so it is better to order a project from specialists. Or ask consultants to provide narrow tables with recommendations from manufacturers.
To make your own calculations, you can use manufacturers’ recommendations or online calculators. So, for example, Rehau specialists in the technical brochure “SOLELEC Electric Underfloor Heating Systems” indicate that:
- in central Russia, for heating sanitary rooms in standard residential buildings, the required power is 140-170 W/m²;
- in buildings with high heat losses, the indicator can increase significantly, but in well-insulated houses, on the contrary, it will decrease.
As a rule, the desired power of the system is selected based on the preferences of the owner of the residential premises, taking into account the above data. Then, using the selected indicator, the cable length and laying pitch are calculated.
Automation installation
It is necessary to cut two channels in the wall for power cables from the sensor and thermostat. And also cut a small recess in the wall to fix the thermostat. The installation height above the finished floor is 50 cm and above.
Wires enclosed in protective tubes are inserted into the finished grooves. Next, the regulator is installed in accordance with the manufacturer's instructions.
Most manufacturers recommend installing temperature control devices in areas adjacent to the bathroom (for example, corridors) to prevent operational failures due to water and steam.
Preparing the base
The subfloor should be carefully leveled, all defects removed, and cleaned of dust, dirt, and sand. After the repair compounds have dried, heat-insulating material is laid on the surface (in some cases, waterproofing is added). A mounting tape is installed on top, onto which the cable will subsequently be fixed.
Laying heating circuits
Installation of the wire in a zigzag pattern begins from the point where it is connected to the thermostat. For fastening, clamps or protruding “petals” of the mounting tape are used. The loops must be formed with a smooth bend, without sharp creases.
A temperature sensor, hidden in a protective corrugated pipe, is fixed between the circuits on the floor and then connected to the thermostat.
Testing
After completing the installation work, you need to turn on the system and conduct an audit: are all elements connected correctly, are there any interruptions during activation, etc.
Pouring the screed and laying the finishing coating
The installation of the screed layer using the wet or semi-dry method is carried out according to the standard scheme. That is, beacons are installed on the rough base or the level of the future floor is marked on the wall. Then the solution is carefully poured onto the surface and leveled using the rule. The permissible thickness of the screed is from 3 to 8 cm. After 14–28 days, it is recommended to re-check the functionality of the cable, sensor and control automation.
Self-leveling self-leveling floors can be used to install the screed. They can be poured in a layer less than 3 cm. Before purchasing the mixture, make sure that the composition is allowed to be laid on floor heating systems.
If everything is functioning properly, then you can begin installing the tiles. In accordance with the instructions, tile adhesive is prepared, applied to the base, and tiles with a seam of 2 mm or more are installed on top. After the adhesive composition has dried (about 3-7 days), it is necessary to carry out control testing of the ETP again. A working heated floor means uniform heating of the entire useful surface, as well as a noticeable change in temperature when changing the thermostat parameters.
Working with thermomats is somewhat different from the cable installation method. In particular:
- Sectional underfloor heating in small bathrooms with an area of less than 7 m² can be connected to a regular electrical outlet (socket). But at the same time, you need to purchase a thermostat with an automatic shutdown function when overheating. For rooms with an area of 8 m² or more, a separate electrical connection is required.
- Before installation, it is necessary to test the thermomats - check the electrical resistance of the cable using a conventional voltmeter and compare the indicators with the data sheets. The permissible error is no more than 10%.
- As a rule, sectional mats have standard sizes. It is not advisable to cut them, because self-regulating cables are used for production. It is better to order products of non-standard dimensions from official dealers or ETP installers.
- As a base, it is allowed to use concrete slabs, screeds, prefabricated floors made of DSP, SML, etc.
- Due to the peculiarities of the ETP, it is necessary to pre-lay out the mats along the base (with the grid facing up).
- Installation begins from the wall on which the thermostat is supposed to be installed. The dimensions of the areas must match the area of the surface being used. Places for installing stationary objects (baths, showers, toilets, etc.) are excluded, and the necessary technological clearances are also taken into account - up to 10 cm from stationary objects.
- To avoid obstacles during the installation process, you can cut the mesh (but not the wire!).
- To lay connecting wires, cables for connecting the temperature sensor and thermostat, a 20*20 mm recess is cut into the floor and wall. A corrugated pipe is installed in the trench, plugged on one side.
- Thermal mats are fixed to the subfloor using double-sided tape, mounting brackets, nails or a glue gun. Then a heated floor temperature sensor is inserted into the corrugated duct and connected to the thermostat.
- After installation, the electrical resistance of the sections is re-measured, which will allow checking the functionality of the system. If everything is in order, then you can proceed to the final stage - pouring a thin-layer screed, assembling a dry subfloor, or applying tile adhesive 8-10 mm thick, followed by laying the tiles. In the latter case, you must work very carefully with the spatula so as not to damage the heating cable.
- Control testing of the functionality of the system is permitted after the adhesive or screed solution has completely dried.
We also note that many manufacturers offer special sets of cable electric floors with simplified installation methods. For example, the Rehau line includes a two-core shielded SOLELEC cable with reinforcement, which can be laid not only under the screed, but also in a layer of tile adhesive.
For wood subfloors, manufacturers offer special ETP systems - these are so-called soft heat kits with a power of 10–12 W/m². Their laying is done using the “dry” method, using special mounting sheets. You can install laminate, engineered wood, parquet boards, etc. on top.
Warm electric floors of a soft series for mounting sheets.
What are the disadvantages?
There are a lot of legends about the negative qualities of this equipment. But how true are they? So, the most common myth is rumors that the floor is electrocuted. In fact, this is not so. After all, even from physics lessons it is clear that the reliability of the insulating material is undeniable, and ceramic tiles are not a conductor at all. If you still have doubts, you should not use cable systems, choosing the safest heating mats and infrared equipment.
The second most popular rumor is about electromagnetic radiation. We hasten to disappoint: there is much less EMR from heated floors than from a simple TV. Accordingly, no harm.
The only real downside is the need to install hardware under the tiles. That is, if you have a recent renovation, the floor will have to be removed and reinstalled. But such a problem can be easily solved with banal planning. After all, it’s better to think about the need to heat floor tiles even before starting renovations. This way you will avoid additional costs and unnecessary hassle.
The conclusion is obvious: most of the “disadvantages” of heated floors are inventions of people who know absolutely nothing about this equipment. So is it worth following the lead of people living in the past? After all, today you can absolutely safely enjoy all the benefits of civilization!
Carbon heated floors
A type of low-temperature floor heating systems with low power are products with carbon heating elements that are fixed to a polymer base. Manufactured in the form of:
- strips of graphite-containing composite paste, which are applied at intervals of 5-10 mm between two layers of polymer film. The total thickness of the product does not exceed 0.5 mm;
- thin semi-rigid rods, which are secured with a “ladder” between two flexible wires.
Accordingly, the finished kits are called film (infrared) and rod heated floors. Since they use a parallel type of connection of elements, the systems will continue to operate even if individual segments fail.
A special advantage of carbon heating complexes is installation directly under the floor covering. In the bathroom, such electric floors can be laid under tile adhesive, laminate, vinyl tiles and even plank flooring. For effective operation, the coverage area should reach 70% of the usable space. The downside is that if water gets in (seeps through the adhesive layer or into the joints between the slats), the entire segment may turn off.
Here are step-by-step instructions for installing a film ETP.
Drawing up a drawing
You need to start by drawing up a layout diagram for the IR film, taking into account the bypass of stationary objects in order to prevent overheating.
The power is selected independently, taking into account the conditions specified above in Chapter 3. For example, it is assumed that Electrolux Thermo Slim is installed with a declared power of 165 W. The planned level of heat transfer based on manufacturers' recommendations for buildings in central Russia is 140 W/m². For a bathroom with a usable area (free of stationary objects) of 5.5 m², the heat requirement is 140 * 5.5 = 770 W. Accordingly, the film floor will require 770 / 165 = 4.7 m², optimally – exactly 5 m².
Preparing the base
The rough screed must be strong, smooth, monolithic and dry. The surface must be cleaned of dust, dirt, oil, bitumen and other contaminants. Next, the thermal insulation is laid with the reflective side up.
At the same stage, it is recommended to prepare in advance a place for temperature control automation, closer to the existing power points.
Flooring film
Heating strips are cut to predetermined sizes and fixed to the base with tape in accordance with the diagram. You cannot lay the film overlapping, this will lead to excessive heating and failure of the segments. The best option is end-to-end. The interval to stationary objects or walls is up to 10 cm.
Connection
Using the clamps included in the kit, the copper conductors of the ETP are connected to the wires. Some manufacturers recommend creating contacts by soldering. In any case, you must strictly follow the attached instructions.
After connection, the unused ends are insulated, as well as all sections of the connection.
Temperature sensor and thermostat
A channel is cut in the wall and floor into which the temperature sensor wire is laid. IR film is laid on top. The thermostat is connected to the sensor, film floor and power supply in accordance with the manufacturer’s instructions.
Functionality check
The heating film is activated for 15–20 minutes, the functionality of each segment is tested. After the heated floor has cooled, some manufacturers recommend gluing the carbon strips to the base using acrylic heat-resistant glue.
Since ETP has a smooth surface, to improve adhesion the film should be treated with Betonkontakt primer. After drying, tile adhesive is carefully applied to the floor and tiles or porcelain tiles are laid. After 3-14 days, the system is re-checked.
Unlike film flooring, rod ETP is not afraid of overheating and can be successfully installed under any stationary objects, including bathroom furniture, plumbing equipment, etc.
The installation technology is simple and includes the following points:
- Planning the work process and drawing up a layout diagram.
- Determining the installation location of the thermostat and cutting channels for laying the temperature sensor and connecting cables.
- Preparing the base: creating a clean, smooth, monolithic floor.
- Installation of thermal insulation material under heating elements.
- Layout of the rod ETP from the point of installation of the thermostat with subsequent fixation of the elements using tape.
- Connection and insulation of mats in accordance with the manufacturer's instructions.
- Connecting the thermostat and sensor into a single complex with an ETP.
- System performance testing.
- Pouring screed under laminate, vinyl tiles or applying tile adhesive and then laying tiles.
Since heating elements can fail when interacting with water, water-repellent additives can be added to the adhesive composition. Thanks to them, water seepage through the layers is eliminated and a long service life of the underfloor heating system is guaranteed.
We suggest watching the video below for a more detailed process of installing a rod-heated floor.
Bathroom size and shape
These must be taken into account when choosing the type of heater to install. While there are many options that are ideal when space is at a premium, not all bathroom heaters can be used in small spaces without causing inconvenience. This is another factor in favor of underfloor heating systems.
For larger bathrooms, considering how efficient the heater will be throughout the space should be a major focus. For small rooms, a more important factor is choosing the optimal location for the heater, taking up the least amount of space.
Water heated floor
To form a VTP, two methods are used:
- “Wet” method, which involves installing a classic dry or semi-dry screed. Suitable for all types of buildings: concrete, brick houses, log houses, frames. The main thing is that the power “skeleton” of the structure is strong enough.
- “Dry” method, requiring the use of special mounting sheets or an entire system of lags. This is a lightweight installation option used for houses with weak supporting structures, on unstable foundations, as well as in rooms with low ceilings (up to 2.5 m).
The installation of an HTP in a bathroom using the wet method is carried out in 7 stages:
Project
Regardless of where exactly the sanitary room is located, whether there are windows or not, one should calculate such a parameter as heat loss through the building envelope (including walls, ceiling, window blocks). This is necessary in order to determine the required system power during peak loads with a margin of up to 10%. The recommended level is up to 0.1 kW per square meter of floor space.
Professionals, as a rule, have at hand special tables with a whole system of adjustment coefficients. If you plan to install it yourself, we recommend using highly specialized online programs located on the websites of well-known manufacturers (Uponor, Rehau, etc.).
Next steps:
- a plan for laying pipelines is drawn up with an interval between turns of 10-30 cm. For a small bathroom, combined wiring diagrams are not required - a simple “snake” (for rooms with one or two external walls) or a “snail” (for uniform heating of the entire room) is enough. ;
- the location of the manifold cabinet and the channels for supplying electricity and water are noted;
- the total thickness of the “pie” is calculated, taking into account that the height of the doorway after laying the finishing coating should be equal to the optimal 205 cm;
- the final mass of the entire structure is calculated, which will make it possible to determine whether such a load on the load-bearing supports is permissible or not.
Pipeline laying diagrams for high-pressure transport stations.
Since the total length of the contour in the bathroom almost never exceeds 20 m, there is no need to install expansion joints.
Collector
This element can be installed both in a sanitary room and in any other adjacent room. In the first case, it is recommended to fix the block on one of the walls, closer to the riser. You need to take care in advance:
- arranging a niche for the box;
- piping;
- by cutting channels for electrical cables, the task of which is to power automatic control systems.
To decorate or disguise a cabinet, you can use false panels or plasterboard covered with tiles on the front side.
Preparing the base
The floor under the HTP must comply with the requirements of SP 29.13330.2011 (SNiP 2.03.13-88). In particular:
- Integrity, monolithicity. All defects must be eliminated and the surface treated with a primer with a strengthening effect. For example, widen the cracks and fill them with repair compounds, fill the holes with putty, and trim off the bumps.
- Stiffness and strength corresponding to 15 MPa and above.
- Residual moisture for a concrete base is no more than 5%, and anhydrite – up to 1.5%. The indicator for a subfloor made of wood or wood-composite boards is 12%.
- Cleanliness, which implies the complete absence of dust, sand, dirt, bitumen, oil stains, traces of soot, soot, etc.
- Evenness with an acceptable limit of no more than 2 mm for every 2 meters of surface. All irregularities must be eliminated.
In addition, it is recommended to stick or staple a damper tape 5–15 mm high (depending on the thickness of the floor pie) around the perimeter of the sanitary room and waterproof it. The latter can be polyethylene film, polymer mastic, rigid coating compositions, or rolled materials. Particular attention is paid to corners, as well as places adjacent to pipelines.
The next step is laying thermal insulation material for the floor and fixing it to the base. This stage is mandatory, because otherwise part of the thermal energy will go down, and not, as expected, up. You can use extruded polystyrene foam boards, polystyrene foam with a density of 35 kg/m², basalt or fiberglass wool. The optimal insulation thickness is up to 5 cm.
On top of the prepared base it is necessary to lay a reinforcing mesh made of metal or glass-composite rods 4-6 mm thick. It will serve as a frame for securing the pipe contours. Some craftsmen recommend fixing it to the base for reliability.
Installation of heating circuits
The layout of pipelines for the VTP system is carried out in accordance with a pre-developed diagram. The turns are secured using plastic clamps, PVC holders, metal wire, etc.
Alternatively you can use:
- anchor brackets - convenient when working on insulation materials;
- metal tape with fixing “antennae” - useful for fastening on rigid bases;
- special forms made of polystyrene foam with protrusions;
- fixing tracks, which are a kind of strips or comb made of aluminum, galvanized steel or plastic. There is a recess in the center into which the pipes are tightly laid and securely fixed.
We remind you that during work you need to ensure that the channels are even and free of creases, dents and other defects. If, due to the characteristics of the sanitary premises, it is impossible to maintain the minimum permissible interval between turns, some of them must be thermally insulated using corrugated pipes.
Connection and testing
First of all, it is necessary to mount the pumping and mixing unit in a pre-installed cabinet. If the control unit is located directly in the bathroom, then its installation is carried out before the heating circuits are laid out.
Now you can connect the pipelines to the corresponding outputs of the block. SP 41-102-98 recommends that at the same stage, immediately perform pressure testing of the system under pressure exceeding the nominal operating pressure by 1.5 times, but not less than 0.6 MPa. During hydraulic tests the following is carried out:
- Checking the pressure gauge.
- Balancing the collector in accordance with the tuning tables.
- Examination of pipelines along the entire length, which will allow early identification of depressurization points, leaks, creases, areas of overheating and other defects.
Screed
If there are no malfunctions or have been eliminated, then you can begin preparing and pouring the solution. Manufacturers of components for HTP recommend a minimum thickness of 3–4 cm above the surface of the heating circuits, and a maximum thickness of up to 9 cm.
To create a screed you can use:
- industrial cement-sand or concrete compositions with grade strength not lower than M-150;
- self-leveling self-leveling mixtures with o on the packaging;
- homemade solutions of a grade not lower than M-300. They do not have the necessary elasticity, so plasticizing additives must be added to the composition.
The finished screed mixture is laid on pipes with water at room temperature under a pressure of 0.2–0.3 MPa (2-3 atmospheres), and carefully leveled. To ensure uniform maturation of the cement mortar, the surface can be covered with a film. Technological break – 14–28 days. It is not recommended to drain the liquid from the system for another 1-3 days.