0
6732
22.11.2014
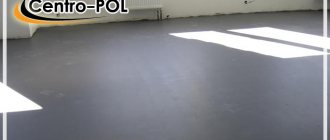
Self-leveling floor screed with your own hands is a completely doable process that anyone, even a non-professional, would be able to do. This is very easy to prove.
Self-leveling floor screed
The floor is the most used part of any room, so it is most susceptible to wear and tear and quite often requires repair. The floor must be free of flaws and distortions, because the entire interior rests on it.
There are many modern floor coverings. For example, the floor can be covered with elegant or simple laminate, original ceramics or beautiful linoleum.
In any case, before proceeding with the installation of any finishing floor covering, the floor must be properly prepared, namely, leveled.
Types of mixtures for leveling
types
Leveling dry mixtures for floors have a rather complex composition, the binding element of which is cement or gypsum, to which modifying polymers and mineral fillers are added. Modifiers provide good adhesion, mobility of the mixed solution, increased elasticity, and the ability to self-level.
The self-leveling floor, one might say, does not shrink. It is distinguished by hardness and high wear resistance. The presence of water-retaining additives increases the time required to adjust the solution, thereby avoiding cracking.
Cement-based ones are suitable for use in any room, and gypsum-based ones are suitable only for rooms with low humidity.
The second type of mixture, gypsum-based, can also be used to form a thicker floor screed; for comparison: the maximum thickness of the cement-sand layer does not exceed 50 mm, and the maximum thickness of the gypsum-sand layer does not exceed 100 mm. This type has gained great popularity in European countries due to the special qualities of its binding substance - gypsum, a natural, environmentally friendly, dust-free material, and also an excellent heat insulator.
made of plaster
Moreover, gypsum has the ability to regulate the moisture and temperature conditions in the room and, if it is not very suitable for bathrooms, then parquet on a gypsum screed does not dry out - gypsum absorbs an excess of moisture, and if there is a lack, it gives it back.
Materials with cement as a binding element are used for initial floor treatment, concrete floor repair, or floor leveling. We looked at possible options for finishing alignment in this article >>>. They are applied in a thick layer. In addition to sand, its composition includes coarse-grained components (0.5-2.5 mm): expanded clay crushed stone or ground granite.
On a note
For example, to produce the Vetonit Light Floor mixture, a cement-containing binder and expanded clay crushed stone are used. It smooths out large irregularities, up to 30 cm thick. And what is important, this screed dries much faster than concrete.
In any case, it must be taken into account that each type must be used strictly for its intended purpose. For example, if a self-leveling floor intended for finishing is used for a thick layer (base), cracks will inevitably form.
Technology of using the mixture
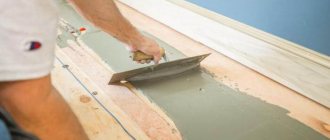
It all starts with her kneading. This is done in portions. First, pour the appropriate amount of water, then add mixtures for wooden or concrete floors. As for water, the packaging often indicates a range of its amount per unit of solution. This range is taken based on temperature differences. If the room temperature reaches the maximum permissible, then the amount of water that reaches the highest limit is given. And vice versa. Neglect of this rule leads to “hedgehog” or “cotton wool” results. During kneading, the drill or mixer should operate at 100-300 rpm. Do not touch the walls of the dish with the nozzle, as the homogeneity of the mass will deteriorate. Knead for up to 4 minutes. Then wait up to 4 minutes (during this time the self-leveling mixture matures). At the same time, the partner prepares the solution in the second bucket. Then comes the filling stage. The mixture is poured onto the part of the floor furthest from the door and smoothed using a squeegee. The assistant rinses the empty container. Next, prepare a third portion of the solution. The second one has already been sent for maturation. You also need to rinse the mixer attachment. The entire floor is poured in this sequence. At the end, a board is placed in front of the doorway, which will not allow the concrete or wood floor mixture to leak out of the room. After pouring, you need to release air bubbles from the screed.
Release air bubbles
To do this, the master takes a needle roller and, moving in paint shoes, moves it over the filled layer. This process is often demonstrated in videos.
Quality of produced materials
Despite all the commonality of dry mixtures, each manufacturer uses its own recipe, that is, its own ratio of added modifiers. This determines their different behavior.
You can form a preliminary opinion about the quality based on the consumption of the composition in its finished form, which is indicated by the manufacturer on the packaging.
In the case of a high-quality mixture, on average, at most 1.6 kg/m2 should be consumed per 1 mm layer. The strength and speed of complete hardening depends on the declared volume of water required to prepare the solution, and the less it is, the better the quality.
Self-leveling floor mixtures: which ones are better?
Very often, laying flooring requires a level subfloor. Nowadays, leveling the floor is not a difficult task. If previously the only solution was to install a concrete screed, today dry methods, traditional cement screed, and self-leveling mortars of various types are used to level the floor.
Calculation of material consumption
Before you start processing the subfloor, you need to accurately calculate the amount of consumables. If there is a shortage of it, further formation of a flat surface will be difficult. Installing multiple layers is not recommended as they will not always have good diffusion.
Material consumption is mainly influenced by the quality of the original coating. If there are significant changes in level, more leveling mixture will be required. The presence of cracks and depressions is also important. They will help increase the amount of solution. Therefore, it is recommended to prepare the subfloor before final pouring.
In addition to this factor, the following must be taken into account when calculating:
- Nominal density, kg/m². It is the main parameter influencing the amount of material;
- Planned thickness of the new coating;
- Use of additives to reduce consumption. It is recommended to do this only if the manufacturer indicates such a possibility.
For an accurate calculation, it is best to read the instructions on the package. It also indicates all the nuances of preparing the composition and the requirements for its operation.
Advice
The average density of epoxy-based material is 1.4-1.65 kg/l. For a polyurethane mixture this figure is slightly lower - 1.2-1.25 kg/l.
Types of self-leveling floor screeds
The self-leveling mixture will, of course, make it easier for you to screed the floor, but you shouldn’t expect any miracles from it. You can simply pour the screed and wait for the result only if there are only small irregularities on the floor surface. In other cases, you may have to use several types of self-leveling screeds.
Related article: Stone bathroom sink
There are several types of self-leveling compounds, which should be selected taking into account the room where they will be used
Types of self-leveling compounds:
- A rough self-leveling screed is used when the floor is in critical condition. This composition is poured into a fairly thick layer (about 5-7 cm).
- The medicinal mixture is used to eliminate defects in certain parts of the floor. This product will perfectly cover small holes and cracks.
- The finishing liquid leveling mixture is used for the final preparation of the floor for installation of decorative covering. This composition is applied in a layer of 0.2-1 cm. After the finishing screed dries, you will receive a perfectly flat and smooth floor.
Each type of screed is used in its own specific case. Sometimes it happens that you have to combine several layers of different products on one floor. Often, rough and finishing screeds are used together. A combination such as a local and finishing mixture is also possible.
If you do not want to use a liquid self-leveling mixture for the floor, then you should pay attention to the Knauf Superfloor dry screed, which is made by laying GVL elements on an expanded clay filler.
Self-leveling mixture can be used on almost any substrate. The only exception is wooden floors. However, some craftsmen claim that a strong wooden base can be leveled with a finishing compound if you first put a film under it.
Self-leveling polyurethane floor
For residential premises, self-leveling flooring is chosen, the basis of which is polyurethane resin, for non-residential premises - epoxy resin or methyl methacrylic resins and others.
Advice
For the chemical reaction to proceed correctly, working with a self-leveling polyurethane floor (one or two-component) requires special conditions, namely the absolute absence of moisture.
Polyurethane flooring is a finishing coating, and at the same time it is final, and its optimal thickness is 1.5 - 2.5 mm. It hardens completely within a day. While the floor is curing, all factors affecting its integrity are excluded: drafts and sunlight.
The transparent surface of polyurethane floors does not require additional decorative finishing, but at the same time allows you to find new interesting solutions. For example, place a volumetric composition or design under a layer of self-leveling coating. The only thing you need to take into account is that the thickness of the fill depends on the volume of the composition, and the cost depends on the thickness.
Such floors look great in the kitchen, bathroom and restroom areas.
The basis of a two-component polyurethane floor is an aqueous dispersion of the polymer and primary alcohol, which, in combination with the polymer, gives it strength and rigidity. This type of self-leveling flooring is definitely more durable. For a coating 0.1 cm thick, its consumption is 1.5 kg per m2.
Choosing a resin-based self-leveling floor requires special attention - it is better to give preference to a well-known brand with detailed instructions on the manufacturer’s website and with a quality certificate.
Even when buying the most expensive screed, it should be recognized that it alone will not be enough. No matter what words of praise are written regarding their independent fluidity, in order for the screed to fully cover the floor, it should be helped with a rule, a spatula and a needle roller, spreading the creamy mass in different directions .
To increase adhesion, you will need a primer impregnation. It is better to buy it according to the manufacturer's recommendations to ensure the best result.
Preparatory work
Determination of gender characteristics
First of all, you need to determine the characteristics of the base - this determines whether it is possible to use a self-leveling floor or use a traditional cement screed, as well as to determine the required self-leveling mixture.
These characteristics include:
- base strength – bases that are not strong enough will require additional processing; at home, the strength can be determined using a glass cutter: if the width of the scratch is not greater than the width of the glass cutter roller, you can fill it without additional work;
- room humidity - in damp rooms (kitchen, bathroom, etc.) only cement-based mixtures can be used;
- evenness of the base - to determine the filling option (single-layer or two-layer) and the required amount of mixture; checked with a bubble level.
surface humidity - checked using a plastic film left on the surface for a day: if perspiration has formed on the film, the surface of the base must be primed before pouring; if drops have formed on the film, the self-leveling floor can be filled only after waterproofing the base (or completely abandon this technology in favor of a traditional screed);
Preparing for pouring
When preparing a room for pouring, it is necessary to remove furniture, debris and sweep up dust. If after a day the dust appears again, the base needs a primer. You also need to prime the base if it has high humidity.
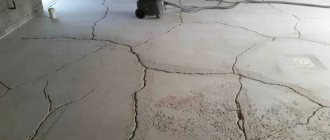
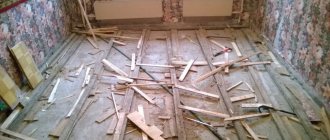
If there are cracks in the concrete, they must first be repaired.
How to prepare homemade leveling mixture
The composition of homemade is almost identical to the composition of dry ready-made mixtures:
- cement brand: M500, D0 or D20, PC 500 D0 or D20 (a certain guarantor of cement quality will be the full details of the manufacturer indicated on the packaging) – 1 part,
- washed (clean) sand of at least class I, grain size, up to 5 mm - 3 parts.
First, mix the ingredients in dry form, after which, gradually stirring, add water until the consistency of thick and viscous sour cream is obtained. When compiling, special attention is required to ideal cleanliness, sifting of sand, and the amount of water introduced - its excessive amount significantly reduces the quality of the screed.
Of course, a self-prepared option is relatively inexpensive, but the risk of getting a low-quality screed is quite high.
Gypsum and cement self-leveling floors
Mixtures are also divided according to composition into cement and gypsum.
Let's consider a mixture based on gypsum; it is used in spaces with low humidity.
The main advantages of this mixture are:
- Possibility of filling the floor in a volumetric layer up to 10 cm.
- The material has good thermal insulation properties.
- Low price.
At relative humidity above 70%, the use of building mixtures of this type is unacceptable. Due to its composition, which includes gypsum, it has a low drying rate
Now we will look at cement mixtures. They are widely used due to their universal composition.
The main advantages of the self-leveling floor from this mixture are:
Possibility of use in rooms with high humidity.- Increased wear resistance.
- Fast drying.
But such mixtures also have disadvantages.:
- High price of self-leveling mixture
- Limitations on layer thickness from 3 mm. up to 5 cm.
Floor preparation
Forming a rough surface is the main stage of work before pouring the self-leveling mixture. Before this, an analysis of its condition is carried out - defective areas are identified, and the optimal method for eliminating them is selected.
First you need to clean the floor from the old decorative surface, if any. Then you should remove the debris and dust that inevitably forms at this stage of work. Using the building level, the maximum and minimum height differences are determined. This directly affects the consumption of the self-leveling mixture.
The order of the preparatory processes is as follows.
- Cleaning the floor from construction debris.
- Filling cracks, reducing the height of strong protrusions. To do this, you can use a grinding machine with special attachments for concrete.
- Surface treatment with primer. It will promote better adhesion of the mixture to the base.
- Waiting for final drying.
If primer is not available, you can make a solution from a self-leveling composition. To do this, you need to mix the powder with water in a ratio of 1:10. Externally, the resulting liquid will resemble cement laitance.
It is also necessary to ensure a good level of ventilation and lighting in the room. The maximum and minimum temperature and humidity values are indicated on the packaging. They must be strictly observed, since if violated, the composition parameters may change.
Advice
Moisture is not allowed on the surface of the subfloor. This will lead to the formation of voids and a lack of adhesion of the self-leveling mixture to the base.
General tips for use
Floor leveling mixtures allow construction work to be completed in a very short time, but at the same time they require very careful compliance with the instructions. Therefore, before using them, or better yet before purchasing, it is recommended to always read the manufacturer’s recommendations and pay attention to the purpose of the solution, as well as its suitability for the room. After this you can make a choice. Before use, you should always determine the required amount of material. Practice shows that to create a one-millimeter screed on one square meter of wooden floor, on average, almost a liter of solution is needed.
Further calculation consists of calculating the area of the room and determining the thickness of the required layer. Next, all numbers are multiplied. This is how you determine how much self-leveling mixture you need to stock up on. All work should be carried out in a room whose doors and windows are closed. The main thing is that there are no drafts.
Temperature range – 15-30 degrees Celsius.
Operation at other temperatures is undesirable. If it is cold, self-leveling mixtures will not be able to provide adequate strength to the floor, since the water will be released too slowly and the excess formed will destroy the polymers. Working at high temperatures will result in premature evaporation of water. The solution will not have time to spread normally over the surface. The creators of various videos often talk about this. It is also important to maintain the desired level of humidity. Often its value should be 50-65 percent. You need to use those solutions whose expiration date has not expired. Another important condition is the presence of assistants.
The condition is the presence of assistants
It is worth understanding that the work must be organized so that when the last sections are poured, the first row is still liquid. This means that you need to spend up to 15-40 minutes kneading, pouring, and smoothing the solution (the time depends on the characteristics of the product). It is impossible to complete this time without helpers. One person should prepare the solution, another should pour and straighten it. You can speed up the work using an automixer and a pump that supplies the solution.
Pouring technology
First, the stage of preparing the composition for further filling is performed. To do this, you will need to read the instructions and strictly follow their points. Additionally you will need water. It should not contain dirt or other third-party components.
If you plan to do a large amount of work, it is recommended to purchase or rent a construction mixer. You should also prepare a mixing container in advance. First, water is poured in, and then the self-leveling compound is gradually poured in. At the same time, mixing occurs. Lumps are not allowed. The mixture should be homogeneous. After this, it should stand for 30-40 minutes. Why you can perform the pouring process.
Stages of work.
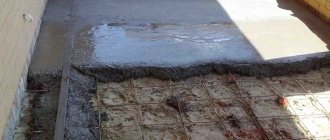
- Filling starts from the corner of the room. The composition must be applied in such a way that additional layers are not formed.
- The minimum thickness should be about 5 mm. Otherwise, the surface strength will be low.
- Using a spiked roller, it is necessary to remove air from the layer.
- Wait until the composition spreads evenly over the entire surface of the subfloor.
If part of the mixture hardens during operation, it can no longer be reused. The room must be ventilated before final drying. If this is not done, the likelihood of increased humidity in self-leveling mixtures will increase.
Advice
If the maximum difference in floor height is 2 cm or more, it is recommended to level it using a cement screed. The final formation of the surface can be done using the compositions described above.
Types of self-leveling floors
A subfloor can have many different imperfections, and self-leveling mixtures of different compositions are suitable to eliminate them.
Subfloor
If it is necessary to carry out rough leveling, during which a number of large defects are eliminated, then a quick-hardening solution is used.
Rough Alignment
Thanks to him, rough preparation is carried out in a short period of time. Fast-hardening floor leveling mixtures are suitable for creating thin screeds. However, since a thin layer does not have great strength, it is necessary to use a special reinforcing tape, the choice of which is large.
The final self-leveling self-leveling floor is created using substances whose components can form a very strong bond with each other. From such solutions a screed no thicker than 5 millimeters is made.
To fill, you need to have a flat base. The peculiarity of this screed is that its top dries very quickly. The middle hardens much longer. Therefore, walking on it prematurely can create dips.
Finish self-leveling self-leveling floor
Floors with large chips and uneven surfaces are treated with special substances. They are capable of creating a very hard screed and firmly bonding to the subfloor. Of course, such properties greatly affected the price; usually special self-leveling mixtures are very expensive. Partially such solutions are used for wooden floors.
Special self-leveling mixtures
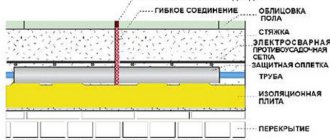
Often people install heated floors. Therefore, they use solutions for such a heating system. This substance is mainly used for pouring screed over heating elements. For this reason, it is endowed with good thermal conductivity.
Pouring screed over heating elements