Depending on the size of the slope and the required level of force resistance, such a structure can be made of various building materials: reinforced concrete, brick and even wood.
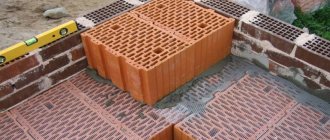
With the advent of new reinforced wall blocks on the country's construction markets, they began to be used for the construction of retaining walls on personal plots with a retaining height of no higher than 1.5 m.
Requirements
Requirements for these structures are formed depending on their purpose . According to this indicator, they are classified into decorative and strengthening. The former are intended to add landscape to an area that has slight slopes, while the latter must be powerful and durable in order to withstand significant soil pressure.
The main task of retaining walls is to prevent the soil from sliding with the subsequent washing out of the fertile layer on the plot. Urban planning standards impose increased requirements on blocks for these structures.
Features of choice
The construction industry produces a line of block products that are designed to strengthen and level out the errors of the existing topography, thereby preventing further collapse or sliding of the soil.
The advantage of using blocks for such structures is the ability to simultaneously perform decorative functions, bring the surrounding area to the chosen style, and protect against landslides.
To select types of blocks by materials and sizes, the developer must consider the following important points :
- characteristics of the soil and its susceptibility to destructive processes under the influence of natural factors;
- geometry of unevenness, rational methods of slope compensation;
- what kind of retaining structure should be: load-bearing or in the form of a stable foundation, for this preliminary calculations must be performed;
- The material of the walls is determined taking into account the height, type of supporting structure and principle of operation.
When choosing blocks for retaining walls, which are located in densely populated areas, the following conditions must additionally be provided :
- take into account dynamic impacts from all types of transport;
- the inevitability of demolition of dilapidated buildings at the construction site;
- the importance of performing archaeological research;
- the obligation to dismantle old underground utilities and foundations;
- the need for reconstruction and strengthening of surrounding buildings.
Types of designs
Reinforcing retaining walls made of blocks are divided into 3 types:
- Massive , maintain ground pressure due to their large mass. In this case, the strength of the structure will depend on the size of the recess. Such walls require a large amount of building material. Therefore, for private housing construction in areas with a slight slope, it is recommended to construct low retaining structures above the soil level by 0.6-0.7 m, with a depth of 0.2-0.25 m and a thickness of 0.3-0.40 m.
- Combined ones have less weight than the first ones. In order to increase stability, a foundation is built with a size much larger than the width of the retaining wall. In this case, the soil layer will put pressure on the protruding components of the foundation, thereby reducing the load and increasing the stability of the structure.
- Thin-walled ones have an L- or T-shaped configuration. In this design, the vertical soil pressure on the support will reduce the horizontal loads and increase the resistance of the retaining structure to overturning.
What are they made of?
This design usually contains 4 components:
- the body is the main visible part;
- foundation - underground foundation;
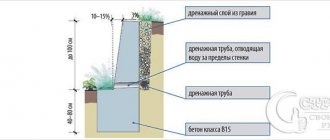
- drainage - a system for collecting atmospheric water;
- drainage – a pipeline system for discharging collected atmospheric waters.
Moreover, if the first part of the structure is required mainly for the implementation of the retaining function and pursues an aesthetic goal, then the remaining parts of the structure are necessary to meet technical standards.
Such structures are grouped by height:
- small up to 1 m;
- average up to 2 m;
- high over 2m.
The choice of material and dimensions of the block and foundation is made after calculating the retaining wall based on the loads that may affect its structure:
- vertical: the force from the backfill soil acting on the wall and the area; weight exerting pressure on the upper surface of the structure;
- total mass of the retaining wall structure;
- horizontal: the frictional force that occurs in areas where the soil connects to the foundation;
- soil pressure on the retaining wall;
- forces arising from seismic vibrations of the soil;
- wind pressure, especially for walls higher than 2 m;
- water flows, especially in basins;
- vibration destructive forces arising from the movement of transport, especially railway;
- winter swelling of the soil.
Calculation of retaining walls of different types and designs
Calculations are performed based on the manual for SNiP 2.09.03-85. The calculation is carried out for two groups of limit states and includes checks for:
- wall shear resistance;
- strength of the foundation soil;
- strength of retaining wall elements and joints;
- permissible deformations;
- permissible crack opening sizes.
This work is quite difficult even for a professional builder. It is necessary to operate with a large number of formulas and take into account several factors that affect the design. If it is necessary to build a structure with a high degree of responsibility, it is recommended to seek help from experienced specialists. Decorative walls can be constructed without calculations, based on the minimum requirements (for massive walls they are indicated earlier).
If the type of retaining wall and its design are chosen correctly, and the technology was not violated during construction, such a protective element will ensure safety both with strong and with small differences in heights on the site.
If you are the owner of an uneven plot located on a slope, you are probably close to the problem of how to strengthen the slopes in order to prevent the ground from collapsing, and at the same time create a beautiful landscape. Installing retaining walls on the site will help you.
The retaining wall serves to protect unstable soil from crumbling. Also, with the help of retaining walls, you can divide the area into zones and decorate the dacha. It is quite possible to build such a structure yourself using various materials.
What stones are suitable for construction?
In order to determine the most suitable type of block, you will need to take into account not only the strength and decorative elements for the garden area, but also the installation of the drainage system and the general dimensions of the retaining structure.
The financial component plays a significant role, since in general the designs are expensive.
The choice of wall material is made during design and survey work , which will establish both the required type of block and the dimensions of the wall to ensure the immobility of the soil for many decades to come. As a rule, the choice of masonry stone option is carried out during a feasibility study, comparing various options with each other, and choosing the most optimal one in the “price-strength-design” ratio.
The construction of low retaining walls in most cases is carried out for decorative purposes, so they do not require careful calculation of stability and the use of high-strength blocks.
For taller structures, accurate calculation of loads , selection of block material and their dimensions will be required. Moreover, to prevent the wall from tipping over or moving, the following measures are taken:
- the side facing the ground is made as rough as possible, with protrusions for adhesion to the ground;
- protrusions are made in block structures;
- To reduce the soil pressure on part of the structure, a slope is made on it directed towards a hill.
Note ! Based on regulatory requirements, blocks made of lightweight porous materials are used for decorative protective walls. More powerful strengthening structures are made from FBS concrete blocks with a width of 400 mm and a density of 2000-2300 kg/m3.
Best stones for supporting walls
The material of the blocks and their strength are decisive when choosing wall material for retaining structures:
FBS block : M150-200, density 2300 kg/m3.20x20x40cm and light weight - 33 kg, average cost 5312 rubles.
for 1 m3. Such dimensions allow the wall to be erected without the use of lifting equipment. This is an excellent solution for landscape design, although they are usually used when constructing a reinforced building foundation.- clay concrete blocks can be used for retaining walls with an additional protective layer. The best modification: solid D1950, 390x190x188 mm, M 100, cost 4180 rubles. for 1 m3.
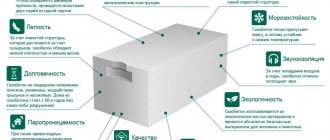
- Foam blocks - the lightness of the building material and ease of installation, at the most affordable cost, make them preferable for many developers.
However, when installing it, you need to be careful when choosing the brand and strength. You will also need to plan for the installation of waterproofing and an effective drainage system. The most suitable for a retaining wall may be a modification of blocks with the following characteristics: structural D1200, M150 with a density of 1200 kg/m3, with a vapor permeability coefficient not higher than 0.1, with dimensions 200x300x600 mm, cost 3800 rubles. for 1 m3. - Cinder blocks , you need to choose high-quality ones with smooth outer edges and high-strength characteristics, either with expanded clay filler, or sand-cement M-100 and 125, it is better if they are 2-hollow, so that additional vertical reinforcement can be performed.
Such wall material will also require finishing and waterproofing. Characteristics of the best option: M100, density 1200 kg/m3, dimensions 390x190x189 mm, cost 4200 rubles. for 1 m3.
Materials for joining concrete blocks
There are two ways to lay concrete and reinforced concrete blocks - using concrete block adhesive and mortar mixture. More details about these methods are below.
Cement-sand mortar
To prepare cement-sand mortar, it is important to use only high quality cement, at least grade M400. The sand must have a uniform structure, without clay lumps and other large inclusions
The sand must have a uniform structure, without clay lumps and other large inclusions.
If there are any, then the sand is sifted through a sieve and it is advisable that this process be carried out several times. This will allow for better adhesion of the sand to other components and subsequently the solution will not crumble or fall off in pieces.
Therefore, the recipe for preparing a cement-sand mixture is as follows:
- 1:3, where 1 is cement, and 3 is sand;
- water should be taken at the rate of 0.7 parts of the total amount of cement.
To achieve the required plasticity or, if the walls are laid in winter, then you need to get a frost-resistant mixture. To do this, special plasticizers and additives are added to the solution. Additional components are also needed if the sand was very wet.
The mixture is mixed in small volumes
The advantage of the cement-sand mixture is that it allows you to cover the imperfections that may be on the surface of the blocks - potholes, uneven walls and pits.
Due to a layer of 2-3 cm, such problem areas are eliminated, however, this same advantage can also become a disadvantage. The thicker the seam between the blocks, the higher the thermal conductivity. In this case, additional wall insulation will help.
Glue
This is a universal method for connecting blocks, since it allows you to mount elements with a minimal seam - about 2-3 mm. The advantage of this method is high thermal insulation and, accordingly, low thermal conductivity, so the walls do not require additional insulation.
Another feature of the glue is that its price is several times higher than the cement-sand mixture, however, it will take much less than cement mortar, so the cost will be justified.
Glue is purchased in construction stores in the form of a dry mixture and you can dilute it yourself, for this:
- The dry ingredients in a plastic container are mixed with water in the ratio indicated on the package (water is added first, then the dry mixture is poured into it).
- It is advisable to mix using a mixer or drill at low speed.
- There is no need to mix a lot of glue at once, since it is consumed slowly and, if you do not use it in time, the adhesive mixture will harden. If the laying is carried out in winter, then additional anti-frost additives must be added to the mixture.
- The glue is applied to the surface of the block with a spatula and the mixture is leveled with it, and the residue is returned back to the container.
Materials and tools for construction
A developer who has decided to build a retaining wall on his personal plot with a height of no more than 1.5 m must prepare equipment, tools, equipment and building materials before starting work:
Blocks according to design documentation.- Additional blocks of different sizes.
- Masonry components for the mixture: cement and sand.
- Reinforcement material: reinforced mesh and reinforcement.
- Geotextiles, roofing felt for waterproofing.
- Gravel and sand for making a foundation pad.
- Concrete mixer, manual or electric.
- Containers for transferring the laying solution.
- Measuring tools: angle, tape measure, building level and plumb lines with marking cords.
- Shovels.
- Tamping.
- Master OK.
- Slings for heavy blocks if they will be lifted by lifting mechanisms.
Is the material suitable for a cellar?
Cellars are often built on summer cottages to build another room for storing equipment or winter supplies. Basements are also made in private houses so that the owners have the opportunity to store household supplies.
Basements can be built not only from monolithic concrete, but also using concrete and reinforced concrete blocks. A cellar made of this material can serve as a high-quality foundation for the construction of a residential building.
According to construction norms and rules, it is possible to build cellar walls from concrete blocks, but it is worth taking into account some factors. The blocks must be made of a certain grade of Portland cement, which is regulated by its strength.
When should concrete blocks not be used?
Cellars should not freeze, but the temperature inside them should remain cool. The service life of a concrete cellar is the same as the service life of the concrete itself: the more reliable the material, the longer the cellar will last.
There are times when constructing a room under a concrete block house is undesirable:
- when the goal is to save construction costs;
- when a newbie does the work;
- when the groundwater level is too close.
Concrete blocks are not low in cost on the construction market, but this disadvantage can be solved by making the masonry material yourself. It will take longer, but will save you a lot of money.
If a beginner is doing the work, it is better to use a monolithic type of concrete or other material, since you need to take into account all the nuances of laying the walls of the basement. One more nuance: you should not use masonry with this stone if groundwater flows too close nearby. In this case, monolithic concrete will be better, since it does not have gaps that form in the masonry joints.
Step-by-step DIY construction instructions
This instruction has been prepared for the use of the most popular blocks for retaining walls: FBS and expanded clay concrete.
For protective walls with a height of more than 1.5 m, a design will be required, and in the case of creating less soil support from a slope located on the adjacent site, the structure can be erected according to a detailed drawing. It marks the kinks and boundaries of the structure. It will help you calculate the required volume of building materials.
Next, you will need to transfer the drawing to the surface of the site, accurately outline the edge of the passage of the retaining partition on it so that you can begin digging the trench.
Step-by-step instruction:
For serious retaining structures made from heavy blocks, a foundation will be required.
For clay soil, it is enough to install a belt type; in areas with weak soils, a pile option. The width of the pit is selected based on the width of the wall multiplied by 3, that is, for a block of 20 cm, the foundation must be at least 60 cm.- The foundation is installed in formwork with reinforcement, on a gravel-sand cushion, at the rate of 1st layer of gravel at least 30 cm, and a layer of sand - 18 cm, both layers are carefully compacted.
- The formwork for the foundation is constructed below ground level 20-25 cm. For additional reinforcement, reinforcement is placed in it, on broken brick and filled with concrete M 150/200.
- If the blocks are porous, a waterproof layer is laid between the foundation and the first row of stone; as a rule, several layers of roofing material are used.
- For greater structural strength, the masonry mortar should be in the form of a cement-sand mixture (CSM).
- A CPS solution is generously applied to the waterproofing layer and the first row of blocks is installed, leveling them with a mallet.
- After the 1st row has dried, they begin laying the second and so on.
- For low retaining walls, masonry is done in half a block, and for reinforced walls, in two blocks
- After the last row has been laid, the upper part is protected with a canopy, which can be made of cement, metal or metal tiles. This is necessary in order to protect the structure from atmospheric moisture getting on the walls and their further destruction.
- Install a drainage system to drain flood and rainwater. Effective drainage reduces the risk of destruction and also prevents the creation of cracks from swelling of liquid at sub-zero outside temperatures.
- The space between the retaining wall and the soil is filled with river sand, which is carefully compacted.
- If necessary, decorate the wall with decorative building materials.
How to make a retaining wall on a site is shown in this video:
Installation work
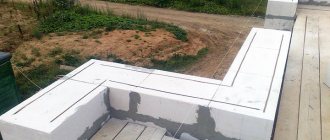
After the calculations and preparation of the construction site have been carried out, the foundation for the retaining wall made of FBS begins to be built. They use either a poured reinforced foundation or a ready-made monolithic slab. First, pour a layer of sand and compact it, after which similar actions should be carried out with a layer of crushed stone. Geotextiles are laid on top and the concrete base is poured. If a poured foundation is planned, then connecting pins are installed in the preparation, and the finished structure is left for 4-5 days, after which the insulation begins.
Waterproofing is carried out using a roll or spray method. In the first case, you will need a gas burner to attach the roll insulation. In the second case, a special device is required that sprays liquid rubber. Insulating using the coating method is long and difficult, and the quality is noticeably lower. To ensure the durability of the foundation, thermal insulation is carried out with extruded polystyrene foam, which is able to withstand the weight of the future structure.
When the insulating work has been carried out, they begin to pour or lay the finished factory slab.
The foundation must be absolutely level. In the presence of irregularities, the pressure will be distributed unevenly, which will lead to destruction of the base and shifts in the wall. If a stepped foundation is created, then each section must be horizontal to prevent the entire structure from sliding.
Retaining wall diagram
After the foundation is ready, they begin to lay the first row of blocks, which will be below ground level. If the wall being erected is high, then there may be 2-2.5 underground rows. It is important to correctly calculate on what day the laying of the wall will begin, so that construction equipment and workers do not stand idle, this will save you from unnecessary costs for rent and labor. Each row must be knitted horizontally with reinforcement with a diameter of 2 cm. When the row is ready, the next one begins, and so on until the wall rises 1 row above the expected level of the upper soil.
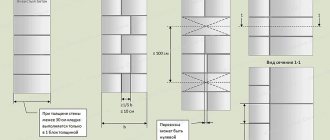
If the wall is high and the pressure is planned to be high, in order to avoid destruction, it is necessary to build a triangular-shaped retaining wall. The width of the lower part of the wall is higher than the upper one, and protrudes to the side where the soil will be supported. Thanks to this design, the pressure is distributed over a larger base area, which reduces the load on individual blocks. The finished wall is covered with waterproofing along with the foundation slab and filled halfway.
Waterproofing and wall finishing
After construction is completed, the wall and base are waterproofed for greater strength. In cold regions, wall insulation is sometimes used, but it is not effective if it is applied only on one side. To carry out insulation, the seams between the blocks are plastered to create a smooth surface and eliminate the possibility of gaps into which moisture can penetrate.
If you want to give the outside a beautiful look, then you need to plaster it and use finishing materials that imitate stone or brick. You can also use simple cement, but you must remember that you will need a special mesh so that it does not slide off the wall when it becomes saturated with moisture.
Possible difficulties and errors
When constructing retaining walls, there should be no small details, especially in areas with weak soils and a high slope angle.
If the developer made mistakes when performing the required stages of constructing a protective structure, a dire situation may arise when sliding soil will not only demolish the protection, but will also cause damage to the household and utility rooms located nearby on the site. This wall will have to be dismantled and a new one erected.
During the construction of a retaining wall, developers most often make the following mistakes :
- The calculations of the FBS structure were carried out incorrectly; the foundation cannot withstand the weight of the structure and the pressure of the retained earth.
- Absence or improper installation of the drainage system, constant flooding of the retaining wall.
- During construction, a waterproofing layer was not installed between the foundation and the first row of blocks.
- The waterproofing layer on porous blocks has not been completed.
- Improper excavation of the pit.
- Uneven and unsatisfactorily prepared base for the foundation.
Block Features
A prefabricated strip foundation made from FBS blocks for a house has a number of features. Before starting construction, it is necessary to take into account all the advantages and disadvantages of the material and select the most durable type of blocks.
Why a block base?
Such a foundation can be erected in 5-6 days; laying a pile or monolithic foundation takes several months. The construction of walls begins immediately after laying the plinth: FBS blocks do not gain strength, unlike monolithic slabs. Additional parts are not used during the construction process; installation of formwork and reinforcement is not necessary. Laying a block foundation is carried out independently; the help of experienced builders is not required.
What are FBS blocks?
The basis of the plinth is made up of building foundation blocks. These are concrete structures made using special technology. The material used in the process is durable reinforced concrete. Foundation blocks evenly distribute the load over the entire area. Before starting construction work, you need to calculate the approximate size of the structure being built.
Standard characteristics for foundation blocks:
- height - no more than 58 cm;
- width - 60, 50, 40 and 30 cm;
- length - 238, 118 and 78 cm.
Special holes are made in the side parts of the blocks at the factory, which are filled with cement during construction.
Positive sides
FBS blocks used in foundation construction have a number of advantages compared to other materials.
These include:
- sound insulation;
- thermal conductivity;
- absence of negative impact of external factors;
- ease of installation;
- a wide range of;
- resistance to temperature changes;
- long service life;
- high strength and reliability;
- low cost (compared to other materials).
Construction work is carried out regardless of the type of soil. Buildings can be erected in earthquake-prone regions.
Disadvantages of blocks
FBS strip foundation has a number of disadvantages
Laying is reminiscent of assembling a construction set, so it is important to pay attention to the interlocking of the blocks with each other. Monolithic masonry forms a flat surface, so the structure does not require additional reinforcement, unlike a block foundation
If the base is laid out from large blocks, then special equipment may be needed
If the base is laid out from large blocks, then special equipment may be needed.
Types of bases
Before starting construction, you need to decide on the type of foundation.
There are several main types:
- Pile. Suitable for the construction of structures (baths, garages) on soils with a high level of acidity and groundwater (deep).
- Linear. One- or two-story residential buildings are built on a linear foundation.
Foundation building blocks (by design) are:
- Empty. Low-strength material, used for the construction of fences. Light weight is ensured by the void inside the block.
- Monolithic. The reinforced concrete structure is equipped with grooves and is used for installing communication systems.
- Solid. The blocks are connected to each other in advance, forming a square. To increase strength, the structure is additionally reinforced.
Selection of blocks by size allows you to calculate the parameters of the structure being built in advance and draw up an estimate.
How to choose block sizes
When purchasing FBS, you must adhere to the following recommendations:
- Manufacturer. The quality of the material directly depends on the manufacturer. You need to purchase FBS made at the factory. Homemade slabs have lower compression grades. Before purchasing, you need to study reviews about a particular material.
- Geometric accuracy. FBS with precise geometry is faster and easier to install. Much depends on the manufacturing technology of the plates. If concrete is poured into special forms, the block turns out smooth. When using immediate stripping technology, the slabs will have a trapezoidal cross-section. They provide a large support area, which is why this type of material is used in the construction of buildings in earthquake-prone areas.
- Places of communication. They are determined in advance. In order not to drill holes in solid slabs, you need to purchase special FBS.
For the construction of residential buildings, it is preferable to use slabs 238 cm long. The use of such FBS will reduce the number of vertically located seams.
Average prices
| № | Block name, strength and dimensions | Average cost RUR/m3 |
| 1. | FBS block, M150-200, 20x20x40 cm | 5300 |
| 2. | Expanded clay concrete blocks, D1950, 39x19x18.8 cm | 4200 |
| 3. | Foam blocks, D 1200, M150, 20x30x60 cm | 3800 |
| 4. | Cinder blocks, M100, 39x19x18.9 cm | 4200 |
| 5. | Block 01-1486, 39.5x30.5x16.7 cm | 7900 |
Advantages and disadvantages
Foundation blocks have been used for a long time.
Even with the appearance of many new materials, they did not give up their positions. Due to their advantages, they are still used in both foundation construction and retaining structures. What workers are needed for can be seen in the video:
Characteristics of different FBS blocks
Before buying blocks, you need to calculate whether it is more profitable than renting formwork for pouring solid concrete. If it is possible to wait for hardening, then a monolithic wall may be cheaper.
Advantages of concrete walls
FBS blocks have been used in construction for a long time. And now they have not lost popularity due to the following advantages:
- High speed of work. Factory-made blocks are completely ready for use. There is no need to waste time hardening the concrete.
- Favorable cost when using standard blocks.
- Simplicity of installation technology.
Concrete blocks are widely used by construction companies. When choosing this type of retaining wall for a private home, it is worth considering several features:
- The need to use lifting equipment. Depending on the size, one element weighs from several hundred kilograms to several tons. It will not be possible to install such a load manually.
- The large mass will also affect transportation costs. Shipping products from factory to site can be expensive.
- Demand for qualified specialists. To securely attach the element to the hook of the lifting equipment, the help of a slinger is required. There may also be issues with unloading, storing and installing in the design position.
FBS retaining wall with buttresses, plan view.
Before using foundation blocks for private construction, you need to carefully weigh the pros and cons.
Surface preparation and installation
To make it easier for the reader to understand, we will present all the stages of building a wall made of concrete blocks (FBS, expanded clay concrete, foam blocks) in the form of step-by-step instructions:
- Like any other construction project, the construction of a wall must begin with a drawing. It is necessary to mark the entire structure, its bends and boundaries. Also in your drawing you should note the height and width of the future building, this will allow you to calculate the required amount of material.
- Then you need to transfer the data from the drawing to the surface, that is, draw on the ground the area of the wall for digging a trench. You can use a can of spray paint.
- Now you can dig a trench. Its depth depends on the height of the wall, as well as the material used in construction. If the height is no more than 1 - 1.5 m, then a depth of 30 - 40 cm for concrete or stone and 25 - 30 cm for foam blocks or bricks will be sufficient. At a height of more than one and a half meters, a more powerful foundation and the help of specialists are required.
- Filling the pillow. A layer of crushed stone and gravel, at least 10 cm thick, is poured into the bottom of the pit, and then compacted well.
- Next, the first row is laid. For greater structural strength, it is better to fix the blocks with cement mortar. In the meantime, while it is still movable, you need to level the blocks using a rubber or wooden hammer.
Process of laying cement blocks
- After the first row has dried, you can proceed to the next one. To obtain a monolithic wall, the masonry should be done in half a block, and to further strengthen the structure, you can lay out a double row.
- Having laid out the last row, you should cover the top of the blocks with a canopy made of cement or metal. This will protect the wall from moisture and subsequent destruction.
- The remaining space between the ground and the wall must be filled with soil, or better yet, river sand and compacted.
- If necessary, finish the surface with decorative materials.
At this stage, the main work can be considered completed.
As you can see, an uneven area is not a death sentence, but a good basis for an interesting design solution. And if you have basic construction skills, you can do all the work yourself, saving a lot of money.
There are various methods and materials for constructing a retaining wall on sloping terrain. Many homeowners are wondering how to build a retaining wall, what is the best material and type of wall to choose, and how it will fit into the overall design of the home.
We will try to give answers to these questions, especially for people who want to do this work with their own hands, for their own project.
How to build a retaining wall - choosing the right material
During the planning stage, how to build a retaining wall is always an important decision. To do this, it is recommended to consult with a specialist, choose the best retaining wall ideas and its design. The material for your wall should be stable, functional and, of course, attractive in appearance.
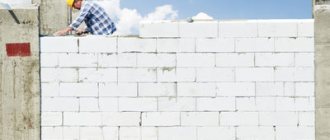
Many DIYers choose to use cinder blocks or concrete blocks to build their retaining walls. Concrete wall blocks are designed specifically for retaining walls and can be installed relatively easily. Labor costs when building a retaining wall from blocks are not significant, since their size is larger than, for example, bricks.
Main stages of construction
If you are one of those who are wondering how to build a retaining wall, you should know that there are some basic rules and steps that need to be followed while installing concrete blocks.
The first step is to mark the location where the retaining wall will be erected and, using a construction tape and string, mark the desired height and length of the wall.
Preparing the Base for the Retaining Wall The second step is to dig a trench along the entire length of the retaining wall and make a gravel base. Check the preparation height mark and compact the gravel.
Step three - you can begin installing the block retaining wall. Start at one end and gradually move towards the other end of the wall. Don't forget to check the level and level the blocks if necessary. Fill the voids with gravel.
Drainage is critical so make sure you install a drain pipe and begin laying the next row of blocks. Again, check the level and horizontalness of the installation. Fill the voids with gravel and repeat the steps until you reach the desired retaining wall height.
Complete the retaining wall by installing the top row of solid blocks. In order to secure them, you can use special glue. Allow to dry according to manufacturer's instructions.
Develop one or two plans.
A well-designed diagram will be indispensable during the construction process. Make sure that the plan diagram of the area where you are going to build the wall is drawn out in detail and to scale, so you don’t have to grab your head during the construction process if you suddenly make a mistake somewhere.
Order materials.
You'll have a wide range of materials to choose from, so take your time to make sure the color and design you choose suits your home and surrounding area. According to your plan, make an estimate of how much you will need with a 10% premium for reinsurance to cover possible miscalculations.
- Mark your project area.
For ease of use,
It's a good idea to use spray paint to outline the area where the wall will be, or mark the boundaries with pegs.
Dig out the marked area.
For a gravel wall foundation, you will have to dig an area or trench about 15 to 17 cm deep. Also, the trench should be about 35 cm to 40 cm inches wide.
Advice:
It will be easier to determine the level and horizontal line when building a foundation if, when digging a trench, you make it as even and flat as possible.
Make a foundation.
Build a foundation using gravel, gradually backfilling the trench in stages. Depending on the height of the wall, you will have to make a foundation about 10-15 cm deep. Also, you should make sure that the foundation is wide enough so that the concrete block fits completely on it. To prevent gravel from the foundation from being washed away by water from under the wall, it is necessary that the concrete block at the base is at least 2.5 cm deep into the ground.
Advice:
Using a mechanical plate compactor will ensure a solid foundation. You can also use a hand rammer, which is cheaper but not as effective. To ensure a straight line when laying the concrete block in the base, use a stakeout line.
Install the first concrete block.
Now that you have the base and level, lay out the first row of the wall in the same way. This will be the most time consuming and important step in the construction process. The tools needed to complete this task are a rubber hammer and a 30cm level. When installing the first concrete block, make sure that it is level lengthwise and crosswise. Also, you should make sure that when joining the concrete blocks, they are lined up and level with each other.
Advice:
if you do not line up the first row according to the level and the blocks do not fit tightly together, this will lead to the collapse of the entire wall, and you will only be able to notice this after laying the next few levels.
Build a wall.
Laying out new rows of concrete blocks is simple, but it is important to ensure that the concrete blocks line up or make a smooth curve. You can do this by looking down from the wall to see how they are lined up.
Advice:
If you make a curve in the wall, you may have to chisel some of the protrusions from the bottom of the concrete block to make an arc. This part is determined by eye, little by little, using the selection method.
Fill wall cavities with stones.
As you build the wall, fill the cavities with river pebbles or other medium-sized rocks that will help filter out water and dirt when it rains. This will also help contain the soil behind the wall.
Finish the wall.
To complete the wall, take the wall cap and glue it on. It is recommended that the cap extend above the last row an inch or the length of the index finger from the tip to the bend of the first knuckle. To make the bend, you may have to trim the lid with a concrete saw.
Backfill and clean up the area.
Fill the space behind the wall to the top of the cap or just below it. Clean up the area in front of the wall so that it looks beautiful and the foundation is protected from washing away.
Clean air, green spaces, lack of city noise are the reasons why the construction of suburban housing has recently become increasingly popular. However, not everyone gets flat plots for individual development. What should those owners do who have received plots in areas with fairly large differences in elevation? In this case, a concrete retaining wall will help, the construction technology of which has been worked out for decades. Such structures are also widely used in urban development, as cities are growing and there are not enough flat areas for the construction of new buildings.
Stone laying: direct execution of work
Before building the wall, moisten the stones with water and sort them so that they match in size and shade, and set aside the largest ones so that they fit right through and perform the main binding function.
Apply a layer of lime mortar to the frozen foundation, which should be at least 2 cm, and place several large binding stones on it, and others between them, trying to lay them as densely as possible. Now, using the same principle, you can make another layer, but try to always place the connecting components in different places to make the masonry stronger.
But before proceeding with subsequent layers, it is necessary to make a wooden template at the ends of the proposed structure. This way you will get a completely even masonry. To do this, use smooth boards. The stand itself has the shape of a rectangle with jumpers along the diagonal. The width of the rack is equal to the width of the wall, and the height is equal to its height. A cord is pulled between the side ribs of the rack. It should be attached so that it can be moved freely, moving to each subsequent layer.
To be more confident that each stone will fit securely in exactly its place, you can first lay the stones without mortar, trying to move in small sections in order to remember the position of the components of the future wall. It should not be forgotten that the seam between the stones in the lower layer should always be covered by a whole stone of the subsequent layer. And only then can you make finishing masonry with mortar. The amount of solution should not be too large, as it breaks down faster, making the entire structure less reliable.
Sometimes it happens that some stone does not fit tightly enough into the masonry. In this case, use wooden wedges, driving them into the resulting hole, which is subsequently filled with mortar, but only after the main masonry has dried.
The need to tilt the front or rear wall of the structure also depends on the pressure expected on the wall body. In natural relief areas, stability is ensured by the mass of the soil and the wall itself. In this case, the structure is rigidly buried and is considered elastic. In addition to stone, including cobblestone, brick and concrete walls, elastic structures also include structures that used dry masonry, gabion and rye walls. For such structures, the height of which does not exceed 1.5 m, the slope of the front edge of the wall can be minimal (10-15 degrees).
The rear angle can be determined using the formula:
tg e = (b - t)/h (1),
- e is the angle of inclination of the calculation plane to the vertical;
- b is the width of the foundation base;
- h is the distance from the soil surface to the base of the foundation;
- t is the wall thickness.
The angle of inclination of the calculated plane to the vertical e is determined not more than (45° -j /2), where
j is the angle of internal friction.
Thus, the angle of inclination of the wall can also be approximately determined by the formula:
Moreover, the found indicator will differ for different types of soil: for sandy soil - from 26 to 40, for clayey soil - from 18 to 30.
The finished retaining wall in your garden or dacha must be cleaned of excess lime. Use a wooden scraper first, then a brush and sponge. Clean the finished structure with water, and not with chemical solutions, which can change the color of the stone or even deform it.
Retaining wall
The reason for building a retaining wall is usually an area with differences in height. But even if you have a flat landscape, the wall will make it not boring. You can build it yourself.
Brick, wood, natural stone, concrete, as well as various combinations thereof, are suitable for building a wall. Let's give the structure a beautiful bend. Let's decorate our creation with ceramics, pebbles, shell rock, and plant it on top and along the plant. The highlight of the garden is ready!
What types are there?
The following types exist:
- Full-bodied.
- Hollow.
For the construction of protective structures, it is recommended to use both hollow and solid concrete blocks, since they are light in weight and easy to lay.
In addition, the cost of these types is significantly lower than expanded clay concrete or polystyrene concrete.
Foam concrete and aerated concrete products do not have the great strength required for a protective structure.
Construction of walls made of FBS: installation of a retaining wall foundation
Construction of a retaining wall
FBS foundation wall blocks are used in regions with different climatic conditions and on all types of soil compositions.
Preparatory work
The main role in conducting such construction work is given to planning and performing preliminary calculations. A mistake made here can lead to the fact that the FBS retaining wall will topple due to soil pressure when the rainy season begins.
It is difficult to carry out all the calculations according to current standards on your own, and experienced craftsmen recommend ordering them from specialists. These unforeseen expenses will save you from future repair costs or installation of a new wall made of fbs blocks.
Having completed all the necessary calculations and drawn up a plan for construction work, we proceed to purchasing materials and equipping a place for their storage. We will need:
- fbs blocks;
- hydro- and heat-insulating materials;
- river sand;
- crushed stone;
- geotextile fabric;
- pipes for the drainage system;
- concrete solution;
- steel reinforcement.
Having brought everything necessary to the site, we mark the territory. To simplify the work, you can use a cord and pegs. When marking, make indentations of at least three meters from the future walls in the direction of the increase in the soil layer.
If you plan to build high and long walls, you should hire an excavator to remove excess soil and dig foundation trenches.
Foundation installation
Having completed the calculations and prepared the area, they arrange the foundation for retaining walls from FBS blocks.
For this purpose, poured foundations on a reinforcement frame or factory-made monolithic slabs are used.
This is done using roll or spray materials. The first method will require a gas torch to fix the insulating material to the concrete. For the second case, you need a device capable of spraying liquid rubber.
Once all activities have been completed, it is allowed to pour or lay the finished reinforced concrete slab. The foundation must be even, otherwise the pressure will be distributed unevenly, causing destruction of the foundation and displacement in the walls.
When installing a stepped foundation, each section is installed horizontally to avoid sliding of the entire object.
Wall installation
Having prepared the foundation, we proceed to laying the first row of the FBS retaining wall, which is located below the soil level. If a high wall is planned, then there should be at least two – two and a half underground rows.
It is necessary to correctly determine when you will start laying the wall so that there is no downtime for the equipment and work crew, which will save unnecessary financial expenses.
Each row being erected is connected horizontally, for which steel reinforcing bars with a diameter of 20 mm are used. As soon as the row is prepared, they begin to build the next one until the wall is raised a meter above ground level.
With this design, the pressure is distributed over a larger section of the base, which reduces the load on individual blocks.
Self-built FBS retaining walls are finished with a waterproofing layer and filled in half.
Waterproofing
The foundation blocks of the walls and bases are waterproofed to give them additional strength. In areas with cold climatic conditions, insulating material is used for walls.
For better efficiency, this type of finishing is done on both sides.
To install insulation, block seams are plastered to a smooth surface to eliminate the possibility of ruptures where water can penetrate.
Drainage arrangement
Having filled and compacted the soil around the foundation of the retaining wall, it is imperative to install a drainage network through which groundwater approaching the walls will be drained.
For this purpose, a special pipe is laid along the length at an average level from the height. The sequence of work is as follows:
- A fiberglass mesh is placed on the geotextile pad, protecting the fabric from the sharp edges of the crushed stone layer. The width must have a margin in order to completely protect the pipe.
First, a crushed stone cushion five to ten centimeters high is placed in the trench, then a drainage pipe is laid. For better drainage, a slope of two to three millimeters is provided.
If water drainage is planned not to the sewer system, but to external areas from the walls, it is necessary to install drainage systems and place them every two to four meters, taking into account the level of soil moisture.
It is recommended to use PVC pipes for the drainage system. Their installation is carried out at the stage of masonry work; to improve waterproofing, the pipes are covered with bitumen mastic. Their inclination should be twenty degrees.
Having completed the installation of drainage, the pipes are covered with crushed stone and covered with the ends of the mesh and geotextile material. All that remains is to fill the system with soil and begin installing the linear drainage system.
Features of the construction of block supporting walls
During construction work, it is recommended to take into account certain factors that can affect the stability of the object and the degree of its reliability:
Subject to all requirements and construction standards, using wall foundation blocks that comply with GOST standards, the erected retaining wall will solve several important problems at once:
Retaining block walls, built in two or more levels, will create the opportunity for planting flowers and other plants that decorate the overall design.
There are many ways to design, and the choice depends only on the personal preferences of the owner and the characteristics of the soil.
Conclusion
By following all building codes, you can use a supporting wall to level the area. The durability of the concrete material is such that the constructed wall will serve you for a long period without needing repair work.
Construction of a retaining wall
FBS foundation wall blocks are used in regions with different climatic conditions and on all types of soil compositions.
Preparatory work
The main role in conducting such construction work is given to planning and performing preliminary calculations. A mistake made here can lead to the fact that the FBS retaining wall will topple due to soil pressure when the rainy season begins.
It is difficult to carry out all the calculations according to current standards on your own, and experienced craftsmen recommend ordering them from specialists. These unforeseen expenses will save you from future repair costs or installation of a new wall made of fbs blocks.
Having completed all the necessary calculations and drawn up a plan for construction work, we proceed to purchasing materials and equipping a place for their storage. We will need:
- fbs blocks;
- hydro- and heat-insulating materials;
- river sand;
- crushed stone;
- geotextile fabric;
- pipes for the drainage system;
- concrete solution;
- steel reinforcement.
Having brought everything necessary to the site, we mark the territory. To simplify the work, you can use a cord and pegs. When marking, make indentations of at least three meters from the future walls in the direction of the increase in the soil layer.
If you plan to build high and long walls, you should hire an excavator to remove excess soil and dig foundation trenches.
Foundation installation
Having completed the calculations and prepared the area, they arrange the foundation for retaining walls from FBS blocks.
For this purpose, poured foundations on a reinforcement frame or factory-made monolithic slabs are used.
This is done using roll or spray materials. The first method will require a gas torch to fix the insulating material to the concrete. For the second case, you need a device capable of spraying liquid rubber.
Once all activities have been completed, it is allowed to pour or lay the finished reinforced concrete slab. The foundation must be even, otherwise the pressure will be distributed unevenly, causing destruction of the foundation and displacement in the walls.
When installing a stepped foundation, each section is installed horizontally to avoid sliding of the entire object.
Wall installation
Having prepared the foundation, we proceed to laying the first row of the FBS retaining wall, which is located below the soil level. If a high wall is planned, then there should be at least two – two and a half underground rows.
It is necessary to correctly determine when you will start laying the wall so that there is no downtime for the equipment and work crew, which will save unnecessary financial expenses.
Each row being erected is connected horizontally, for which steel reinforcing bars with a diameter of 20 mm are used. As soon as the row is prepared, they begin to build the next one until the wall is raised a meter above ground level.
With this design, the pressure is distributed over a larger section of the base, which reduces the load on individual blocks.
Self-built FBS retaining walls are finished with a waterproofing layer and filled in half.
Waterproofing
The foundation blocks of the walls and bases are waterproofed to give them additional strength. In areas with cold climatic conditions, insulating material is used for walls.
For better efficiency, this type of finishing is done on both sides.
To install insulation, block seams are plastered to a smooth surface to eliminate the possibility of ruptures where water can penetrate.
Drainage arrangement
Having filled and compacted the soil around the foundation of the retaining wall, it is imperative to install a drainage network through which groundwater approaching the walls will be drained.
For this purpose, a special pipe is laid along the length at an average level from the height. The sequence of work is as follows:
- A fiberglass mesh is placed on the geotextile pad, protecting the fabric from the sharp edges of the crushed stone layer. The width must have a margin in order to completely protect the pipe.
First, a crushed stone cushion five to ten centimeters high is placed in the trench, then a drainage pipe is laid. For better drainage, a slope of two to three millimeters is provided.
If water drainage is planned not to the sewer system, but to external areas from the walls, it is necessary to install drainage systems and place them every two to four meters, taking into account the level of soil moisture.
It is recommended to use PVC pipes for the drainage system. Their installation is carried out at the stage of masonry work; to improve waterproofing, the pipes are covered with bitumen mastic. Their inclination should be twenty degrees.
Having completed the installation of drainage, the pipes are covered with crushed stone and covered with the ends of the mesh and geotextile material. All that remains is to fill the system with soil and begin installing the linear drainage system.
Features of the construction of block supporting walls
During construction work, it is recommended to take into account certain factors that can affect the stability of the object and the degree of its reliability:
Subject to all requirements and construction standards, using wall foundation blocks that comply with GOST standards, the erected retaining wall will solve several important problems at once:
Retaining block walls, built in two or more levels, will create the opportunity for planting flowers and other plants that decorate the overall design.
There are many ways to design, and the choice depends only on the personal preferences of the owner and the characteristics of the soil.