What you will need for arrangement
To install a garage drain, you need to prepare some tools and materials. All of them can be purchased on the construction market.
Required Tools
The tools you will need are a set of wrenches and fasteners. They are necessary for the installation of pipe products that will drain water into the sewer or septic tank.
Materials
If you decide to use a septic tank to build a drainage system, give preference to plastic containers. They are durable, reliable, airtight. Plastic is resistant to corrosion, does not leak, and is lightweight. This makes it possible to install it alone, without the help of others.
There is no need to create an additional waterproofing layer, since the septic tank is installed on a sand bed.
A plastic septic tank has certain disadvantages. So, it costs more than a concrete container. However, if we are talking about a garage space, you should not save. It is better to immediately choose high-quality and reliable material.
You will also need: geotextiles, crushed stone, sand and, of course, a shovel for digging trenches.
How to properly drain around a garage
How to make drainage in the garage on your own? On the one hand, this can be done. In fact, there are no difficulties with this. But you need to know the basic installation steps. However, the help of a specialist in this matter will not hurt to eliminate the risk of incorrect installation of the entire drainage system for a given utility room. The main steps look like this:
- It is necessary to correctly determine the location of water discharge
. In this case, indicators such as the depth of soil freezing are taken into account so that water passes through the trays at any time of the year and does not freeze. - Without sand traps, the drainage system will not function well and will quickly fail.
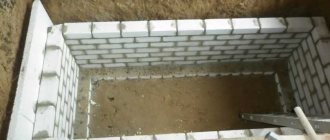
- Trenches are dug
in the garage area . To do this, the top layer of soil is removed. The size of such recesses is not arbitrary. Their depth is determined by the size of the tray, and another 20 cm is taken: 10 cm of this is for crushed stone preparation, and the other 10 cm is for the concrete base. The width is also taken into account by the size of the tray and 10 cm on each side. - The soil inside the trench must be compacted and sprinkled with crushed stone.
- To position the trays evenly, pegs are driven into the ground and a guide cord is pulled.
- In advance, you need to make holes in the drainage elements where the pipes leading to the sewer will be connected.
- The trays that will be located at the very end of the system must be secured at the ends with plugs and treated with sealant.
- Next, the concrete mixture is prepared. It must be filled starting from the places where the sand traps are installed. After pouring, the concrete is leveled with a trowel.
- After this, a sand trap is installed in place and fixed on the sides with a concrete mixture.
- Trays are laid out level on the concrete mixture, fixing the joints with sealant.
- When using plastic trays, they may become deformed. Therefore, they are usually installed immediately with grilles, which are covered with film for protection.
- When these elements are installed, they are fixed on the sides with concrete mortar.
- The gratings above the trays should be 3-5 cm below the surface.
- If the surface should be made of paving stones, then this material is laid out. And if there should only be soil, then it can be returned to its place only 2-3 days after the completion of the main work.
Then the performance of the drainage system is tested experimentally. Since the load of the elements is important for garage drainage, it can only be checked 10 days after completion of the entire work package.
Source
Design diagram
When installing a garage drain, you need to take into account the following features of this procedure:
- According to the construction rules, the septic tank must be located at a distance of more than 5 meters from the garage. Otherwise, unpleasant odors will enter the garage;
- a typical internal sewerage system has hydraulic seals that prevent odors from the sewerage from entering the garage;
- the drain must have a radius of at least 5.5 centimeters. The radius of the pipes is 2-2.5 centimeters;
- tubular products can be either smooth or corrugated. The main thing is that they are resistant to chemicals;
- You can prevent the occurrence of dampness coming from the floor and the spread of odors by installing a ventilation system.
How to make a sewer in a garage - briefly about the stages
Heating system in the garage
Before constructing a pipe system, you need to decide on the location of the septic tank into which the wastewater will be drained. After the planning stage, you will only need to dig a hole and compact it with a layer of sand. This will give stability to the septic tank, which in the future will be installed strictly vertically with an extension towards the receiver towards the garage.
The next step will be to set the required slope and secure the insulated sewer pipe. At the same stage, the installation of the drainage system takes place. To do this, experts advise using standard models of plastic drains, which are compact in size and will cost you very little.
Attention! If you want to ensure reliable drainage in your garage, then buy plastic pipes and a septic tank from proven companies. Buying used options or second-hand pipes will later result in leaks and the replacement of all components of the sewerage system.
After arranging the external components of the system, you can proceed to the installation of internal sewerage. Let's look at it in more detail.
Do-it-yourself internal sewage system in the garage
It all starts with the standard installation of sewer pipes into the garage. Pipe systems with a smaller diameter than the outside are used here. In addition, they must additionally be equipped with hydraulic valves.
Most often, plumbers use pipe diameters in the range of 40–50 mm, and the outlet hole should be at least 110 mm. At the same time, in the store you can choose any types of pipes - both corrugated options and smooth samples are suitable. After connecting all the pipes inside the room using clamps, they are attached to the external drainage system.
Step-by-step installation process
The drain system installation algorithm is as follows:
- Opening the floors.
- Digging a trench in which the pipe will be placed. The depth should be 40-50 centimeters. The slope is 3 millimeters per meter.
- Laying a cushion of crushed stone at the bottom of the trench. It is recommended to use pebble crushed stone in a fraction of 0.5 to 2 centimeters.
- Laying geotextile fabric on a crushed stone bed. The installed pipe will be wrapped in this fabric.
- Installation of pipe in a trench. The pipe must be led through a trench to the septic tank. The beginning of the pipe (drain hole) is in the middle of the garage.
- Filling the pipe with sand (the trench must be completely filled).
The liquid that enters the pipe will go into the septic tank. Now you know how to make a drainage system in a garage.
How to get rid of water in the garage
Advice: Before determining a method for organizing water drainage from the garage, you should understand the reasons for its penetration into the room.
There are several technologies for draining water from a building:
- The foundation is dug out completely, to the entire depth. A drainage system is installed around the garage and water is drained outside the site.
- The drainage system can be installed inside the garage . In this case, technological gutters are cut down along the entire perimeter, and all moisture will flow into one well located in the garage. The floor must be made of a special drainage coating that has a layer of air, and a drainage pump must be installed to pump water from the garage into the well.
Advice: This is a fairly complex technology that requires the help of specialists.
- If water begins to appear in the garage, you can use injection waterproofing technology (see Waterproofing a garage and the correct approach to doing the work). To do this, holes are drilled along the entire perimeter between the floor and the wall in increments of approximately 20 centimeters, into which special packers are inserted. Through them, waterproofing substances - resin or gel - are pumped under high pressure by pumps. Their hydroactive components, when interacting with moisture, increase in size up to thirty times and fill existing seams, cracks and voids.
- If there is condensation in the garage, you additionally need to cover the walls with liquid rubber - two- or three-component. This can be done manually or with a spray pump, which will allow the waterproofing membrane to be applied more evenly. In this case, it is necessary that the surface of the walls is dry.
How to arrange external wall drainage
With this method, groundwater is redirected into continental sands.
Advice: The external drainage system should be installed at the same time as the construction of the garage begins, which will avoid troubles in the future.
When arranging water drainage it is necessary:
- Dig a trench around the perimeter of the garage, going 40 centimeters below its floor. The width of the trench is approximately 40 centimeters.
- In increments of two meters, holes are made in the trench to the sand level. The depth of such devices depends on the depth of the garage.
- Drainage plastic pipes are installed in the wells, which must first be wrapped in geotextiles.
- All openings must be covered with a fine grating made of galvanized steel, which will prevent soil and stones from falling into the drainage pipes.
- Geotextiles are laid at the bottom of the dug trenches. This will prevent the drainage ditch from silting up.
- Crushed stone or gravel is poured into the trench.
- The upper edges of the geotextile are folded over.
Septic tank in the garage: which one to choose and how to properly organize the drainage?
Details Published 02/15/2021
Many people put a sofa there, find a place for a table, and also equip it with a sewer system and install a toilet and even a shower!
But it’s unlikely that you will be comfortable if the water from the shower is drained haphazardly, and instead of the usual toilet you put a dry closet in the garage.
How to properly organize a sewer system in a garage, is it possible to install it in the basement of the garage, and is it worth doing it yourself? We will describe it in detail in this article!
Making a car wash with your own hands
Washing in the garage
To make a car wash in your garage, just follow these simple tips:
- first you need to prepare a septic tank, for which a hole for a container is dug about five meters from the room, and it is installed on a sand bed;
- a sewer pipe is installed at a slope from the garage to the tank, which must be insulated;
- Then the drain itself is arranged. To do this, you can use a variety of options. The first is the use of ready-made plastic drains, which are relatively compact, measuring 300x300x300 mm. This drain is perfect for a one-car garage, it is easy to install, and its cost is low. The second option is used for a large two-car garage. To do this, a stainless steel box is installed, which has a thickness of 0.8 mm. The depth of the box should be 600 mm, length – 810 mm, width – 390 mm. Holes for pipe outlets are made in the side walls of such a box.
This drain is perfect even if you need to wash cars and garage floors almost every day, but you need to correctly calculate the capacity for a septic tank of the required volume. This determines how quickly the septic tank fills; services will be needed to pump it out. Return to content