During the construction of a house, there is no way to do without installing a ceiling. This design limits the height of the room, insulates it from the penetration of cold air in winter, and takes on loads from the roof or upper floor. In modern technologies, a slab reinforced with reinforcement is most often used.
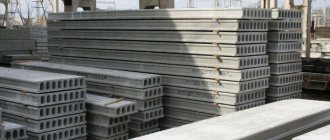
Types of floors
Depending on the location, attics are distinguished, which separate the living space and the roof.
Creating thermal protection is their main task. Another type of ceiling - interfloor - serves to separate residential floors from one another and provides sound insulation. And the basement, the third type, is an intermediate link between the floors and the basement. In addition, another classification is known, presented in the table. Types of floors
| Titles | Application | Appearance |
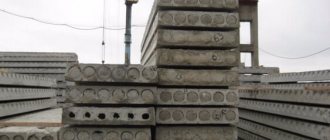
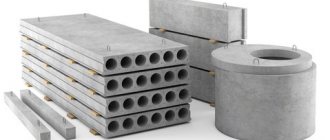
| Ribbed | Cellars | Vertical ribs in 1-2 directions |
| Attic spaces | ||
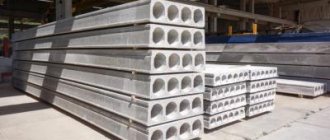
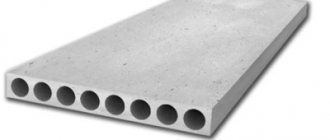
| Hollow | Interfloor ceiling | Round and oval voids |
| Monolithic | High-rise buildings and buildings | Reinforced concrete complete covering |
Advantages and disadvantages
Installation of such a structure is simple, but it requires the use of equipment.
Among the positive aspects of using such concrete structures are:
- affordability;
- resistance to destruction and fire;
- long service life;
- thermal insulation;
- low sound conductivity parameters;
- easy installation.
Flaws:
- Availability of stationary sizes.
- Installation and transportation require the use of special equipment and transport.
Characteristics
The technical and operational indicators that are prescribed in GOST 23009–2016 include:
Such structures have clearly defined dimensions.
- design load bearing capacity;
- geometric exact dimensions;
- concrete grade;
- seismic resistance value;
- indicators of resistance to aggressive environments.
View "GOST 23009-2016" or
Technology of reinforcement of monolithic floors
After collecting the reinforcing mesh, the formwork is installed at a distance of two centimeters from the side ends and longitudinal reinforcement. The latter must be intact. If you have to use sections, you need to overlap at least 40–50 cm. In areas with increased load, such as areas near the fireplace or columns, it is necessary to strengthen the frame with bent elements or rods, the length of which is 40 cm.
When reinforcing a monolithic slab, it is important to maintain the mobility of joints and connections, but at the same time securely fix them. To do this, instead of welding, tying with clamps and wire is used. It is permissible to resort to welding when using ready-made structures, where the cross-section of the reinforcement bars is at least 10 mm. Such products must be marked with the letter “C”. All connections must be staggered.
How to calculate?
To make a concrete floor with your own hands, you need to know the design parameters. They are based on a comparison of strength and load. All calculations are carried out by designers who use special programs. And the collection of building codes and regulations contains formulas and constant indicators. The general algorithm of actions is as follows:
- Drawing up a drawing to determine general indicators.
- Calculation of the mass of everything that the coating will withstand.
- Divide the total amount by the number of slabs.
The thickness of a standard floor slab is 180-200 mm - the average value specified in regulatory documents.
Pouring concrete
Pouring and concreting a monolithic floor slab is usually carried out using a concrete pump, especially if the slab is located on the second or third floor. You can do it yourself, but the game is not worth the trouble, because you will have to hire assistants, which will “eat up” all the savings.
To compact concrete, use a deep or surface vibrator, but do not forget that excessive vibration can lead to the opposite effect and the concrete will delaminate.
Deep vibrators should be installed in increments not exceeding the radius of its action of one and a half. The time of vibration at each step should ensure compaction of the concrete mixture; one of the signs is the cessation of settling and the release of bubbles.
When performing work, it should be taken into account that when concrete dries quickly, it shrinks and microcracks form. Therefore, after pouring concrete with your own hands, the entire structure should be watered for at least three days.
Diagram of a monolithic reinforced concrete floor.
In winter, it is necessary to order concrete with anti-frost additives, which, although they have a negative effect on the reinforcement, are acceptable if the additive is factory-made. By the way, it influences the time it takes for concrete to gain strength, which should be taken into account when carrying out winter work.
Crushed stone must be added to the concrete, otherwise the strength will be low, the reinforcement must be tied with binding wire, welding the reinforcement will not provide the same strength as a bond. It is not recommended to add gravel; its surface is flat, which will make the adhesion fragile.
The slab monolith must be durable; this requires not only high-quality material, but also adherence to technology. It is not recommended to pour concrete in winter, even taking into account frost-resistant impurities; it is better to carry out all work in the warm season.
Do-it-yourself concrete flooring
How to make formwork?
Necessary construction supplies
| What is necessary | Kinds |
| Materials | Wooden boards 50X50 |
| Thin plywood | |
| Wooden beam | |
| Tools | Hacksaw |
| Hammer | |
| Axe | |
| Level | |
| Level | |
| Nails |
The construction of formwork is the first stage of such work.
Installing the plywood on supports placed in a horizontal position is key to this process. Based on the area and volume of the floor, materials are used. The strength of the formwork must be high, so calculations are made taking into account long-term floor loads. Construction includes the following actions:
- Making a frame from beams and support posts.
- Laying boards on top or plywood.
- Laying a brick side on the outer side of the formwork.
- Covering the surface with plastic film.
Rules for correct installation of formwork:
- prevent cracking when pouring concrete;
- check the strength of the installation of jacks located under the formwork;
- use moisture-resistant plywood;
- install formwork not only around the area, but also around the perimeter of the building.
Reinforcement
This design will help make the plate more wear-resistant.
This process is needed to add rigidity to the structure. For this you need:
- iron rod;
- fine mesh;
- old iron pipes.
In order to make 2 layers of reinforcement, the first mesh is laid on the lower part, the second on the upper. Knitting wire will help tie solid reinforcement into a mesh. The ends of the rods are secured to the supporting beams. Having installed the intermediate clamps in a checkerboard pattern, install the end ones. They serve as assistants for maintaining distance.
Technology of pouring structures
To do this, take sand, crushed stone, cement in proportions 2:1:1. Using a concrete mixer, stir, adding water until the consistency of liquid sour cream. Pour the solution into the formwork with slow movements. And in order to prevent distortions, a vibrator is used, uniformly filling the formwork with the mixture. It takes several days for the concrete to set. And only after drying is the final filling done.
DIY floor slab
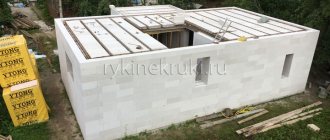
Hello dear homemade people. In this article we will make a monolithic floor slab between the first and second floors of our future cottage. The feasibility of such an overlap arises when the first floor, or the entire cottage, is made of stone, and the size of the overlapped areas is not standard.
Such a slab can also become the only possible solution in cases where it is impossible to fit a truck crane to a construction site (as was the case for me), and of course, it provides us with the much-needed opportunity to save money, since the cost of a homemade slab turned out to be significantly lower the cost of floor slabs is lower than the cost of wooden floors, and the quality, with appropriate execution, is much better.
On the issue of quality and reliability. Since the calculation of the slab is unique for each specific case, I will not give it, I will give an example.
The area of my largest covered room is 32.5 m2 (5 x 6.5). The thickness of the slab is 15 ± 2 cm.
I loaded 3 thousand pieces onto this ceiling. red brick, and if at first I tried to stack it closer to the edges, then I unloaded it right in the middle, and in the process of further work, I was forced to move it from the edges to the middle, since I was making a plinth along the perimeter, and the slab withstood this load.
A link to a resource with calculation formulas is in the comments.
Formwork
It is better to make formwork under the slab from the material that you can use in the future for other purposes, since we will try to preserve it in the form that it had before being used in the formwork.
You can, of course, also use laminated plywood, 22 mm thick, which is used in monolithic house construction, but this is already expensive. It will no longer be possible to sell it for the same price upon completion of the work, since part of it will have to be cut, and its use for other purposes is also impractical due to its high cost.
But you can buy used telescopic stands. Unlike plywood, they are then sold very easily, and for the same price as they were purchased.
If you make formwork from boards 150 x 25, then the ceiling will not be perfectly flat, since the edged board has, albeit slightly, a different thickness. These irregularities are easily smoothed out during further finishing, because anyway, the concrete will need to be covered with plaster.
If the ceiling in any room needs to be made smooth, for example in a swimming pool, for mosaic finishing, then you can put 10 mm plywood on the boards, which will definitely find another use later.
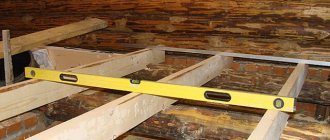
Now, how the formwork is made. The formwork consists of a frame, for which timber 150 x 50 mm is suitable, support posts, and a ceiling (edged board 150 x 25 mm).
The frame is made along the perimeter of the room, reinforced with transverse bars located at a distance of 60 - 80 cm from each other, and supported level by support posts.
Then the boards are laid on the frame, simply laid on, but not fastened, otherwise, after pouring the slab, there will be great difficulties in dismantling the formwork.
You can also put 8-10 cm thick plywood on the boards, then the ceiling in the room will be smooth.
But so that the formwork material can be used in the future for other purposes, before reinforcement and pouring concrete, it must be covered with one layer of plastic film, with an overlap of about 20 cm.
Only the formwork boards are covered with film. The end of the wall on which the slab will rest remains uncovered.
Yes, I almost forgot, before covering the formwork with film, along the outer edge of the wall, a side of half a brick is made from two rows, that is, the height of the side should correspond to the thickness of the slab - about 15 cm. On the inside, the side can be insulated with penoplex, or polystyrene foam, so that the stove does not freeze in severe frosts.
This side will be the outer part of the formwork.
Reinforcement, reinforcement bundle
After the side is ready and the formwork is covered with film, you can begin reinforcing. At first I used the technology that is used in monolithic housing construction. That is, I knitted a lattice 20 x 20 cm, then placed a bench element on it, and knitted the second row of lattice on it.
The main difficulty lies in making the bench. It turned out to be almost impossible to do it without a stationary pipe bender. And even using a pipe bender, making a bench 7 cm high turned out to be very difficult.
In monolithic housing construction, benches with a height of 12 cm are used, and the thickness of the slab is 20 cm. But there are completely different loads and different areas. A standard floor slab is 15 cm thick, and for a private two-story house, this is quite enough.
Therefore, we will do the reinforcement of the slab a little differently. First, a lattice 40 x 40 cm is made. Then a second lattice of the same size is made on it, which is attached to the first, offset by 20 cm.
The result is a lattice 20 x 20 cm, made of four rows of reinforcement d 10. I wrote about the load that such a slab can withstand a little higher. The lattice must be raised above the formwork so that it then appears in the mass of concrete. To do this, you can use pieces of chipped tiles.
Now, how to knit the reinforcement. You can knit it with a special crochet hook, but this will require some skill. When working as a reinforcer, this is necessary, but for reinforcing the volume of one private house, I think it is unnecessary.
In addition, the speed of crocheting is not much higher than that of the method I want to propose, and even after crocheting, you still have to tighten the twists.
The method is this: we take a small coil of knitting wire and cut it into four parts with a grinder, having previously secured them with tape.
Then we bend each part in half, and with the resulting double wires we tie the reinforcement. Then we go over the entire grid with pliers and tighten the twists.
Fill
After this, you can fill the formwork with concrete. It is advisable to do this in one step, so you need to invite enough assistants for this operation, or make a crane like mine. Using it and a concrete mixer, the three of us poured a 32.5 m2 slab in one day.
To make the slab stronger, during the pouring process, you need to vibrate the poured concrete from time to time. An ordinary hammer drill can act as a vibrator. We insert a broken drill bit d 14 - 18 into it, and resting it from below against the formwork frame, we work in the bumper mode.
After the slab is poured, it should immediately be covered with film and left there for several days. This will protect the concrete from drying out and cracking.
Once again, I want to draw attention to the fact that after manufacturing the slab, the formwork will have to be disassembled, and not broken, so when installing it, think about whether you can then disassemble this or that fastening from the outside without breaking the material.
Approximate drying times for concrete:
Three days at 20° C - 30% brand strength.
14 days - 60-80% brand strength.
28 days) - 100% brand strength.
90 days) - 120% brand strength.
More detailed information taking into account external factors (frost, heat, etc.) can be found in reference literature.
I’ll tell you how to accurately determine whether the concrete has dried or not. You need to throw a piece of roofing felt on it in the evening, and in the morning see whether a dark spot has formed under it or not.
If there is a stain, it means the concrete has not dried yet.
The proportions of concrete, and recommendations for its production and use can be found in the article Proportions of cement mortars in shovels and buckets.
If the article does not answer your question, ask it in the comments. I will try to answer as quickly as possible.
I wish you success in your work.
Section Construction >>>Subsection Walls and Floors >>>
Come on, what else is interesting?
Pile-strip foundation Walls made of expanded clay concrete How to lay brickwork Blind area