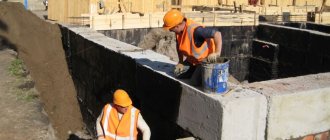
What is a pile-screw foundation?
According to the structural design, a screw pile is an iron pipe that is hollow inside, at the lower cone-shaped end of which drill blades are welded for screwing it into the ground. After immersion in the ground, these support pillars are connected by a grillage or the lower rows of the log house. As a result, each of the supports takes on part of the load from the building, distributing it across the entire pile field.
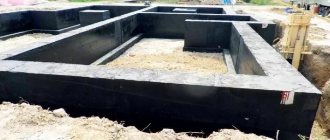
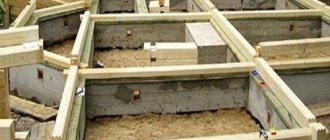
This is what the base looks like
We recommend:
Any work on the foundation of a house from the company GLAV-SVAI
Calls within Russia are free: 8 (800) 70-70-988
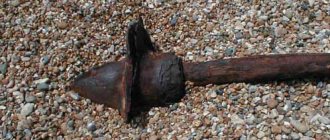
The blade at the end of the tip from below, on one side, simplifies screwing the pipe into dense soil layers, and on the other, plays the role of a holding anchor. In some cases, if necessary, such a support is simply unscrewed from the ground and used in a new location for a new pile foundation. The main thing is that it does not rust by this time, being in the ground.
Determining the length of the pile
On stable soils, it is enough to screw in the piles to a length of 2.5 m.
The length of the supports used to construct a screw foundation will depend on the soil, the depth of its freezing and the level of the grillage.
If there is stable soil on the site, it will be enough to install supports 2.5 m long. On complex terrain with differences in height, structural elements of various lengths will be needed, depending on the height of the terrain.
On unstable soil, the support should be of such length that it reaches stable, compact soil. Its location is determined by test drilling.
You need to screw in the screw structure to the depth where sand and clay lie. Stable soil will ensure that the load-bearing element is firmly anchored in the soil. The presence of a dense fraction is determined by the particles remaining on the blades.
After this, the depth of the formation is measured. Lower a pebble into the well on a rope until it touches the bottom. Make a mark on the string, lift it and measure the length.
In seismically active areas, the length of the well must be at least 4 m. Supports are purchased half a meter longer than the design ones. It is better to cut off the excess later than during the drilling process it turns out that the length of the pile is not enough.
Types of screw foundation
According to the configuration and purpose of the blades there are:
- Broad-bladed - a typical version with one blade in 1–1.5 strokes.
- Multi-blade - with several blades.
- Narrow bladed - with a tip in the form of a screw for 5–8 turns of the screw.
Various types depending on soil
The first option is intended for light buildings and stable soils. The second type of screw piles is used when it is necessary to improve the load-bearing capacity of a support with compensation for its vertical movements, as well as for tall and heavy cottages with a total weight of 2-3 floors.
The third type is for foundations on soils with an abundance of stones. For permafrost conditions, it is also recommended to take a narrow-bladed analogue, only it does not have a pointed end, but an open cut with teeth along the perimeter.
The pile tip can be cast (VSL) or welded (SWS). The first one costs more. However, it is more durable and able to withstand greater loads than its welded counterpart. If the soil at the construction site is dense or the foundation needs to be made for a large house, then it is better to spend money and get one with a cast tip.
How to place piles
The method of placing screw piles and to what depth they should be screwed depends on the type of soil and the weight of the structure being built. The foundation on screw piles is very stable and can withstand heavy loads. One screw pile 250 cm long with a diameter of 10.8 cm can withstand a load of up to 5 tons.
At what distance should the piles be placed from each other?
Distance between piles
The optimal distance between installations is 1.7 m. The exception is those places where the load will be increased. For example, a column and a furnace.
It is necessary to ensure that there is a distance of at least half a meter between any two piles. If the top layer of soil is weak, then the distance can be 1.2–1.5 m.
The maximum distance for standard small houses depends on the building material:
- If a frame house is being built, the distance between devices can reach three meters.
- If aerated concrete is used, the distance can be reduced to 2.5 m.
- If we build from brick, then we place the piles at a distance of no more than two meters.
Weights of structural parts
By calculating the total weight of the future structure, you can correctly calculate the placement of screw piles. Typical weight values for different design devices are:
- frame-panel walls up to 15 cm thick (20-30 kg/sq. m), log walls - 600 kg/cu.m. meters, aerated concrete - 400–900 kg/cu.m. m, brick - 600–1200 kg/cubic. m depending on the type of brick.
- sheet steel roof - 20–30 kg/cu.m. m, roofing felt – 30–50 kg/sq.m, slate – 60–80 kg/sq.m. m;
- wooden floor with insulation with a density of 200 kg/cu.m. m – 70–100 kg/sq. m, basement on wooden beams with the same insulation - 100–150 kg/sq. m, monolithic reinforced concrete – 500 kg/sq. m, from hollow slabs - 350 kg/sq. m.
For the calculation, the total area of the building is taken.
Pros and cons of foundations on piles
Among the advantages of using such a base are:
- Durability and high load-bearing capacity - such piles can withstand seasonal heaving without problems and last 50–80 years;
- Cost-effective – costs 20–30% cheaper than other options;
- Lack of construction waste and large volumes of earth excavation;
- High speed of construction - two to three days are enough for self-installation of a foundation from screw piles;
- Possibility of creation on almost any type of soil;
- Ease of implementation - it is much more difficult to make a slab or strip foundation with your own hands;
- A large number of modifications of tips and heads;
- Possibility of reuse;
- There is no seasonality of work as such - screw supports can be screwed in even in winter, as long as the soil allows it.
It is not recommended to install it only in swampy, flooded areas, where excess moisture will lead to rapid thinning of the trunk walls. In other cases, this is simply an ideal choice.
There are also disadvantages to a screw foundation, but they are much fewer and are worth mentioning only:
- Impossibility of arrangement below the floor of the basement or basement;
- Additional costs for insulating the house from below.
Considering the pros and cons, it is clearly clear that the advantages greatly outweigh the disadvantages. However, there is one big “BUT”.
Electromechanical corrosion
The screw support must be manufactured in accordance with standards and from high-quality steel. And after that, it must also be checked by the quality control department using ultrasound or x-ray. The main problems for developers who have opted for a pile-screw foundation usually arise precisely because of defective materials.
Do-it-yourself pile installation
Installation of piles in a small area can be carried out without the use of special equipment. A team of several people will be able to cope with this task within a few days. The tools you will need are a screw structure consisting of a pipe (its diameter must exceed the diameter of the support itself).
The pipe should be modified: make several holes for a reliable connection with the support and 2 eyes (levers will be installed in them). If it is necessary to install long pipes (up to 400 cm), the presence of several people will be required. One of them should periodically check the level of the support. The easiest way is to make a pile roll with your own hands according to the drawings.
Tools. Installation equipment
To install the supports manually, you will need the following tools:
- levers (thick-walled pipes, 250 cm long and 5 cm in diameter);
- sledgehammer, hammer, jig, shovel, crowbar;
- building level and tape measure;
- reinforcing bars (can be replaced with wooden stakes);
- marker or chalk for marking;
- Bulgarian.
Manual labor can be replaced by the use of equipment for driving piles:
- Hydraulic rotator. This device is necessary for installing supports with a diameter of 80 mm or more.
- A design that allows you to tighten the piles with a drill and a gearbox with a wrench (some resort to tightening the piles with a meat grinder).
Installation technology
First of all, install the corner supports. To do this, make a small pit (the depth should be 50-70 cm). A support is installed in this hole and they begin to screw it. A device for screwing piles can make the task easier. To make it, a crowbar is inserted into the technical hole of the support. After this, pipes of suitable diameter are put on both sides.
How to tighten screw piles using a motor drill. Types of motor drills used
When installing piles with your own hands (in the case of a large pipe diameter), it is faster and easier to carry out the work using a motor drill. There are several varieties of these instruments. The difference lies in the type of motor and power of the device:
- Mechanized, with engine power up to 3.5 l/s. Their weight reaches 11 kg, so 1 person can work with it. The disadvantage is that it is recommended to use such devices only for drilling soil of categories 1 and 2.
- Mechanical, in which the engine has a power of 3.5-7 l/s. Their weight is about 30 kg, so the presence of several people is required. Such motor drills are also used for soil categories 1 and 2.
- Two-block. This pile drill consists of a drilling part and a motor. They are more powerful, so they are suitable for category 3 soil. In addition, thanks to its convenient design, you can operate such a drill alone.
Machine for driving screw piles Iron-219
To install supports for foundations, specialized installations for driving piles are often used, including Iron 219. The main task of this device is to drive piles.
If the work is carried out by the operator and workers, the device can install supports with a diameter of up to 133 mm. Piles with larger diameters will require securing to a vehicle.
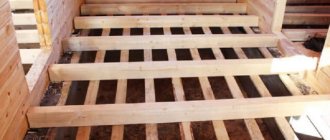
Installation of a pile-screw foundation
The technology for arranging a foundation with your own hands from screw piles is as follows:
- A test screwing is carried out to determine the strength of the soil.
- Calculations are carried out with the preparation of a support placement plan.
- The site is marked.
- The installation of support piles is carried out, followed by cutting them to the level.
- Concrete is poured inside the support.
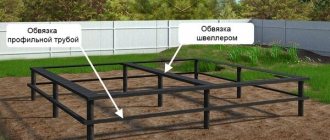
- The created pile field is tied.
For each type and modification of a screw-shaped pile, its load-bearing capacity is indicated in the passport. Here, both the size and configuration of the blades, as well as the wall thickness and barrel length, play a role. Depending on the groundwater level, freezing depth and soil composition, the pile field placement plan is calculated in each case separately.
When designing, it is also necessary to take into account the mass of the entire future structure, under which the foundation is built on screw piles. Moreover, the calculation should include the weight of not only walls and ceilings, but also roofing and loads from snow and wind. After all, ondulin or membrane roofing obviously weighs less than slate or tiles. And all this must be foreseen in advance.
It is best to entrust the project preparation stage to a specialist. If you plan to make a screw foundation with your own hands, then calculations should be carried out on the basis of SP 24.13330. Or you will have to install more supports with a reserve, increasing the construction cost.
Download
Step-by-step photo instructions
Marking the first foundation support according to site landmarks
There shouldn't be any difficulties with marking. You just need to mark the places for supports on the site in accordance with the project. The main thing during construction is the strict verticality of the pillars screwed into the ground.
We dig a “pit” 20-30 cm deep for the first support
Insert into the pit
Tighten using special levers (steel pipes)
To simplify the positioning of pile supports when they are immersed in the ground, you can use a drill or shovel to dig a small pit half a meter deep. Next, the supports are screwed into the soil using a crowbar, a powerful electric drill with a gearbox, or automotive special equipment that acts as a lever. This is done in increments of 1–3 meters.
It is recommended to involve a third assistant when screwing, who will adjust the vertical position during the process.
When the pile stands strong enough, hang a magnetic level and adjust the last part of the screwing according to the level - level it with weight
If it becomes difficult to screw, then we invite helpers
The first one is screwed exactly to the level
We mark the second one - the corner one on the same side from the first one
We dig a pit, install a second support, level it and check the distance from the first
If it is necessary to move the pile, then we tilt it in the opposite direction, make 2 turns and measure again
When installing and screwing them in, it is extremely important to ensure that the supports do not move to the side. This immediately reduces the ability of the pillar to withstand the design loads. It is better to unscrew such piles and do everything again. At the same time, placing them again in the same place is strictly prohibited. It will be necessary to move this “screw” a little to the side.
When the support is at the required distance, we tighten it in the same way as the first one.
We mark the third pile with 2 dimensions: the width of the wall and the diagonal of the house
Similarly, by tilting we adjust the distance between the pillars
After maintaining the distances, tighten the third
Similarly, mark and twist the fourth, observing the diagonal and side dimensions
We stretch the twine along the entire perimeter and mark the intermediate supports with a marker on the twine.
We install each support in the pits according to the marks and level and compact it with earth
We tighten the pile and follow the level and string marks
After twisting all the pillars, we mark the same marks with a hydraulic level
Using a grinder we cut all the supports to the level
Fill the pile with cement-sand mortar to a level of 10 cm to the end
The remaining part is filled with ready-made dry cement-sand mixture.
We put on and weld the heads, clean and paint the seams against corrosion
After the piles are installed in place, they are cut at the desired level from the ground. Then it is recommended to fill these supports, which make up the considered version of the foundation, with concrete from the inside. This allows you to protect the metal from corrosion and additionally strengthens the entire pile screw field.
A head in the form of a square steel plate measuring about 25 x 25 cm is welded on top of each installed post. And finally, all welds are treated with protective compounds. Then on this pile foundation you can lay a grillage or immediately the crowns of the log house.
To prevent the wind from blowing under the house and cooling it down, the pillars must be covered with external cladding along the entire perimeter of the building. Corrugated sheeting or metal tiles are perfect for this. But you can also use facing bricks. Everything is at the choice of the cottage owner.
Selection of pile parameters
When choosing screw piles you need to consider everything:
- Dimensions and material of construction.
- Load on the foundation.
- The pile must be made with high quality and using quality materials.
- Anti-corrosion treatment is required.
- The tip and blade must be securely welded to the barrel (pipe).
- The minimum pipe wall thickness is at least 3.5 mm. Typically, a maximum thickness of 5 mm applies.
The length of the pile depends on the following factors:
- Type of soil.
- Freezing depths.
- Solid formation level.
The pipe for piles can be either seamless or with a seam. The first ones are noticeably more expensive.
The diameter of the pile is selected based on the load to which it will be subjected. The most popular piles are 57-133 mm. When building a foundation for a small frame house, as a rule, a diameter of 89 mm is used. The bearing capacity of such piles is 4000-5000 kg.
Large two-story houses are placed on 108 mm piles, the bearing capacity of which is 5000-9000 kg. with a pile weight of 30 kg. (2.5 meters).
If the building site is uneven, the piles are combined - the diameter and length may be different.
Correct selection of piles is the key to the reliability, stability and durability of the foundation. To do this, it is necessary to take into account all the listed parameters.
Pile material
Equally important is the correct selection of pile material - it is determined during design, taking into account the expected load. For this purpose, data obtained from studying the anti-corrosion activity of soil layers is used.
Based on this, the thickness of the metal of the support blades is selected.
Blades made of metal up to 5 mm. are used exclusively for light buildings. If it is massive, then the blade should be no thinner than 6 mm.
After the above studies have been carried out, you need to select the grade of steel for the products being manufactured. It directly depends on the chemical aggressiveness of the soil:
- Weak. It is enough to use steel St. 3.
- Average. More expensive steel will do here - St. 20.
- Strong. 09G2S and 30XMA are suitable here.
Anti-corrosion coating
Considering that the supports will be located in a humid, aggressive environment (soil), you need to take care of the anti-corrosion protection of the metal. Moreover, this coating should not be damaged when screwing them.
The compositions may be different - it all depends on the budget of the owner of the future home.
The simplest method is to coat the metal with two layers of anti-rust primer, which is done in two layers, drying after each according to the attached instructions. You can use, for example, ship paint.
After the support is already screwed in, concrete must be poured inside it. This gives the following:
- Reduces corrosion - there will be no condensation inside the barrel.
- It makes both the pile itself and the entire pile structure stronger.
After all the piles are leveled by cutting with a grinder, you can weld the heads - the upper ends of the supports.
Application of foundations on screw piles
To build a screw foundation made of iron piles, a team of 5–7 people often needs one day. In this case, there is no need to wait for the concrete to settle or set. Such a foundation is completely ready for further construction of the building. This strip or monolithic slab foundation must be maintained for at least 20–30 days. With screw supports, the stage of installing supports for the house takes much less time.
House made of SIP panels