How to connect a heating cable.
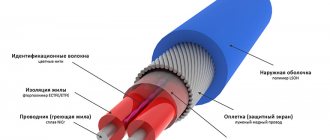
Let's consider connecting a heating self-regulating cable (with a grounding screen) with a special set of couplings for connection.
In short, to connect the heating cable you need to do 2 things:
- Seal the end of the self-regulating cable by properly cutting and preparing it,
- Connect the beginning of the heating cable to the power wire and seal the connection.
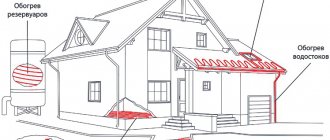
When purchasing a heating cable for roofing and gutters , and connecting it yourself, please note: before shrinking the end sleeves, you should sand and degrease the insulation under them. This will increase the adhesion of the adhesive layer, and consequently the reliability of the seal of the coupling.
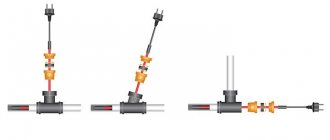
About the cable inside the pipe: connecting the heating cable inside the pipe.
Video for 30 minutes and below a series of photographs with explanations:
Go:
Initial data: we have a self-regulating heating cable, a connection kit, a factory cold tail (cord with plug).
We use tools (from left to right): a tool for removing insulation from a power wire, pliers with narrow noses, regular pliers, side cutters, a construction knife, crimpers, a construction hair dryer.
Cut the outer insulation. Be careful not to cut through the braid. All sizes: what length to cut, how much to cut, are indicated in the instructions for the connection kit.
Removing the outer insulation:
Unravel the heating cable braid. It’s more convenient to do this with an awl:
We twist the braid into one core, it will be needed to connect the grounding of the heating cable:
We cut the inner insulation, approximately 2 cm away from the outer insulation:
Removing the internal insulation:
Next, we separate (cut through) the heating self-regulating matrix flush with the internal insulation:
We separate it qualitatively so that the matrix is easily pulled together, but carefully so as not to damage the conductive wires:
We heat up the self-regulating heating matrix with a hair dryer. Be careful not to melt the edge of the internal insulation of the heating cable:
Use pliers to pull the heated matrix from the conductive cores:
The matrix should tighten easily. If this fails, you should heat it until it shrinks easily.
We put connecting sleeves on the ends of the conductive wires and crimp them with special crimpers.
It happens that there is no special crimping tool for connecting a self-regulating cable. Then, it is sometimes used as pliers with a cutting part, the cutting edges of which are blunted and filed with a file until a small gap is formed.
Select the appropriate heat-shrinkable tubes from the kit:
We put two heat-shrinkable tubes on the conductive cores; they should reach approximately to the middle of the sleeves:
We cover the adhesive heat-shrinkable tubes with a hair dryer and let it cool:
Glue should appear along the edges of the heat shrink. Prepare the following heat shrink:
We put it on the heating cable up to the braid and outer insulation so that it covers the place from which the cores come out:
We line it with a hairdryer and pinch the middle with narrow-nosed pliers. Let it cool:
With this connection of the heating cable, the current-carrying conductors are isolated from each other at the connection point:
We put the external coupling on either the heating cable or the power cable in advance:
We make the grounding end of the power wire longer; it can be cut in place in the future:
We put the appropriate heat shrinks on the insulated cores of the power cable:
We connect the current-carrying conductors of the heating cable and the insulated conductors of the power cable - we crimp the sleeves with crimpers:
We move the heat shrink to approximately the middle of the sleeves:
And we also heat them for casing:
We heat it carefully so as not to overheat, but also enough for the adhesive sublayer to become active - this can be seen by the release of glue from the ends, let it cool:
Thanks to the adhesive sublayer, the connection of current-carrying conductors is completely sealed:
We cut the ground wire to the length we need and crimp the connecting sleeve onto it:
We cut the braid to approximately the middle of the sleeve:
We put 60 mm heat shrink on the ground wire:
And connect the braided heating cable harness to the ground wire:
We push the heat-shrinkable tube all the way and encase it with a construction hairdryer. Here you should be careful when heating so as not to overheat the pre-made V-shaped connection:
The connection is almost ready:
We slide the external adhesive heat-shrink sleeve onto the connection:
We position the coupling so that the connection itself is in the middle, and on both sides the coupling would go to both the heating cable and the power cable:
We plant, heating with a hair dryer:
It is important to heat from the middle to the edges to avoid air bubbles, and not to overheat the middle with the connection already made:
Let it cool, and the connection of the heating cable to the power wire is ready:
A protruding adhesive sublayer is visible along the edge of the coupling:
Now you need to cut and seal the end of the connected heating cable. To do this, we use the two remaining adhesive couplings 50 mm and 100 mm:
Cutting the outer insulation:
Removing the outer insulation:
Unraveling the braid:
And cut the braid:
We make a V-shaped cutout at the end of the heating cable:
We put adhesive heat shrink on the internal insulation:
Heat it up and pinch the tip with pliers:
Let it cool, cut off the excess and try how far to push the outer coupling:
We put on the outer coupling, heat it and clamp the end with pliers:
Let it cool and observe the protruding sealing adhesive sublayer:
The heating cable connection is complete:
You can view and buy the cable here:
Subscribe to the newsletter
Heating cable is one of the most technological innovations. It is widely used in everyday life, agricultural and industrial applications. The popularity of this cable is due to the fact that it is the best alternative to gas and water heating systems. The heating cable is more economical and safer. It can be turned on in a specific room only at the moment when heating is required. But is it possible to connect heating cables together? Yes! We'll look at how to do this below.
How to connect 2 pieces of self-regulating heating cable?
Two heating cables can be connected to each other.
The main thing is to make this connection correctly. Only in this case will the system you are setting up work for a long time and without interruptions. To connect 2 pieces of self-regulating heating cable, you need to perform the following steps:
1. Cut the outer and then the inner insulation of the cable and remove it. 2. Heat the semiconductor core with a hairdryer and remove it to expose the conductive wires. 3. With another heating cable, perform the same actions as described in points 1 and 2. 4. Connect the wires by soldering or crimping. 5. Use heat shrink tubing to insulate the twist.
How to connect 2 pieces of resistive heating cable?
To connect 2 pieces of resistance heating cable, do the following:
1. Remove the protective sheath from a small section of the cable. 2. Fold the braid back over the sheath. 3. Remove the insulation a short distance. 4. With the other cable, do all the actions described in the 1st, 2nd and 3rd paragraphs. 5. Connect the heating wires by soldering or crimping. 6. Use heat shrink tubing to insulate the twist.
How to connect the heating cable and the “cold” end?
To connect the heating cable to the “cold” end, you will need reliable couplings. Proceed in the following order:
1. Cut the outer insulation of the heating cable and remove it. It is important not to damage the braid. 2. Straighten the cable braid and twist it into a “tail” (it will be needed to ground the heating cable). 3. Cut the inner insulation of the heating cable and remove it. The black semiconductor core must be completely exposed. 4. Heat the core with a hairdryer and remove it with pliers to expose the conductive wires. 5. Place connecting sleeves on the ends of the cores and crimp them with a special crimper. 6. Place heat shrink tubing onto the cores. 7. Set the tubes with a hairdryer and wait until they cool down. 8. Place the connector on either the cold end or the heating cable. 9. Make the grounding end of the power cable longer (in the future it can be cut off). 10. Place appropriate heat shrinks on the insulated cores of the power cable. 11. Connect the conductive cores of the heating cable and the insulated cores of the “cold” end - crimp the sleeves with crimpers. 12. Move the heat shrinks and heat them to casing. 13. Cut the ground wire to the length you need and crimp the connecting sleeve onto it. 14. Cut the braid to the middle of the sleeve and apply heat shrink to the ground wire. 15. Connect the braided “tail” of the heating cable to the grounding wire. 16. Move the heat shrink tubing and heat it with a hair dryer. 17. Slide the coupling onto the connection and fit it with a hair dryer. The coupling must fit both the cold end and the heating cable.
Now you know how to connect the heating cable, so you should not have any difficulties in this matter. If for some reason they suddenly appear, seek help from a competent specialist.
During severe winters, homeowners often face the problem of freezing of various pipes - sewer and water pipes. Since it is not always possible to lay pipes below the freezing depth of the soil, more and more often experts advise, and people end up using a heating cable for water supply.
Heating cable connection
Heating cable is one of the most technological innovations. It is widely used in everyday life, agricultural and industrial applications. The popularity of this cable is due to the fact that it is the best alternative to gas and water heating systems. The heating cable is more economical and safer. It can be turned on in a specific room only at the moment when heating is required. But is it possible to connect heating cables together? Yes! We'll look at how to do this below.
How to connect 2 pieces of self-regulating heating cable?
Two heating cables can be connected to each other.
The main thing is to make this connection correctly. Only in this case will the system you are setting up work for a long time and without interruptions. To connect 2 pieces of self-regulating heating cable, you need to perform the following steps:
1. Cut the outer and then the inner insulation of the cable and remove it. 2. Heat the semiconductor core with a hairdryer and remove it to expose the conductive wires. 3. With another heating cable, perform the same actions as described in points 1 and 2. 4. Connect the wires by soldering or crimping. 5. Use heat shrink tubing to insulate the twist.
How to connect 2 pieces of resistive heating cable?
To connect 2 pieces of resistance heating cable, do the following:
1. Peel a small section of the cable from its protective sheath. 2. Fold the braid back over the sheath. 3. Remove the insulation a short distance. 4. With the other cable, do all the actions described in the 1st, 2nd and 3rd paragraphs. 5. Connect the heating wires by soldering or crimping. 6. Use heat shrink tubing to insulate the twist.
How to connect the heating cable and the “cold” end?
To connect the heating cable to the “cold” end, you will need reliable couplings. Proceed in the following order:
1. Cut the outer insulation of the heating cable and remove it. It is important not to damage the braid. 2. Straighten the cable braid and twist it into a “tail” (it will be needed to ground the heating cable). 3. Cut the inner insulation of the heating cable and remove it. The black semiconductor core must be completely exposed. 4. Heat the core with a hairdryer and remove it with pliers to expose the conductive wires. 5. Place connecting sleeves on the ends of the cores and crimp them with a special crimper.
6. Place heat shrink tubing onto the cores. 7. Set the tubes with a hairdryer and wait until they cool down. 8. Place the connector on either the cold end or the heating cable. 9. Make the grounding end of the power cable longer (in the future it can be cut off). 10. Place appropriate heat shrinks on the insulated cores of the power cable. 11. Connect the conductive cores of the heating cable and the insulated cores of the “cold” end - crimp the sleeves with crimpers. 12. Move the heat shrinks and heat them to casing. 13. Cut the ground wire to the length you need and crimp the connecting sleeve onto it. 14. Cut the braid to the middle of the sleeve and apply heat shrink to the ground wire. 15. Connect the braided “tail” of the heating cable to the grounding wire. 16. Move the heat shrink tubing and heat it with a hair dryer. 17. Slide the coupling onto the connection and fit it with a hair dryer. The coupling must fit both the cold end and the heating cable.
