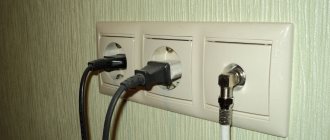
Screwless clamp
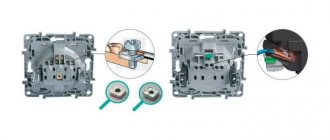
Installation of Legrand Valena sockets is often carried out using terminals: spring-loaded or regular. This is the best option if the wires are made of copper and are not afraid of temperature influences. It is easier to install such models: just place the cable in the terminal, and it will clamp it automatically. There is no need to tighten the wires every six months, so this design is considered more convenient.
Installation Features
A standard socket always comes with three wires:
- Zero
- Phase
- Grounding
All of them are marked accordingly. On the socket itself (on its reverse side) on the terminals you can find stickers, each of which corresponds to a particular wire. It is impossible to confuse them if you pay at least a little attention to this process, and besides, they are always marked with a universal color marking. Accordingly, the wires must be inserted one by one into the correct terminals, not forgetting to first turn off the power. After this, the ends of the wires must be carefully trimmed with wire cutters and then secured with clamps. And don't forget to connect the ground wire in place!
Sometimes connecting wires can be inconvenient, but Legrand sockets have one significant advantage - thanks to the features of their design, you can get to the terminals from any side. Accordingly, the process of connecting wires is much less complicated than when using some cheaper sockets from a nameless manufacturer.
Installation of Legrand TV socket
If you don’t know how to connect a TV outlet, you can turn to professionals, but you can also do it yourself. Legrand products in this regard are practically no different from those of other manufacturers. True, most of them offer to independently cut the cable and connect it inside the socket assembly, but the Legrand TV socket can be connected without cutting the cable. This, however, does not apply to all models, but only to those equipped with automatic terminals. If in doubt, consult the seller before purchasing. At the Electron store, our employees will be happy to help you with your choice, and they will answer all your questions.
Installation of Legrand Valena sockets: we proceed in stages
There is nothing complicated about installation. The main thing is to follow the instructions and be able to use the tool. You need to do this:
- install the mechanism in the undercut box. For this purpose, mounting holes are provided on the device body;
- connect the wires to the terminals. You need to remove the insulation from them in advance;
- secure the socket box. If you plan to install Legrand sockets in a concrete wall, dowels are used. When the base is wooden or plastic, screws will do. If you are working with a metal surface, use self-tapping screws or self-tapping screws. You can prepare the mounting holes using a drill.
- secure the frame and decorative box. The latter is secured with screws in the center of the panel.
Attention: before installing the Legrand Etika socket, turn off the power supply. You can determine whether there is voltage in the network using a special tester or an indicator screwdriver.
Pinout of RJ 45 Legrand socket
But in order to implement such a scheme, you need to connect those ends of the cables that go outside in the room to a special Internet outlet into which a patch cord will be plugged in to connect to the computer. I will tell you using the example of the popular Legrand model, a well-known manufacturer of various small items for repairing indoor wiring. This is how it looks externally when assembled and already installed on the wall.
And here it is - disassembled.
To connect cables to it, you must first remove the braid and disconnect the twisted pairs from each other. At the same time, be careful not to damage the cables; they are very thin and easily break even with a small cut. After this, we take the socket and turn the latch so that the top cover to which this latch is attached is removed.
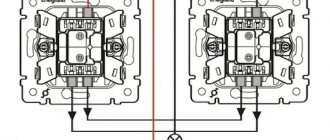
Legrand socket connection diagram (RJ-45)
How to do this is clearly shown in the manufacturer's official diagram. Just before doing this, pay attention to how the colors of the wires are located in relation to the base mount, so that later, when installing it in place, you do not put this box upside down and thereby confuse the cables. In the model I am describing, the blue color is directed towards that part of the base of the rosette that is located on the “elevation”, and the brown color is on the lower part.
After removing the top part, we insert our network cable from the side of the white latch - so that the braid goes inside it to prevent the colored wires from bending. Now let's look carefully at this little gray box. It has special grooves for these cables, and on the outside there are color and numerical designations indicating which wire should be fixed in which color. Confusion for beginners is caused by the fact that in these color designations the manufacturer tried to combine both type “A” and type “B”. Both of these types with color numbering are demonstrated in the instruction picture above. So, it will be easier to navigate by matching the wire numbers marked on the connector with the cell numbers on this box for crimping the socket.
In this case, you need to choose exactly the type with which the opposite ends of the cables with connectors that will be connected to the router were or will be crimped, that is, both ends must have the same crimp type - either A or B.
We decided on the type and after that we arrange the colors according to the numbers on the socket. I would like to point out that there was an error in the official instructions - in the picture, brown and white-brown are reversed in relation to the actual color of the socket.
Next, we take the box with the inserted wires and easily place it on the base of the mount - while remembering that the blue colors look towards the elevation. And we tighten the latch until it clicks - at the same time, sharp contact plates cut through the braid and the wires are connected to the contact cores on the external connector of the socket. It should be noted here that this does not always happen correctly - I had cases when the braid was not cut through and one of the wires did not make contact, as a result of which the connection between the PC and the router did not work.
In order to determine this, you need to “ring” each contact for the passage of an electrical signal between the two ends of the cable. This can be done either using a universal device that is used by all electricians. Or using a special tester for checking Internet connections - I ordered one from China and showed it to you in a video review. In this case, to connect an outlet to the device, use a known working patch code, for example, which came with the router.
Installing a Legrand Etika socket: what else do you need to know?
To ensure successful installation, consider several features:
- The decorative overlay does not fasten on its own. It is held in place by the lid and is needed to hide possible defects in the base;
- When removing insulation, make sure that the metal base is not damaged. Even one accidental cut can cause a vein fracture;
- If you place the mechanism on a tree, do not forget to provide a non-flammable base. The fact is that the plastic structure can melt or catch fire. To prevent this from happening, a sheet of aluminum or asbestos is installed between the electrical installation and the wall.
Installing and connecting an internet outlet
Before connecting, it is necessary to correctly pin out the cable cores. The remaining end of the cable must be connected to a computer outlet. For these purposes, it has an RJ45 connector. Officially it is called 8Р8С, which corresponds to 8 positions and 8 contacts. It is to this that the twisted pair is connected, in which each core is marked with its own color. Based on this, the connection is made.
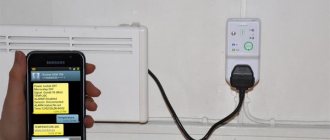
Connecting a computer outlet can be done in accordance with two generally accepted standards - Norma T568A and Norma T568B. They differ from each other in the order of arrangement of the cores in the connected cable. This is clearly visible in the presented figure. Option A is not used often; most connections are made using option B.
After connection, you need to check the signal flow and proceed to the final stage of installation. The finished terminal block with conductors is installed in its place inside the Internet socket, and the remaining wire is neatly laid in the free space in the installation box. The terminal block is securely fixed in the socket with bolts.
At this stage another check is required. A computer is connected to the finished outlet, which should detect the presence of the Internet or local network. If there is no such connection, it is necessary to check the correct location of the wires and the quality of the terminal block crimping. Just one weak core is enough and there will be no connection.
At the end of the test, all excess wires should be trimmed and the cover plate should be installed in its place. It has several plastic latches for fixation. The cover is applied to the socket, after which you need to press it until it clicks and the computer socket will be completely ready for use.
Crimping twisted pair cables and connecting a Legrand computer socket
This material discusses crimping a twisted pair cable of category 5E with an RJ-45 connector, connecting a Legrand socket with a screw mechanism, and methods for testing crimp quality using the “PING” command and using a LAN tester.
Prices for installation work can be found here
| Crimping a twisted pair cable using an RJ-45 connector |
It is convenient to use the HT-318 stripper to strip insulation. It is also used when terminating cables into some models of network sockets.
Pair of Category 5E RJ-45 connectors
To check and test the quality of crimping, use the console command “PING” or a LAN tester type NS-468 from BITES
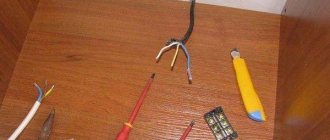
First of all, let's prepare the cable
First remove the insulation. Insert the wire into the appropriate hole in the stripper and make a full turn, then remove the insulation
The cut can also be made with a knife or a crimper blade specially designed for this purpose: barely press on the handles of the crimping tool so as not to catch the wires, and make a slight turn, about 20 degrees
Bend the wire to make the cut larger
Cut the nylon thread (if any) with a knife or crimper
Straighten each strand with your fingers so that they are even. After that, fold them according to the following pattern (pattern “B”):
Attention! In diagram “A”, the “white-orange”-“orange” and “white-green”-“green” pairs of cores are swapped:
You can also use circuit “A”, but in this case, crimp the connector on the back of the cable using the same pattern
Check yourself again:
It is also possible to crimp four wires instead of eight (for example, if one or more wires are damaged). In this case, the maximum transfer speed over the cable will be 100 megabits per second (about 12 megabytes)
The wires must be cut so that their length is the same:
After trimming we get neat edges
If the colors on one side are hard to see, then turn the connector to the other side (here, of course, the diagram goes from bottom to top)
In the case of four cores, they should be arranged in the connector as follows:
After checking, insert the cable all the way so that ( 1 ) all eight (or four) wires rest against the edge of the connector under the copper contacts and ( 2 ) the edge of the cable insulation is deeper than the clamp
Now insert the connector into the crimper socket until it stops
The connector is crimped: the copper contacts have pierced the insulation of the cores, and the clamp holds the cable by the outer insulation
If you are making a regular Ethernet extender, then carry out the same procedure for the other side of the cable, and then test it by connecting a computer or laptop to the LAN port of your router