Conditions for performing connection work
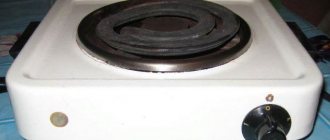
I would like to note the following. In the photographs in this article, the panel and oven are connected directly to the power cable, with both devices connected to the same cable. Speaking from an electrical installation point of view, this is not correct. For a hob or electric stove, a separate supply circuit with separate grounding must be laid. A modern oven, despite its size, has double protection and can be connected to a simple (without grounding) outlet. In this example, the oven comes with a socket, which we cut off and connect directly.
But be that as it may, in my example, both the oven and the hob are connected to a common cable using a power terminal block (block) designed for high current in the circuit, below you will see its photo. I would like to note that connecting an electric stove or hob to so-called twists, solders or low-power terminal blocks like Wago is DANGEROUS.
Related article: TV in the kitchen - choosing a place to place the TV
Work plan
We divide the planned work into the following parts:
- Preparatory work;
- Electrical preparation;
- Hob connection;
- Oven connection;
- Installation of devices in place;
- Functionality check.
Let's start with the preparatory work.
Correct installation
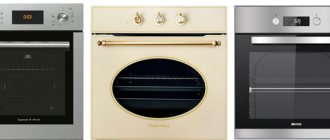
We determine the location for installing the wind device. Most often, the housing is built into an already installed kitchen unit. In this case, space is significantly saved and the interior of the room is preserved.
Manufacturers of modern kitchen furniture produce them to a single standard
, according to which the body of your device will ideally fit into the special section designed for it. In this case, all that is necessary is to carefully install the electric oven directly under the countertop of the selected section and level it to the building level. You can level the device by adjusting the height of its legs.
If there is any misalignment during installation of the device, the quality of its heating will be significantly lower. And the device itself may fail faster.
Here are a few requirements that can guarantee the normal functioning of the oven:
- The lower part of the oven body should be at a distance of at least 6-8 cm from the floor.
- The distance from its side walls to the sides of the kitchen unit should be at least 5-6 cm.
- The distance from the back walls of the oven body to the wall should be at least 4-5 cm.
Having figured out how to install an oven, we will now be puzzled by the question of how to properly connect it to the power supply.
Connecting the hob and oven - preparatory work
In principle, all preparatory work, without which it is impossible to connect the hob and oven, must be done in advance. Namely:
1. Power supply for household appliances must be connected and located on the wall behind the stove. If the connection is planned to be made through a socket, then the sockets are located behind the oven installation site no higher than 100 mm from the floor. If the connection is planned to be made through a power terminal block (block), which is what we will do in this article, then the length of the cable for connection is selected locally, based on the convenience of the work. 2. Let me remind you that to power the electric stove (hob), a separate electrical group must be allocated, a cable with three cores, brands VVGng, NYM, must be laid. The cross-section of the cable cores is 4 or 6 mm2 (not less), depending on the power of the hob. 3. A hole must be cut in the installed countertop for the hob. The tabletop itself must be firmly fixed.
To start connecting the hob and oven, all you have to do is turn off or check the power supply to the stove, prepare the tools and unpack the purchased appliances.
Prepare the tool
First, the hob is connected and installed, then the oven.
Related article: Corner hob: features, models, installation rules
Equipment installation
Installation of any equipment is carried out in several stages:
- Preparing tools.
- Preparation of the workplace.
- Installation of the device.
- Oven connection.
Tools. To build an oven into a kitchen set you will need: a Phillips screwdriver, a drill, insulation, a painting knife, a fork, since it is not included with the equipment.
As for preparing the workplace, you need to think in advance where the oven will be installed. We are accustomed to the traditional installation of the appliance, when there is an oven under the hob. How to install differently, you ask? You need to break your stereotypes and be guided not by generally accepted rules, but rely on the arrangement of furniture and the ease of use of appliances. Based on this, many install the oven above the countertop level. As a result, your kitchen will correspond to the new fashion trend, it will be easier for you to monitor the preparation of dishes, and this will make it easier to care for the device.
Having decided on the place, you need to take care of the appropriate size of the niche in the kitchen furniture. To do this, it is not at all necessary to first purchase a built-in oven. Thanks to the standard sizes of ovens, they can easily be built into an existing kitchen set. The main thing is that the niche is level. Even a slight misalignment can lead to damage to the electronics and improper heat distribution (in the case of a gas oven).
Oven measurements for a niche
Installation. There must be gaps between the installed oven and the niche to prevent overheating of the furniture, which can lead to a fire. They will provide air ventilation. You need to make a gap of 5 mm at the back of the device, 5 mm at the sides and 10 mm at the bottom.
Connecting the hob
- Unpack the hob and oven;
- Prepare a PVS 3x4 cable to connect the panel;
- Remove the top insulation from the cable by 10-12 cm;
- Strip the cable cores and crimp them with a special tool (it is not expensive);
Crimping the hob connection cable
Related article: Where to buy built-in kitchen appliances
PVA cable cores are multi-core. To ensure a strong connection and for safety reasons, crimping is mandatory. The power of the hob is high, the currents are high, and if there is poor contact, a fire can occur.
- Connect the PVA cable to the hob;
- Close the panel terminal block cover.
The connecting cable is connected to the hob.
Move on to the oven.
Related article: 10 designer tips for organizing a comfortable kitchen: kitchen ergonomics
Drawings on how to build an oven with your own hands
This task is not as difficult as it might seem at first glance. To facilitate installation, household appliances are produced in certain standard dimensions. You can always replace one built-in oven with another without changing your kitchen furniture.
The standards here are simple: any electric or gas oven is built into a 600x600 mm niche. Moreover, the width of the niche is 600 mm, taking into account the thickness of the side walls of the oven module (according to the requirements of most models, the finishing size of the opening must be at least 560 mm).
The depth of the oven is designed to fit under a worktop with a standard width of 600 mm. That is, the body to the front overhang should be 550-560 mm. It will not be possible to build an oven with your own hands under a narrowed countertop. But for an expanded one, in various design variations, it’s fine.
Nuances may arise in specific non-standard cases. Therefore, carefully study the instructions when purchasing household appliances. Some ovens require space for ventilation in the box design.
Or even a special cutout for air circulation in the bottom of the cabinet or countertop.
A typical oven cabinet design is shown in the drawing.
If the cabinet table is “clamped” between adjacent modules, then there is no need for an upper tension bar. Many furniture makers do not install it at all.
If the height of the kitchen set is standard (840-850 mm with different tabletop thicknesses), then the height of the very side of the oven cabinet will be 720 mm. By simple calculations (720-600), we obtain a space of 120 mm at the bottom of the installation. More precisely, the free space will be (120-32) only 88 mm, minus the thickness of the bottom and shelf.
A drawer with a box 50-60 mm high is usually built into this space. If you increase the height of the bottom row of the kitchen to match your height (you can read about this here), then the drawer will be deeper and more functional.
Actually, using the same principle, the cabinet “turns” into a cabinet for a built-in oven. We simply increase the height of the space in the bottom drawer.
But there is one important nuance here. The depth of the sides of a cabinet that has been increased in height must also be increased so that the gap between the wall and the cabinet body is not visible.
This means that the air circulation near the oven built in this way will be disrupted. It’s not for nothing that the instructions for ovens for installation in a pencil case include a separate drawing. In which you can see that you need to leave the drink under air circulation.
Therefore, a cutout should be provided in the countertop covering such a low cabinet for a built-in oven with your own hands. It can be covered with a ventilation grill.
Oven connection
Check if the power supply cable is turned off
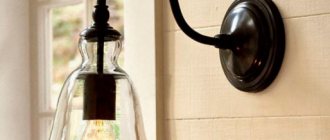
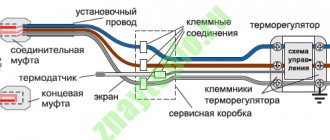
- Strip the cores of the power cable and make rings at the ends, almost like in the photo (the ring should close). The rings will ensure a tight and reliable connection;
- Connect the terminal block to the power cable. Tighten the mounting screws securely;
Connecting the terminal block to the power cable of the hob.
- Place the hob next to the cut. Pass the connecting cable through the panel cut. Connect the cable from the hob to the connecting terminal block. Tighten the mounting screws securely;
In the photo we see that the connecting wires of both the hob and oven are connected to the terminal block.
Ovens are usually ready for connection and have their own plug, which you just need to plug into your socket. If an outlet is not provided, then bite off the plug from the oven cable and connect it to the hob terminal block, after crimping the stripped ends.
- Close the terminal block cover (it is transparent, in the photo on the right). The connection is ready.
Hob and oven connected
Installing devices in place
- Place the hob on the installed countertop. Don't forget about the seal between the panel and the countertop. If necessary, use additional sealing with acrylic or silicone sealant. Apply the sealant in a thin layer so that it does not squeeze out from under the edges of the panel after installation (it will turn yellow over time).
After securing the hob, move on to the oven. We insert the connected oven into place.
Functionality check
- Turn on the previously turned off power supply;
- Check the functionality of the installed devices.
That's all! The hob and oven connections are complete.
©Remont-kuxni.ru
Other articles in the section: Plumbing and kitchen appliances
- No entries found