Contact welding is one of the most technologically advanced, but at the same time simple methods of joining metal parts. It is used both in large-scale production and in everyday life. This type of welding is thermomechanical, since high temperature and mechanical pressure are used simultaneously to join metals. Airplanes, ships, cars and microcircuits are assembled using resistance welding. Factories usually use large, powerful machines.
Manual resistance welding is also quite feasible. To do this, home craftsmen use homemade resistance welding machines, since their production does not take much time and saves money. Homemade devices are used both at home and in small private workshops. In this article we will tell you what the contact welding method is and how it is used to weld stainless steel or any other metal. We will also teach you how to assemble a resistance welding machine with your own hands.
Features of contact spot welding
This type of welding is considered thermomechanical. It is used if you need to solder thin metal sheets or homogeneous small elements together.
The photo of spot welding clearly shows its key phases:
- combining elements in the desired position;
- securing them between the electrode contacts of the unit;
- heating leading to the formation of a strong weld.
This method of connecting parts realized in metal to each other is very popular. Its advantages are as follows:
- ease of the process;
- low cost of consumables;
- high performance.
Do-it-yourself spot welding: diagrams, principle
Spot welding machines are not used as often in everyday life as arc welding machines, but sometimes it is impossible to do without them. Considering that the cost of such equipment starts from $450-$470, the profitability of its purchase is questionable.
Household spot welding machine CBA-1.5AK
The way out of this situation is resistance spot welding with your own hands. But, before we tell you how to make such a device yourself, let's look at what spot welding is and the technology of its operation.
Briefly about spot welding
This type of welding is contact (thermomechanical). Note that this category also includes seam and butt welding, but it is not possible to implement them at home, since complex equipment will be needed for this purpose.
The welding process includes the following steps:
- the parts are combined in the required position;
- they are secured between the electrodes of the device, which press the parts;
- heating is performed, as a result of which, due to plastic deformation, the parts are firmly connected to each other.
A production spot welding machine (such as the one shown in the photo) is capable of performing up to 600 operations within a minute.
Equipment for machine spot welding
Process technology
To heat the parts to the required temperature, a short-term pulse of high-power electric current is applied to them. As a rule, the pulse lasts from 0.01 to 0.1 seconds (the time is selected based on the characteristics of the metal from which the parts are made).
When pulsed, the metal melts and a common liquid core forms between the parts; until it hardens, the welded surfaces must be held under pressure. Due to this, as it cools, the molten core crystallizes. A drawing illustrating the welding process is shown below.
Spot welding process illustration
Designations:
- A – electrodes;
- B – parts to be welded;
- C – welding core.
Pressure on the parts is necessary so that, when pulsed, a sealing belt is formed along the perimeter of the molten metal core, preventing the melt from flowing outside the zone where welding occurs.
To provide better conditions for crystallization of the melt, the pressure on the parts is gradually removed. If it is necessary to “forge” the welding site in order to eliminate inhomogeneities inside the seam, increase the pressure (do this at the final stage).
Please note that to ensure a reliable connection, as well as the quality of the seam, it is first necessary to treat the surfaces of the parts in the places where welding will take place. This is done to remove oxide film or corrosion.
When it is necessary to ensure reliable connection of parts with a thickness of 1 to 1.5 mm, capacitor welding is used. The principle of its operation is as follows:
- the capacitor block is charged with a small electric current;
- the capacitors are discharged through the parts being connected (the pulse strength is sufficient to ensure the required welding mode).
This type of welding is used in those areas of industry where it is necessary to connect miniature and subminiature components (radio engineering, electronics, etc.).
Speaking about spot welding technology, it should be noted that it can be used to connect dissimilar metals together.
Basic functional principle
The spot welding scheme is simple. First, the metal products are pressed tightly against each other. Then, at short intervals, a current is supplied to them, which heats the metal and starts the diffusion process.
As soon as the device is turned off, the electrode contact area begins to cool and the material begins to crystallize.
DIY spot welding videos
1. Video about the use of the GYSPOT 3502 spot welding machine, designed for removing dents using an inertial hammer, welding rivets, studs, nails, dowels, washers and bolts, removing pits and upsetting surfaces using a carbon electrode:
2. Video about using the double-sided spot welding machine GYSPOT 32D-C for repairing surfaces and joining a car body:
3. Do-it-yourself capacitor welding with automatic supply of hardware:
Structural design of the welding unit
The pictures of spot welding show that its structural design is represented by three blocks (two main and one auxiliary). The mechanical unit includes:
- electrodes in the form of clamping pliers;
- clamping mechanism;
- rotation drive (in suture equipment);
- compression and upset mechanism (in butt welding).
Key elements of the electrical unit:
- transformer device;
- output voltage regulator;
- secondary contour unit;
- primary circuit breaker;
- cycle regulator.
The auxiliary unit contains water cooling and pneumatic hydraulic systems.
Note!
- DIY induction heater ♨️ - reviews of the best manufacturing options. Varieties of homemade device designs + step-by-step master class (160 photos)
Do-it-yourself Gauss cannon: TOP-130 photos of the best ways to create it yourself. Design features + master class for beginners
DIY clamps - a step-by-step master class for beginners. Schemes for manufacturing different designs + 170 photos
To obtain a discharge of the required power at a low voltage, an induction transformer is required. A correctly selected balance of windings will provide the powerful impulse necessary for melting the metal in the contact zone of the electrodes.
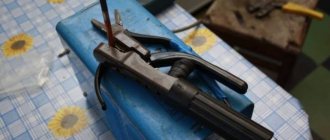
The clamping pliers in a do-it-yourself spot welding machine look like two contacts made of graphite or copper. They are mounted on various levers and driven by a compression mechanism, the drive of which can be:
- mechanical;
- pneumatic;
- hydraulic;
- electromagnetic.
Resistance spot welding method
A spot welder joins metal in multiple areas at the same time. Industrial models are capable of securing a part in 600 areas in one current start. The home version will be able to put 1-2 points.
The quality of the resulting seam depends on:
- Supply current. Do-it-yourself contact welding is made from transformers, so the current can reach more than 100 amperes. This is enough even for thick sheets of metal.
- Electrode type and shape. Welding electrodes sold have a specific shape, depending on the required seam.
- Surface quality. Loose, dirty and greasy surfaces are worse for welding, since the current cannot penetrate evenly. If the surface is partially dielectric (eg greasy), the weld will have poor performance.
- Exposure period. The interval at which current is applied may create a point that is thicker or narrower.
Required inventory
To get a compact welding tool, you will need a number of things:
- transformer device of an unnecessary microwave oven;
- terminal block;
- copper rod 0.17 cm thick;
- a piece of 8 mm multi-core cable;
- timer mechanism;
- adapter for 12 volts and 0.5 amperes;
- PSU case from an old computer;
- switch;
- micro button;
- lath (made of wood);
- steel spring.
Operating procedure
Below are instructions on how to make spot welding using a microwave you don’t need in your household:
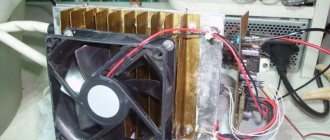
Disassemble the old microwave oven. Pull out the 800 A transformer device. Disassemble the computer power supply. You only need a steel case and a 220 volt power connector. In the future, it will be used to accommodate the “filling” of the welding unit.
Note!
Do-it-yourself electric scooter - a master class with step-by-step instructions for doing it yourself. Tips and simple patterns for beginners + the best photo reviews
DIY rocking chair: TOP-120 photos of the best manufacturing options. Master class on creating a rocking chair at home
- Smokehouse from a gas cylinder - the best master class on making a homemade smokehouse with step-by-step photo diagrams for beginners
Place the transformer, timer board and power adapter inside the case. Try on and mark the locations of the holes - then you will need to make them using a drill.
Remove the secondary winding of the transformer, replacing it with a power cable. In this case, there is no need to dismantle the transformer plates. It is enough to cut off the winding first from one edge, then from the other, using a chisel and hammer. After this, all that remains is to remove the remaining wire with a drill.
Make new windings from the power cable. Place the modified transformer in the housing. Drill 2 holes in the area where the grill is located. Pass the coil leads through them. Make more holes, now in the bottom of the body, to install the trans.
Connect the timer mechanism to the front panel. Insert the LED, soldered from the board and extended with wires, into the hole made earlier.
Attach the power switch to the rear panel. Cut off the plug from the adapter. Solder all the elements of the future device using wires and terminals. Connect a microbutton to the timer - there is no need to fix it. Set the pulse duration for welding.
Use steel corners to attach a wooden strip to the body of the welding machine.
Note!
Do-it-yourself compressor: TOP-130 photo reviews of finished compressors. Step-by-step instructions + diagrams and drawings
Do-it-yourself wind generator: TOP-170 photo reviews of finished devices. Detailed DIY instructions for beginners
Do-it-yourself tennis table: TOP-150 photos of the best manufacturing ideas. Master class on creating a tennis table at home
Remove the terminal strips from the terminal block, put them on the cable contacts that need to be cleaned beforehand, and screw them to the rail. Equip the rail with a start button, having previously made a hole for it.
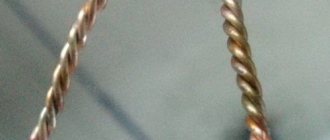
Use copper wire to create electrodes. Don't forget to sharpen the ends. Secure the electrodes made of copper into the terminal blocks.
Supplement the design with a spring to return the device contacts to their original position. For this purpose, you need to screw another wooden strip to the top of the case. That's all. Work on creating a homemade spot welding unit has been completed.
The resulting tool has quite high power. Therefore, in order to avoid burning holes in thin metal sheets, it is recommended to set lower time parameters on the timer. In addition, the compact dimensions of such welding allow it to be placed even in a small studio.
Spot welding from hand-assembled welding equipment
The algorithm for creating a unit for spot welding from a welding tool, as well as the materials required for this, are almost the same as in the case of a transformer from a microwave oven. But there are a number of points.
Creating resistance welding from an inverter device with your own hands is irrational, because direct current is not needed for operation. As a result, we opt for a transformer device from an alternating current device.
The number of turns is calculated using the following formula:
N=50/S. Here N is the number of turns, and S is the core size.
Handmade welding pliers
The pliers are an important part of the welding machine. Their design solution depends on what work is planned to be carried out, the expected dimensions of the elements to be connected and the type of drive. The electrodes are made of copper wire, the thickness of which must be equal to or greater than the thickness of the secondary winding cable.
Welding transformer
Now we have come to the conclusion that assembling contact welding from an inverter with your own hands is a labor-intensive and unjustified process. And in my future publication we will talk about assembling a device with a transformer from a microwave oven.
To select a transformer (since any one will not suit us), we rely on the recommended power, and the power should be at least 1 kW or even more, since with less power you will not be able to weld metal 1 mm thick, please pay attention to this.
Transformers with a power of 1 kW are not available in all microwave ovens; such powerful microwave ovens have more functions when compared with conventional microwave ovens.
Welding nuances for lithium batteries
Often, craftsmen are faced with the need to attach a thin steel plate to lithium-ion batteries. And for 18650 batteries, elevated temperatures are terrible.
The solution to the problem is self-made special spot welding. Its specificity is the automatic control of the progress of work.
Basic DIY spot welding parts for batteries:
- modified microwave oven transformer;
- primary winding control board;
- auxiliary power supply;
- incoming circuit with fuse;
- microswitch;
- secondary winding wires with electrodes made from electric soldering iron tips.
Now let's look at how to make spot welding with your own hands for lithium batteries:
- Having stocked up with the necessary components, place the knobs that regulate the pulse time and power of the welding machine itself on the body.
- Install a switch from an old microwave oven.
- Take a steel plate and a lithium battery. Set the electric pulse time to 8-11 μs.
- Place the plate on the battery and place the contacts on top. The device is ready!
Features of resistance welding manufacturing
How to do resistance welding? The process requires some knowledge and adherence to the principles on which the full operation of homemade equipment depends. At the initial stage, you need to remove the transformer from the microwave oven; you will need a magnetic core and a primary winding.
Then a new winding is constructed on the transformer. For these purposes, a stranded wire with a cross-section of at least 10 cm2 is used. The cable is wound in 2-3 turns.
In order to properly construct resistance welding for car repairs with your own hands in the subsequent period, you should perform the following steps:
- the control of contact welding with your own hands is being thought through. For this purpose, a special system is installed that allows for uninterrupted welding;
- production and connection of welded electrodes;
- installation of the internal part of the device into a durable and reliable case. A housing from an old microwave oven will do.
If you strictly follow all the steps and recommendations, you can easily make a simple household welding machine. The main thing is to draw up the correct diagram and prepare the required components for the equipment. The finished device is suitable for household work; it can be used to repair car bodies and other products.
Where is spot welding used?
Spot welding is used if it is necessary to manufacture any metal structure. Advantages of this technology:
- environmental Safety;
- high strength characteristics of the connection;
- speed and ease of work automation.
Due to the above advantages, spot welding is used:
- in the automotive industry;
- in shipbuilding;
- in the aviation industry;
- in the production of electronic products and household appliances;
- when creating jewelry;
- at enterprises producing consumer goods, etc.
The power parameters and capabilities of manually made resistance type welding cannot be compared with the performance of a factory-assembled machine. Despite this, it can be used for welding metals of all types of steel and alloys.
DIY spot welding from an inverter
Spot welding can be found not only in production, but also in everyday life. The advantage of choosing this type of welding is its reliability. This fastening method makes it easy to connect different carbon steels and non-ferrous metals. At the same time, you can build almost any configuration and combination with metals.
Allows you to create a product to suit any fantasies and needs.
Range of applications
Most often, spot welding is widely used in the repair of cables and household appliances. Spot welding allows you to repair batteries and other mobile portable devices.
Welding technology
The technology for welding batteries is quite simple; an example can be seen in the video below.
The entire welding process consists of heating the working metal surface to a plastic state. In this state, the products are easily deformed and connected.
To ensure quality, a continuous melting process is required. Continuity and a certain speed of working tempo, pressing force are key in the work. In the future, these parameters characterize the quality of products.
The operating principle of this welding is based on the conversion of electrical energy into thermal energy. When exposed to heat, the metal surface melts.
The electrode contact should be placed at the junction of the 2 working surfaces of the parts required for fastening.
Solidification of the molten mass occurs at the moment the current is turned off. This eliminates the effect of spreading of the surface of the seams. Therefore, this type of welding is called spot welding.
Ticks
The attachment of parts is carried out by securing the surface using special pliers. Which are divided into suspended and manual.
- Hanging. They are widely used in factories and industrial enterprises and can be reused.
- Manual. The main function is to transmit electric current to the electrodes.
Several advantages
- High speed;
- The highest degree of electrical safety;
- Ensuring high-quality connection;
- You can make a welding device manually.
Technical process
The entire system is built on elementary heat transfer in order to melt the metal at the fastening points. The quality of welding can be affected by poor surface cleaning and visible oxides.
You can get acquainted with the technical process by following the link to the video.
Using the law of thermal conductivity, this parameter should be taken into account for most common metals. Thermal conductivity parameters for some of them are presented in the table below.
| Name of metal | Melting point, Сᵒ |
| Iron (low carbon steel) | ~1400 |
| Copper | ~690 |
| Aluminum | ~430 |
| Zinc | ~1120 |
Electrodes must also meet certain parameters:
- Thermal conductivity;
- Electrical conductivity;
- Mechanical strength;
- Processing speed.
Electrodes are short-lived and require careful handling. If you are constantly exposed to temperature conditions, it is necessary to interrupt. This feature allows the electrodes and the surface to be welded to cool. Thus, the life of the electrodes is extended.
The diameter of the electrodes affects the current characteristics and, accordingly, the quality of the seam. The cross-sectional diameter of the electrode is selected based on the thickness of the working surface. The electrode should be approximately twice as thick as the products being fixed.
contact welding
Resistance welding allows you to carry out work in normal home conditions. But, more often than not, this method is widely used in industry.
Video on the topic of resistance welding with your own hands.
Manufacturers made sure that bulky spot welding machines were not present at home. Compact mobile devices have long been invented. Their purpose is to repair household appliances.
This device is called a spotter. The device is equipped with two terminals designed to secure one of them to the working surface of the product. The second output is connected to the electrode.
There is no need for pliers in this configuration. The power source must be located at a sufficiently close distance from the work site.
Don't worry about a small-sized device; it's quite functional for its size.
The simplest devices use single-phase current. But you shouldn’t hope to secure the part more than one millimeter. More complex parts are secured using an additional transformer.
Price
The cost of spotters is quite low. In the most expensive category are inverter ones.
As a rule, household devices do not require large amounts of power. Therefore, you can get by with a homemade device.
Spot welding is distinguished by its seam quality. In most cases, severe mechanical stress is required to destroy it. Most often, drills are used for this.
Device diagram
If there is such a need, there is a desire to make the device yourself, then it is quite possible to assemble it at home.
The size of the spot welding machine depends primarily on the needs. The most convenient are devices with medium dimensions.
Drawing. Diagram of a spot welding machine.
The operation of the device is based on the Lenz-Joule principle. The requirement of physical law states that the conductor must produce heat in an amount equal to the resistance of the conductor, as well as the square of the current and the time elapsed.
Such a circuit solution requires the installation of a rectifier bridge. The capacitor is charged through the thyristor bridge. The first thyristor acts as a cathode.
The capacitor block is a kind of protection and serves as a current releaser. A swing principle is created, constant charging and discharging of capacitors. This principle allows you to create the effect of spot soldering. The seam cools evenly and promptly, preventing the metal from spreading.
To increase power, an additional thyristor with a shutdown relay is also added to the circuit.
Homemade apparatus
An important part of the welding machine is the transformer. The minimum power value should be 750 W.
Video on creating your own device.
You can create a device using an inverter. Before you begin your goal, you need to have some skills in the field of electrical engineering.
A simpler scheme is considered to be using a transformer instead of an inverter. But such devices are not powerful enough to work with metals of a sufficient thickness of more than 1 mm.
Steps to create a device
- Remove the transformer from the unwanted microwave;
- Get rid of the secondary winding, fastenings, shunts;
- Make a secondary winding with a thicker wire than in the primary;
- Check the assembled device for current leakage;
- Eliminate leaks with insulation using tape;
- Check the current strength. The value should be no more than 2 kA.
Copper wire of considerable thickness is most suitable as tips or electrodes. The tips are sharpened and secured.
Next you need to install the switch switch. The transformer should be fixed to the base. Grounding is installed for protection. Connections must be insulated.
svarkagid.com
Microwelding: nuances of creation and use
Having decided to make spot welding in artisanal conditions, you need to remember a number of nuances of its application:
- Before starting the device for the first time, you need to check the reliability of the insulation and connections of all parts of the structure.
- It is required to organize an auxiliary ventilation system.
- Do not use the device for a long time without breaks.
- Electrode tips must be sharpened regularly.
- Before starting work, it is worth performing a test run at low power.
Any craftsman can assemble spot welding with his own hands. You only need to have a minimum of knowledge in the field of electrical engineering. Making your own welding machine is much more profitable and fun than buying an industrial tool.
This equipment will invariably come in handy in a garage hangar, as well as for those who make jewelry or repair electronics.
Do-it-yourself spot welding from an inverter
Many people mistakenly believe that making a spot welding machine from an inverter with their own hands is a very complex technological process. This is not entirely true.
If you have sufficient knowledge of electrical engineering and experience working with a soldering iron, you will be able to do this job. The resulting device will not differ from the factory ones in terms of its efficiency.
Transformer for welding
To assemble a spot welding machine with your own hands you will need:
- U-shaped transformer (the larger the core size, the better);
- contactor (relay for high current. Must withstand 800-1000 amperes);
- 25 volt relay;
- 25 volt transformer;
- set of copper cables;
- copper tip.
The device control circuit will consist of:
- power supply;
- control circuits;
- relay.
Device control circuit
Transformer assembly
The main part of a spot welding machine (as, in principle, of any other electrical appliance) is a transformer.
It is this that will generate the voltage necessary for normal operation. Due to the fact that to assemble such a device with your own hands you may need a device with a high transformation ratio, it is best to borrow a transformer from a microwave (700-800 W). If one has not been found, then the best option would be its 1 kW analogue.
Microwave transformer
To make a transformer for a spot welding device with your own hands, you must follow this algorithm:
- Knock down the secondary winding. Due to the fact that only the primary one is useful to us during work (it is located inside, wrapped with a thicker wire, but the winding layer is thinner), to remove the secondary one, you can use any tool that comes to hand: a chisel, a chisel, a hacksaw, a hammer or even an electric drill . The main thing is not to damage the primary winding and not to disrupt its integrity.
- Apply a secondary winding. To do this, we need a harness made of copper wire (cross-section from 2.5 to 3 centimeters). It must be wrapped with electrical tape. Each layer of the winding is covered with insulating paper and varnished.
- Check winding directions. This can be done with the most ordinary voltmeter. In addition to the directions of the windings, it is also worth checking for short circuits in the network. If there are none, you can move on to the next point.
- Check the current strength. If your design involves 2 or more transformer windings, you should definitely check the output current. If it is more than 2000 amperes, it must be reduced. Otherwise, this is fraught with serious voltage drops.