Of course, everyone knows what a table lamp is - it is one of the simplest lamps that does not require installation; you buy it and use it. A table lamp can be found in any room, be it a bedroom or living room, study or office; in general, it is an almost universal lighting device for all occasions! It is worth emphasizing the fact that the lamp not only helps to illuminate the workplace or gently accentuate an area of the room, but is also an interior decor item in itself. A table lamp well-chosen in style perfectly complements the interior design and adds a special charm with its light and accentuates details.
In stores it is not always possible to find the right lamp design that ideally matches the stylistic design of the interior. In such a situation, you can always make a lamp yourself at home; it is not as difficult as it seems at first glance. If you look carefully, you will always have the right material at hand to create a masterpiece. Let us emphasize that it is really easy and does not take much time, and a beautiful creation created with your own hands always brings special warmth to the environment and evokes pride! In the end, it’s just nice to make something in your free time, to realize your creative potential, the result will please the eye for years.
Anything can serve as a material to create a table lamp, you just need to show a little ingenuity and imagination. For example, these can be mechanical parts, water pipes, paper and cardboard, glass and plastic bottles, tin cans, branches and saw cuts, beer keys, disposable tableware, beads, fabric and much, much more. Thanks to such a variety of available materials, you can make a table lamp in any style that suits the interior. By the way, you don’t have to make a lamp from scratch; you can take an existing one as a basis and simply update its lampshade. Let's get straight to the creation process and take a closer look at 7 creative shade ideas for table lamps that are easy to make at home. Let's figure out how this is done :
Making a table lamp from metal tubes
Interior design in loft and steampunk styles is currently gaining increasing popularity. In fact, making a table lamp that emphasizes and complements this style is very simple. It is enough to have several copper tubes, wiring, a lamp base and ordinary household tools that are found in every home. It will take very little time and a completely authentic lamp will be ready! There are two approaches to manufacturing: you can bend the tube into the desired shape (copper bends easily), or cut suitable pieces and then glue them in the desired sequence. Both options have the right to exist, whichever is more convenient for you. Next, we simply stretch the wiring inside the tubes, attach the socket, screw in the light bulb and enjoy our creation.
Lampshade
A lampshade is almost an essential element of any table lamp, floor lamp or pendant lamp. Its task is to hide the lamp and socket from prying eyes, generate soft, diffused light and, if you want, protect against accidental contact with a hot lamp and electrical elements. This is also an interior solution, selected in accordance with the overall design style of the space.
We said “almost an obligatory element” because certain design styles, such as loft or high-tech, often do without a lampshade in their lighting fixtures, leaving the lamp (often of an original shape) open.
You can find many very different lampshades, incl. and such as in the presented photos. A standard lampshade for a table lamp consists of a steel wire frame with a fastening near the socket and a fabric or plastic cover, sometimes a glass cap of an original shape.
When building a table lamp with your own hands, the issue with the lampshade is usually solved in one of four ways:
- use a ready-made lampshade;
- decorate the finished frame from an old lampshade;
- make the frame yourself and then decorate it beautifully;
- do without a lampshade at all.
The second option can be considered the most common, however, the most “hardcore” and “crazy” DIYers do not run away from difficult decisions, but stock up on the necessary tools and materials and rush into battle. When creating a frame, you cannot do without strong steel wire, tools for bending it and electric welding (for thick wire) or serious soldering. You can do without all this by connecting the individual wire elements with careful twisting.
Read also Crafts from cotton pads. Original ideas for creativity
After manufacturing and painting (not necessary, but desirable) the frame of the lampshade, it will have to be decorated in one way or another, whichever you like best and suits the interior. This can be plain or decorated fabric, paper with appliqués (fortunately, LED lamps practically do not heat up), pendants made of beads, original glass and other decor, which are offered in abundance by special stores for needlewomen, both individually and in ready-made sets.
You can use thread weaving and covering with ready-made macrame.
Lampshades made from various types of cardboard boxes, large tin cans, metal sheets twisted into a cone, etc. look somewhat brutal. However, for the loft style and the like, this is a very good design option for lamps!
Making a table lamp from paper or cardboard
This option is even easier to manufacture and does not require much time and effort to find the necessary materials. It is enough to buy the required amount of thick paper such as Whatman paper or cardboard at the nearest stationery store. We mark the polygons according to the template and carefully cut them, placing a board underneath first so as not to cut the surface of the table. We glue the cut parts together from the inside, wait for the glue to dry completely and paint the outer surface with regular red in the desired color. In fact, the work is ready, you can use the resulting design to refresh an old lamp, or make the base yourself, it’s very easy. As a result, the result is a very original lamp that can decorate any room with its appearance. A multifaceted work of art!
Making a table lamp from a bottle
Making a lamp from a glass or plastic bottle is as easy as shelling pears, the simplest, but at the same time quite original option, suitable in style for any interior. We will need a bottle of any shape that we like best, a sufficient length of electrical wire with colored insulation, preferably fabric, and a base for a light bulb. The manufacturing process is extremely simple, you need to drill a hole at the base of the bottle, pull a wire through it, and randomly place the rest of the wire inside, attach the base to the neck and voila, our table lamp is ready!
Flower pot table lamps
Flower pots of different sizes can serve as decoration for a table lamp leg. To do this, take pots of different sizes, make suitable holes in them, and place them on the leg of a table lamp. The pots can be glued together using a glue gun or superglue.
Flower pots in the decor of table lamps
Flower pots are not used for table lamp shades as they are opaque. It is logical that light will not pass through such lampshades. But for pendant lamps, flower pots are quite suitable. To do this, cut out the bottom of the pot, attach it to the frame, and then decorate the pot in any way.
Making a table lamp from a tin can
To make it, we need a small tin can, some wood and wiring. We cut the timber to the required size depending on the height of the lamp that you want to get in the end. We make a base out of it, attach our tin can on top, and make a hole in the bottom. We stretch the wire through the can and fix it along the base; inside the can we install a base for the light bulb. You can decorate the top of the jar to your liking, paint it any color, make a design or ornament, or cover it with paper. The result is a wonderful product that boys will especially appreciate. The surface of the can can be slightly deformed to obtain a lofted sound.
"Eco-lamp" made of wood
Such a table lamp is obviously most suitable for the interior of a country house, although under certain conditions it will also find its place in a city apartment. To make it, you need to have at least some experience in creating crafts and skills in working with tools.
To begin, select a suitable round piece - an end cut of a log with a diameter of 25-30 cm. The round piece should be heavy enough to provide the lamp with a stable position; it would be nice if the opposite planes converge slightly on one side, as in the photo below. Then the bottom cut will need to be made at the widest point for maximum stability.
Treat the surfaces with sandpaper in several stages, reducing the grain size of the sandpaper, then saturate the wood with some protective compound, the same stain, keeping in mind their properties to change the color of the surface being coated. Try not to touch the outer surface around the circumference, preserving its natural appearance as much as possible, especially if the bark is preserved on it. In those places where the bark has peeled off, it needs to be glued with PVA or other wood glue. To preserve the natural texture and relief, the bark should be carefully brushed and covered with 2-3 successive layers of colorless varnish. Apply the same varnish to the remaining surfaces of our round wheel after all the drilling work has been done with it.
Next you will see options for using a tree stump and suitable size logs as a stand.
Let's start drilling. To do this, you will need an electric drill and wood drills of a suitable diameter and length. Our task is to install in the upper part a tubular metal stand-holder for the socket and lampshade frame, into which to insert an electric power cord from the back side of the lamp (decide on the side of the round, it’s logical to choose the less beautiful one). To do this, drill a through hole with a slightly larger diameter than the thickness of the prepared wire, exactly in the middle from top to bottom. If the drill is not long enough, continue drilling from the opposite side (from the side of the stand) towards the hole already made - try not to miss each other! Then, on the back side, closer to the stand, drill a side outlet of the main hole, into which we will insert the wire a little later.
Read also DIY wire crafts. What are there, useful tips, examples, photos
The next step is installing the lampshade stand. As a rule, they use a part from an old lamp. This is a chrome-plated (less often painted) metal tube of small diameter with an external thread for mounting on wide nuts of the lampshade frame and the lamp socket bracket. Depending on the outer diameter of the tube, drill or expand with a round file a hole in the upper part of the wooden round to a depth of 7-10 cm. The task is to fit the lampshade stand as tightly as possible into the hole to the specified depth. Measure the required length of the tube in advance: from the top threaded part to the round frame - slightly greater than the height of the existing (or planned to be manufactured) lampshade, plus a length equal to the depth of planting in the wooden round frame. Saw off the excess with a hacksaw.
Inspect the stand carefully: if it is in good condition, then you can use it as is; if there are noticeable traces of rust, then it is probably better to thoroughly sand it with sandpaper and paint it with spray paint.
When everything is ready, we run the electrical cable. We push it through the short side hole and, pushing it from below with a long strong rod, direct it to the upper exit. Pull out the required amount of wire with a small margin (always make a supply of wire) and, passing it inside the tube, insert the latter into the prepared hole and, gently tapping the top with a wooden hammer or a suitable block, press it into the round. Please note that pressing into a hole that is too small can split the wood, and in a hole that is too large it will wobble, which is also undesirable. Planting on glue is also not the best option.
The last stage of manufacturing our “eco-lamp” is to connect the wire to the socket, the plug to the free end and, if desired, a switch. In the photo you can see a chain hanging from under the lampshade from a microswitch, like in a sconce, but this is not at all a necessary element; you can limit yourself to the usual series switch on the power cord, as in a regular table lamp. Then we install the lampshade, screw the lamp (incandescent or LED) into the socket and check the functionality. Hooray! From now on you are the owner of a stylish and practical item in your home.
Alternatively, instead of a round log, you can take an ordinary log of suitable size and texture, and instead of a lampshade, leave an open lamp - there is a large selection of original electric lamps on sale, for example, the stylish “Edison lamp”.
Making a table lamp from branches and saw cuts
In this case, the design is limited only by imagination, because nature itself offers an endless number of options for creativity. It is enough to take a walk in the nearest forest on the weekend and there, very quickly, you will definitely find a suitable preparation - a dry branch, a root, a piece of wood. All that remains is to trim the find, clean it well and varnish it. If desired, you can use tinting or colored paints. We fix the workpiece on the base for stability, stretch the wiring, attach the base and our table lamp is ready. The result is a very organic and naturalistic creation, beautiful and useful. Nature has long thought of everything for us, use it...
Making a table lamp from beer opener keys
Making such a lamp is very simple, although no matter how you look at it, you will need a sufficient number of keys from beer cans and other cans. We take the key, cut the ring on one side and bend it in half, do the same with everyone. When the blanks are made, we simply assemble them in the shape of a cylinder according to the principle of chain mail. As a result, we get a wonderful lampshade; such a product will undoubtedly attract the eyes of guests and cause admiration.
Making a table lamp from disposable spoons
The seemingly complex design in the shape of a pineapple is actually very easy to make. We will need a plastic bottle as a base and a lot of plastic spoons. We cut off the bottom and top of the threaded bottle, and use a sharp knife to make small dotted cuts around its circumference. Next, we prepare the petals of our pineapple from spoons, cut off their handle almost at the very base and paint it yellow. When the paint has dried, insert the spoons into the cuts with the notch down and thus collect the scales from the bottom up. We decorate the top with leaves cut from another bottle. Our pineapple lamp is ready, it looks very warm and homely, perfect for a child’s room.
We looked at only 7 ideas on how to create a table lamp at home with your own hands without spending much time. As you can see, making a lamp is very simple, all you need to do is show a little imagination, and the scope for creativity is truly limitless. A lamp can be made from anything, any already unnecessary thing or item: children's toys, old things, pieces of fabric, glasses, old appliances, and so on. Everything is in your hands, don’t be afraid to experiment!
DIY lamps: photos and principles for choosing a light bulb for the device
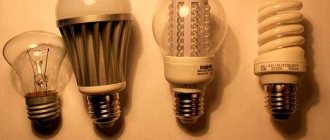
The first thing you should pay attention to when choosing a lamp for a homemade lamp is wattage, which determines the amount of energy produced by the light bulb. For a regular table lamp, the figure varies from 40 to 120 W. It is important to take into account the type of material from which the device is made, since fire safety will depend on this criterion. Thus, an incandescent lamp, even of relatively low power (60 W), when used for a long time, can cause a plastic lampshade to melt, damage the integrity of a wooden lampshade, or even cause a fabric lampshade to ignite.
You should also pay attention to the lumens indicator, which determines the amount of light emanating from the lamp. Accordingly, the higher this value, the brighter the lamp will shine, but for a table lamp you should not choose an option higher than 1000 lm. It should be noted that the proximity of artificial light to natural light depends on the number of lumens. There are other things to consider when choosing a light bulb.
Form. The pear-shaped type of light bulb is considered traditional. It should be said that not only incandescent lamps, but also modern energy-saving fluorescent options are distinguished by this form. In addition, there are spiral lamps, in the form of a candle or tube. The choice of product generally depends on the design of the homemade lampshade.
Base size. Repairing a table lamp, which involves changing the light bulb, is much easier to carry out if you have a standard E27 socket. Other, no less popular options are E14 or E40. Modern DIY LED table lamps have a bayonet base, characteristic only for this type of light bulb.
For table lamps, a lamp with a power of 40-120 W is suitable
Life time. Basically, manufacturers indicate on the packaging the approximate service life of the product, but in most cases this indicator depends on proper use and the characteristics of the power supply. It is logical that with frequent voltage surges, a lamp of any class will fail faster. Among all lamps, LED products have the longest service life.
Character of lighting. The instructions for the device indicate what kind of light will come from the device (it can be cold or warm). The choice of warmth of light depends on the selected lampshade and its color, as well as on the main functions assigned to the device.
Energy consumption. If you plan to use a table lamp as a night light, you should choose the most energy-efficient light bulbs that will save on electricity. Despite the fact that you will have to pay a little extra when buying a light bulb, utility bills will be lower.
Contains hazardous elements. Fluorescent lamps contain mercury inside, so it is extremely dangerous to install such a tabletop device in a child’s room. These lamps must not be thrown into the trash because they must be disposed of properly to prevent environmental pollution.