Many car enthusiasts, when problems arise with electrical wiring, immediately begin frantically looking for a familiar auto electrician to solve the problem, citing the fact that they do not understand electricity. In fact, there is nothing difficult about carrying out electrical diagnostics yourself. To do this, you will need a multimeter and a little knowledge, which we will try to outline for you in this article. Read the information below and you will not have any questions about how to find a short circuit in a car or, conversely, how to find a broken wire in a car.
Devices for troubleshooting electrical wiring
To find a short circuit or broken wiring, you can use a multimeter.
If you only need to determine the presence or absence of voltage on a section of the circuit, then you can use a special 12 V light indicator. A test lamp that you can make yourself is also suitable. To do this, two wires with a length of at least 50 cm should be soldered to a car lamp (no more than 4 W).
Possible reasons
The entire electrical system of a modern car can be divided into circuits of sensors, as well as actuators (drives), which include lighting devices and electric motors. In the first case, some sensor is connected by wiring to the electronic engine control unit (ECU). It is from here that a voltage of 5 Volts is sent to the sensor, which is analyzed and changes depending on the measured parameters.
The consumer circuit includes wiring from the battery, relay, switch, fuse, lamp or other consumer. Each of these circuits only works fully if it is intact.
During the operation of the car, the wires can be damaged due to the following reasons:
- damage from rodents;
- unprofessional installation of wiring;
- mechanical damage, moisture ingress;
- physical wear of wires.
The factors listed above are likely to lead to open circuits and short circuits. For example, if you screw some kind of screw through a wiring harness, this can cause a “short”.
How to find a broken wiring in a car
If there is a break, the electrical circuit opens. Often the cause of lack of voltage is poor contact in the circuit connector. The block body hides oxidized contacts, so troubleshooting can take a long time. A break may be detected when the pads or wires are swayed.
To find a break in the test, you need to set the multimeter in ohmmeter or continuity mode. The terminals of the device are connected to the ends of the circuit being tested:
- If there is no break, the multimeter will beep (in dial mode) or the resistance will be minimal (in ohmmeter mode).
- If there is a break in the wiring, there will be no sound signal (in dial-up mode), but the resistance will be very high (in ohmmeter mode).
Wire for car electrical wiring, wire quality requirements
The fastest way to find a current leak in a car
The principle on which the choice of cable should be based is ensuring fire safety, since as a result of quite prosaic reasons, a vehicle is quite easily susceptible to fire. In any wiring, including automotive wiring, there are two main risk factors: current overload and short circuit.
The cable must be selected so as to prevent overheating and current overload when installed correctly, and the wire insulation must protect against possible short circuits, as well as minimize the consequences if this occurs.
And most importantly: it is important that the cable delivers life-giving energy without significant losses. A car cable must be selected taking into account two main aspects: its physical and mechanical parameters and electrical characteristics
As for the electrical characteristics of the cable, they are responsible for safety and power losses. Two important parameters are the material and diameter of the cable core. They determine certain resistance readings per meter of length. The lower the resistance, the better: less energy is lost on the way from the battery to its destination. In addition, the cable heats up less.
It is much better to use a wire with a copper core rather than an aluminum one. However, the most effective are oxygen-free copper strands. Their resistance is even lower, but such a cable is more expensive. If we talk about the core diameter, then it is advisable to choose a larger one, but do not overdo it.
Physical and mechanical parameters relate more to the insulation than to the core. Insulation plays an important role: it protects the cable from short circuits and exposed cores
Therefore, it is important that the insulation does not melt, tan or crack. It must have a certain margin of strength so as not to tear under conditions of the slightest friction/tension/rolling
It should not react in any way with various products of the chemical industry that are intended to “prevent”, “feed” and “treat” the car.
In general, the responsibility of insulation is to withstand all kinds of chemical and physical influences to which the cable is exposed. Additionally, if a fire occurs, the insulation must not spread the fire.
How to find a short circuit in a car wiring
A short circuit is an unacceptable connection of part of a circuit to ground or another part of the circuit. Often the cause of a short circuit is severe oxidation of the contacts in the block, or damage to the insulation of the wires. If, after replacing a faulty fuse, it blows again, there is likely a short circuit in the wiring.
To find a short circuit, disconnect the section of electrical wiring being tested from the rest of the vehicle wiring. Set the multimeter to dialing mode. We connect one probe of the device to a section of the circuit, and the other to the body (“ground”).
- If there is no short circuit in a section of the circuit, the device will not emit sound signals.
- If there is a short circuit, the multimeter will beep (the circuit will be closed).
We inspect the entire section of the chain for damage.
How to check a car battery with a multimeter
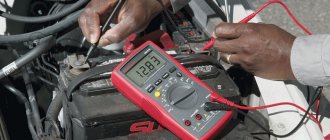
If you suspect that the battery is not working well, then again, a multimeter will help you. So, arm yourself with a multimeter configured to measure voltage (20V):
- Disconnect one terminal and connect the red contact to the positive and the black to the negative. Normal voltage should be between 12.4 - 12.8 Volts. It is important to take measurements at least an hour after stopping the engine.
- Measure the voltage under a load equal to twice the capacitance. For example, if the capacity is 75 Am/hour, then the load should be 150 Am. If the voltage drops below 9 Volts, it means something is wrong with your car’s battery (undercharging or failure). After disconnecting the load, the voltage should be restored within 5-10 seconds.
Technological instructions of AVTOVAZ
Below are general methods for checking electrical continuity, checking for shorts using an ohmmeter and a voltmeter.
Electrical continuity check
Loss of electrical circuit integrity can be caused by the following reasons:
- disconnecting the harness block;
- weak connection of the harness block;
- contamination, oxidation, corrosion of contacts;
- deformation of contacts;
- wire damage.
Check the continuity of the circuit in the following sequence:
- Disconnect the earth wire terminal from the battery.
- Visually check that the harness connectors are connected on both sides of the electrical circuit and that the locking latches are latched.
- Disconnect the pads, visually check the contacts for dirt, corrosion, and deformation.
- By pulling the wires next to the block, make sure that the wire and the terminal are tightly pressed together and that the terminal is fixed inside the block.
- Using a probe of a given diameter and length corresponding to the size of the contact in the mating block, make sure that the terminals of the harness blocks provide a reliable connection (the terminals are not recessed in the block, the probe fits tightly into the terminal).
- Using an ohmmeter, measure the resistance of the circuit between the pads. The resistance of a working circuit should be less than 1 ohm. To avoid damage to the terminals, it is allowed to use probes of a given diameter for measurements that correspond to the size of the contacts in the mating blocks.
Checking the circuit for short to ground
Perform the check in the following sequence:
- Disconnect the connectors on both sides of the electrical circuit.
- Connect the probe, one end connected to the “+” of the battery, to the terminal of the circuit being tested. If the probe lights up, it means that the circuit being tested is shorted to ground.
To avoid damage to the terminal, the probe must be connected using a probe of a given diameter that matches the size of the contact in the mating block.
Checking the short circuit to the on-board network
Perform the check in the following sequence:
- Disconnect the connector on one side of the electrical circuit.
- Connect the probe, one end connected to ground, to the terminal of the circuit being tested. If the probe lights up, it means that the circuit being tested is closed to the on-board network.
- Reconnect the disconnected block.
- Disconnect the connector on the other side of the electrical circuit. Perform check 2.
To avoid damage to the terminal, the probe must be connected using a probe of a given diameter that matches the size of the contact in the mating block.
Measuring voltage at wiring harness contacts
Perform the check in the following sequence:
- Disconnect the connector on one side of the electrical circuit.
- Connect the positive cord of the voltmeter to the terminal of the circuit being tested, the negative terminal to the vehicle ground. Record the voltage value.
To avoid damage to the terminal, the positive cord of the voltmeter must have a probe of a given diameter that matches the size of the contact in the mating block.
Let us remind you that it is more convenient to carry out wiring diagnostics when you have the car’s electrical circuit diagrams at hand (for Lada XRAY, Vesta, Largus, Granta, Kalina, Priora, Niva 4×4).
Key words: universal article
+13
Share on social networks:
Found an error? Select it and press Ctrl+Enter..
Second hands
How to use a multimeter correctly
New cars are a separate category: all automakers, without exception, pay maximum attention to the cars they sell.
Therefore, their share in fire chronicles is negligible, because:
High level of control on the assembly line; Mandatory maintenance for the first 2-3 years; Rigid selection of suppliers of components (including wires and electrical components).
And it’s a completely different matter for cars that have been in use - who did what with them, how correctly they followed all the instructions, etc. no one can guarantee.
It is quite possible that the car's wiring was treated this way
But even without the “playful hands” of the previous owner, there are a lot of places in a used car that require control:
High-voltage wiring of older cars often suffers from problems associated with violation of the integrity of its insulation. If in the evening under the open hood in the area of the wiring you notice bright flashes of electrical discharges, replace all high-voltage wires, including the tips, as quickly as possible.
Recommendations
First, decide on the type of short circuit:
Short circuit of two phases Short circuit to earth Short circuit with another load circuit.
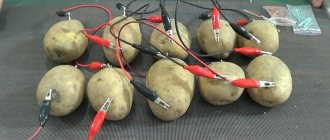
For example, let's take a simple car. You noticed that the left front parking lamp began to spontaneously go out and light up. Find the wiring diagram in the instructions and familiarize yourself with it. Now look at what wires are connected to your lamp. Start disassembling the problematic circuit, disconnect the lamp itself and check the power. If the problem is not power, then look for the adjacent connector in the circuit; in your car it is located near the left fender of the car. Disconnect this connector, if the power to the light bulb disappears, then connect the connector and after the lamp lights up, it will become clear to you that a short circuit of two phases occurs between the next connector and the lamp.
Now take care of the connector on the left wing, open the circuit and remove the winding from the wiring, take a close look at the wire leading from the connector to the lamp, if you notice a burnt spot on it after a short circuit, start replacing this section of the wiring with a new one, you should have a soldering iron and just solder the required section and insulate it, protecting it from condensation, check the operation of the car.
A self-powered test lamp helps to detect a short circuit. You just need to disconnect the wiring from both ends of the circuit and also inspect the wires to visually determine the place where the burnt wire is. This lamp can detect a ground fault if you disconnect the battery.
https://www.youtube.com/watch?v=5Dc_MJQ9zWc
golifehack.ru
Twists, solders and terminals are the enemies of normal car operation
The wiring in a car consists of hundreds of different connections. 4-5 wires come from each sensor, which come into the central wiring braid and connect to the ECU and intermediate sensors and relays. In each case, many wiring details can be problematic, and this depends on the make of the car, its childhood diseases and the quality of the build. For example, in VAZ cars there are a lot of twists in the braid of wires that are poorly clamped during production. This causes the sensors to not work properly.
So, the problems are as follows:
- twists need to be properly crimped, and ideally, their presence in cars should be completely avoided, otherwise, due to shaking and vibration, these elements of the electrical system will fail;
- adhesions are also undesirable, they very often oxidize when exposed to any moisture, and this can cause certain problems with the car, including even complex short circuits;
- terminals are a good solution that is used in some machines, but it is important to use high-quality terminal blocks and insulate them, protecting the influence of moisture on the contacts and connections;
- problems are especially popular when inexperienced specialists were involved in wiring repairs; their twists fall apart at the first serious hole and lead to problems;
- connections when integrating new electrical appliances are an important weak point even in very high-quality cars, so let’s say again that you can only trust a car with an experienced electrician.
Daewoo cars have a whole problem with twists in the wiring. The same problem was inherited by Ravon brand cars. Twists in the braid of wires to the ECU and in the engine wiring begin to cause difficulties after 3 years of operation of a new car. And the worst thing is that replacing the braid of wires with a new factory part does not help to completely eliminate the problem; over time, the difficulties return again. Therefore, owners of such machines often solder twists and get a longer-term solution to the problem. But this is not a panacea; you won’t be able to get rid of troubles once and for all.
Checking ignition cables
The ignition cable must be subjected to careful visual inspection. If it is porous, has cracked insulation, oxidized contacts or other damage, the wiring must be replaced. If the ignition cable appears normal, its function can be measured by testing the wires with a multimeter:
- Set the ohmmeter to 20 kOhm.
- Attach one pin to the end of the cable.
- Read the result on the digital display of the device.
Important to remember! A discrepancy between the instrument readings indicates that the wiring is not working properly. Permissible resistance values:
- Ignition cable copper core: from 1 to 6.5 kOhm.
- Inductive resistor and carbon resistor: The value is determined based on the resistance multiplied by the cable length (plus tolerance).
- Ignition cables have inductive resistance: from 2.2 kOhm to 8 kOhm.
- Ignition cables carbon resistor: from 10 kOhm to 23 kOhm.