When a person buys a new washing machine, a dilemma arises: whether to connect it yourself or seek help from a specialist. Sometimes home appliance manufacturers prohibit self-installation. If this condition is violated, the warranty obligations are canceled. If you decide to install the Atlant washing machine yourself, check this important detail in the store. When there are no restrictions, you can start connecting without fear of losing the right to repair under warranty.
Preliminary check of the unit
Regardless of whether you buy the washing machine yourself or order delivery to your home, before you sign the receipt papers, check its functionality. In the presence of the seller's representative, open the package and inspect the body of the washing machine. There should not be even minimal damage on it.
Most often they occur during delivery, when it is carelessly transported or lifted into the apartment. If, when inspecting the washing machine, you see chipped paint on it or a mark from an impact, do not sign the report. Demand that the product be replaced with one that is fully functional and without damage.
If the washing machine is delivered safe and sound, calmly sign the acceptance documents. But before you release the courier, make sure you have the store number where you can contact him. The phone will come in handy if a defect is subsequently discovered or other issues need to be resolved quickly.
The next step in checking the washing machine is connecting it to electricity. Plug in the power cord and make sure that the backlight of the screen and control unit is on. Turn the washing machine mode switching knob, the values on the display should change.
Final Steps
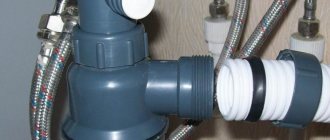
Lastly, the drain hose is installed in its place. It fits tightly enough into the rubber coupling, which eliminates not only leaks, but also the appearance of an unpleasant odor from the sewer. After this, you can open the water supply tap. A brief hiss will be heard - this is the inlet hose being filled. At this point, you need to take a piece of rags and thoroughly wipe all connections. After a minute has passed, it will be possible to determine the presence or absence of the slightest leaks on them. This can be easily done with a piece of regular toilet paper, which will immediately show any moisture if there is any.
Now the drain hose is in its “rightful” place
Getting ready for the procedure
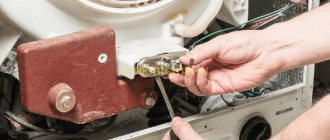
Then you can start connecting the equipment. To do this, you need to remove the fixing bolts located on the rear wall of the washing machine body. They are designed to hold the tank so that it is securely fastened during transport. Remember that until you remove them, the washing drum will not move. Moreover, starting a washing machine with retaining bolts remaining will lead to breakdown and non-warranty repair.
Attention! Before installing the washing machine yourself, you must read the attached instructions.
The fasteners are removed using a wrench or pliers. After removing them, close the holes with plastic plugs. You will find them in the parts kit that came with your washing machine. To do everything correctly, refer to the manufacturer's instructions.
Connection to water supply
This is the most important part of the job. The first question when connecting is which pipe to connect the machine to. Most manufacturers recommend serving cold water. Then the machine itself will heat the water to the desired temperature using a heating element.
Sometimes they connect to hot water to save energy for heating. But this solution has several disadvantages:
- Hot water contains more salts, which form scale. Feeding it into the washing machine will cause the heating element to quickly overgrow.
- If you pay for hot water by meter, the savings are dubious: it’s cheaper to pay the electricity bill.
The water supply hose that comes with the machine is short (about 0.6–0.7 m). Often this length is not enough for connection. Plumbing stores sell longer hoses (3 m or more). The hose is screwed at one end to the input on the rear wall of the machine. The second end of the hose requires a tap into the water supply. How to make it? There are several options.
Tapping with a crimp sleeve
A crimp coupling will help you make a cut into a metal pipe. This plumbing device consists of two halves, which are placed on the pipe anywhere and tightened together with four bolts. To ensure tightness, a sealing gasket is placed between the coupling halves and the pipe.
One of the two halves has a threaded outlet. When the coupling is put on, a hole is drilled through it in the pipe (you will need an electric drill and a metal drill). The insert is ready, all that remains is to screw the ball valve to the outlet, and to it the second end of the water supply hose.
Insertion into metal plastic using a fitting
A crimp coupling is not suitable for a metal-plastic pipe, since when tightened it will simply crush the wall.
To cut into the water supply, a fitting is used. It is attached according to the following scheme:
- A piece corresponding to the size of the fitting is cut out of the pipe.
- Attach connecting rings with nuts.
- Use a calibrator to flare the ends of the pipe to which the tee will be attached.
- Fitting fittings are inserted into the ends of the pipe.
- Move the O-rings to the joints and tighten the nuts.
If the pipes are made of polypropylene, you will need a plastic tee with a metal thread inserted into the outlet. To secure it in the cut, you will need a “soldering iron” for plastic pipes.
Connection using a tee
The easiest way, suitable for beginners. The insertion is made at the point where water is supplied to the drain tank or at the point where the pipe is attached to the mixer. You will need a plumbing tee equipped with a ball valve. Simply unscrew the water supply hose, screw in the tee and screw the hose to the other end of the tee.
This option has several disadvantages:
- If the supply is carried out through a mixer, you will have to turn off the water to the tap every time you wash.
- The hose from the machine will be in plain sight, which does not look very aesthetically pleasing. You can fix the problem by hiding the hose in a decorative box.
If the option of connecting to a mixer is more of a temporary measure, then the machine can be connected to the point where water is supplied to the tank on a permanent basis. Unfortunately, this option is only possible in combined bathrooms or when the machine and toilet are located close, through the partition.
Connecting a washing machine without running water
If the house does not have running water, you can connect the machine to a large water tank. There are two ways to provide pressure:
- By gravity. In this case, the tank should be located at least a meter above the entry point into the machine. This is how they usually connect the car at dachas or other temporary housing.
- Install and connect the pumping station. This option is more reliable, but is associated with higher costs. Therefore, it is used when permanently living in a house without a centralized water supply.
The tank will ensure stable operation of the machine, just remember to periodically add water.
Place for a “home assistant”
Before connecting the machine to the sewer and electricity, think about where exactly you will place it. It is best to choose a location in advance and purchase a washing machine according to the dimensions of your bathroom or kitchen (depending on where it will be located). If you buy a built-in washing machine, be sure to think about how to close it. The door must be the right length and width, fit in with its surroundings and be easy to install.
Pay attention to the floor covering on which the washing machine will stand. The best choice would be a concrete floor or tiles, they are the most durable. If there are boards under the washer, they must first be strengthened.
Important! It is better not to place equipment on laminate flooring, because if it leaks, it will swell and become unusable.
When choosing an installation location, pay special attention to the length of the hoses; they should be enough to reach the points of connection to the pipes. When you have prepared the place and made sure that the washing machine fits in it, you can start connecting. This must be done strictly according to the instructions.
Where to put the equipment?
Before you connect the washing machine, you need to find a place to place it. It is better to do this before purchasing the equipment, since its model and dimensions depend on where and how the machine will be installed. So, a standard full-size washing machine is suitable for a bathroom, and a built-in, narrow one is suitable for a kitchen set. But the future “home” for the unit must be approached responsibly.
More often the machine is “settled” in the bathroom. Despite its modest dimensions, there is always a place for a washing machine - next to the sink, toilet or under the sink. Everything is purely individual, and depends on the available square meters in the room and the wishes of the owners. The “minus” will be increased humidity, but the “plus” will be the connected communications.
The second most popular place for washing machines is the kitchen. Here the washing machines are placed next to the cabinet or directly in the unit. As a rule, there is more free space in the dining area, better ventilation and less humidity. But there are also disadvantages, for example, unpleasant odors from washed clothes and storage of household chemicals next to food.
The third option is a hallway or storage room. This choice is made when there is no opportunity to “attach” appliances in the kitchen and bathroom. But communications are more problematic here.
It is rare, but it is practiced to install a washing machine in the bedroom. In fact, the name of the room is not important. The main thing is that the room meets certain standards.
- Failed communications. Sewer pipe, water supply, electricity - all this should be no further than a meter from the planned location.
- Flat floor. The surface under the machine must be straight and stable. In other words, the washer cannot sink or tilt to one side. Ideally, you need a concrete or tile floor.
Before connecting the washing machine, you must make sure that the placement location complies with the specified standards.
It is not necessary to connect to centralized water supply and sanitation. There are options for draining waste water into a sink or bathtub, and collecting it from a tank or barrel. The main thing is to ensure full functioning of the machine. Once everything is ready, you can start connecting.
Is the outlet compliant?
To ensure electrical safety, the washing machine requires a dedicated outlet with the appropriate voltage. It must be grounded and protected from liquid ingress. Although modern household appliances, as a rule, meet all standards for protecting people from electric shock, it is better to be on the safe side.
The standard length of an electrical cord is usually one and a half meters. In this regard, you should consider the location of the outlet in the immediate vicinity of the washing machine. Of course, you can use an extension cord, but it is much more dangerous.
Why is grounding necessary in a socket? It prevents minor electric shocks that occur due to voltage entering the external parts of the machine. They do not pose any serious danger to the user, other than inconvenience. For this reason, it is recommended to use grounded outlets.
Connection to a water source
Connecting water to the unit
To begin the installation process, several steps must be completed. To ensure the operating mode, it is necessary to supply water, and there are several ways to solve this problem. But there are two circumstances:
- The water in the pipeline must be under pressure of at least 1 kgf/cm2.
- Washing water must be free of impurities.
If the pressure is low, it can be increased using a special pump.
A filter is used to purify water.
Water supply methods
Connection to water supply
- Use for inserting a crimp sleeve. Prepare a flexible hose, size 3/4 inch. Then you need to connect it to the machine, and to the valve on the other side.
- If the pipe is made of metal. Ensure that the valve is inserted into the water supply pipe using a crimp coupling. Two parts of the structure should be put on it. They are connected by bolts. A tap is screwed onto a threaded outlet; it is better to use a ball one. The water flow passes through a special hole directly through the coupling structure.
- Insertion with fitting. When making pipes made of metal-plastic, a fitting should be used; this design is also called a tee. To do this, you need to cut a hole in the material of the connected pipe in a given place and mount this element there, then connect the ball valve to it. Sealing of the seats is ensured by cuffs measuring 32x25, made of rubber.
- Using a tee for connection. The best method is to connect using a flexible hose. For these purposes, a long hose is used, and a tee is used to connect components (see picture No. 3 below). Fastenings are used to ensure reliability. There is also a way to connect the washing machine to the water supply through a hose attached to the water filler for the toilet barrel, using a tee (see picture below No. 4).
Application of tee and union nut
The connection to the sewer through a tee may differ: a hose with a diameter of 22 mm is used, but there are no 50 or 32 mm sockets; therefore, a seal is used - an elastic band made with a transition to 22 mm. To make the length longer, a fitting is used. If the machine is installed in another room, then an adapter in the form of a PVC pipe is used.
Example of connection to a washbasin
Solution for Dacha
Connecting a washing machine to the sewer is possible without running water. The technical device will be especially in demand at the dacha. To do this, the filling tank must be raised to a height of at least one meter, and a hose must be connected to the washing machine from the bottom of the base. This will ensure pressure for the unit to operate. Purchasing a pumping mechanism will cost significantly more. The last device may be small. A private cottage is the optimal solution for this type of installation.
Providing a water supply is only 50% of the whole matter; then the issue of waste water disposal should be resolved, namely, how to connect the washing machine drain to the sewer.
We provide equipment with water
Next, you need to connect the machine to the sewerage and water supply. Typically, the washing machine's water intake hose is connected to a cold pipe. There are models that are allowed to be connected to hot water, but this is rare and certainly does not benefit the equipment. The washing machine has a heating element that brings the water to the temperature required for this mode.
Moreover, connecting to a hot pipe can cause harm:
- water comes in more contaminated, which leads to constant filter blockages;
- Higher hardness worsens the quality of washing; you will have to spend much more washing powder to achieve results.
Read the instructions, and if the manufacturer does not provide an option for connecting to a hot water supply, connect the hose to the cold pipe. You shouldn't even consider other options. They will only harm your new washing machine.
If there used to be an old washing machine in this place, installing it yourself will take place without any problems. You just need to screw the new hoses to the same outlet points. After this, you need to open the water and check for leaks at the connection point.
It will be more difficult to connect the washing machine in a new location. If you don’t already have a pipe tap, you’ll have to do it yourself or call a specialist. It all depends on the experience and set of tools you have.
Important! The tap that supplies water to the washing machine must be in the closed position outside of the washing process to avoid leakage.
When connecting on your own, remember the following important points. Be sure to use only the hoses that come with the washing machine. Pay attention to the pressure in the pipe; it must be within the values recommended in the instructions.
How to make a tap into a sewer
The most complex of all connection methods, but at the same time the most reliable.
Having tinkered once, then you can use the washing machine for the rest of your life without any hassle. When tapping into a sewer, the same principle is used as with a water supply. You need to install a tee on the existing appliance to connect the appliance itself and the washing machine. But here there are at least two options.
Cast iron pipe
Cast iron sewers are now very rare, but sometimes they do occur. In this case, it is better to choose a sink or kitchen sink drain as the insertion point. Smaller diameter pipes are used there, there is free access and installation is much easier. If you use an old cast iron siphon, you will have to replace it at the same time.
What you will need
- Sewer tee 45° of the required diameter.
- Rubber reduction for the transition from a cast iron pipe to a tee.
- Rubber reduction for transition from tee to drain hose.
If the insertion point is at floor level or a height of less than 50–60 cm, then:
a piece of pipe according to the diameter of the sewer or a check valve.
If a standard hose is not enough, then also:
- additional hose of the required length;
- hose connector (usually included);
- two clamps for fixation.
- Remove the siphon drain from the sewer outlet.
- Clean the outlet and install the rubber reduction. Additionally, you can seal the joint with silicone sealant.
- Install the tee inside the reduction, and insert the siphon drain from the sink or sink into the tee.
- Install a rubber reducer into the remaining additional outlet and insert the drain hose from the washing machine into it.
- If the drain hose is not long enough, first extend it using a connector and an additional hose, securing it with clamps.
- If the tapping point where the end of the drain hose is inserted is at a height below 50–60 cm from the floor, additionally install a check valve or use a piece of pipe to raise the tapping point to a height of about 60 cm.
- Do a test wash and check for leaks.
Plastic pipe
The most common option with simpler and more reliable installation. The connection procedure is similar to the previous one. The only difference is that you will not need to make the transition from cast iron to plastic.
What you will need
- Sewer tee 45° of the required diameter.
- Rubber reduction for transition from tee to drain hose.
If a standard hose is not enough, then also:
- additional hose of the required length;
- hose connector (usually included);
- two clamps for fixation.
If the insertion point is at floor level or a height of less than 50–60 cm, then:
a piece of pipe according to the diameter of the sewer or a check valve.
Sewage outlet
In addition to connecting to electricity and water supply, you should also worry about the removal of dirty water. Some people simply lower the hose into the bathtub or sink, but this is completely unaesthetic and unhygienic. Surfaces quickly become dirty and coated with plaque; they will have to be cleaned much more often.
The correct solution would be to connect a siphon to the fitting, a special outlet that is found in almost all modern plumbing fixtures. It is closed with a plug that must be removed and a drain hose put in its place. The connection is securely secured with a clamp.
When connecting, please note that the drain hose has a special bend. It prevents unpleasant odors from the sewer from entering the washing machine. Otherwise, even the most fragrant fabric softeners will not help.
So, you have connected the washing machine to electricity, water supply and sewerage. Now we need to adjust it and try the new technique in action. When starting up for the first time, you should constantly be nearby in order to notice problems in the operation of the washing machine in time. In practice, installing the Atlant washing machine is quite simple and usually does not cause problems. The main thing is to do everything according to the instructions and follow the above recommendations.
Interesting:
- The washing machine broke down under warranty
- Warranty for Siemens washing machines
- Reviews of Atlant washing machines
- Warranty for LG washing machines
- Installing a Whirlpool washing machine
- How to install and connect a Samsung washing machine
Reader comments
- Share your opinion - leave a comment
Download instructions for the Atlant washing machine
How to connect an Atlant washing machine
Before connecting your appliance to the power supply, you must check the voltage; if it does not correspond to the norm, that is, the parameters specified in the operating instructions for the Atlant washing machine, then you must install a stabilizer. I recently corresponded with a consumer about this
Help, twice in 3 years I changed the control module on the Atlant washing machine, the voltage in the network seems to be normal, ranging from 220 to 245 volts, but for some reason the brains constantly fail. As I understand it, this is a common glitch in the electronics of these washing machines.
Yes, indeed, the electronics of the Atlant washing machine want to be better, but if it is operated correctly, it can last for a very long time. You said that your voltage jumps to 245 Volts, this is already abnormal, but for the Atlant washing machine this is already a critical point. There can be only one way out of this situation - this is the purchase of a current stabilizer, and its power should not be less than 3 kW, but in general you need to calculate how much your home consumes maximum electricity and, if possible, it is advisable to install a stabilizer for the entire house or apartment . Only in this way can you protect yourself from unnecessary costs associated with repairing the control module
Below I suggest you watch a video in which I talk about repairing the Atlant washing machine and about some of its negative features. I think it will be interesting to see not only for those who are going to buy this equipment, but also for those who already have it
How to connect an Atlant washing machine to the sewer
I often come to an application, and there the hose is stupidly lowered to the floor and stuck into the sewer at a height of no more than 30 cm, that is, they usually crash into the siphon, in the bathroom, under the washbasin. As a result of this connection, self-draining occurs. More than once, angry owners came to me with indignation that the SM did not wash their clothes. Guys, the Atlant washing machine is not anything special and its problems are exactly the same as in washing machines of other brands. First of all, read the instructions carefully, where it is written in black and white that the drain hose must be at a height of at least 70 cm (see photo above). I am outraged when a person, without even reading the instruction manual, begins to criticize this brand. Here I chose one comment on the channel that just delighted me, I advise you to read
A very crappy machine, we bought it but couldn’t connect it to the sewer; it had a very short hose that barely reached the sewer. After consulting with the master, we bought an additional hose, 2 m long, and connected it to the original one. After the work was done, the machine stopped washing altogether. They called the repairman again, he came and said that the hose was not long enough and the sewer inlet needed to be raised. I don’t understand what kind of technique this is, which depends on the height of the hose, because it was impossible to provide some kind of valve. It seems like an advanced brand, but they make such garbage. One more thing, we connected this washing machine through a carrier, and as a result the carrier melted. In general, it’s not a machine, but some kind of invasion by Mamaia, everything breaks because of it and we’ll also have to redo the entrance to the sewer
Tell me, isn’t this nonsense, if you buy such equipment, then you must be prepared for the fact that it will consume not 100 watts, but at least 2500 watts. The fact that you will have to redo the sewer drain, I’m sorry, but this is your problem, no one will install the valve for you, by the way, on any brand, I have not yet seen a valve installed, including on Bosch. There is no need to criticize technology unfairly
Photo of how to properly connect a washing machine to the sewer
How to connect an Atlant washing machine to the water supply
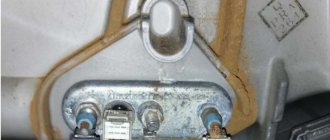
Everything is simple here and there is no need to reinvent the wheel. I’ll say right away that the length of the hose does not matter → the pressure pressure plays a role. Please note that there is a small mesh in the valve body, this is the water inlet filter; it very often gets clogged, especially if people use a well or the water in the water supply wants to be better. There is a lot of mule and sand coming from the well
After a month of operation, our Atlant washing machine stopped filling with water. We live in a rural area, it is very expensive to call a repairman, and the service department said that they would arrive only in 2 weeks. The machine selects all the programs, but without reaching the required water level it turns off, and some letters appear on the display. Tell me, maybe we can somehow fix the situation ourselves
First of all, you need to unscrew the water inlet hose from the washing machine and check the pressure, then remove the water inlet filter from the valve body. You can pull it out using pliers, please note that the filter does not unscrew, it is simply pulled out. Apparently it is clogged with sand or mule, in general it needs to be rinsed well
Operation of the Atlant washing machine
In this paragraph I will tell you what needs to be done to make your SM work as long as possible. In principle, these recommendations are in the instruction manual, but unfortunately many people don’t even read them, so I decided to list them
- Place a rubber mat under the washing machine → firstly, your washing machine will not slide on slippery tiles or slippery floors. Now many will say that the washing machine has rubber feet, and of course this is true, but according to my observations, this does not greatly prevent the machine from moving from place to place. Secondly, thanks to the mat, the vibration on the washing machine will be much less, this is also from observations
- Do not turn on the maximum temperature mode → do not listen to those who claim that 90°C does not affect the operation of this equipment. It also influences how, especially this influence is felt where the water is of poor quality. Firstly, a lot of scale forms, and secondly, we must not forget that at 90 degrees, the washing machine works much longer, since the heating element must heat the water to the set temperature. I often observe that the contacts on the heating element burn out or one of the terminals burns out, this is due to the fact that the heating element consumes a lot of electricity. The control module has a relay that controls the operation of the heating element; it can also quickly fail. There are some other nuances that I could talk about for a long time, but I think that the ones I have listed are quite enough to make you think about using the maximum temperature mode
- After washing, open the loading hatch and the powder container a little → this is necessary so that an unpleasant odor does not appear, in other words, so that the machine does not suffocate
- Use good powders
- You cannot use carriers, tees and adapters
- Install a separate outlet from the meter
If you follow all the recommendations that I wrote above, then your machine will work much longer than that of your neighbor who doesn’t care about all these tips
Download the operating instructions for the Atlant washing machine
Now we can begin the main part of our article, or rather, why I wrote it in the first place. Below you can download operating instructions for Atlant washing machines of different models. In the manual you can see the washing modes, and read more about how to connect the washing machine to the sewer and water supply. You can read about the additional functions that exist on washing machines of this brand. Remember the instruction manual, it’s not just a beautiful magazine, it’s a guide thanks to which you won’t need to call a technician from the service center again. Pay attention to how the drain system is cleaned, this is very important, because the main breakdowns are associated with the pump, that is, with the drain pump. All instructions are uploaded to Yandex disk, if you are a resident of Ukraine, I recommend installing the Yandex browser or the Opera browser on your computer, there are just a lot of instructions, and I don’t have time to download them from one file hosting service to another. I wish I could find you a manual for your model.
Atlant SMA-5FB 820E SMA-5FB 1020E SMA-5FB 1020E1 SMA-5FB 1220E SMA-5FB 1220E1
Atlant SMA 60U810-XX SMA 70S810-XX SMA 60U1010-XX SMA 70S1010-XX SMA 60U1210-XX SMA 70S1210-XX SMA 70S1210-A-XX
Atlant SMA 35M81-XXX SMA 45U121-XXX SMA 35M101-XXX SMA 50S81-XXX SMA 45U81-XXX SMA 50S101-XXX SMA 45U101-XXX SMA 50S121-XXX
Atlant SMA 35M82-XXX SMA 50S82-XXX SMA 35M102-XXX SMA 50S102-XXX SMA 45U82-XXX SMA 50S122-XXX SMA 45U102-XXX SMA 50S142-XXX SMA 45U122-XXX
Atlant SMA 45U84-ХХХ SMA 50С104-ХХХ СМА 45У104-ХХХ СМА 50С124-ХХХ СМА 45У124-ХХХ СМА 50С124-А-ХХХ СМА 45У144-А-ХХХ СМА 50С144-ХХХ СМА 50С84-ХХХ СМА 50С144-А-ХХХ СМА 60К124- A-XXX
Atlant SMA 50U87-XXX SMA 50U107-XXX SMA 60s87-XXX SMA 60s107-XXX
Atlant SMA 50U88-XXX SMA 50U108-XXX SMA 60S88-XXX SMA 60S108-XXX
Atlant SMA 50U82-XXX SMA 60S82-XXX SMA 50U102-XXX SMA 60S102-XXX SMA 50U122-XX SMA 60S122-XX SMA 60S142-XX
Atlant SMA 60U87-ХХХ SMA 70С87-ХХХ СМА 60У107-ХХХ СМА 70С107-ХХХ СМА 60У127-ХХ СМА 70С127-ХХ СМА 60У127-А-ХХХ СМА 70С127-А-ХХХ СМА 70С147-ХХ СМА 70С 147-A-ХХХ
Atlant SMA 70S102-XX SMA 70S122-XX SMA 70S142-XX
Atlant SMA 50U86-XXX SMA 50U106-XXX SMA 60S86-XXX SMA 60S106-XXX
Atlant SMA 60U86-XXX SMA 70S86-XX SMA 60U106-XX SMA 70S106-XX SMA 60U126-A-XXX SMA 70S126-XX SMA 70S126-A-XX SMA 70S146-XX SMA 70S146-A-XX
Atlant SMA 50U89-XX SMA 50U109-XX
Atlant SMA 60U87-ХХХ SMA 70С87-ХХХ СМА 60У107-ХХХ СМА 70С107-ХХХ СМА 60У127-ХХ СМА 70С127-ХХ СМА 60У127-А-ХХХ СМА 70С127-А-ХХХ СМА 70С147-ХХ СМА 70С 147-A-ХХХ
Atlant SMA 60U88-XX SMA 70S88-XX SMA 60U108-XX SMA 70S108-XX SMA 60U128-XX SMA 70S128-XX SMA 70S148-XX
Atlant SMA 60U89-XX SMA 60U109-XX SMA 70S89-XX SMA 70S109-XX
Atlant SMA 35M81-XXX SMA 45U121-XXX SMA 35M101-XXX SMA 50S81-XXX SMA 45U81-XXX SMA 50S101-XXX SMA 45U101-XXX SMA 50S121-XXX
Atlant SMA 35M82-XXX SMA 50S82-XXX SMA 35M102-XXX SMA 50S102-XXX SMA 45U82-XXX SMA 50S122-XXX SMA 45U102-XXX SMA 50S142-XXX SMA 45U122-XXX
Note. All information provided on the site is not a guide to action, but serves solely for educational purposes.
Final steps and verification of work
At the end of the installation process of the washing machine, you need to align the body strictly horizontally. A regular building level is suitable for this.
The height of the machine legs is adjusted by twisting. For additional stability, you can place the machine on a rubber mat. These manipulations minimize vibration of the unit during operation.
At this point, the installation can be considered complete, all that remains is to proceed to the test run. The following indicators indicate a successful result:
- Which washing machine should you choose? Rating of the best models and new products of 2021
Floor fan: review of the best options for apartments and private houses
The best microwave ovens: TOP models of 2021! Review of only proven models and leaders in the home appliances market
- The washing machine tank quickly fills with water to the required level;
- the drum rotates evenly during different programs (washing, spinning);
- there are no leaks in the water supply and drainage systems;
- during operation, the unit does not produce any extraneous noise, vibration is felt within normal limits;
- The heating function works properly.
The above set of rules is universal, however, it is worth taking into account the individual characteristics of each washing machine model and, when connecting, read the attached instructions.
How to install a washing machine yourself
The store will offer installation services upon purchase, but this is expensive. The washing unit can be installed independently.
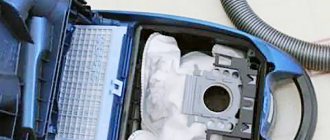
Removing Shipping Bolts
The first step is to remove the shipping bolts, which protect the drum from shaking during transportation. On different models there can be from 4 to 6 pieces. Instead of unscrewed bolts, rubber plugs are inserted, which are usually included in the purchase kit.
PHOTO: priborka.life Removing transport bolts from the rear wall of the machine, freeing the cable and hose
Connection to communications
This is the most responsible work that requires a responsible approach.
Water pipes
The machine is connected to the water supply with a one and a half meter hose at two points. The hose has fittings with union plastic nuts on both sides. First, one end of the hose with an L-shaped end is screwed to the fitting on the rear wall of the machine. Then the other end is connected to a fitting pre-installed on the water pipe. No additional sealing of the connection is required; the nuts are self-sealing. You have to tighten them by hand; no keys are needed here.
PHOTO: ekb-holod.ruConnecting the supply hose to the water supply
There must be a tap in front of the fitting that shuts off the water in emergency situations.
PHOTO: blackstoneinspections.comConnecting the supply hose to the machine
Sewerage
Draining from the machine must be done in such a way as to avoid the effect of self-leakage of water from the tank. To do this, the hose is laid with a bend, which should be located above the water level in the machine. The drain can be installed directly into the sink. For this purpose, the kit includes a sleeve with a special clip.
If the drain hose is immersed directly into a thick sewer pipe, then the drain point should also be higher than the water level in the machine tank.
PHOTO: stirkauborka.ru Kink in the drain hose
PHOTO: irp-cdn.multiscreensite.comConnecting the drain hose into the hole in the sewer pipe
Related article:
Electricity supply
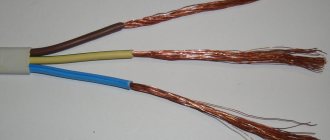
The washing machine is an energy-intensive unit. Power consumption can vary from 2 to 2.5 kW and higher. Wiring to the socket should be carried out with a cable with a cross-section of at least 2.5 mm². It is advisable to install a circuit breaker in front of the outlet. For low power, you can choose a machine with a current of 10 A, for high power - 16 A. It is advisable to install a separate machine, only on the machine. The socket itself must be designed for a current of at least 16 A. The socket must be installed in a place that is convenient and accessible for quick disconnection and connection.
PHOTO: remont-book.comConnecting power supply
Fixation of legs
Alignment of the machine in space relative to the geometric vertical is done by screwing in and unscrewing the legs. The leveling result should be monitored using a building level, or even better, using a laser level. Under no circumstances should you level the machine by placing anything under its feet. Once leveled, the unit should not rock.
PHOTO: kursremonta.ru Aligning the machine with adjusting bolts
Testing
After installing the machine and connecting all communications, the device should be tested: check the water supply and drainage according to the program, and the absence of leaks at the connections. Testing is carried out without loading things into the car.
Watch this video on YouTube
Where should I put the machine?
Logically, the answer to the question about the future location of the new washing machine should have been given before purchasing it. This decision will dictate the need for a removable cover or certain dimensions of the unit. But even without prior thought, it’s not difficult to “set up” a washing machine - the modern equipment of the machines allows you to easily experiment and change the initially chosen location to another. However, there are not many accommodation options.
- Bathroom. The most popular and optimal option due to accessible “outputs” to communications and convenient use. The small area of the room does not interfere with installing the machine next to the bathroom: compromises are found with embedding the machine under the sink or purchasing compact “vertical” equipment. But there is a big “minus” - high humidity, which violates the standards for safe and long-term operation.
- Kitchen. Many people choose built-in models to install them in a kitchen unit or place the new unit next to the refrigerator. This is a good choice with fully functioning ventilation, normal humidity and the presence of free space.
- Hallway and storage rooms. If there are empty niches in the corridors, then they can also be used to place a washing machine. Even better is to “hide” the assistant behind the door or in the closet.
There are also less popular options. Residents of hostels and hotels, for lack of other places, have to install a washing machine in the sleeping or dining area.
It all depends on the capabilities and features of the apartment layout.
The main thing is that the following conditions are met:
- water supply and sewerage are nearby or easily accessible;
- the nearest moisture-resistant outlet at a distance of no more than 1-1.5 meters (this is the average length of the cord);
- the floor does not sag or tilt (concrete or tile is best);
- the door opens freely, and there are no problems with access to the control panel and powder receptacle;
If there are no obstacles to using the washing machine, feel free to plan to add a new “tenant” to the interior. If necessary, supply sewerage to the selected area. After the final decision, we proceed to the next stage - preparation for connection and installation.