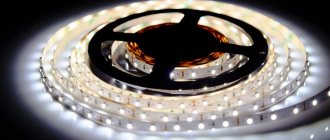
LED strip device
However, from the very beginning you should find out what an LED strip is and what structure it has. And so its composition assumes the presence of such elements as:
- Printed circuit board.
- LEDs.
- Current limiting resistors.
- Connecting conductors.
The printed circuit board acts as the basis on which all other elements are installed. All LEDs are divided into groups. Each group assumes the presence of three diodes.
LED strip circuit
It is worth noting that these three diodes are connected in series with each other and are connected through a resistor to the main connecting conductors. In other words, each group is connected in parallel to these conductors. As a result, a combined connection is created.
Each of these groups is indivisible. If you need to use a short-length LED strip and there is a need to cut off some part, then this must be done so that the group is not divided.
In fact, to ensure this purpose, the manufacturer designates the permissible cutting locations. They are often indicated by the letter "O" and a scissors icon.
Also in the same place there are special contacts that can be connected to the power supply thanks to special connectors or wires. In the latter case, the wires must be soldered to these contacts.
Connection diagram
The LED strip is a coil that can be cut in certain places. If you follow this rule, the shortest segment will contain several LEDs connected in series and a resistor.
Diagram of a segment of a monochrome lighting fixture.
The design of the RGB(RGBW) tape is somewhat more complicated, but the principle is the same - when cut in specified places, you can get a segment with elements connected in series.
RGB illuminator circuit.
If you cut non-adjacent terminals, you can get several such segments connected to each other. Therefore, prepared pieces of tape are also connected in parallel to each other, but they must be connected in series. This is how the circuit of this lamp is built.
To assemble a complete circuit, you will need a power source for the appropriate voltage and current consumption, which is equal to the current of the full length of the blade used with a margin of 20-30%. LEDs are undemanding in terms of many supply voltage parameters, so they do not need a power supply with a good anti-aliasing filter or even a stabilizer. A lightweight, compact and inexpensive switching voltage source is quite suitable.
You will also need a power switch. In some cases, a circuit breaker will be required. As a result, the general diagram for connecting a monochrome tape will look like this:
Connection diagram for short sections of LED strip.
The minimum current of the circuit breaker is selected with a small margin from the ratio Iwork>Itape*(220/Usupply), where Usupply is the supply voltage of the tape.
Connection diagram for long sections of LED strip.
Using this scheme, you can connect pieces up to 5, maximum 10 meters long. If the total length of the segments is greater, then too much current will flow through the conductors on the canvas, which will lead to overheating or burnout. Therefore, canvases with a large total length are divided into groups of 5-10 meters and powered in parallel.
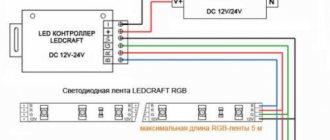
The RGB strip is connected in a similar way, but using it in static mode is uninteresting, so another element appears - an RGB controller that controls the colors of the glow in dynamics.
Connecting RGB lighting.
If the total length does not allow the tape to be powered in serial form, proceed in the same way as in the monochrome version, but another problem is added - the load capacity of the controller. In order not to overload its outputs, signal amplifiers are added - one for each group of segments.
Types of LED strip
Depending on the LEDs, LED strips are divided into white (it can also be called monochrome and duralight) and color. They have different numbers of contacts. So, the white tape has two contacts.
Colored is characterized by four contacts. Three of them represent three colors: red (R), green (G) and blue (B). The last contact is designated V+.
Decorative three-color LED strip
The main difference between these types of LED strips is the LEDs. The LED itself is a semiconductor. These semiconductors come in a variety of colors, and when current passes through them, they glow in different colors.
The white LED strip has one semiconductor crystal, the colored LED strip has three different crystals. These crystals can have different sizes and these sizes determine the overall power of the ribbon.
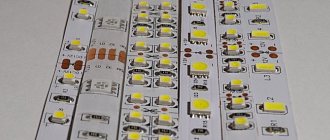
Today, there are two main types of LED strips on the market, which can be easily installed with your own hands. They are SMD 3528 and SMD 5050. The abbreviation SMD stands for LED manufacturing technology.
There is another manufacturing technology. It is designated DIP. SMD 3528 has an LED matrix with dimensions of 3.5x2.8 millimeters. At the heart of this matrix there is one LED, which indicates the ability to create only white color.
SMD 5050 contains an LED matrix with dimensions of 5x5 millimeters. This matrix has three crystals. This type of LED strip produces colored light.
What will be needed for installation?
In addition to the tape itself with the desired color and the required length, you will need:
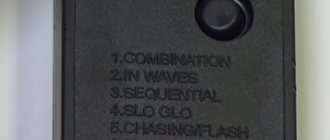
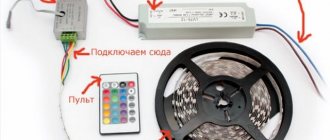
- Controller. Essentially a control panel. It will turn the backlight on and off, as well as switch colors and adjust brightness. It can be wired or remote. Connects to the power supply.
- Power unit. Plays the role of a transformer that converts the voltage to the required one. The power supply unit is selected depending on the length and power of the tape.
- Connector . Necessary for connecting individual pieces of tape into one. You can assemble the backlight without it, but then you will need to solder the segments.
Characteristics
It is also worth mentioning the main characteristics of the LED strip. One of the characteristics is the number of LEDs per linear meter. This number can be 30, 60, 120 or 240 LEDs.
The more LEDs per meter, the brighter the light emitted will be. Brightness also depends on the power of one LED.
The second characteristic of an LED strip is power. It depends on the power of the LEDs. Manufacturers usually indicate the number of watts per linear meter. The total power of the required tapes is determined by multiplying the number of meters by the number of watts per meter.
Also, the LED strip, which is very easy to install yourself, is characterized by the levels of moisture protection and the luminous angle of each LED. The LED strip may not be protected from moisture, it may be half or completely protected from moisture.
This is important when installing it in the kitchen or bathroom.
Self-production
It is very difficult to accurately copy a factory LED strip, since it uses a flexible printed circuit board and special LEDs.
However, you can do without this by purchasing a textolite strip and ordinary LEDs. Also, you will need resistance - as you know, on a factory tape, it is practically not noticeable.
What do you need to prepare for installing LED strip?
In the future, we will look at what you need to have in order to install LED lighting in your home yourself.
Any LED strip operates at reduced voltage. Today, the most commonly used tapes are those that require 12 or 24 volts. Manufacturers also produce 36- and 64-volt ribbons. However, they are used very rarely. Given this, direct connection to the public network is prohibited.
In order to supply current with the required voltage, you need to use a power supply. In addition to this block, you also need to prepare the following elements:
- connectors;
- soldering iron;
- plug (will be installed on the other end of the tape);
- controller;
- RGB amplifier.
The controller and RGB amplifier will be used if you install a colored LED strip yourself.
Helpful advice: if the total length of the LED strip exceeds 5 meters, then you need to stock up on additional power supplies and RGB amplifiers (again, in case of using a colored strip). There is a rule here: there must be one power supply for five meters of LED strip. In the case when the ribbon has colored LEDs, then for every additional five meters you need to use an RGB amplifier.
Some people may note that you can take one powerful unit and connect 10 or more meters of LED strip. From the technical side, this can be done, but there are some problems.
The brightness emitted by a semiconductor crystal depends on the current strength. The longer the ribbon, the less current will be at the end. This will result in the brightness of the last LEDs being reduced. In addition, the first semiconductor crystals will be in a state of overload.
Selection of power supply
One of the most important points in preparing an LED strip for DIY installation is the correct selection of the power supply. The main task is to determine its power. To do this, you first need to know how many watts the LED lighting system will consume.
How LED strips are connected to the block
As already noted, the power of a lighting system created on the basis of LEDs will be equal to the total length of the strip multiplied by the power of one meter of LED strip. Next, you need to add another 30-50 percent to the resulting figure. This percentage is the power reserve.
If the LED strip will be turned on and off, and most of the time it will be in the off state, then the watt reserve should be 30 percent. When the LED strip works constantly, the margin should be 50 percent.
For example, we have 5 meters of LED strip. One meter has a power of 10 watts. The total power will be equal to 50 watts. Next, we take the maximum watt reserve (50 percent) and get the power of the power supply, which in this case will be 75 watts.
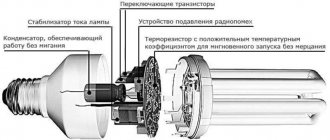
Making your own power supply
The power supply can be purchased, or you can also make it yourself. Our example will show how you can make a reliable and powerful unit based on a cheap, low-quality electronic unit.
The main thing for creating a power supply with your own hands, which will be used for LED lighting at home, will be an electronic transformer with a power of 50 watts. It provides a voltage of 12 volts.
It is worth noting that these 50 watts are the nominal value obtained from the general electrical network. The final output power level does not exceed 30 watts. This is normal, since such a unit has an efficiency not exceeding 60 percent.
Its electronic circuit is shown in the figure:
Power supply circuit for LED strip
Ultimately, we will have a unit that can provide full operation of a 10-watt LED strip.
At the very beginning, we need to home-wind a pulse transformer. The reason for this is that when under load, it supplies a voltage that can drop to seven volts. We need 11.5 volts.
In our power supply, the secondary winding is formed by nine turns of 0.8 mm wire. Our task is to unsolder one of the wires of the 2nd winding from the board. Next, we determine in which direction its turns are wound and wind four more turns in the same direction.
To rewind the turns, the transformer does not need to be disassembled. Also, the turns themselves may be uneven. When the turns are wound, clean the ends of the wires of the factory and new windings from varnish. Next they are connected. The other end of the new winding is soldered to the place to which the old wire was soldered.
Thanks to this, the transformer will produce 14-15 volts. Under load, this value will drop to 10.5-11 volts. To rectify this voltage, you need to use Schottky diodes, which are found in computer power supplies, or pulse diodes. The current strength of the latter should not exceed three amperes.
The next task is to smooth out the current ripples that will be received by the DIY LED lighting system for the apartment.
This task is performed using a film capacitor, which has a capacitance of 0.22-1 µF. Ultimately, we get rectified current.
However, we still need to take care of stabilizing this current, since there may be sudden voltage surges in the network. To do this, you can use an integrated zener diode or a linear stabilizer on a transistor, made by yourself.
The first method is implemented by using a ready-made microcircuit from the 7812 series. It must be installed on a heat sink.
If the stabilizer is created using the second method, then a transistor, a powerful power switch and a zener diode are prepared. All these elements must be installed on the heat sink.
The zener diode can be anything. The main thing is that it has 11-12 volts and a power of one watt. The resistor power should be one or two watts.
Installation rules
After preparation is completed, installation of the tape begins. If connectors are used, the tape can be immediately installed in the desired location.
If the connection will take place without connectors, then you first need to solder the corresponding wires. The main rule when soldering is to maintain polarity. If this is not done, the lighting will not work.
Helpful Hint: The solder joints are very delicate and unreliable. As a result, during installation you need to treat them very carefully. Using connectors will be more reliable.
When installing LED strips, certain rules are followed:
- The surface on which the LEDs will be mounted must be cleaned and degreased with alcohol
- If the surface is made of metal, then electrical insulating material must be installed on it.
- The LED strip should not be bent too much. The bending radius should be more than two centimeters. Otherwise the contacts will be damaged.
- Cutting can only be done in those places designated by the manufacturer.
- Before installation, be sure to check its suitability.
- Connection of several parts of the LED strip is carried out in parallel.
Video.
The video explains how to connect an LED strip with your own hands. It is given below.
How to attach
Before attaching the LED strip, the first thing you need to do is mark the installation site. Regardless of the room, along the perimeter of the ceiling in the living room or along the length of the cabinets in the kitchen, a straight line is drawn with a pencil.
Without a drawn line, you will simply stick the tape crookedly, and believe me, it will be visible and not very beautiful!
Fastening is carried out in two common ways:
- gluing the tape itself to the adhesive base;
- installation in an LED profile, which is also attached with glue or screws, dowels, depending on the base.
The first method will be an excellent solution for rooms with normal humidity and a straight, non-rough surface. Otherwise, over time it will peel off and fall off.
Some craftsmen add expensive, high-quality glue to the base before installation. This approach has one drawback - the tape cannot be dismantled later without damaging it.
During installation, do not peel off all the protection of the adhesive base at once; this should be done gradually, as you fasten it in place.
The second method is considered more reliable and safe, but at the same time labor-intensive and costly. It is worth noting that when installed in a profile, you can use diffusers; they allow you to get softer light.
After applying the markings and choosing the installation method, you need to decide on the location of the LED strip power supply (the driver is needed to power the entire circuit with electric current). A place in a niche or closet is best.
If possible, try to place the driver so that air circulates around it, because... When working, it heats up and generates heat.
Warm air must be removed, this will reduce the operating temperature of the power supply and extend its service life.
Once you have decided on a location for the power supply, proceed to installation. The LED strip is attached to the profile with glue and covered with a diffuser.
During the process you will have to cut and join the tape. There are no pitfalls in this matter, but there are still some things you need to know.
We have already talked about how to properly cut an LED strip; you can read about it here. In places where you need to connect, use connectors or soldering.
Expert opinion
Mikhailova Maria Vasilievna
Furniture store manager. Knows everything about comfort and interior design
Soldering will be preferable for aggressive environments (streets), because... less susceptible to oxidation.
Afterwards all that remains is to connect the driver and the tape with a cable.
The power cable that will connect the tape must be selected based on the driver parameters; it must withstand the consumed load. Be sure to take this condition into account.
It is advisable to attach the connecting cable to the wall in a plastic box that matches the color of the walls. The ideal fastening approach is to groove the wall, lay the cable inside and putty. If this is not possible, then use a plastic box.
Comments:
Syoma
Good article, it’s a pity that I’m not very comfortable with a soldering iron. We'll have to leave this work to the masters.
Nathan
Syoma, there is no need to solder the block, you can buy it, but soldering a tape to it, even for a beginner, will not take more than 10 minutes of time. I think we can try.
Syoma
Nathan, I don’t mind, but I don’t even have a soldering iron, and I don’t really want to bother with it.
Nathan
Syoma, I’m not trying to persuade you, but usually the cost of electronics engineers’ services is more than the cost of a cheap Chinese soldering iron, rosin and tin. Just count the time, the necessary tools, materials and compare with the figure that will be given to you in the TV studio. However, their work may take up to 3 days. In general, the choice is yours.
Syoma
Nathan, thanks for the advice, I’ll definitely consider it
Mamo4ki
When preparing to install the LED strip, segments of insufficient length may appear. They can be successfully spliced together without compromising the operation of the tape as a whole. You can splice sections of LED strip in two ways: using an LED connector and soldering. There are also two ways to connect tapes by soldering: direct soldering of tape pieces together or using additional wires.
Leave a comment Cancel reply
Related posts
LED strip in the bathroom - features of use, rules and installation procedure Aesthetic kitchen lighting with LED strips Installation of LED strips in the sauna room Illumination of a stretch ceiling with LED strip - features and installation procedure. Video.