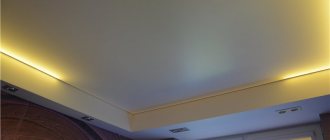
Purchasing a ready-made LED lamp can be expensive, although the LED strip used for its manufacture is much cheaper, it can easily be cut into pieces of any length and installed in a convenient place. In this regard, the issue of self-manufacturing a lamp from LED strip becomes relevant.
Application areas of LED lamps
The main areas of use of LED lamps are:
- street lighting;
- industrial facilities;
- office lighting;
- architectural structures;
- decorative ceiling lighting in residential buildings, shopping malls, public catering outlets, hotels;
- decorative floor lighting on roads, pedestrian areas, stairs;
- wall lighting in residential premises, public catering establishments, and cultural heritage sites;
- spot LED lighting: paintings, cornices, various art objects;
- transport facilities;
- emergency lighting during evacuation operations and when lighting the most dangerous places;
- explosion-proof lighting: oil and gas and mining facilities, gas stations;
- lighting of premises with increased requirements for cleanliness: medical laboratories, treatment rooms, clinics, hospitals.
Calculate and measure
LED lighting can be made using individual LEDs, LED lamps, as well as strips. The most functional for room design are ribbons. LED strips are sold in reels 5 meters long. You can connect several in a row if you need more, or cut off a piece if you need less. They are connected only through a power supply, which reduces the unstable 220 volts to the required and stable voltage. Before you buy, calculate how much tape you need and what kind of power supply accordingly. The required voltage is indicated on the tape; it indicates how much one meter is needed to operate. Take the total length of the tape, multiply it by the voltage of one and add a power reserve of 20 percent. The resulting result will be your power supply.
Required materials and tools
The main components of a LED strip lamp:
LED Strip Light
The optimal strip width is 8 mm.
The LED strip is designed for 12 Volts, but there are also designs for a 24-Volt network. For this reason, to install and run a homemade LED lamp, you cannot do without a rectifier and adapter. Using a controller or adapter, 220 V alternating current is converted into 12 V direct current, taking into account the electrical power consumed by the tape.
The LED strip can have a silicone layer applied on one or both sides, protecting the device from external influences. On the other side there is an adhesive layer for gluing to the surface.
For tape, as a rule, diodes and resistors of the SMD 3528 and 5050 brands without leads are used. This marking shows the dimensions of the diodes.
| LED type | Number of diodes per 1 meter | Power size |
| SMD 3528 | 60 | 4.8 W |
| SMD 3528 | 120 | 7.2 W |
| SMD 3528 | 240 | 16 W |
| SMD 5050 | 30 | 7.2 W |
| SMD 5050 | 60 | 14 W |
| SMD 5050 | 120 | 25 W |
For an LED strip designed for a constant voltage of 12 Volts, you need a power supply - if you plug it into a 220 V network, it will immediately burn out.
power unit
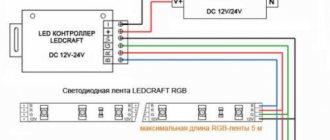
The power supply can have different power and shape. This could be a low-power device similar to a charger, or a powerful metal structure with a built-in cooler. Some power supplies have dimmers and remote controls. An RGB strip requires an RGB controller that controls color. Some power supply models have color and musical effects and can be controlled via a Wi-Fi connection.
Choosing a power supply for a homemade LED lamp is not difficult. This is done based on the power indicated on the tape. For example, if a tape 2 meters long has a power of 12 W, then it needs 24 W, but the power supply must be selected taking into account a reserve of 20%.
Aluminum corner
Its dimensions should be 10x10 mm, and its length should be 1.5 meters. You can use a plastic electrical box as a corner. This replacement will not affect the quality of the lighting device.
Other materials and tools:
- screws;
- small switch;
- electric drill;
- ruler and marker;
- jigsaw;
- pliers.
Creation of a fluorescent LED lamp
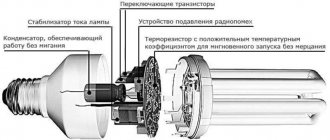
Consider making a lamp using a fluorescent lamp. Its production principle is somewhat similar to that described above. Only here a fluorescent lamp and pieces of LED strip will be used.
This 220-volt LED lamp will delight you with a long operating time and pleasant light. It can be installed in any room and any lamp.
To work you need to stock up on the following parts:
- The remaining lamp diodes.
- Capacitor.
- Electrolytic capacitor.
- Four pieces of LED strip.
All edges except the wick must be removed from a burnt-out fluorescent lamp. Next, you need to cut the finished LED strip so that it can be divided into equal 12V pieces. You should end up with pieces consisting of three LEDs. The cut pieces must be attached in sequence.
The parts of the LED strip are attached so that the base is elongated. For this, it is better to use a foam board that can be easily polished. You can easily attach a diode strip to it. You can even create an attractive design for such a device using liquid nails. After drying, only diodes will appear.
So, in this article we looked at how to make a lamp with your own hands. If you perform the process correctly, the device can serve you for many years.
Assembling a lamp from LED strip
A homemade LED lamp can have a device of various formats due to the flexibility of the LED strip. The lighting fixture can be horizontal, vertical or with legs. Assembly options depend on the type of device and the capabilities of the wizard.
Simple option
Do-it-yourself assembly of the simplest and most common lamp is carried out in several stages:
- The length of the corner or electrical box is measured.
- Mounting holes are drilled in the corner or box for screws and a switch.
- The box is fixed in the place provided for it.
- A switch is inserted into the hole.
- Wires are soldered to the LED strip.
- The surface is degreased with acetone.
- An LED strip is installed along a corner or electrical box.
- Wires are used to connect the power supply or adapter.
- All connections are checked.
This is how a horizontal structure is assembled, the most common for illuminating the cooking area in the kitchen, countertops, desktops and wall shelves. As decoration elements, you can use various materials that match the surrounding interior.
When choosing a place to place this lighting device, you need to take into account that the optimal height from the illuminated area is considered to be 0.7-0.8 meters. This will provide the most effective lighting.
How to make a simple lamp from LED strip without using a power supply is shown in this video:
Connection diagrams for LED lamps
A DIY LED lamp is connected to the power supply in two ways. The first method involves using the driver as a power source, and the second - a power supply.
If autonomy and mobility are required, you need a battery-powered lamp. In this case, the device body must have a compartment for batteries. It is better to use a frame from an old non-working electrical appliance, using the slots for batteries.
Homemade LED lamp. The light element is an LED strip. Power source – DC power supply.
Driver
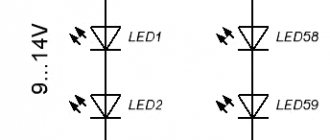
The LED is a nonlinear load; its electrical parameters change depending on operating conditions. When using a driver, the use of a current-limiting resistor is not required; all drivers have a factory current value; the number of LEDs in the circuit is selected based on this indicator.
Depending on the voltage range in which the driver operates, the number of LEDs that are connected in series is selected, thus the connection is made in parallel using the serial method.
DC power supply.
A feature of the driver is that it always produces the same current from the output filter, regardless of the magnitude and fluctuations of the input voltage. They are made on the basis of transistors or microcircuits.
power unit
The power supply has only a calculated output voltage; the LED is ignited by including a resistor in the circuit, which protects the LED from burning out. When a resistor burns out, the LEDs installed in the module may completely fail.
If you do not want to calculate the circuit with the driver, then it is better to use a power supply and LED strip. In this case, you need to pay attention to the power of the tape and power supply, creating a margin of 20% in favor of the power supply.
Driver for powering the LED strip.
Drivers are used only to connect LEDs and are the basis of all LED lamps. It is important to note that the driver is designed to operate in a specific circuit; it is not suitable as a power source with other LEDs. You can connect any LEDs to the power supply, the main thing is that a current resistor is installed in the circuit, and the power consumption of the LEDs does not exceed the peak power value of the power supply.
LED Strip Light
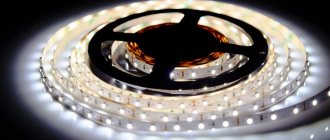
The LED strip is a flexible rubberized “printed circuit board”. It contains current-limiting resistors and unpackaged LEDs. This convenient design allows you to make your own lamp and install it anywhere. At the same time, the device of the tape allows you to make cuts on it and divide it into pieces of the required size.
Note! To avoid breaking the contact between the LEDs, it is necessary to cut the tape only in specially designated places. They are marked with a white line.
After the cut, the contacts in its place must be soldered to the supply wire.
LED Strip Light
Also, the structure of the LED strip has a self-adhesive layer, allowing it to be installed anywhere. Today, these products have various options in terms of installing LEDs, differing in the characteristics of the luminous flux. The most popular tape models today are products with 12V power.
You can make a lamp from an LED strip with your own hands from any of its formats (single or multi-color type). The main thing is to follow the assembly instructions, and also take into account the structural features of the tape itself. Such a homemade lighting device is most often used not as the main light source, but as an additional one. For example, it can be installed on a desktop, under the bottom of a wall cabinet, etc.
