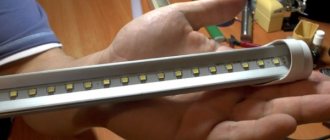
LED strips are becoming more popular every year. They fit favorably into the interior of living rooms, entertainment facilities, or are used to attract attention on advertising banners. But, like any backlight, LEDs can fail after a while. To solve the problem, the tape can be replaced, but this is not always beneficial.
If the breakdown is not critical, the elements can be repaired yourself. To do this, you need to understand their design and operating principle. Experience in soldering microcircuits will also come in handy. But before you start repairing, you need to understand whether it will help or not. Sometimes a breakdown cannot be fixed.
What problems may arise
The causes of breakdowns are as follows:
- The backlight does not come on completely . First you should check if the power supply is turned on. The next step is to check the voltage at the outlet. A multimeter or test lamp is suitable for this. If everything is in order, you should check the wire that leads to the power supply. If there are no problems, pay attention to the quality of the connection between the tape pad and the wire. Also, the cause of the malfunction may be in the printed circuit board;
- the diodes lit up only up to the center of the tape . The cause of the malfunction is the burnout of one of the segments;
- LEDs flicker constantly . There may be several reasons for this. One of them is a failure of the power supply. It is also recommended to check the entire length of the connections and the supply wires. Sometimes flickering occurs due to overheating or gradual failure of diodes;
- A separate piece of tape or some diodes flicker . This occurs due to damage or burnout of one of the chips. The resistor may also be faulty.
LED strip does not light up halfway
This breakdown is common - in one of the segments the track has failed. Diagnostics consists of applying power to areas that are located behind the problem area of the LED strip. Don't rush to blame diodes for a breakdown. Sometimes this happens due to a break in the conductor. To prevent this from happening, the bends should not be too sharp.
An example of a break on a bend.
To repair, the non-working section must be removed and the working parts soldered together. This repair option is not always appropriate, since the tape will become shorter. In any case, you will have to buy another product to fill the gap.
Lost brightness
The loss of brightness may not be immediately noticeable. The ribbon will continue to glow, but not as brightly as before. This can happen with a single section or along the entire length. Possible reasons:
- The LEDs are reaching the end of their service life. If the diodes stop shining as before after 2-3 months, this indicates a manufacturing defect. Attenuation may also indicate overheating;
- power supply failure. Check the contacts where the tape connects to the power source. If a plug-socket pair or connector was used at the junction, oxidation may have occurred, causing current conduction to be impaired in these places.
Dimmed LEDs.
There's no light at all
If all the diodes do not light up, you should look for the cause in the power supply. First you need to check the 12-volt adapter and the presence of 220 volts. The problem may occur at the low voltage output and input. In most cases, the cause of this is a poor connection in the area with the first three chips. To find out, power should be supplied from the following diodes in order. If the backlight is turned on, the problem area is cut off along a special line.
Line for removing the damaged section.
Flashing
Flashing LEDs may indicate insufficient adapter power. To prevent this from happening, each source must have a power reserve of at least 20% . In addition, soldering that was performed with aggressive types of flux can cause flickering. When connecting individual sections, it is recommended to use regular rosin or immediately neutralize the flux that remains on the substrate.
Recommended rosin for soldering.
If the product operates on a 220 V network, there is a possibility that the smoothing capacitor has failed. In this case, the flickering will be almost invisible.
The most harmless reasons for blinking LEDs are a breakdown of the control panel, a problem with a section of three chips, or the diodes running out of resources.
Causes of tape burnout
LED lamps from well-known manufacturers can last for tens of thousands of hours (30-50 hours). The main reason why LEDs fail is insufficient quality. Not all manufacturers equip the product with reliable new generation tapes. This is caused by the desire to offer your product at the lowest possible price.
This situation is dictated by market needs: consumers often prefer cheap products, without thinking about the fact that consumer goods last much less than a high-quality lamp. Even if a cheap lamp does not burn out and continues to work, the intensity of its glow very quickly decreases by 30-50%.
It is generally accepted that the lowest quality products are of Chinese origin. This statement is partly true. However, it should be understood that 9 out of 10 lamps are made in China.
Moreover, many models are produced in Chinese factories by well-known Western manufacturers. Such products meet international quality standards. But products from purely Chinese manufacturers are not always acceptable in terms of reliability.
Advice! The best option for lighting strips are models where one solid LED is installed, rather than many small diodes.
If you nevertheless purchase an inexpensive product, you should expect other troubles, including:
- motley glow;
- uneven light distribution;
- poor quality of the adhesive surface.
However, purchasing even an expensive tape from a well-known manufacturer does not guarantee its long-term operation if the operating conditions do not meet the standards. For example, not all consumers take into account the current and power of the power source. Also, many people ignore the temperature regime, using tape intended for indoors outdoors.
The cause of failure is often incorrect installation. In particular, the lack of protection against mechanical damage can lead to disruption of the integrity of the tape and moisture penetration inside. As a result, the entire tape or its individual fragments fail.
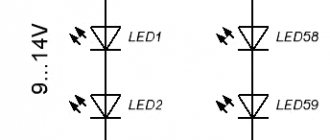
Irregularities in the power connection are another cause of lamp malfunction. The tape operates on the principle of a chain with parallel sectors. At its end, the current, having passed through all segments, is summed up. If the total current is high, the traces may overheat, causing the luminaire to fail. To avoid this situation, it is recommended to divide too long sections of the tape into shorter fragments.
Diagnosis of nutrition problems
Checking the power supply is carried out according to the following scheme:
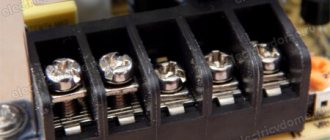
- Checking the reliability of the connector connection to the power supply.
- If the unit has a network indicator diode, you need to check whether it lights up or not.
- If there is no diode, the serviceability is checked with a multimeter. There should be no voltage at the output. Otherwise, the unit needs to be repaired.
One of the first things you need to check is the control panel. Sometimes just replacing the battery is enough. If it does not sit down, the infrared sensor may have failed.
The next step is to check the LED strip. You need to apply voltage to its terminals using two additional wires, without using a power supply. “Plus” is connected to the terminal, it is indicated by an arrow on the plug, and “minus” is alternately fed to the remaining terminals. At this stage, the main thing is not to make a mistake so that there is no short circuit between the wires of the unit.
Power unit.
Power can be supplied from a battery or 5-15 V batteries. The tape will not shine brightly, but this is enough to check its performance. If several chips or one of them turn out to be inoperative, the backlight will not light up only in problem areas. The repair will consist of replacing damaged diodes with new ones.
Repair
First of all, you need to answer the question: why does the tape not work? To perform diagnostic work at home, as well as for repairs, you will need the following materials and tools:
- multimeter;
- indicator screwdriver;
- a small fragment of a working diode strip with conductors attached to it;
- soldering iron, passive flux, solder;
- connectors.
All methods for repairing and diagnosing electrical circuits and circuits described below include the application of two rules:
- Checking the integrity of all components of the lamp.
- Voltage testing.
In some cases, oscillography may be necessary as a method of testing the luminaire. However, checking with a multimeter is usually sufficient.
Light bulbs don't light up
If the lamp does not light, follow these steps:
- Test the supply voltage. We check the presence of input voltage in the power supply. Using an indicator screwdriver, we monitor the phase in the socket. If the power supply is an open type air-cooled unit, it is recommended to check the power at the input terminals. On the multimeter, set the mode for measuring alternating voltage (V).
- Output voltage testing. The next task is to find out whether the power supply provides the required 12 V. You will need a short piece of LED strip that acts as a control light. We check the voltage at the output terminals of the power supply and at the contact pads of the lamp. All segments are equipped with four contacts: a pair of plus and minus. The voltage needs to be tested either at the end of the LED strip or at the extinguished segment. If voltage comes to the tape, but the lamps still do not turn on, the problem is directly in the tape, or more precisely, in the violation of the integrity of the conductors.
- If a fault is found in the power supply, the problem is due to one of the following reasons: a broken track, a blown fuse, a damaged diode bridge, or some other part has failed, and this is noticeable visually.
How to fix an LED strip
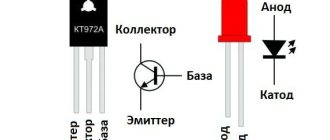
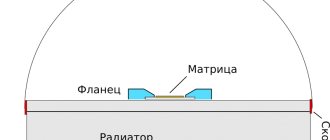
If one of the chips is burned out, it can be replaced and the backlight will be fully restored. When it comes to the breakdown of the SOV plate, repair will not help. First, they check with a tester, then unsolder the damaged diode, connecting the circuit without it or with another element. In most products, the circuit board is made of aluminum to effectively dissipate heat to the heatsink.
Structure of LED strip.
The heat dissipation substrate on the back side of the chip is soldered to the current-conducting track. During dismantling it will have to be unsoldered. Plastic printed circuit boards also contain such tracks. Based on the material, it is necessary to choose the correct soldering method. To work you will need:
- blade;
- tester;
- holder;
- tweezers;
- flux;
- soldering iron (it is recommended that it be thin). For a standard soldering iron, you will have to make the tip yourself. Copper wire is suitable for this.
To remove the aluminum board, the case is separated from it. You can use a knife. The board is usually soldered to the base with two wires; they need to be unsoldered. For convenience, the tape can be fixed in the holder. At the next stage, the tester checks each track. A burnt-out diode can be visible to the naked eye, but not always.
Burnt out diode.
The quality of soldering should be inspected. If there is a defect in production, this will affect the service life of the diodes. When the burnt chip is identified, you need to take a soldering iron and tweezers. The burner should be on the other side of the board. When the soldering softens, the diode is removed with tweezers. The new chip must be fastened before the aluminum base cools down.
Features of LED strips and types of power supplies
LED strips are characterized by low voltage (24 or 12V). In this regard, a power supply is required for their operation. When creating your own backlight using LED strips, you need to remember that you need to choose the right power supply.
Note! The most important parameter in choosing a power supply for LED strips is their power. To calculate the power of the power supply, you need to know the density of the diodes per meter of tape, as well as the total length of the backlight.
The service life of the converter will depend on how correctly the power of the power supply was calculated for a particular LED strip. To reduce the risk of premature failure of a power supply suitable for an LED strip, you need to select it according to the appropriate parameters:
Note! The most popular are tapes rated for 12 V.
12V LED strip
- cooling method. It can be active (the unit is equipped with a fan) and passive (the unit has a grille on the top of the housing). Converters with an active cooling system are considered more profitable;
- the material from which the body is made. For a power supply unit, the housing can be made of aluminum, metal or plastic. Models made of aluminum or metal are considered to be of higher quality.
In addition, you need to remember that cheap Chinese converters will not last long. They may need repairs after just a couple of months of work. But products from well-known manufacturers will last the entire service life allotted for them.
Functional testing steps
Before purchasing an LED strip, all buyers have a justified desire to check its performance. To do this, you need to have a battery with you, for example a “krona”.
Checking the tape using a crown.
The product will not light up at full brightness. To test a long section, you will need a large battery, for example, which is used in an uninterruptible power supply for a computer. It is suitable because it has 12 volts at the outputs. One of the best options is a car. To test individual LEDs, use a multimeter or a 3-volt battery.
Video example of repairing a 220 volt LED strip
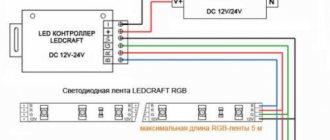
If the RGB or RGBW LED strip stops working
The multicolor LED strip has a more complex structure and connection diagram; it is powered by an RGB controller, which is usually supplied with a voltage of 12 V from the power supply. If necessary, an RGB amplifier is added to the circuit. Naturally, additional modules, connectors and wires reduce the reliability of the entire system. If the RGB or RGBW tape does not light up when you try to turn it on, then you should look for a breakdown in the following sequence:
- Make sure that the RGB controller receives the required voltage from the power supply.
- Using the remote control, set the maximum brightness mode and measure the voltage at the output terminals of the controller for each color one by one (should be about 12 V).
- In the on position, check the reliability of connections at the terminals, connectors and soldering points. Poor contact will immediately make itself felt.
- It happens that only one color in an RGB strip does not light up. In this case, either contact with the corresponding wire is lost, or one of the controller channels has failed.
If, as a result of the check, all the blocks are in working order, but the tape does not light up, then you should take a closer look at the remote control. Perhaps one of the buttons on it is stuck, preventing any further actions. Or the battery needs to be replaced. You can easily verify the absence of an IR signal using your phone camera.
It may also be that all control modules are working properly, but the LED strip has burned out, and for no apparent reason. Most likely, the cost of 1 meter of such tape did not exceed $2, and the LEDs installed on it were not initially designed for long-term operation. Try to protect yourself from cheap Chinese products, which even under normal operating conditions are not able to work for more than 1 year.
LEDs last a very long time. This is true if a number of conditions are met. But over time, you notice that the LED strip lights up dimly or some other problems in its operation.
The reason for its popularity is obvious - a huge number of variations in its installation and implementation of lighting circuits, safety and durability. But how to determine why the LED strip does not work, find the cause of the malfunction and eliminate it?
Tips before buying a new tape
When looking for suitable lighting, you should not pay attention to cheap Chinese online stores with attractive prices. Such products contain low-quality chips that quickly burn out or become dull. In addition, the backlight is unlikely to be returned under warranty.
It is also worth considering the purpose of the LED strip. It comes in single color and multi-color. The latter is used as decorative illumination of a surface or individual objects. A single color is suitable for highlighting a certain area in a house or apartment, window and door openings.