Pool lighting is needed for several reasons: it turns the structure into an attractive element of landscape design, makes it possible to operate it at night, and prevents accidental falls into the water in the dark. The presence of moisture determines increased requirements for the electrical safety of the system.
Basic requirements for lighting
A properly designed system has the following distinctive features:
- A voltage of 12 V and appropriate equipment are used. The choice in favor of low-voltage power supply was made because of its safety. Water is a good conductor of electricity and this increases the risk of electric shock.
- The circuits are connected to the network through a residual current device. Metal parts are grounded.
- The type of lamps and their location are selected so as not to dazzle swimmers, incl. through reflections on the water.
- Changing lamps does not require emptying the bowl.
- The equipment is waterproof.
- Horizontal illumination at floor level is at least 100 lux (requirement of SNiP II-4-79 “Natural and artificial lighting”).
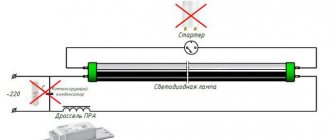
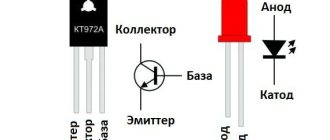
The mains voltage of 220 V is reduced to 12 V using a transformer. Some sources, such as light emitting diodes (LEDs), operate on constant current. They are connected via a power supply consisting of a transformer and a rectifier. The product is selected in accordance with the power consumption of the diodes.
How to install color lighting
Before installing the light, you need to measure the desired length exactly to the centimeter. Next, lengthen the tape by soldering, if necessary. Do not forget to ensure the tightness of the connection in any way possible.
Installing the tape itself is quite simple. You simply screw the fasteners to the side wall, thereby securing the tape in the desired position at the desired depth. Ask your lighting store salesperson what LED strip mounts are available.
The photo shows one of the options for mounting an LED strip for pool lighting.
Method of attaching LED strip to the pool wall
Next we run the wires to the power source. This is another vulnerable spot, so it is advisable to provide additional moisture insulation to the wires. The power supply must be installed away from water so that even the strongest splashes do not reach it.
The unit is connected to a network with a voltage of 220 volts and converts the voltage to the 12 volts we need.
It is also recommended to install an RCD - a residual current device - into the power system. This device will turn off the current in the wires if an unexpected situation occurs. And this is another plus for the safety of your family.
How to connect the RCD, see the instructions supplied with the device. There you will find all the answers in simple and accessible language.
Pool lighting options
Devices are placed and powered in different ways. Depending on this, the following types of lighting are distinguished.
Upper
Lanterns located above ground level are designed to illuminate the pool and surrounding area. If the structure is located indoors or under a canopy, ceiling devices are used.
If there are no supporting structures above the bowl, wall sconces are attached to nearby buildings or masts with spotlights are placed.
The most comfortable system for swimmers is the reflected light system. Special elements in the design of the devices redirect 80% of the radiation to the upper hemisphere. Above the surface of the water, such lanterns are placed on special walkways.
Bowl lighting
The devices are placed on the walls above the water level along the entire perimeter or on the long sides. The lamps scatter radiation and have a subdued brightness. Otherwise, they will blind the swimmers.
Underwater lights
The maximum decorative effect is achieved by placing several lanterns at depth. They emphasize the volume of the structure, and when observed from the side, they create the effect of shining water.
For such purposes, special lighting devices are produced.
They have the following features:
- waterproof design;
- use of impact-resistant and safety glass;
- use of corrosion-resistant materials - stainless steel or plastic.
The immersion depth should not exceed the maximum permissible for this model. It is given in the characteristics.
Floating
They are autonomous devices in the form of a ball. The power source for the lamp is a built-in battery.
Depending on the design of the model, it is charged in one of 2 ways:
- manually from the network;
- automatically via solar battery.
The lamps have positive buoyancy; there is no need to use supporting devices.
They are mainly used in buildings where installation of stationary lighting is impossible or difficult:
- in inflatable and frame pools;
- in ponds.
If the area is not protected from the wind, it is recommended to anchor the instruments. Otherwise they will collect on one side of the bowl.
Fiber optic
The system consists of the following components:
- projector;
- a bundle of threads made of light-conducting polymer (cable);
- controller.
The operating principle is based on the ability of optical fiber to transmit photons. When one end of the thread is irradiated by a projector, the second glows, regardless of its length. The trajectory of the cable also does not matter; it can even be rolled into rings. The thread itself does not emit light; only its end is lit. As a result, the observer sees many shining points. They flash, go out and change color depending on what commands the controller sends to the projector.
Advantages of fiber optic luminaires:
- Vivid visual effects. Glowing points are placed in the form of a cluster of stars, the Milky Way or a lunar path. You can also use them to make paintings.
- Safety. Electrical equipment is located at a distance from the pool; optical fiber does not conduct current.
- Durability. The service life of the light guide is 50 years.
The disadvantage is the high cost.
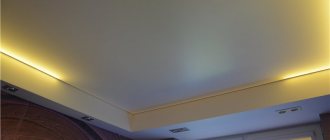
Contour
The lamps outline the bowl, emphasizing its shape. At the same time, they zone the territory. Most often, pools of non-standard configurations are designed this way.
The glowing line can be solid or dotted. The first option is made up of fiber optics or LED strips, the second – with spotlights.
Local lighting
Designed for 1 element or small area. This type includes illumination of a decorative waterfall, columns placed around a bowl, amphoras or exotic plants in tubs, etc.
A lamp intended for stairs, bridges and other functional elements should not impede their use.
Thematic video
The video does not explain the process of installing the backlight itself, but the creation of a waterproof tape from ordinary tape. In any case, you will find it useful and interesting.
Read also: Chilean walnuts benefits
Now you can install LED strip lighting for your pool with your own hands. All that remains is to purchase everything you need and get down to business.
Every happy owner of a swimming pool will never give up high-quality and beautiful lighting for their brainchild.
The problem is that not everyone knows how to do it correctly and safely. Still, this is not the same thing as illuminating the ceiling or floor in the rooms of the house.
In this case, connecting a spotlight is no different from connecting any other light source.
It’s better to consider underwater and floating options. With their help, in the dark, you will be able to see not only what is on the surface of the water. You will also be able to clearly distinguish the entire terrain.
In addition to beauty, this will greatly increase the comfort of swimming.
All the work is not that difficult and it can be done at any stage. Both initially during the construction period, and in the case when the pool is already in active use.
Let's consider the 2 simplest and most inexpensive lighting options:
- small sealed battery-powered lamps
- LED strip
First of all, remember the safety requirements that must be followed when installing lighting in a pool and other bodies of water:
- supply voltage
Forget about 220V forever, no matter how sealed the equipment you have. Here you can use only light sources with a voltage safe for humans - a maximum of 12 volts.
- IP degree of protection
It must be at least IP68. The number “eight” means that such products can be safely immersed to a depth of more than 1 meter for any length of time.
Another popular degree of moisture protection, IP67, will no longer work here.
Products with this IP are allowed to be immersed to a depth of no more than 1 meter, and for a short period of time no more than 30 minutes.
The simplest and cheapest option is to purchase a compact, moisture-proof, battery-powered lamp. It must have a remote control.
It is better to choose RGB models with multi-colored backlighting. Such lamps are sold in a varied assortment on AliExpress.
Let's look at one of these models. It is powered by three AAA pinky batteries. The case can be easily unscrewed to replace batteries.
There is a rubber gasket around the circumference providing 100% waterproofness. But even if you don’t trust it, no one is stopping you from additionally coating these places with sealant. Then certainly nothing will leak inside.
Inside, in addition to batteries, there is an infrared sensor for receiving signals from the remote control.
The lamp is sold without batteries included, but the remote control itself usually contains one. In addition to white light and other colors, you can programmatically enable a variety of dynamic effects.
This lamp is the safest and cheapest way to illuminate your pool, fountain or pond. There is no need to worry about safety when connecting wires, or worry about how to seal contacts and conductors. Look for a place for a power source, etc.
In addition, many of us have some kind of psychological barrier. No matter what ultra-reliable and protected equipment you put in the pool, some will still be afraid to get into it when the backlight is on.
No matter how beautiful everything looks from the outside.
They believe that there is no 100% guarantee that the insulation will not deteriorate somewhere and a current leak will not occur. Accordingly, any wires under water, even low voltage ones, frighten most users.
And with this safe lamp, even if water leaks into it, nothing will happen to you except for damage to the batteries and electronic components of the device.
- low power
For a large pool you will need several pieces at once.
- short battery life
If you actively use your pool, you will most likely have to change the batteries frequently. Therefore, purchase two sets of the highest-capacity rechargeable battery models in advance.
Those who don’t want to bother with batteries and replacing them have an even simpler option. Floating lamp with automatic recharging from a solar panel built into the lid.
I threw this one into the pool and forgot about it. During the day it recharges itself, and in the evening you turn on the backlight from the remote control and enjoy the picture.
It is recommended to install the above-mentioned lamps to a depth of about 30cm. For deeper layers, other professional equipment will be required.
Another beauty of this type of lighting is that it doesn’t even need to be fixed to the walls. And this very often causes problems if there is nothing metal nearby.
Some types have a built-in magnet under the cover, with the help of which the lamp is attached to any piece of iron. If you don't have one, you can use vinyl magnetic tape.
It adheres equally well to both the walls of the lamp and the walls of the cup and comes in different polarities.
So, in the most desperate situation, you simply throw such lamps upside down onto the surface of the water in different parts of the pool and enjoy the wow effect.
Moreover, for several lamps of the same type, one remote control will be sufficient. They are all simultaneously controlled via one infrared channel. You can set both one color and its synchronous change at different points of the pool.
Just be prepared in advance for one possible disadvantage of such lighting. All such surface lanterns attract flying insects very well at night. And after them the birds may fly.
In addition to Chinese products, there are also better quality overhead lights. For example, floating pool lighting from Intex.
It initially comes with built-in batteries. In addition to swimming pools, such a mini lamp in a jacuzzi looks good.
Read also: The effect of detergents on the body
And if you have a small pond or mini pond in front of your house, then this is almost the only inexpensive way to make such lighting.
You won’t dive to the bottom and attach powerful spotlights to the ground there. And these miniature LED bulbs were thrown into the water right near the shore, and have already significantly changed the entire night picture of this creek.
Another advantage of such waterproof LED lighting is that it can be used not only in large pools, fountains and ponds, but also at home in ordinary vases with flowers or in hookahs.
The beauty of the bouquet in this case will look completely different than in daylight. You can order all this from our Chinese comrades using the links below.
Lamp option No. 1 is here.
Lamp option No. 2 – here.
Lamp with solar panel - from here.
The second popular method of illuminating ponds is the use of LED strip. Mandatory conditions for its installation:
- degree of moisture protection IP68
- voltage 12V (do not forget that there are 24V and 36V models)
This LED strip is filled with a sealed compound and, in addition, placed in an impact-resistant silicone shell.
However, do not confuse it with simple sealing tapes in silicone, which are intended for installation in the kitchen, bathroom or outdoors with minimal protection from splashes, water drops and rain.
For swimming pools and Jacuzzis, you need to choose a protection class of IP68 or higher.
Most people buy options with RGB backlighting, which are controlled remotely from a remote control. True, after a month, having played around a lot with switching colors, in the end they always leave one of the ones they like the most.
White and blue look the most beautiful and organic. If the walls of your pool are not ideally clean, turn on the blue spectrum. It hides and smoothes out a lot from discerning eyes.
But red is not very good. A pool with it will resemble a giant plate of borscht.
Green and yellow are too harsh on the eyes. It is also not recommended to turn on flashing modes for a long time. You may feel dizzy quickly.
Under normal conditions, such tape is glued to its adhesive backing. But when installing in a pool, it is better to apply an additional layer of glue. Read the separate article below for the most reliable way to mount an LED strip on any surface.
The only weak point of such an LED strip is the places where the wires are connected and soldered to the contact tracks.
Although they are silicone-coated, they are the first to fail when exposed to water for a long time. Another difficulty is the length of the backlight.
Most often, you won’t have enough of a single piece of 5 meters and will have to connect two LED strips together. The best option here is soldering.
Read about how to do this in an accessible and understandable presentation, even for people who have never held a soldering iron in their hands, in the article below.
It turns out that the maximum length of the LED strip is 5 meters. And if you have a large pool perimeter, you may need 10-15 m or more.
These segments will have to be powered only in parallel on both sides. The connection diagrams will be slightly different from the usual ones.
What to do and how best to insulate the joints of two tapes and the places where the power wires are connected. In this case, it is safest to hide the entire tape in a transparent hose.
To pull it through such a tube, first pass a fishing line with a small weight through it.
Pull the weight through the hose from one end to the other using a vacuum cleaner.
Next, attach the wires from the LED strip to the end of the fishing line and place the backlight there. Do the same with the second piece 5m long.
Now the most important thing is to connect it all tightly and bring the wires out from the depths of the water. A plastic tee will help you in this matter.
Place a hose with tape on it on both sides, and through the central terminal, lead the wires straight to the place where you will have the power supply.
The block itself, if it is not sealed (it’s better to take a waterproof one), place it as far away from water as possible. This power source converts 220V AC voltage into safe 12V DC.
There are also certain tricks to choosing its power.
The 220V power cable, which will go from the electrical panel to the unit, must be connected through an RCD with a leakage current of 10 mA.
As a result, you get a completely sealed system of both the lighting itself and the wires. You can attach the hose to the walls of the pool using clips.
In turn, after draining the pool a little, you place them on silicone glue.
If you are just at the stage of assembling your pool and you have a frame, then you can use a more “safe” lighting method.
In this case, your LED strip will not even end up in water. The fact is that the cup bag of frame frames is slightly translucent and this can be used.
At the assembly stage, it is enough to glue the LED strip between the metal wall and the cup bag.
All power cables are buried in the ground and routed further into a separate panel.
After filling with water, the cup bag presses the light tightly against the wall. You can choose more powerful LEDs for better illumination.
The result will exceed all expectations.
And most importantly, everything will be absolutely safe and nothing will get in the way in the pool.
You can order a good waterproof LED strip with IP68 from here.
Operating instructions
The backlight operation is regulated by the following devices:
- Main switch.
- Programmable controller. Implements complex scenarios such as periodic or chaotic color changes, blinking, etc.
- Dimmer. Allows you to smoothly change the brightness of the glow.
A dimmer performs the same function as a rheostat connected in series to a circuit, but it is designed differently. In this device, semiconductor elements cut off part of the alternating voltage sinusoid, while on the rheostat the voltage drop is adjusted by changing the resistance. Thus, the dimmer operates with virtually no losses and does not generate heat.
The controls and power supply are installed in the house. Then you won’t have to go to the pool every time to turn on and adjust the lighting.
Power and low-current cables are laid in trays with covers that protect them from damage. Each conductor is placed in a sealed corrugation that prevents contact with water. The cables are secured to opposite walls of the tray so that there is no interference from the power cable in the signal cable tray.
Rules for installing electrical appliances in conditions of high humidity
When installing electric lighting devices, sockets, switches and wiring near a body of water, as well as indoors with high air humidity, standard safety requirements must be observed. However, given that the lighting in some cases comes into direct contact with the water mass, we can add to this set of rules that all electrical appliances in the pool must be powered exclusively from a direct current network with a voltage of no higher than 12 volts. In this case, power supplies and adapter modules must be connected from a network with a grounding conductor and located outside the area of high humidity and direct contact with water.
Rules for installing lamps
Overhead lights are placed outside the water table to avoid glare. Devices with direct and concentrated light are deflected from the vertical by an angle of no more than 60 degrees. Only lanterns with reflective elements are allowed to be installed above water.
Around the bowl or along its long sides, the lamps are placed on the same line and at the same distance from one another. If they are installed at uneven intervals, the design will lose its attractiveness.
Placing lanterns on opposite walls on the same line is irrational. It is correct to install them in a checkerboard pattern, then the same number of lamps will cover a larger area.
How to choose the right lighting fixtures?
Pool lamps differ in power and operating principle. They are selected according to several criteria.
By area and depth of the bowl
For a standard pool, the required specific luminous flux is 100 lm/sq. m. For lanterns located at great depths or equipped with color filters, this figure is increased by 20%-30%.
For different devices, the luminous flux in lm per 1 W of power consumption is:
- LED lamps – 90-120;
- halogen – 15-20;
- incandescent – 8-10;
- luminescent – 25-50.
The first 2 types are mainly used. Outdated incandescent lamps are uneconomical, while fluorescent lamps are demanding in terms of operating conditions.
Thus, for a bowl with an area of 20 square meters. m of standard depth, on average, you will need LED lights with a total power of 20 W or halogen lights with 115 (W). If you use high-quality products from popular brands, this figure will be lower.
LED sources are superior to halogen ones in terms of efficiency and service life. But they are expensive and have a small dispersion angle of 120 degrees.
By purpose
The installation location is taken into account when choosing a lantern according to its moisture protection class. It is listed in second place in the IP index. The first digit indicates the class of protection against ingress of solid particles. When choosing a lamp for a pool, attention is not paid to it.
The required moisture resistance class of the lantern, depending on the installation location, is:
- In the upper position - IP X4 (splash protection).
- In the bowl above the water mirror - IP X7. Such devices are designed for short-term immersion. This class includes LED strips in silicone filling.
- Underwater – IP X8.
There is a 9th class in the DIN standard. It is introduced for equipment whose housing does not allow water to pass through during high-temperature pressure jet washing. Installing such lights in a pool does not contradict the requirements, but is not economically feasible.
Overhead lighting devices must be equipped with a diffuse diffuser.
Depending on the desired effect
For utilitarian lighting, monochrome spotlights are used. Their advantage is low cost and ease of installation.
In decorative systems they use:
- LED strips and RGB lamps (3-color);
- fiber optic devices.
They connect to a programmable controller.
There are 2 types of spotlights:
- built-in;
- invoices.
The first ones look more impressive, but are difficult to install. You will need to make a recess or through hole in the wall.
Pool lighting with LED strip
The second popular method of illuminating ponds is the use of LED strip. Mandatory conditions for its installation:
- degree of moisture protection IP68
- voltage 12V (do not forget that there are 24V and 36V models)
This LED strip is filled with a sealed compound and, in addition, placed in an impact-resistant silicone shell.
However, do not confuse it with simple sealing tapes in silicone, which are intended for installation in the kitchen, bathroom or outdoors with minimal protection from splashes, water drops and rain.
For swimming pools and Jacuzzis, you need to choose a protection class of IP68 or higher.
Most people buy options with RGB backlighting, which are controlled remotely from a remote control. True, after a month, having played around a lot with switching colors, in the end they always leave one of the ones they like the most.
White and blue look the most beautiful and organic. If the walls of your pool are not ideally clean, turn on the blue spectrum. It hides and smoothes out a lot from discerning eyes.
But red is not very good. A pool with it will resemble a giant plate of borscht.
Green and yellow are too harsh on the eyes. It is also not recommended to turn on flashing modes for a long time. You may feel dizzy quickly.
Under normal conditions, such tape is glued to its adhesive backing. But when installing in a pool, it is better to apply an additional layer of glue. Read the separate article below for the most reliable way to mount an LED strip on any surface.
The only weak point of such an LED strip is the places where the wires are connected and soldered to the contact tracks.
Although they are silicone-coated, they are the first to fail when exposed to water for a long time. Another difficulty is the length of the backlight.
Most often, you won’t have enough of a single piece of 5 meters and will have to connect two LED strips together. The best option here is soldering.
Read about how to do this in an accessible and understandable presentation, even for people who have never held a soldering iron in their hands, in the article below.
It turns out that the maximum length of the LED strip is 5 meters. And if you have a large pool perimeter, you may need 10-15 m or more.
These segments will have to be powered only in parallel on both sides. The connection diagrams will be slightly different from the usual ones.
How to make a pool light with your own hands?
The system is laid out at the design stage of the structure. As a result of this approach, its maintenance is simplified, and lamps and cables can be changed without emptying the bowl.
Before pouring a monolithic concrete pool, pieces of plastic pipe filled with wet sand are placed in the formwork at the places where the lamps are installed. After the wall has hardened, the sand is removed and a through hole is obtained. When backfilling a pit, add enough soil to form a trench around the bowl. From here they change the bulbs in underwater lanterns without emptying the bowl, and this is where electrical communications are laid.
It’s easier to organize lighting using an LED strip. Installation procedure:
- The wall of the pool and the LED source are coated with glue. Models with double-sided tape do not require this.
- Glue the product.
- The cable cores are connected to its terminals by soldering.
- Insulate bare current-carrying parts at the point of contact with heat-shrinkable tubing.
- Clamp the wires on the other side of the wire into the terminals of the power supply.
Installation of a recessed underwater light in a concrete wall is carried out as follows:
- The self-adhesive gasket from the kit is attached to the device body, after first removing the protective celluloid film from it.
- The second seal is placed on the inside of the pool wall around the through hole for the lantern.
- Place the lamp into the hole and secure it with screws.
- Check that the device is positioned correctly.
- It is finally secured using special clamps.
- Check the functionality of the device.
Underwater lights for frame pools are produced. Installation procedure:
- Mark the position of the lighting devices.
- According to the markings, first, only the insulation is cut out to make sure that there are no frame elements in the designated areas. If they are present, they move a few cm to the side.
- Place the fixture of the lamp on the outside of the bowl and trace its outline with a marker.
- Mark the center of the circle and make a hole in this place with a thin drill.
- Focusing on it, an opening for the mortgage and cable is cut out from the inside using a crown. You cannot do it outside (although it is more convenient to do this using markings), otherwise the acrylic coating will be torn. To avoid overheating, the crown is periodically immersed in water.
- On the inside of the bowl, a mortgage is applied to the hole. It is positioned so that the outer ears are horizontal. On the acrylic, mark the position of the fasteners with a pencil.
- Holes are drilled from the inside according to the markings.
- A coupling is glued into the reciprocal part of the mortgage, sealing the cable entry point.
- Rubber O-rings are attached to both parts of the lantern.
- Clean the acrylic around the hole with a petal wheel.
- Screws are inserted into the holes of the embedded flange and the rubber gasket is coated with sealant.
- Place the part in place and press it against the wall with your hand.
- On the reverse side, a mating part, previously coated with sealant, is put on the screws. The fasteners are tightened evenly.
- A junction box is installed at the edge of the pool above the lantern and connected to the embedded hose.
- Pull the wire through the assembled assembly, having previously put a nut and seal on it. The end of the cable should come out of the junction box. After this, the nut is tightened.
- Attach the lantern to the side lugs of the mortgage.
It is recommended to repair a hydrobarrier damaged on the outside using bitumen-based sealant. Instead of cut out insulation, construction foam is applied.
Organization of lighting
Arranging external lighting for a pool with your own hands, as a rule, does not cause problems and can be done by anyone, including a novice craftsman.
To organize the underwater part of the pool lighting, you can use:
- spotlights that can be powered either by power or by batteries;
- LED strip.
Selection and installation of lamps
The following types of underwater or above-water lamps are used to illuminate the pool:
- overhead, characterized by low cost, compactness and ease of installation. To install lamps, it is not necessary to prepare special holes on the walls or floor, which has a positive effect on the quality of the lining of the reservoir and the level of its tightness;
Surface-mounted lighting equipment
Surface-mounted lamps can be attached using special bolts included in the equipment kit or a magnet installed on the lamp.
- built-in The main advantage of this type of equipment is the absence of protruding parts that could cause injury to a person. Installation of built-in lamps is more complex and in most cases is performed by professionals;
Lighting equipment mounted on the pool floor or wall
- floating. While wall and floor lamps require installation and connection to power, modern floating lighting fixtures can be powered by batteries or the sun. Such equipment is distinguished by ease of installation, originality, the ability to move freely to any area, and a variety of shapes and sizes. Negative qualities include the low power of devices and a short period of use.
Lamps floating on the surface of the water
When choosing lamps, in addition to the type of equipment, you must consider:
- dimensions;
- power;
- type of lamps installed.
They can be installed:
- halogen lamps, which provide bright light but have a short service life;
- fluorescent lamps that consume less electricity and have a longer service life. When using lamps of this type, special requirements are placed on the tightness of the lighting device, since a small leak can lead to lamp failure;
- diode lamps. The most modern type of equipment, which is characterized by low energy consumption, versatility, resistance to mechanical damage, long service life, but at the same time higher cost;
- incandescent lamps. It is permissible to use only when organizing external lighting.
Types of lamps for pool lighting
Watch the video to see how the lamps are installed.
Useful tips and tricks
In a small bowl, you can limit yourself to placing lamps on only 1 wall. Choose the one from which the observer most often looks at the pool. In this case, he does not see the spotlights. It seems as if the water itself is glowing.
To replace the light bulb, it is recommended to take the overhead lantern ashore, if possible. This will prevent moisture from entering the housing, which would lead to a short circuit of live parts to water with subsequent electrical injury to swimmers.
To ensure uniform lighting, devices are placed in increments of 60-100 cm.
Underwater lights are installed at a depth of up to 1 m. For a lower placement, it will be necessary to increase the power of the devices, which will lead to an unjustified increase in energy costs.
It is not advisable to place lamps at a depth of less than 60 cm. In this case, the volume effect will still not be achieved. If the pool is shallow, it is better to install overhead lights.
LED backlight requirements
Typically, a strip with LEDs is located underwater at a depth of up to 1 meter. The depth is determined primarily by the water resistance of the insulation. In addition, we need contour lighting, so lowering it too deep also makes no sense.
Also, the light should not be too bright. If LEDs blind you in normal daylight, then it is better to choose a strip with less powerful LEDs.
Beautiful design examples
Decorative lighting of an artificial reservoir gives an aesthetic appearance to the area adjacent to it.
It can be done in a classic or designer style.