Wiring diagram for LED lamps for Armstrong. Armstrong lamps
Due to the fact that Armstrong suspended ceilings are installed quite quickly, simply and inexpensively, they are very often used for finishing public and office premises.
In addition, they are distinguished by the fact that during their installation there is little dust and dirt residue left in comparison with other varieties. Even a beginner can install such a ceiling. Such a ceiling will very well hide any communications, while providing very easy access to them. From the point of view of an electrician, such a ceiling greatly simplifies the laying of electrical wires and the installation of lighting (after all, it is enough to simply insert the mounted lighting device into any cell). The only thing that needs to be done is to strengthen the ceiling by using extra hangers so that there is no sagging.
I will quote the words of Armstrong specialists regarding the installation of these devices: when installing raster-type lamps, without using an individual suspension for them, you should maintain 0.6 m between the supporting (guide) rails and suspensions.
When installing raster-type lamps, without the use of additional suspensions, the devices must be rested on a pair of supporting rails. However, based on practice, we can say that one suspension next to the lamp is quite enough, if the suspensions are located a couple of cells under tiles measuring 600x600.
The process of installing and connecting lamps in suspended ceilings
It is highly recommended, before starting installation, to remove the rasters (protective transparent plastic or glass) from the lamps. This will give you access to the terminal block through which the lamp is connected to the power supply and will make it possible to install lamps (unless, of course, they subsequently interfere with the installation and installation of the device).
It is advisable to install the lamps immediately (after all, it is easier to do it below than in an already installed device).
The installation technology depends on the types of lamps. Here are the main three types of luminaires mounted in Armstrong system ceilings: the first two types have standard sizes (about 590x590). They are mounted quite easily: tilt the lamp at an angle to the guides and the plane, insert it into the cell, then turn it and put it in place (in the square of the cell). It must be remembered that from the base of the ceiling (or communications) to the ceiling frame is no more than 200 millimeters.
Of course, I also installed lamps whose dimensions were equal to half a ceiling cell; in this case, the lamp is placed at any convenient edge in a cell of the ceiling frame, and the free space is covered with decorative tiles of a suitable size.
Of course, it was necessary to install devices that were round and square in shape, whose dimensions were significantly smaller than the cell itself for the lamps. To install such devices, it is necessary to carefully and accurately cut out the mounting hole in the decorative tile.
Installation and connection to the electrical network
Lamps are changed when renovations are done. Before connecting the equipment, be sure to disconnect the power and install it in the ceiling. Each type of coating has its own installation methods. The Armstrong suspended ceiling, consisting of square plates in a metal profile, is mounted as follows:
- The tile is lifted in the right place, shifted and removed from the cell.
- The wiring to the installation site is laid above the suspended ceiling and consists of two (phase, neutral) or three (phase, neutral, ground) wires.
- Before installation, it is necessary to disassemble the lamp body by removing the diffuser.
- The ends of the wires are stripped and connected to the lamp, as indicated in the manufacturer's diagram. Some models have a different connection method. The stripped wire is inserted into the clamping terminals and the contact strength is checked. To do this, you need to pull the vein. In addition, you can twist the stripped wires, which are then insulated. Or connect via a terminal block. The switching node will be hidden from public view by the body of the product.
- Insert the diffuser back into the lighting fixture housing.
- Place the lamp in the cell. This equipment is lightweight, so you don't have to worry about the lamp falling on your head.
Surface-mounted luminaires can be installed on any ceiling by screwing the body to the surface. The wiring is done through a special groove, which is then puttied, or through an external cable channel.
- https://lampaexpert.ru/svetilniki/pravilnyy-montazh-v-potolok-armstrong
- https://samelectrik.ru/kak-ustanovit-svetilnik-armstrong.html
- https://220.guru/osveshhenie/svetilniki/svetodiodnyj-armstrong.html
Connecting luminaires to the network
Connecting such devices is quite simple. The zero wire (usually blue) is connected through the terminal block to the connector bolt marked with the letter N, while the phase wire (it can be painted red or white) is connected to terminal L, and ground (yellow-green wire) ) – to the connector that has a special designation.
If all the lamps are connected to a pair of cables (this is done if the lamps are connected in parallel), it is necessary to strip all the wires, twist them in pairs according to color and, only then, connect them to the terminals.
That's probably all that can be said about the installation of lighting devices on Armstrong-type ceilings. As you can see from this article, even a beginner can install them.
And one more thing I would like to say about this. If you have doubts about what type of illuminators to choose (fluorescent or LED-based), then you need to rely on several factors:
The price for installing an Armstrong lamp will be at least 20% lower than the average market cost of such a service if you order it through the Yudu service. The site presents both private specialists and specialized companies that carry out all types of installation of Armstrong lamps at any address in Moscow:
Yudu performers service both office premises in the capital, as well as apartments and private houses of any type. The assembly and connection of new lighting is carried out by them either as part of a general renovation of the room, or separately. Services can be ordered any day of the week around the clock.
Formation of order cost
Preliminary prices for specialist services can be viewed in their profile. The prices presented reflect the average cost of this or that type of Armstrong lighting installation. The final price for installing Armstrong lamps will depend on the following factors:
There may be other factors that will affect the order amount. But in any case, the price for installing an Armstrong lamp when ordering from Yuda will be one of the most affordable in Moscow.
Armstrong lamps are lighting fixtures designed to be built into a suspended ceiling. We will talk about the features, varieties, pros and cons of such lamps, as well as the intricacies of their installation in this article.
Armstrong lamps were named after the name of the company that first introduced this product to the market of our country. Lighting devices of this type are structures mounted from profiles and built into a suspended ceiling instead of some of its sections. The standard dimensions of Armstrong ceiling lamps are 600x600 mm - the same dimensions as suspended ceiling slabs. Lighting structures are installed in the ceiling along with its other parts, ultimately creating a flat, single-level surface. Dismantling the lamps is also not difficult, so if necessary, the structure can be easily removed and then put back in place.
Armstrong lamps: pros, cons, main characteristics
Before you buy Armstrong ceiling lamps, you should familiarize yourself with their main features in as much detail as possible and study the positive and negative qualities of the structures. It should be noted that lamps of this type are considered one of the most popular products on the Russian market. This demand is due to the high performance properties of the product, as well as its cost-effectiveness. The use of such lamps allows you to save significant money, since, unlike conventional incandescent lamps, Armstrong lamps consume several times less electricity. Such savings will be especially noticeable if lighting fixtures are used in large quantities in large rooms.
I would like to consider the advantages of Armstrong lamps in more detail:
As you can see, lamps of this type have a number of positive qualities. But we must not forget about the shortcomings of the designs; let’s consider them in more detail:
Types of Armstrong lamps
Depending on which lamps are used in the ceiling lighting structure, a distinction is made between fluorescent and LED lamps. Many people prefer to install fluorescent lamps, and the reason for this lies in their relatively low price. However, Armstrong LED ceiling lights are considered a more profitable and economical option. Let's consider the comparative characteristics of these two types of devices:
How to change a light bulb
There are 3 ways to attach the light source. Depending on this, as well as on the type of light bulb, replacement is carried out using different methods.
Before work, the lighting must be turned off on the panel and a stable base must be prepared. You can change the lamp only after the housing of the lighting fixture has completely cooled: there is a very high risk of damage to the glass part, which could result in injury to the worker.
There is no need to disassemble the suspended ceiling for this; the device is not even removed from the cell.
A special cartridge is typical for fluorescent and LED devices. First of all, remove the fixing ring, remove the glass from the transparent part of the device, and then unscrew the light bulb. The special chuck requires an additional 90 degree rotation.
To change an LED or fluorescent model, you should wear cotton gloves or protect your hands in some other way: greasy stains on the quartz glass of the bulb sharply reduce the service life.
In the lighting panel, replacement of any device is carried out only after its complete dismantling. The module is detached from the wires and removed from the ceiling frame.
The video discusses in detail all replacement methods.
Using Armstrong lamps in the interior
Armstrong lamps do not have a wide variety of shapes, but with their help you can create quite interesting interior designs. Thanks to the built-in design, such lamps do not overload the space and do not take up extra space.
Such lighting designs look very good in combination with suspended ceilings, and when installing Armstrong lamps in a suspended ceiling, you can get a smooth, single-level surface that looks neat and laconic.
The design of some lamps allows them to be used in narrow spaces such as corridors and hallways. In addition, Armstrong lamps are resistant to moisture, so they can be safely installed in bathrooms and kitchens. Often such structures serve as the main lighting, although in some cases the lamps serve as a decorative addition to the chandelier.
Armstrong ceiling lamps can often be found in office spaces, because good lighting is an important condition for productive work. The unobtrusive, strict, laconic design of such lamps can fit into any office. Such devices do not stand out against the background of the general style of the room, and their cool, diffused light sets the mood for work.
Calculation of the number of Armstrong lamps for a room
When deciding how many lighting fixtures are needed to illuminate a particular room, you should rely on the rules and regulations prescribed in regulatory documents. The amount of light in public rooms, as well as in industrial workplaces, should reach 100-150 lm per 1 m². In rooms such as offices, libraries, school and university auditoriums, as well as in various kinds of laboratories, the lighting should be brighter and equal to 500 lm per 1 m². If work with small parts is carried out indoors, for example, in drawing workshops, the luminous flux must be at least 1000 lm per 1 m².
As for LED lamps, the numbers here will be slightly different:
As you can see, LED lamps will be a more economical option, especially if the room is large enough and a lot of lamps are required. But when calculating the number of lighting fixtures, it is important to take into account not only their power, but also some other factors, for example, the height of the ceiling of the room. It is known that the higher the lamp is above the illuminated surface, the lower the illumination will be. For example, if the Armstrong lamp is placed 1 m above the surface, the illumination level will be approximately 1000 lm, but if the device is raised 0.5 m higher, the luminous flux will drop to 450 lm. At a height of 3 m this figure will be 115 lm.
How many Armstrong lamps do you need per square meter of an office, store or other premises?
To calculate the number of light sources for a store, hotel, school or other institution, you need to contact professionals, for example, specialists from the MAXUS store. Below we provide data for approximate purposes only.
SNiP requirements are taken as a basis:
- in the warehouse, utility room, corridor and other places where visual tasks are not performed, lighting of 100–150 lux is acceptable;
- in living rooms, including hotel rooms, this figure should be about 200–300 lux;
- in libraries, laboratories, offices, classrooms and similar premises, lighting of at least 500 lux is required;
- in drawing rooms, in production and other places where they work with small parts - from 1000 lux.
To calculate how many Armstrong lamps need to be installed per square meter, consider the size and shape of the room, the layout of light sources, the color and reflectivity of walls, ceilings and other surfaces.
What matters is the height of the room and the distance from the floor to the illuminated surface. After all, if a model with a luminous flux of 1000 lm is located a meter from the desktop, then the illumination will be 350 lux, and if the target plane is 3 meters away, the indicator will drop to 115 lux. In addition, the KSS, brightness and other characteristics of the light source are taken into account.
An example of calculating lighting for an office in a lighting design program
Installation of Armstrong lamps on the ceiling
Let's take a closer look at the installation features of Armstrong lamps. For example, let’s take a design with standard dimensions of 600x600 mm. The lamp will be installed in an Armstrong ceiling or any other suspended plasterboard ceiling. The whole process can be described in the following stages:
There are cases when lamps are not built into the ceiling, but mounted directly on its surface. I would also like to consider this process in more detail:
Armstrong ceiling lamps, photo:
What will be required for installation?
Armstrong ceiling lamps are installed when the suspended slatted structure is already installed. To install the lamp you need:
- How to install a surface-mounted LED ceiling light for your home and office. Types and benefits
- Screwdriver Set.
- Stepladder - the height of the streams is generally more than 3 meters.
- Pliers.
- Electrical tape or heat shrink tubing.
- Indicator.
- Actually the lamp.
Cells for installing lamps
Expert opinionAlexey BartoshSpecialist in repair, maintenance of electrical equipment and industrial electronics.Ask an expert a questionImportant! At this stage it is assumed that the cabling and conclusions for each luminaire have already been made. If this is not the case, then you need to make cable leads for each light panel, that is, for a 600x600 mm section you need one phase and one neutral wire.
Installation of Armstrong lamp in suspended ceilings
This LED luminaire is designed for installation in ceilings with a standard 600x600 mm module, with visible T24 or T15 guides (Armstrong ceilings or suspended plasterboard ceilings). Before installing the lamp, decide on its installation location in the suspended ceiling and remove the panel from there, the place of which will be taken by the Armstrong LED lamp. After this, connect the network wires to this place.
The lamp can either have individual cardboard packaging or be packaged one piece at a time in a larger cardboard box.
Remove the lamp from the box.
Remove the protective plastic bag.
Connect the network wires inside the LED lamp housing to the terminal block. Connecting the ground wire is mandatory!
Connection diagram of the Armstrong LED lamp with a prismatic diffuser to the power supply network:
All installation and maintenance work on the LED lamp must be carried out only with the power supply turned off.
The luminaire is connected to the electrical network and grounding using installation cables with a cross-section of at least 0.75 sq. mm using a terminal block.
Do not operate the LED lamp without protective grounding!
Then reinstall the diffuser.
Reinstall the diffuser into the Armstrong LED lamp housing.
Reinstall the suspended ceiling panel.
This completes the installation of the Armstrong LED lamp.
The installed lamp will delight the eye with daylight, durability and amazing efficiency!
Installation of lamps in the Grilyato ceiling
The Grilyato ceiling in the photo is the most difficult option for installing lamps, since it requires the use of non-standard solutions. Conventional types of light sources are not suitable for this type of ceiling structure. In this case, it is recommended to use Milano-grigliato raster equipment. Installation of a light source in the ceiling is carried out by replacing one of the panels with a lighting module. To securely fix the lamp, it is necessary to ensure the presence of additional fasteners to eliminate the possibility of loading the Grilyato ceiling.
A more interesting ceiling design made from Grilyato plastic panels is obtained by using built-in Downlight light sources in the grating design. Installation of this equipment is a little more complicated than the previous option. In each specific case, an individual approach to installation is required. Often, for reliable fixation, the installation of additional fastening structures is required. The Downlight range includes round and square models, complemented by reflectors and glass. Installation of any sample from this model range is carried out by cutting a hole using a laser in the grid of the ceiling system.
Installation of lamps in the Armstrong ceiling
For Armstrong-type ceiling structures, LED light sources are most suitable. They have excellent technical data, are unpretentious in operation and last a long time. Installation work for installing Armstrong lighting fixtures includes the following steps:
- To begin with, select a panel in place of which the LED lamp will be installed.
- Then the decorative module is removed and a de-energized electrical cable is supplied.
- We connect the wires to the terminal box located on the housing.
- At the end of the work, we install the Armstrong LED lamp in place of the removed decorative panel.
Installation of lamps in plasterboard ceilings
For plasterboard ceiling systems, point rotating or stationary light sources are used. Due to its light weight and compactness, this type of lighting equipment can be installed over the entire area of the suspended structure. Installation of spotlights includes the following steps:
- Planning the placement of each lighting unit.
- Carrying out wiring to the installation site.
- Creating holes for mounting lamps.
- Electrical connection.
- Fixing the light source to the ceiling surface.
- Checking the system's functionality.
Installation of lamps in the ceiling made of plastic panels
One of the common types of suspended ceiling structures is the structure made of plastic panels. It is recommended to install lighting in this case when installing panels.
- First of all, you should choose the place where the lamps will be located.
- Next, using a drill and a special attachment, a hole is drilled in the ceiling structure. The diameter of the hole must match the size of the lighting fixture.
- Insert a ring with bent fixing springs into the finished hole.
- We pull the wire into the resulting hole and connect it to the lamp.
- Do not forget that all wire connections must be carefully insulated.
- Next, install an LED or energy-saving light bulb and fix it with a special bracket.
- The backlight is ready for use.
Step-by-step instructions for installing lamps in a suspended ceiling in the video.
In conclusion, I would like to note that experts recommend carefully choosing the type and model of lamps for a particular type of suspended ceiling system. When choosing spotlights, it is worth knowing how hot they become, and whether this can lead to damage to the structure. During the installation process, it is recommended to follow the advice of experts and then the suspended ceiling made of plasterboard or any other type will acquire beautiful lighting.
Currently, Armstrong ceiling lamps are very popular. Why? Yes, because it is both fashionable and very convenient: easy to install and cheap. In addition, such lamps have excellent performance qualities.
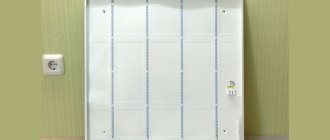
Each Armstrong ceiling lamp is convenient in that it is a ready-made prefabricated structure consisting of a regulator and a power supply - they are hidden directly behind the light diffuser. That is, such lighting can be directly connected to a 220 Volt network with alternating voltage. Also, such lamps are equipped with a radiator. It is precisely the same light diffuser, because it is made not of glass, but of aluminum or a material similar in its technical parameters.
The company also produces so-called LED panels, which are the best option for arranging an office lighting system. Their key advantage is a large light coverage area, energy efficiency, high luminous frequency (which creates minimal eye strain), optimally selected density and brightness of the light flux. Naturally, the lamps in such lamps are replaceable, but even without this they will work for at least 5 years with active use.
Armstrong also produces models of lamps that are built into the ceiling. Their installation is not difficult at all, since the dimensions of such panels are standard (for example, 60 by 60 centimeters, which corresponds to the standard division of profiles in a suspended ceiling).
In total, the key advantages of Armstrong lamps:
- relatively low cost;
- combined with a regulator, transformer and power supply;
- ease of installation;
- it is possible to regulate power and remote control;
- durability (the average operating time of each LED lamp is around 30-60 thousand hours, which is almost 20-30 times more than that of standard incandescent lamps).
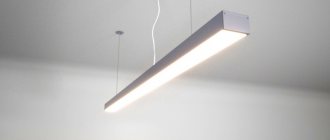
Installation of the Armstrong lamp on the ceiling surface
The lamp can also be installed as a surface-mounted one, i.e. Designed for mounting on the ceiling surface.
Remove the prismatic diffuser from the LED lamp. Drill 4 holes in the ceiling corresponding to the holes in the LED lamp housing.
Install the lamp body onto the ceiling surface using dowels and screws. After installing the lamp, connect the power supply wires brought inside to the terminal block of the LED lamp. Connect the lamp to the electrical network only when the network is de-energized! Connecting the ground wire is mandatory. Reinstall the diffuser.
The ability to install a lamp either built-in or surface-mounted significantly expands the possibilities of its use.
The light source in the lamp is LED strips - highly reliable aluminum boards with powerful LEDs produced by the world leader in this market, CREE, which have high luminous efficiency and the best heat dissipation. This design of LED strips guarantees excellent thermal performance of the LEDs and ensures the durability and reliability of the LED lamp. The LED strips are mounted into the lamp body with rivets and connected by wires to the power source. The metal welded body of the Armstrong LED lamp is made of high-quality sheet steel and is painted with white powder paint. It has holes for attaching the lamp to the ceiling surface, as well as a hole for inserting the network cable inside. The case thickness is only 40 mm. And the polycarbonate light diffuser is securely installed in the LED lamp on the guides and snapped into place with a plug.
The light diffuser is made of high-quality transparent polymer material with a prismatic structure. It is this type of diffuser that allows you to obtain high efficiency of the lamp and ensure maximum light transmission (up to 90%). Thanks to the prismatic structure of the light diffuser, the lamp provides uniform distribution of light without glare to the eyes. The diffuser is installed in the housing on guides.
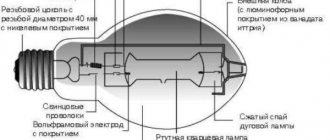
The main disadvantage of fluorescent lamps is the presence of mercury inside them, the vapors of which are deadly to humans.
But technology does not stand still; its active development has led to the creation of LED lamps, which have surpassed fluorescent lamps in almost all respects. Currently, their only drawback is the cost in comparison with fluorescent lamps, but in terms of the sum of all the characteristics and benefits, and most importantly for safety reasons, they are unrivaled.
There are only two varieties of them, two different schemes, the first with ballast and starter, is the most common:
I am a home electrician myself – popular about electrical engineering
When a lamp with a burnt-out LED is repaired, the entire lamp is replaced. Insert the light bulb into the device socket.
After all, only a change in the circuit is required, and the LED tubes are completely identical in shape to fluorescent lamps. What needs to be changed? Now you can turn on the light and assess the level of illumination of the workshop.
This wire also needs to be released by releasing the screw.
To install an LED lamp with a length of mm, mm, mm or mm, you will need to unscrew the starter and screw in the plug supplied in the kit in its place. So it is possible to choose a replacement LED tube when remodeling any lamp.
Connection diagram for LED lamps instead of fluorescent lamps
Next, the cartridges located on one side must be connected to each other with jumpers and returned to their place by connecting the wire coming from them to the terminal block. The next step is to check for continuity between the isolated connectors after installing the jumper.
Replacing fluorescent lamps with LEDs Calculation of the efficiency of replacing fluorescent lamps with LEDs It is incorrect to compare the luminous flux characteristics of fluorescent and LED lamps. Insulate the connection point, insert an LED lamp and apply supply voltage.
Note! Replacing a fluorescent lamp with a T8 LED lamp must be carried out taking into account the model. As a rule, it is pressed with a screw to the part of the lamp body exposed from paint using a screw, as in the photo
Insert LED bulbs. This must be done: the switch could have been mistakenly installed in the gap of the neutral wire, and not the phase wire, and in this case the device will be energized all the time, both on and off.
They do not contain harmful toxic substances, therefore, they do not require special disposal after failure. What needs to be changed? Connecting two fluorescent lamps through one choke.
Connection diagram for LED lamps instead of fluorescent lamps
And once again, everything is quite simple, on one side a phase is supplied to the llamas, and on the other, a zero. In this case, the polarity is not important, since alternating current is connected, connect in the way that is most convenient for you. In addition, it does not matter which of the contact pins the electrical wire is connected to, because each pair of them, on each side of the LED lamp, is closed.
In the case of remaking a raster fluorescent lamp, we simply take the wires that come from the g13 sockets and cut them off, and then we connect all the wires of one side to the phase terminal, and all the wires of the other, to the neutral terminal. As a result, you should get something like the following installation diagram for LED lamps instead of fluorescent lamps:
As you can see, the technology is simple , you don’t need to have any special education to convert, say, all fluorescent lamps in an office, factory or store to LED lamps.
As a result of this modification, you get a new, modern LED lamp, safe, with low energy consumption and a long service life.
Source
Installation procedure
When installing a frame under “Armstrong” or “Grigliato”, it is necessary to provide a minimum allowable distance between the frame slats and the ceiling of 20 cm. Otherwise, installation of the lamp will have to be done simultaneously with the installation of the frame, and this method does not allow easy access and simple maintenance, and therefore not acceptable.
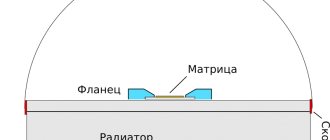
The Armstrong lamp (pictured below) is easily recognizable; it is a square-shaped design with four light emitters (lamps), covered with a scattering film or a reflective grille.
As a rule, installing Armstrong lamps does not cause problems, since the size of the cell window and the dimensions of the devices are the same. When inspecting the structure of a suspended ceiling, it is necessary to visually familiarize yourself with the suspension elements and their location, since there are cases of “fierce” savings by installers.
It is acceptable when there is one ceiling mount for two cells, and at least four for a square of four cells. Otherwise, during installation it is necessary to additionally fasten the lamp to the ceiling to minimize its weight on the suspended structure.
Before installing the Armstrong lamp, the diffuser is removed from the lighting fixture, leaving the housing with the starting equipment. In this state it is easier to manipulate during installation. A lamp is inserted into the selected cell at a diagonal angle. After it is completely behind the ceiling, it is turned horizontally and combined with the cell.
You can learn how to install a lamp in a suspended ceiling from this video:
In addition, we recommend looking at how to evenly position Armstrong-type lamps on the ceiling:
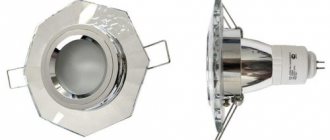
In addition to raster ones, built-in or point lighting sources are also used; holes are cut in decorative slabs for their placement. This solution is well suited for small rooms with low ceilings, or places that require additional light flow.
To install the Armstrong lamp under a suspended ceiling, you must first install special fittings for attaching lighting fixtures. Because after installing a stretch ceiling, it will be almost impossible to correct anything, as is the case with the Armstrong or Grilyato modular ceilings, where the number and placement of elements easily varies.
Features of ceilings
The Armstrong slatted suspended ceiling has its own design features, as well as the lamps suitable for it. Among the main features:
- Speed and ease of installation with minimal dust and dirt.
- You can do the installation yourself.
- Convenience of masking communications of any type and size. The ceiling can be lowered as much as required using special hangers.
- Easy access to each block.
- Elementary installation of a special lighting device instead of ceiling sections. In this case, wiring will not be a problem. The size of each ceiling section is 60x60 cm - it’s easy to lay new electrical communications.
Important! Due to its considerable weight, installation of a special lighting device requires the installation of additional reinforcing hangers. This will help prevent sagging of the entire structure.
Armstrong ceilings have an attractive appearance.
Among the advantages of Armstrong ceilings and their lamps:
- Easy to install on any part of the ceiling. The size of the device is the same as the decorative cell; removing the ceiling element and installing a lighting device in its place will not take more than 1–2 hours.
- Uniform lighting. To do this, the devices are arranged in a checkerboard pattern. This helps eliminate dark areas.
- Adding new light sources without restrictions is carried out in the same way as replacing them with decorative ceiling elements.
- Easy access to wiring and fasteners.
- Each lamp has anti-vandal protection, which ensures the safety of light sources. In the case of mercury fluorescent lamps, this is a significant advantage.
- Lamps used for Armstrong ceilings can be mounted in suspended and plasterboard suspended ceilings. In the first case, the light element is only an LED. Installation in such ceilings has its own characteristics.
There are also disadvantages, the main one being the standard appearance. Consumers also note the high price of each individual lamp.
Rules for connecting to the network
Wiring under the ceiling must be laid in corrugation and secured to the ceiling slab, eliminating sagging. It is incorrect to make a daisy chain connection (in series), when the wire enters the housing and goes out to the next device, using the terminal block as a distribution block. It is correct to place the distribution box near a group of lamps, and lead its own power wire from it to each one.
To connect Armstrong lamps, PVS or ShVVP wires are most often used due to their flexibility and simplified installation. It is also possible to use PV-3 stranded wire with multi-colored insulation. The stripped core is crimped with a sleeve or tinned with tin; this connection forms better contact.
The photo below shows a contact terminal with the markings L—phase, N—zero, PE—ground. How to determine which wire is phase and neutral can be found in our article.
The video below explains how to properly connect the wires to the clamps:
During installation, safety precautions must be observed. When working from ladders or sawhorses, have a partner and do not work alone. Before connecting the wires, make sure there is no voltage, hang a warning poster on the switch, or even better, disconnect the wire from the switching device if the room is large and the switch is far from you. This is all I wanted to tell you about how to install an Armstrong lamp and connect to the network with your own hands.
It will be useful to read:
Connection diagram
To connect to the network, a standard 4x18 circuit is used. Recommendations that will help you carry out everything correctly using the technology:
Lamp connection diagram
- The wiring under the ceiling should be hidden in a corrugation, which is secured with ties. This will help prevent sagging and damage to fragile decorative boards.
- The distribution box should be placed near the lighting fixtures, and the power cable should be led from it to each lamp.
- Install light bulbs and reflectors after placing the lamp in its place.
- Connecting cables: connect neutral (blue) to the terminal block via the N connector, phase (white/red) - to terminal L.