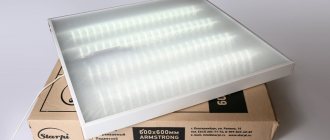
PVC panels are one of the most inexpensive solutions used for finishing the ceiling in corridors, kitchens, bathrooms and any other rooms where you need to save money. The panels are easy to install on your own, which further reduces the cost of the project; you can also embed lamps into them if you follow simple tips and properly prepare for the work.
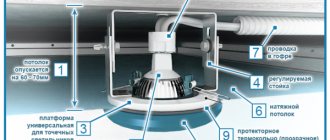
Ceiling made of PVC panels in the kitchen.
Installation of spotlights in a plastic ceiling differs from other options due to the characteristics of the material. PVC panels have their advantages and disadvantages that need to be taken into account. You must not make mistakes, as they will cause the surface to deteriorate at best, and at worst the plastic will begin to melt.
What are the features of the material
PVC panels differ in a number of characteristics, so before installing lamps in such a ceiling, you need to understand the features of this option:
- Plastic is not afraid of moisture and even with prolonged exposure to water does not deteriorate and does not change properties. But at the same time, mold may appear on the surface if the room has poor ventilation and moisture does not evaporate.
- Service life more than 10 years. PVC remains reliable for a very long time when used indoors. It is not suitable for open air due to the fact that changes in temperature and humidity, as well as ultraviolet radiation from the sun, make the plastic brittle in just 2-3 years.
- The panels can be installed with your own hands in just a couple of hours. To do this, you need to assemble a frame from a profile or a wooden block, and then secure it with staples, screws or liquid nails.
- This is the cheapest finishing material today. At the same time, you can buy panels of different widths and colors, which will allow you to decorate the ceiling the way you like.
- The surface is susceptible to impacts, which causes the PVC to crack or break. Therefore, you need to handle the ceiling with care; if you press hard when installing the lamp, a mark may remain there. The work must be carried out carefully.
- You can cut plastic with a hacksaw or a construction knife, which simplifies the work. The main thing is to do everything carefully so as not to damage the surface or leave marks on it.
- PVC is afraid of high temperatures. Components have been added to the composition that prevent the panels from burning, but at the same time they easily melt and deform from constant overheating. Because of this, lamps need to be selected especially carefully; models with incandescent lamps cannot be installed; halogen options are also undesirable. LEDs are best because they don't get very hot even when used for a long time.
- Panels of large width can sag under the weight of the lamps if they are located in the middle. If necessary, you need to place platforms under the ceiling made of suspensions and plastic so that the clamps are held on them. It is better to choose light lamps so as not to do unnecessary work.
LED lights are best suited for PVC.
For your information! If metal ceiling panels are used, the rules for installing lamps for them are the same as for PVC.
Features of PVC panels
Despite the fact that polyvinyl chloride panels appeared on the market relatively recently, they were able to gain great popularity among consumers. First of all, for those who are going to do the repairs themselves. This is due to:
- high operational reliability;
- wide range;
- ease of installation.
A distinctive feature of PVC material is its high resistance to moisture. Therefore, it is increasingly replacing tiles when decorating bathrooms, toilets and other rooms with high humidity.
Due to the fact that ceiling panels carry virtually no load, they are thinner and lighter than their wall counterparts. However, they are more fragile and easily damaged if handled carelessly. PVC panels meet the requirements for materials used for finishing residential and domestic premises. This:
- environmental friendliness;
- reliability;
- resistance to moisture and aggressive environments;
- long service life;
- practicality;
- fire safety.
It must be remembered that PVC panels do not tolerate temperature changes well, as a result of which the material can be deformed. To prevent this situation, you need to choose the right lighting fixtures.
What you will need
Before installation, collect everything you need so as not to be distracted during installation and not look for improvised devices. Some of the work needs to be done before attaching the panels, and some after. What do you need:
- A drill or screwdriver with a wood bit, the diameter of which is selected to match the size of the spotlights. The easiest way is to buy a kit; it is cheap and will come in handy later.
- If you don’t have a crown, buy a 25 mm wide construction knife and a set of replacement blades for cutting. A construction or regular school compass is suitable for marking circles.
- A construction pencil, a tape measure and a square, if necessary, determine the point in the middle of the panel.
- Screwdrivers for clamping the block, if it is a regular type. You can buy self-clamping pads, they are easier to work with.
- Wiring cable. Calculate the quantity in advance, select the cross-section for the lamps. You may also need a corrugated sleeve for laying wires and a junction box (or several).
- Fastening for wires. These can be self-tapping screws on wooden partitions; for concrete, dowel-nails are used.
- Step ladder or table for convenient work under the ceiling. If the height is small, a stool may be enough.
Crowns for wood or drywall are also suitable for plastic.
Before starting work, you need to prepare the room. Remove everything that is in the way, cover the furniture with film. If the room has no windows, install a lamp or hang a carrier.
Choosing a wire
There are a huge variety of non-flammable or low-burning brands of wires, but we need to find one that meets our specific criteria:
- don't burn
- withstand prolonged exposure to high temperatures
These characteristics are fully possessed by RKGM brand wire.
RKGM wire is a soft stranded copper wire, heat-resistant, heat-resistant, non-flammable.
Has two insulating layers:
- external, consists of fiberglass varnished winding
- internal, made of silicone rubber of special strength
Temperature characteristics from -60 to +180 degrees Celsius. The wide range of applications for this wire includes baths and saunas, where air heating and temperature differences reach critical values.
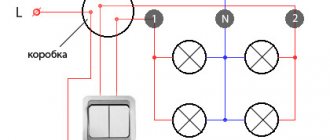
Wiring diagram
You need to make a wiring diagram before starting work; this will help you calculate the cable length, as well as think about the location of sockets and junction boxes. In addition, it is important:
- Calculate the number of ceiling lights. One element usually covers from a meter to one and a half spaces. For good light, they can be placed every 50-60 cm, the maximum distance is no more than a meter. The distance from the walls is at least 30 cm.
- Determine the exact position based on the width of the PVC panels. It is better if the lamps stand in the middle of the elements, it is much easier to make holes. When narrow panels are used, on the contrary, you need to make holes at the joint so as not to weaken the surface too much.
- Wiring is done as usual. It is better to make grooves in the walls, and use special fasteners with clamps on the ceiling. Lay parallel to the walls, turn at right angles, do not run the cable diagonally or cross it. Attach firmly, leaving enough margin to pull out the ends and connect to the lamp.
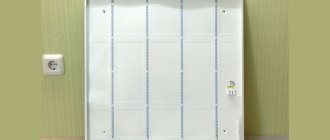
Electrical wiring diagram.
Important! Before starting any wiring work, turn off the electricity.
It is better to draw a diagram on paper, this will make it easier to carry out calculations and correctly plan the position of the elements. It is convenient to make marks with chalk on the ceiling or with a construction pencil.
Types of bathroom fixtures
When arranging any room, it is important to correctly select and install lighting fixtures, which for a combined bathroom or separate bathroom are divided into subgroups according to several criteria. Light sources can be installed at various points in the room. Depending on this, they can be wall-mounted, ceiling-mounted, floor-mounted, built-in into a shower stall or into a mirror
Depending on this, they can be wall-mounted, ceiling-mounted, floor-mounted, built-in into a shower stall or into a mirror
Light sources can be installed at various points in the room. Depending on this, they can be wall-mounted, ceiling-mounted, floor-mounted, built-in into a shower stall or into a mirror.
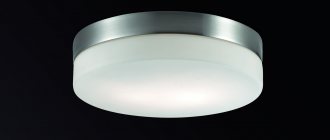
Ceiling variations are in particular demand among consumers. With their help you can achieve diffused and soft lighting in the bathroom.
There are ordinary and moisture-resistant lamps installed in the ceiling in the bathroom. The second option is intended for installation in rooms characterized by high humidity.
Electrical equipment has an IP protection index. The first number is the degree of protection of the device from mechanical damage, and the second indicates its ability to prevent moisture penetration
Lamps can be open or recessed. These subgroups differ in the method of their placement - on the ceiling or on the wall of the room. Depending on this factor, they can be point-mounted and suspended or wall-mounted.
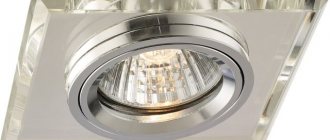
Spotlights mounted in the ceiling structure emit bright light. They can embody the designer’s idea - provide uniform general lighting or emphasize individual areas
Due to the fact that there is a high level of humidity in the bathroom, it is better to use lamps equipped with shades. If you use regular lamps, the contacts will quickly oxidize. This will make the device unsuitable for further use.
Optimal options for bathroom lighting: one lamp with a large bulb, several with a medium bulb or small spotlights
When choosing the placement of lamps, it is necessary to make maximum use of the luminous flux emitted by them. In a room with a small area, it is advisable to install built-in light sources, placing them around the perimeter of the room.
Spotlights along the perimeter allow you to evenly illuminate the room, creating a modern and stylish interior
As for the required number of lamps, here you will need rules for arranging residential premises. According to sanitary standards, bathroom illumination should be at least 50 lux.
According to the rules of the 1st quarter. m area can be illuminated with an incandescent lamp with a power of 25 or 30 W, fluorescent 5-7 W or LED 3-4 W
You can calculate how many lamps are needed to illuminate a small bathroom with parameters of 2x3 m. For this you will need:
- 2-3 incandescent lamps with a total power of 150-180 W;
- about 4 LEDs with an indicator of 18-24 W;
- or a dozen energy-saving ones at 30-40 W.
Knowing the power, you can determine the total number of lamps and choose a way to place them on the ceiling.
It is important to take care of safety when arranging lighting in the bathroom. To do this, you need to check that the wiring in this room is grounded. Another important point is to buy only lamp models with a sufficient level of protection
Do not forget that splashes from swimming can easily end up inside electrical appliances, which can lead to serious problems.
Another important point is to buy only lamp models with a sufficient level of protection. Do not forget that splashes from swimming can easily end up inside electrical appliances, which can lead to serious problems.
Installation diagram of a popular spotlight for the bathroom. The device is installed in a ceiling structure made of PVC panels or plasterboard
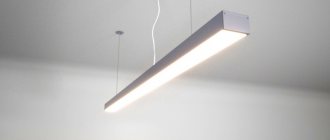
If the bathroom has suspended ceilings, then lighting fixtures designed for suspended structures will be required. They are attached to guides or ceiling tiles.
The installation diagram of a compact spotlight on a suspended ceiling allows you to visually study the process of installing an electrical lighting fixture in the bathroom
Preparing the site, making a hole
Installing spotlights in PVC panels requires proper preparation. It’s easier to combine this work with installation, so there’s less chance of making a mistake or damaging the material. There should be marks on the ceiling for the location of lamps and connected wires. Follow the instructions:
- Start installing panels. When it comes to the element in which you need to make a hole, put it in place and mark the center of the lamp location.
- Carefully remove the panel and draw a circle (or several, if there is more than one lamp per element).
- When working with a screwdriver or a drill with a bit on wood, you need to set the tool level and launch it carefully. Do not press, the plastic is cut very easily, keep the device perpendicular. It is easier to place the panel between two stools.
- If there is no crown of the required diameter, use a construction knife. First, you need to carefully cut through the top along the perimeter, pressing on the tip of the blade and breaking through the surface step by step. Don't rush, it's easy to damage the panel and ruin it. Another option is to make a hole anywhere in the circle, and then cut it around the perimeter with an electric jigsaw, on which it is better to place a plastic blade with fine teeth.
- Jagged edges can be removed with sandpaper. Then the surface will be smooth and the frame of the lamp will press tightly. After preparing the holes, secure the panel, first pulling the ends of the wires out.
The crown makes a perfectly shaped hole in seconds.
By the way! For convenient installation, the wires should hang below the surface of the PVC panels by at least 15 cm.
If the elements are narrow, it is easier to place the holes at the junction. To do this, you need to connect the two parts, mark the location of the hole and cut it out in the same way as described above. It’s better to call an assistant to hold the panels so they don’t come apart when cutting.
Video: Making a hole in a plastic lining for a spotlight
Installing spotlights in a suspended ceiling with your own hands: step-by-step installation instructions
For a stretch ceiling, the best choice is built-in spotlights. They complement the chandelier or are used separately as main lighting. But due to the design and material features, not all light bulbs are suitable; in addition, installation will require additional components - mounting pads and thermal rings. In this article, we will look step by step at how to make spot lighting on a suspended ceiling yourself. We will also tell you how you can add lighting fixtures when the canvas is already stretched.
Types of lamps and recommended lamp power
According to the installation method, spotlights are divided into two types:
- Embedded . The main part of the device is hidden behind the canvas. The bottom edge is at the same height as the ceiling and does not protrude beyond it. Because of this, the overall level of the structure drops slightly. With this arrangement, the spots are less noticeable, but the flow of light is more narrowly focused. The lamp and the canvas around it heats up more and takes longer to cool down.
- Invoices . The lamp is fixed at ceiling level, and the body is located below. When placed outdoors, the device is more noticeable, but it cools faster and illuminates the space more evenly. This type is safer to use.
The body is made from different materials: glass, crystal, aluminum, plaster, plastic. The shape can be round, square or rectangular. To choose the appearance, take into account the overall style of the room.
It is advisable to purchase lamps designed specifically for suspended ceilings. They are designed in such a way that the rays do not shine through the canvas around them.
Drywall is a denser material, so suspended ceilings do not have such problems.
There are several types of light bulbs:
- Incandescent lamps. They are almost never used with suspended ceilings, as they get very hot.
- Halogen. A relatively expensive option and they also generate a lot of heat.
- Energy saving. They are convenient where constant lighting is required, and when turned on frequently they consume a lot of electricity.
- LED. Economical and durable, practically do not heat up.
Important! To prevent the PVC film around the body from melting and turning yellow, it is necessary to comply with the maximum power requirements: 60 W for incandescent lamps and 35 for halogen lamps.
The most common types of base:
- G5.3 (for halogen and LED lamps);
- GX53 (led and energy saving);
- G9 (halogen and LED for surface-mounted luminaires).
Previously, only light bulbs operating on 12V voltage were produced. A transformer was required to connect to the power supply. Now there are lamps on sale that operate directly from 220V.
Some models of spotlights, for example, Feron DL 11, are sold disassembled, that is, the clamps are not fixed to the body. Therefore, before proceeding with installation, you must first install the springs. Assembly occurs in this order:
- Without straightening, place the tail of the spring between the fastening antennae located on the lamp body.
- Place the spring on one of them, then wrap it and squeeze it into place.
- Repeat on the other side.
The ceiling covering is a thin elastic fabric made of fabric or PVC; even under a small load it sags, and under a significant load it can tear. Therefore, lamps are not directly attached to the suspended ceiling.
To build in a lantern, a mortgage is installed before installing the canvas. This is a special plastic platform that is attached to the subfloor and is located on the same level as the molding. After stretching the ceiling, the mortgages are located behind the canvas. Lighting fixtures are attached to them.
Plastic platforms come in different diameters, round or square shapes and are selected depending on the size and model of the lamp. There are two types of embedded platforms:
- Fixed size . Only produced in round shape. There are several models on sale with different internal diameters: 55, 60, 70, 75, 80, 85, 90 and 112 mm. On the reverse side of the rings there are holes for self-tapping screws for convenient mounting of hangers. This is a cheaper option, but such platforms are purchased only after purchasing the lamps, when the diameter of the body is known.
- Universal . They are platforms made of connected rings of different diameters, which can be easily adjusted to fit a lamp of any size. Such platforms are more convenient because they can be purchased in advance. When installing, the rings are cut according to the size of the lamp. Universal mortgages are produced in round and square shapes and are sold in several standard sizes with increments of 5 or 10 mm. Round: 50-100, 55-105, 60-110, 65-115, 125-155, 165-225, 235-305 mm. Square: 50-90, 90-140, 150-200 mm. On the back side of the platforms there are also holes for self-tapping screws.
For fastening, use punched tape or flexible metal hangers. These are galvanized steel strips with perforations. The tapes are bent to give the desired shape. Through the holes they are screwed to the mortgages and the rough ceiling. The hangers are attached to the platform with self-tapping screws (3.5x9.5 mm).
Sometimes adjustable stands are used to mount lamps. The design consists of two metal guides and a U-shaped bar with variable height, to which the platform is attached.
The upper part of the rack is screwed to the ceiling. But such products are more expensive, and they are inconvenient to install due to the need to adjust the height with a wrench.
It is much easier to bend the metal hangers a little, and this can be done even after the fabric has been stretched.
Technology for installing spotlights in a suspended ceiling
We will provide step-by-step instructions and consider in detail each stage of work from marking and preparing mortgages to laying electrical wiring and connecting devices.
What you will need
To install lamps in a suspended ceiling, you need to prepare the following tools:
- stepladder;
- laser level;
- tape measure and pencil;
- marking cord;
- hammer drill with a drill with a diameter of 6 mm (for concrete slabs, wooden floors are not needed);
- hammer;
- screwdriver or screwdriver;
- sharp knife.
Supplies you will need:
- plastic platforms;
- metal hangers;
- fasteners (screws “bugs” and dowel-nails);
- electrical cable;
- terminal blocks (usually a rating of 3-5 A is sufficient);
- thermal rings;
- glue (preferably Cosmofen).
Installation of lamps in PVC panels
Installation of lamps in PVC panels will take little time if preparation is carried out correctly. Before you begin, you should unpack the equipment, inspect it and understand how the latches work, so as not to spoil anything later. Follow these simple tips:
- After attaching the panel, you need to connect the lamp to the output cable. To do this, the ends of the wires coming from the housing are stripped. This should be done in advance so as not to have to work under the ceiling. It is more convenient to use an electrician's knife or a construction knife with a sharp blade.
- Attach a block to the ends of the cable running along the ceiling. The most commonly used option is to insert the core into the hole and tighten it with a small screw (for this you will need a small Phillips screwdriver). Then connect the lamp in a similar way; it is more convenient if someone holds it while connecting.
Connection using terminal blocks. - Press the fasteners with your fingers so that the lamp body fits into the cut hole. Then push it all the way, the springs will press out the protrusions and tightly fix the element to the ceiling. If the light bulb was not included in the kit, you need to insert it before fixing the lamp.
- After installation is complete, check the operation of the luminaires. If everything is done correctly, no problems will arise.
If the light fixture has a removable ring, insert it into the panel.
Important! If work is carried out in a bathroom, toilet, kitchen or other room with changes in humidity, it is better to choose IP44 class lamps.
Installing lamps in plastic panels is not difficult if you prepare everything you need and understand the installation technology. It is better to use a crown to cut the hole, then it will have an ideal shape. It is advisable to connect the wires with blocks, and not with twists and electrical tape.
What tool will you need?
The entire necessary set of tools is usually available in the pantry. If some items from the list are not available, the missing tools can be easily purchased or temporarily borrowed from friends.
Installation of spotlights in a plastic ceiling is carried out using the following tools and materials:
- Roulette
- Round hole saws
- Electric drill
- Sharp knife
At the preliminary stage, even during the assembly of the ceiling itself, tools and materials may be required for laying all the electrical wiring. Connecting wires yourself can only be done if you already have certain electrical skills and relevant experience. In other situations, it is better to contact a professional electrician.
Initial stage: preparing panels
To make the installation of ceiling lights easy, it is necessary to carry out preparation. First, you should make sure you have the necessary tools.
In this case it is:
- pencil;
- electric drill;
- special crown;
- sharp knife;
- abrasive material;
- workplace for drilling (machine, stool, board).
A plastic ceiling is a structure made of long panels that use special grooves for connection. It is important that the distance from the concrete panel and plastic ceiling accommodates the main part of the lamp and the entire wiring kit. This needs to be calculated at the initial stage.
To be securely attached, any lighting fixture requires a hole. It is most convenient to drill the panel on a board. To do this, a plan for attaching ceiling lamps is drawn up in advance, after which the ceiling can be partially dismantled, marked and drilled in the right places.
To do this, use a special crown for plastic or drywall. A wood drill bit will also work. After this, the unevenness is removed using an abrasive material. If you do not have a specialized tool, you can use a regular knife. The intended hole is cut and then finished to perfection with a file. A chandelier or lamp can be hung using the same pattern.
It is important to act carefully, as not all types of plastic are pressure resistant. Damage may occur in areas of excessive pressure.
Peculiarities
One of the most popular materials for ceiling finishing are PVC panels. They have many advantages and disadvantages, one of the main advantages is that you can install light sources into this system yourself. Plastic is an inexpensive material, so ceilings made from this material are very popular. Installation does not require any special professional skills - everything is quite simple.
The assortment allows you to choose elements that vary in length, width, color and design. They are divided into several main types. For example, they can be light and elastic, requiring a special approach and care during installation work. In addition, there are wall analogues. They are quite heavy and have a lot of weight.
Other varieties include:
- glossy;
- with thermal film;
- with wood or marble patterns.
Separately, we can highlight plastic with a beautiful coating and expensive texture - such panels can decorate even the most expensive interior.
Types of spotlights
If we consider them in terms of installation and design features, we can distinguish two types that require different lamps for a plastic ceiling:
- built-in;
- invoices.
The first ones are mounted under the mounting surface of the suspended structure. They require a certain space between the hinged and primary coverings. They are characterized by the use of LED, halogen and fluorescent lamps, both compact and tubular. Overhead lamps for PVC ceilings can be used everywhere, even on heavily finished surfaces. The body of the device contains both the base and the lamp itself. They do not require additional space to accommodate all their elements.
Recommendations for installing lamps and fixtures on ceilings made of PVC panels
An important element in the interior is its lighting. According to scientific research, different types of light devices do not have the same effect on the human body. Lamps with dim, diffused lighting create a calm and peaceful environment. Directional, dotted ones highlight individual objects and parts of the living space. And bright, central chandeliers are suitable for a festive and solemn atmosphere. Different lighting effects cause different reactions in people and create a certain mood. If you manage to create a universal apartment lighting system, this will help to have a beneficial effect on the health and well-being of residents and guests.
Installation and connection of lamps
When installing and connecting plastic ceiling lamps, you must adhere to a number of important tips:
- Wiring is carried out at the request of the house owner, either together with the installation of the ceiling, or in advance.
Installation processIt is recommended to choose a parallel connection of wires rather than a chain connection. This will allow, if one light bulb burns out, the remaining light bulbs to illuminate the room. If the connection is a chain one, then if one light bulb fails, the entire “chain” will not work and troubleshooting will require spending a lot of time until the burnt-out lighting element can be detected.
- To connect, you can use a terminal or, according to the old custom, an insulated twist.
- It is necessary to use corrugation, the edges of which must be insulated. The insulated corrugation does not allow oxygen to enter, and if a short circuit occurs, the wire will not ignite.
- For wiring, it is preferable to use stranded copper wire, which is difficult to heat.
- During installation, tension on the wire is not allowed. The bottom line is that when a hole is made, there is a possibility of missing the wire. In this case, it will need to be tightened. If the wire turns out to be stretched, and the hole made is slightly to the side, then you will have to disassemble the surface and add a piece of electrical wire.
- It is advisable to check the connections made every 2-2.5 years. To do this, you will need to remove the device from the niche, turn it on and check the insulated areas that should not heat up. Since the joints, when exposed to moisture, have the ability to oxidize, they should be checked with particular care.
- Plastic ceiling lights can be placed on the surface of the top of the room in different directions: triangle, spiral, diagonal, semicircle, circle, perimeter. The main thing is that the symmetry of the points is maintained.
- Holes for lamps are made with a drill or screwdriver with special attachments at a distance of 0.4 meters from the wall. However, before making holes, you need to mark the future location of the lamps on the wall.
- Markings with semicircular and round geometric shapes are made using a pencil and a rope, which is used as a compass.
- After the holes are made, you need to insert your hand into them and pull out the wire, which is prudently stretched from above the stretch ceiling. Next, in each hole, its own lamp socket is connected.
- It should be remembered that if putty is applied to the surface, then the wires should not be temporarily “powered” with current.
- To insert the device into the hole, you must carefully press the side clamps on the lighting device. The lamp that fits into the hole should fit snugly against the ceiling. If the lighting fixture does not fit tightly, then it needs to be moved a little to shrink it. After securely fastening, the lamp can be inserted into the lighting fixture.
Also read: PVC insert for suspended ceilings.
Additional information about the specifics of luminaires
To gain complete knowledge of how to install ceiling lights yourself, it is worth studying some of the nuances of this process.
The choice of installation methods will depend on the type of light source and installation location. Since spotlights are used not only for the ceiling, the room should be divided into zones. Installation may be required on wall panels or furniture elements.
It is necessary to divide light sources into main and auxiliary. The main lamp should be more powerful, so you should choose a modification equipped with the thermal protector described above.
The installation features are influenced by the following factors:
- does the lamp have a rotating function?
- outer diameter of the lamp;
- installation depth declared by the manufacturer.
The diameter and depth of the pre-formed landing holes will depend on these features. Self-installation of lamps in ceiling panels is simple. You just need to strictly adhere to the rules, especially when it comes to working with electrical wiring.
Connecting wires
To connect the wires to each other, we use a manual crimping press and copper or tinned copper sleeves.
For soft copper wire, this connection method is almost ideal, rivaled only by tin soldering.
If you don’t have a press at hand, an alternative can be electrical installation pliers or wire cutters, the operating principle of which is no different from the operating principle of an electrical installation crimping press.
Installation work
Before starting work, you need to check that everything is ready. The presence of wires, electrical tape and terminal blocks must be known before starting work. It is also necessary to check the integrity of the switches and the lamps themselves.
- The first step is to choose the location of the light sources. It is best to apply the exact locations on the ceiling. The main thing is not to select points in those places where the profile or panel joint will pass.
- It is better to start installing the lamps before the ceiling is completely assembled (it is easier to install the wiring when only part of the panels are hung). A common problem is the hole for the lamp. Many people unknowingly begin to invent some kind of fraud in order to get it straight and in size. Most people use a drill with a special attachment of a certain diameter. This allows you to make the hole as accurately and accurately as possible. To do this, it is enough to simply work at low speeds without much effort - the plastic will not withstand either speed or mechanical impact. If you don't have a drill, you can use a compass and a utility knife.
- You need to draw a circle with a compass and carefully cut it out with a knife. When making cuts, it is better to always start cutting inside the circle - mistakes will not be visible, and the evenness of the circle can then be achieved using a minimum of effort, but maximum accuracy.
- Drilling a hole is not carried out on an installed panel (this is prohibited).
- After the hole is ready, you need to install the lamp body, snapping it onto the springs.
- Only after these procedures can the panel be installed. Many professional workers recommend inserting the wire into the hole in advance: this will help avoid climbing and searching for the wire after installing the panel. For ease of connection, the wire should hang down by 150-200 mm. When working with wires, it is necessary to disconnect the entire house from voltage and have battery-powered flashlights.
- We remove the insulation from the wires and expose the contacts for connecting the cartridge. If necessary, you can use insulation to connect a wire leading in parallel to the next lamp.
- After attaching the socket, the light bulb itself is carefully inserted into it. It is fixed with a special bracket, often having additional thin glass as a fastener.
Having selected the necessary PVC panels and the necessary lamps, you can create any combination of them on the ceiling. The installation process is simple, but it is necessary to study it and understand the intricacies of the process in order to avoid mistakes.
How to install lamps in PVC panels, see the video below.