Not all home craftsmen know how to hang a chandelier on a plasterboard ceiling. Installation of lighting structures on a concrete frame usually does not raise any questions. He's more familiar. With gypsum board it is a little more complicated. The weight of lamps is often above 1 kg, and plasterboard is a rather fragile material. Therefore, before you start work, you need to study all the details in order to securely mount the lamp on the ceiling.
When installing the chandelier, you need to follow safety rules and choose a suitable mount.
The lamp can be installed in two ways: during installation of a plasterboard ceiling or on an already sheathed surface. In addition, the operating features differ depending on the weight of the lighting structure.
Preparation for installation
Ceiling construction from gypsum plasterboard
Before you learn how to hang a chandelier on a plasterboard ceiling, you need to draw up a project. Decide where you will install the lighting fixture, its weight and power.
Light chandeliers (up to 3 kg) are fixed using a molly dowel; if the device weighs about 6 kg, then embedded structures are used; heavy devices (from 7 kg) are attached to an anchor hook.
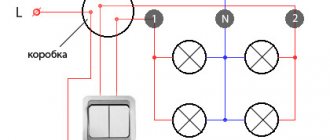
After determining the location for mounting the lamp on a plasterboard surface, pay attention to the wiring diagram. When creating a project, consider the power of the device. The insulation of electrical wiring and its cross-section must be selected taking this parameter into account.
Twisting wires and hiding them under the ceiling trim is strictly prohibited! To connect the wires, special branched boxes are used.
An important condition for installing a chandelier on drywall is the cable cross-section with a margin, this will help to avoid a short circuit when the device needs to be replaced. It is also necessary to make a hole for the wires to exit in the area where the chandelier will be installed. To connect the lighting device, determine “zero” and “phase” on the wires using an indicator screwdriver. Then connect the phase wire on the ceiling with the phase wire on the chandelier, and connect the zero to zero.
Remember the basic recommendations that will help you securely attach the chandelier to the plasterboard base:
- Choose a lamp, decide on the method of its installation and location while creating the frame.
- Provide the installation location of the lamp with a profile: one strip is enough for the hook, and two for the bracket.
- Select suitable fasteners for installation.
- While working, follow safety rules: use reliable scaffolding, turn off the power supply, use personal protective equipment and diagnostic equipment.
If you decide to install lamps after fixing the gypsum board (plasterboard sheet), then a magnet will help you find the profile under the plasterboard sheets. To do this, simply slide it over the surface.
Installation Tools
To install a chandelier on a gypsum board, you need to prepare the following tools:
- For concrete floors, a hammer drill with carbide drills is suitable. If the base is made of clay or wood, then a drill and a screwdriver are enough.
- Pliers.
- To connect the chandelier to power, prepare pliers, diagonal pliers, a knife, and an indicator screwdriver.
- Annular drills of the required diameter.
In addition, you will need the lighting fixture itself and mounting hardware.
Types of dowels for mounting on gypsum boards
To securely hang a chandelier on a plasterboard ceiling, dowels are used, the shape and purpose of which are different. To install lighting structures, the following types of fasteners are used:
| Types of drywall dowels | Peculiarities |
| Dowel nail | This is a plastic structure consisting of 3 sections and a nail (with or without threads). The tip is equipped with antennae that straighten after driving in a nail. |
| Butterfly dowel | A dowel is inserted into the finished hole, and then a self-tapping screw is screwed in. It has “wings” that expand and lock inside. The maximum load that the “butterfly” can withstand is 28 kg. |
| Molly | The molly is inserted into the hole, and then the screw is screwed in. The fastening element opens inside. Maximum load – 25 kg. |
| Driva | This type of dowel can be equipped with or without a drill. They are made from nylon or metal. If the gypsum board is thinner than 12.5 mm, then the drive is screwed in with a Phillips screwdriver, and if it is thicker, a hole is made (6 mm). Withstands weight up to 25 kg. |
| Knauf-Hartmut | This dowel consists of an anchor strip, two guide tabs, a locking latch and a screw. Used for fastening heavy structures – up to 55 kg. |
| Fischer Pd | It is a plastic cylinder with a sleeve and blades on the side with a massive tip. Maximum weight – up to 16 kg. |
| Spring dowel | It is a long screw with a hook at the end and two blades that are held open by a spring. |
Electrical installation rules
If the two-wire electrical circuit of a simple lamp does not cause problems for most home craftsmen during installation, then difficulties are possible with multi-arm chandeliers.
In addition, as with any other electrical appliance, when installing a chandelier you must follow safety rules:
- It is prohibited to use twisted connections instead of terminal connectors for connections hidden under the ceiling;
- Direct contact of aluminum and copper wires is not allowed;
- the cable cross-section must be calculated with a reasonable margin so that its capacity is sufficient if the lamp needs to be replaced;
- it is necessary to determine in advance the phase in the wiring harness and connect it only to the corresponding terminal of the lamp according to the diagram in the instructions;
- Perform all operations on electrical wiring with the mains switch (automatic) switched off.
When installing the chandelier, you may need the help of an electrician. If you make a mistake when connecting the wires, two-button switches or brightness controls (dimmers) may not work correctly.
How to fix a chandelier on a plasterboard ceiling
Attaching a chandelier to a plasterboard ceiling is carried out in different ways. They differ depending on the fastening method, the type of dowels, the weight and size of the lighting fixture.
It is worth considering that gypsum boards can withstand a weight of about 6 kg.
Attention! When calculating the load on the gypsum board, you need to take into account not only the weight of the lamp, but also additional loads (replacing light bulbs, children playing, etc.).
You can mount lamps using a hook, embedded profile, butterfly dowel, anchors, etc. Beginning craftsmen should learn the nuances of working when installing devices in different ways.
On the hook
Option for installing a hook on gypsum boards
Installation of lighting using a hook is carried out in two ways: with a thread or on a suspension.
Threaded fasteners are more suitable for wooden surfaces. But it is worth considering that the length of the hooks is different; when choosing a suitable fastener, you need to take into account the distance between the point of its fixation and the drywall, as well as the depth of its screwing into the base.
Drill a hole in the beam, screw in a hook and attach the light to it. The hole for the hook should be slightly narrower than the diameter of the thread on it so that it fits tightly.
The suspended system is used for reinforced concrete foundations that have voids. The location of such channels should be taken into account when creating the markup.
Installing a lamp on a gypsum board ceiling begins with making a hole with a diameter of 70 mm. Then a piece of reinforcement or a pin is inserted into it, the length of which is 2 times the diameter of the hole made. The material must be laid along the frame channel.
Then you need to take a wire with a diameter of 6–8 mm and form it into a hook with two loops. One loop is hung on a pin in the slab, and a lamp is attached to the second.
On the embedded profile
This mounting method is used for lighting structures up to 7 kg.
The installation is carried out according to the following plan:
- Make markings on the ceiling for the profile.
- Install a gypsum board base.
- Attach the profile to the installation point of the lamp, and mark the fastener locations through the holes in it.
- Drill holes at the marked points.
- Secure the profile with dowel nails.
- Place the wiring in a corrugated sleeve and stretch it to the mounting point of the lamp.
- Cover the base with plasterboard, pull the cables through the drilled hole.
- Connect the chandelier to the power supply and attach it to the embedded structure.
- Put on a decorative cap.
Important! Before installing the chandelier, check the working condition of the sockets.
On a spring butterfly dowel
This installation method is used for lightweight structures.
Do-it-yourself mounting of a chandelier on a plasterboard ceiling
Drywall is a universal building material that has proven itself in finishing walls, ceilings and floors. However, drywall is not very durable and the chandelier is difficult to install. Therefore, before you hang a chandelier on a plaster ceiling, you should think carefully about what you are going to do to get the desired effect.
Preparing for installation
To secure the chandelier to the drywall as tightly as possible, it is recommended to do the following:
Determine the area where the lighting fixture will be installed. Attach the metal profile to the intended location of the chandelier.
Note: Placing the metal profile under the drywall is simple. For this you will need a magnet. Sometimes, instead of a metal profile, a wooden beam is used. It will be more difficult to find.
Electrical wiring
The organization of lighting in each room should be based on a pre-prepared scheme. According to the standard scheme, it is assumed that the cross-sectional area of the cores is always taken with a margin. This is necessary to prevent short circuits in the network caused by changes in the composition of electricity consumers. If there are new appliances that consume electricity in the future, you will need a cable that can withstand a larger load. It is not always possible to change it later; it is better to do it in advance.
After the wiring is completed, a hole is made in the drywall where the lighting fixture is attached to complete the new connection.
Mounting options
Anchor fastening
This type of mount is used to hang the heaviest lamps. The chandelier is attached directly to the ceiling tiles or wooden beams, depending on what is the base of the ceiling. If there are several attachment points, a separate hole is made in the drywall for each of them.
First, marking is done. Accurately measure all distances from the centers of the holes to their edges. Make sure the holes are large enough to accommodate the anchors. The anchors must be inserted firmly but without excessive force.
Anchors must be selected taking into account the applied load and even with a certain margin. The drill bits or bits must match the diameter of the hole being drilled.
The anchor is installed with a slightly loosened nut and an extended pin. The nut is fully tightened. If the distance between the base ceiling and the drywall does not allow placing a lighting fixture, a metal rod of the required length is placed on the anchor.
Hook mount
This fixation method is performed in one of three ways:
Threaded. Threaded hooks are used most effectively for installation into wood beams. Hanging devices are available in various lengths. Therefore, a suitable element is selected depending on the distance between the drywall and the installation site and the depth of the structure in the wood. Drill a hole in the beam with a diameter slightly smaller than that of the hook. Then screw the fastener to the beam. Then place the lighting fixture. Suspense. Hooks are also used in floors where the floors are made of reinforced concrete slabs. Such slabs often have recesses. When marking, remember the location of the cavities. Make a hole in the plate using a hammer (depth - from 50 to 70 mm). Insert rebar or expansion plug (2 times the diameter of the hole) into the hole. Then lay the reinforcement along the hollow channel in the slab. Make a double bent hook from the wire (diameter 5-9 mm). One hinge is attached to a pin located in the plate, and the other is for installing a chandelier on it. Folding pin on a spring. This type of fastening is used for installation in drywall. It can also be installed directly on the floor slab. One end of the pin has folding tabs that open when you insert them into the hole. With spring pins, no additional cross pins are required. The diameter of the hole for the pin is chosen to be slightly larger compared to the diameter of the bent lamella.
The above methods for attaching lamps are the main ones in the case of plasterboard ceilings. However, this list is not exhaustive: if desired, you can use other methods of attaching the chandelier. The main thing is to make sure that the fastening is secure.
how to change the purpose of a room
Tools and materials
To complete the work you will need the following tools:
For concrete slabs, you will need a hammer drill and some drills. If you only need to make holes in drywall (or similar soft materials), a power drill and screwdriver will suffice. Pliers or pliers. With their help we screw the hook into the dowel. A screwdriver with a large blade will also work. To properly connect to the network, you will need an electrician's kit. The following tools are required: side cutters, knife, indicator screwdriver.
Attention! The best way to make holes in drywall is to use guillotines.
You will also need the following materials:
The chandelier itself that we will assemble. Grinders for metal with a hook or a plastic pin with a similar device. If the fasteners are attached directly to drywall, we use studs with a plastic collet. In this case, they are no less effective and the price is lower.
Installation of a light chandelier
This method is used to install light-weight lamps (up to one and a half kilograms). The lighting fixture is attached to the drywall in the following sequence:
Mark the installation location with a pencil. Using a hammer, drill a hole with a diameter of 5-9 mm in the drywall. Insert the pin into the hole. Screw the threaded hook into the dowel.
Installing a heavy lamp
An anchor bolt is needed to hang a heavy chandelier. Install the chandelier in the following sequence:
Make a hole in the marked place using a punch. The hole diameter for a heavy chandelier is from 10 to 12 mm. Insert the anchor bolt. Insert collet. Using a hammer, lightly tap the collet into the hole. Screw in the hook.
This fastening element can withstand even very heavy loads. To decorate the fastening, the hook is sometimes insulated with a PVC pipe. The final stage of work is connecting the lamp to the electrical network.
If a metal frame was previously installed, some features are added to the installation work:
Having attached the fittings to the hook, we attach one metal profile piece to the frame. If using a bracket, you will need two strips. They will evenly distribute the weight of the chandelier and prevent it from falling even with very heavy weight. Make holes in the drywall sheet. They should be slightly smaller than the diameter of the arc pin (3-4 mm). Insert the pin until it stops. Open butterflies securely secure the mounting element. It's very difficult to get it out. Add a hook to the pin.
If you're installing a bracket, you'll also make some holes. Then select a handle according to your console size. Use self-tapping screws to hang the console. Insert them into the console holder. Connect the lighting fixture to the mains. Hang the lamp on a hook or console. Cover the lamp with decorative panels.
Note: The above method is suitable for chandeliers weighing no more than 10 kg. Heavier chandeliers should only be attached to a concrete base. Fastening is carried out with anchor brackets.
Installation of especially heavy fittings is as follows:
Make a hole in the concrete base. The hole must match the diameter of the collet. Insert the spacer and pin into the hole. The pin is needed to support the chandelier. Install only the collet. Screw in the collet using a tool. Attach the hook to the threaded rod.
Useful tips
A few tips for those who want to install a chandelier on a plasterboard ceiling:
Decide in advance on the type of chandelier and the method of mounting it. The place where we plan to install the ceiling lamp must be equipped with an additional profile or flange plate. To attach a heavy chandelier, you will need additional trim. If the chandelier is light and will be mounted on drywall, appropriate fasteners (dowels, spring structures) are required. If the chandelier is heavy, you can use anchors.
During installation, safety requirements must be taken into account. We are talking about reliable scaffolding, turning off electricity during work, and using personal protective equipment. A responsible approach to electrical installation is especially important. It should be placed in a corrugated pipe. Thanks to this, the cables will be better protected. If the cord is installed in a basement ceiling, you will need a strobe light - a special channel 5 cm deep. The chandelier should be attached to the anchor hook, after making sure that it is securely fastened. This can be done, for example, with a load of 16 kg on a thick rope.
The quality of drywall and fasteners is especially important. Don't skimp on safety. Poor quality materials will not allow the fasteners to support the weight of the chandelier, and the structure may collapse.
What to do if the chandelier is heavy
It is better to install lamps weighing 7 kg or more on a reinforced concrete base. It is recommended to fasten them using an anchor hook.
You need to mount a heavy chandelier on a plasterboard ceiling according to the following plan:
- Drill a hole in the drywall to install the structure.
- Drill a hole in the concrete slab, its diameter should match the circumference of the anchor. The main thing is not to make the hole wider, otherwise installation will be complicated.
- Drive the anchor into the slab.
- Connect the lamp to the power supply, secure the housing to the hook.
- Put on a decorative cap.
Multiple hooks can be used if necessary.
Watch the video to see how much a plasterboard sheet can actually withstand:
How to hang a chandelier on drywall if the ceiling is already covered
Installing a heavy structure on a ceiling covered with gypsum board is possible, just follow this plan:
- Drill a hole in the place of intended fastening; its circumference should be slightly narrower than the diameter of the glass.
- Select a plastic bottle with the same circumference, cut off the bottom, punch a hole in the cork, insert an anchor bolt there, the length of which is greater than the distance of the frame to the gypsum board.
- Using a drill inserted into a bottle, make a hole in the main ceiling at low speed. The bottle is used to collect garbage.
- Insert the anchor into the hole, secure it with a wrench, and tighten the nut until it stops.
- Attach the chandelier body to the hook.
- Connect the lamp to the power supply.
- Put on a decorative cap.
Be sure to wrap the end of the anchor bolt with electrical tape during installation.
Anchor fastening
This type of fastening is used for the heaviest lighting fixtures. The chandelier is attached directly to the floor slabs or wooden beams, if this is a private house. If the lamp has several mounting points, then you need to make a separate hole in the drywall for each.
To begin with, markings are made. All distances from the centers for drilling to the walls are accurately measured, taking into account the fact that the holes in the plasterboard must contain materials into which anchors can be secured. The diameter of the holes is selected so that the main fasteners can be installed through them. Anchors must be selected that correspond to the future load or with a reserve. The diameter of the drill or drill will be selected according to their diameter.
Holes are drilled in the drywall, then, using a hammer drill, holes are made in the load-bearing floor material. The diameter of such a hole needs to be such that the anchor itself can fit into it quite tightly, but without unnecessary effort. The anchor is installed by slightly loosening the nut on it and pulling out the pin. The nut is tightened until it stops and, if the distance between the main ceiling and the gypsum board does not allow the future lamp to be hung freely, an additional metal rod of the required length is placed on the anchor.
This type of chandelier mounting is the most reliable, versatile and simple.
The most important
It is possible to attach a chandelier to a gypsum board ceiling yourself, the main thing is to follow these recommendations:
- Draw up a project taking into account the exact placement of the chandelier, its weight and method of attachment.
- Lamps weighing up to 6 kg can be attached to a plasterboard frame.
- To reduce the load on gypsum plasterboard sheathing, use embedded elements, for example, a profile or a piece of plywood.
- If the weight of the device is from 7 to 10 kg, then they need to be attached to a reinforced concrete frame using anchor hooks.
- Observe safety precautions: turn off the power supply before work, use personal protective equipment, etc.
With correct calculations and the use of appropriate fasteners, the installed chandelier will last a long time.
Previous
ChandeliersInstalling a chandelier on a suspended ceiling: how to hang it yourself
Next
ChandeliersIndependent replacement of halogen lamps with LED lamps in a chandelier
Create a masterpiece with LED strip
Of course, spotlights, chandeliers and fiber optics are very interesting, but the best option for lighting a plasterboard ceiling is, of course, LED strips. Here we will dwell on them in more detail. True, for this, as a rule, it is necessary to construct a two-level structure from gypsum plasterboard.
First level installation
Installation of a plasterboard ceiling with lighting includes the construction of a frame; a metal profile is used. The procedure consists of 5 stages:
- stepping back about 10 cm from the ceiling, you draw a horizontal line around the perimeter of the room. A laser level or hydraulic level will help to make it level;
- the starting profile is attached to the wall along the line.
Scheme and names of required profile types
- you will need to insert the main profile into the starting profile and then attach it with hangers;
- you can make the structure more rigid. To do this, install jumpers between the profiles using crab connectors.
Creating a 1st level frame
after the jumpers have been connected, the frame is sheathed with sheets of plasterboard (gypsum plasterboard). To ensure reliable fastening, use self-tapping screws.
Covering the frame with gypsum plasterboard sheets
Installation of the 2nd level frame
You have built the first level using plasterboard on the ceiling. It's time to start the second one:
- at the 1st level the boundary of the second is drawn;
- Having allocated space for the cornice (usually 5-6 centimeters), the starting profile is fixed.
Marking the second level frame
sections of the main profile are cut with metal scissors. They are fixed in the starting guide and serve as suspensions. The starting profile is fixed with hangers.
Assembly of the 2nd level frame
- the main profiles are inserted into the ceiling and the wires are brought out. The frame is sheathed with material;
- Finally, putty is applied to the plasterboard ceiling and the seams are processed.
Sheathing the frame with gypsum plasterboard sheets (don’t forget to install lighting)
Organization of lighting and installation of tape
When installing LEDs, the following installation rules should be observed:
- the tape is cut only in designated areas;
- the elements are connected only using connectors;
- The power supply must have a minimum power reserve of 20% or it will quickly burn out.
You should also remember the location of the LED strip
To make a backlit plasterboard ceiling with your own hands, you need to accurately calculate the power of the power supply. Working with the tape, it will play the role of a transformer. Let's imagine that you are just installing a plasterboard ceiling with lighting in your bedroom. The tape is 6 meters long and has a power of 9.5 W. Multiplying the power by the length, we get 57 watts. Don't forget about additional power in reserve. Applying a coefficient of 1.25, we get a value of 71.25. Thus, you need to stock up on a 72-75 W power supply.
The circle of the tape is connected like this. Power the unit with a voltage of 220 V, connect the LEDs to it. If an RGB strip is used, it is connected through the controller. The red wire is positive, but the negative can be black or blue. Is everything working properly? Can be carefully glued to the ceiling.
A visual diagram of the correct connection of the LED strip
LED lighting kit
A place to put the power supply
Your home requires special attention and effort. When you know how to make a plasterboard ceiling with lighting, it is quite possible to create comfort and warmth in absolutely any room. In addition, this does not require any special skills or a rare, terribly expensive instrument. The ceiling is ready without any effort - you can relax!