One of the most impressive ways to decorate a chandelier at the connection point is a ceiling rosette, which allows you to stunningly design a ceiling lighting fixture. It perfectly hides electrical wires, mounting clips and hooks. But you don’t know which model to choose, how to install and secure it?
We will help you understand these issues. Taking into account our recommendations, you will have the best ceiling rosette for a chandelier. The article discusses popular models sold on the modern market.
We invite you to familiarize yourself with step-by-step instructions for installing and fastening sockets made of various materials with visual photos of each step. We will also tell you what installation features should be taken into account when connecting. The article is equipped with video tips on the selection, subtleties of decor and installation on your own.
Options for ceiling roses
A ceiling rosette is a monolithic or prefabricated structure mounted on a substrate, which covers the unsightly place where the chandelier is attached to the surface and the connection point of the electrical wires leading to it.
The concept of “socket” was borrowed from the French. At the dawn of their appearance, ceiling models looked like symmetrical stylized flowers or wreaths of greenery with leaves diverging diametrically from the center.
Image gallery
Photo from
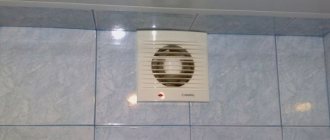
Decorative function of ceiling rosette
Masking and protection of electrical wiring
Option for linking ceiling and room decor
Use in composition
Today, the choice of textures and color options is much wider. These can be heraldic ornaments, geometric patterns, abstract compositions with unpretentious designs that fit perfectly into modern style solutions.
Their shape can be very diverse:
- round;
- oval;
- square;
- polygonal;
- with curved edges.
If in earlier times such functional decorative elements were used exclusively to decorate ceilings, today they are often used to decorate side lighting.
A well-chosen socket can emphasize the originality of the lighting fixture and elevate the interior
Using several small rosettes of different sizes, but with a similar repeating pattern, it is convenient to create original installations.
Ceiling sockets in Moscow
Ceiling rosettes and other products can be purchased at Leroy Merlin in Moscow at low prices. Select the product you are interested in on the website and buy it in our online store. The range of products presented in the catalog is extremely wide. Among them there will certainly be a position suitable in all respects.
All products presented in the “Ceiling Rosettes” section are produced by well-known companies that have proven themselves to be of high quality for their products.
You can always place an order and pay for it online on the official website of Leroy Merlin in Russia. For residents of the Moscow region, we not only have low prices for products in the “Ceiling Rosettes” category, but also fast delivery to cities such as Moscow, Balashikha, Podolsk, Khimki, Korolev, Mytishchi, Lyubertsy, Krasnogorsk, Elektrostal, Kolomna, Odintsovo, Domodedovo , Serpukhov, Shchelkovo, Orekhovo-Zuevo, Ramenskoye, Dolgoprudny, Pushkino, Reutov, Sergiev Posad, Voskresensk, Lobnya, Ivanteevka, Dubna, Yegoryevsk, Chekhov, Dmitrov, Vidnoye, Stupino, Pavlovsky Posad, Naro-Fominsk, Fryazino, Lytkarino, Dzerzhinsky , Solnechnogorsk, Istra and Zhukovsky.
Main types of connection points
Stylized rosettes can be perfectly combined with cornices, borders and fillets, acting as a worthy addition to the interior, or take on the role of a bright decorative accent.
No. 1 - classification of products by type of material
The first models of ceiling rosettes were made mainly of plaster, less often of wood. The production of modern gypsum products is based on centuries-old traditions. The only difference is that special modifying additives are used to improve the plasticity of the material.
Gypsum is a fairly plastic material, the properties of which craftsmen use when working out even small details, giving volume to the relief of the product.
Sockets made of gypsum are famous for their excellent technical characteristics. They are “indifferent” to the effects of the environment and do not require serious care. Synthetic products are no less popular: polyurethane and foam rosettes for the ceiling.
The synthetic polymer is resistant to deformation under the influence of temperature changes, so sockets made from it can be installed in unheated and damp rooms.
The main advantage of polymer materials is their lightness, which greatly simplifies the installation process. But they do not have such clear detail of the drawing as plaster models.
Unlike gypsum analogues, polymer products do not chip or crack if the installation technology is accidentally violated
The only drawback of polymer products is their short service life. After just five years they begin to turn yellow. The defect can be eliminated only by applying a new layer of paint, or by completely replacing the element that has lost its presentability.
A separate niche in the market is occupied by products that have the texture of noble stone, for example, marble.
Models made from natural materials are used to embody traditional architectural forms that were characteristic of royal castles and palaces in a modern interior.
No. 2 - division into types according to installation method
Depending on the installation method, there are:
- Overhead sockets for masking electrical points are products with a smooth base on which decorative elements are located.
- Mortise models are patterns laid out on a substrate, which, after installation is completed, are perceived together with the ceiling surface as a single whole.
Mortise-type models have the advantage over their overhead counterparts in that, due to the inconspicuousness of the joints, they look like a natural extension of the ceiling.
Image gallery
Photo from
Overhead version of the ceiling rosette
Fixing overhead models with glue
Exquisite ceiling mortise
Aesthetic design of a mortise socket
No. 3 - for decoration
Depending on the decorative design, ceiling rosettes come in two types:
- Profile models with a smooth surface . They are made on the basis of a stretched profile and are a form that includes several flat geometric shapes of different sizes, inscribed into each other.
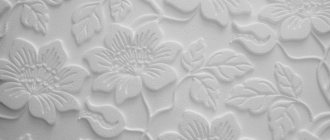
- Rosettes with molded surface and relief shapes . In models of this type, the smooth base of the product is decorated with individual details and decorative elements.
By installing an electrical outlet decorated with many elements, you can construct a three-dimensional picture or a lace ceiling under a chandelier. Beautifully designed stucco molding will easily disguise all the errors and imperfections in the design and layout of the room.
Rosettes with a stucco surface are often designed in some style, so they can be used to advantageously emphasize the theme of the interior
Dome-type sockets are also often found on sale. They have a concave shape. But such models are mounted only in suspended structures, thereby creating the illusion of vast space and at the same time improving the acoustics of the room.
Concave ceiling rosettes in the form of a square, diamond or rectangle look interesting. Such structures are called caissons. They are installed like a cassette ceiling.
Relief models, complemented by stucco elements, give the surface lightness and volume, making it airier and more elegant
Rules for the selection and use of ceiling rosettes
Previously, sockets were made only from gypsum mass. However, modern technology has made the production process more complex. And now, depending on the styles, manufacturers began to produce polyurethane products or ceiling rosettes made of foam plastic.
Gypsum ceiling roses
Stucco molding dates back to the times of the Roman Empire. Therefore, the production basis has centuries of experience. Of course, the technological process has undergone significant changes, and modern manufacturers add modified additives to the mass to bind individual components, but this finishing option continues to remain available to most consumers.
Gypsum sockets do not require painstaking care from you; they are resistant to environmental influences.
Due to the pliability of the material, gypsum can be used to create products of original shapes. And the strong construction and ease of installation add advantages to the benefits of gypsum variations.
Ceiling polyurethane rosettes
Unlike gypsum, polyurethane does not crack over time, tolerates temperature fluctuations, high humidity, and is light in weight. Products made from it are not afraid of installation in damp and unheated rooms.
To organically fit polyurethane ceiling rosettes into the interior, they can be painted in any shade.
The main disadvantage is the short service life. After 5 years, polyurethane foam sockets will begin to turn yellow, and it will no longer be possible for them to return to their previous appearance. You'll have to buy a new model.
At the same time, their choice is much wider than gypsum products, and they are much cheaper.
Foam ceiling rosettes
This material is also used in the production of similar decorative elements for the ceiling.
It costs much less than other types of ceiling roses, and its appearance is represented by a smooth, even surface, without visible granules characteristic of foam versions. The main advantages include light weight, flexibility, ease of installation, and low price.
Criteria for selecting the appropriate option
A high-quality approach to choosing a ceiling rosette will make it a real highlight of the interior. The basic rules include:
- Correspondence of the diameter of the socket to this indicator for a ceiling chandelier.
- The appearance of the product and its decor must match other elements of the ceiling.
- The diameter of the outlet is also affected by the height of the room and the total area of the room.
The table shows standard proportions:
| Ceiling height | 2.5 m | 2.7 m | 3m |
| Square | Product diameter, mm | ||
| 12 sq. m. | 300 | 400 | 450 |
| 16 sq. m. | 450 | 450 | 500 |
| 20 sq. m. | 500 | 550 | 700 |
| 25 sq. m. | 550 | 700 | 800 |
If you decide to make an interior in a classic style, then among all the possible options, stucco molding should now occupy a leading place in your shopping cart. Products made of polyurethane and foam will fit well into a modern interior. They can be painted in colors that match the style or in any other shades.
When choosing a ceiling rosette, remember that it should be made of the same material as other decorative elements.
Criteria for choosing a model correctly
Select sockets for the ceiling in accordance with the dimensions of the lighting fixture. Ideally, the boundaries of artificial stucco should not extend beyond the projection of the chandelier. The choice of a functional decorative element depends on the area of the room and the height of its ceilings. So, for rooms with an area of 15 square meters and above, it is worth choosing models with a diameter of 40 cm.
But even when choosing small voluminous stucco moldings, you should give preference to products with clear detailed drawing. Detailing the ornament will create the desired effect and draw attention to a small but expressive decorative element in a small room.
This decorative element can occupy either a small area limited by the dimensions of the chandelier or the main area of the entire ceiling of the room.
In addition, the socket must be harmoniously combined with other decorative elements used in the design of the walls and ceiling.
The choice is determined by the ultimate goal of the room style being created:
- Wooden rosettes are perfect for decorating living rooms and hallways in houses made of timber or logs. They will harmoniously combine with a wooden staircase and other interior decoration elements made from the same natural material.
- Rosettes made of polystyrene foam and polystyrene foam are suitable for decorating rooms in modern styles, for example, high-tech, modern or art deco. They lend themselves well to painting, easily taking on the shine of all applied layers of coating.
- Rosettes made of plaster and marble chips will look impressive in rooms with high ceilings. They often act as a kind of symbol of luxury and wealth, emphasizing the exclusivity of the design.
Products used to decorate the ceiling are selected from the same type of material, remembering that, for example, gypsum stucco molding looks tasteless against the background of the same foam baguettes.
Together with well-chosen moldings and cornices, a ceiling rosette can add completeness to the renovation, favorably emphasizing the aristocratic style of the room
How to choose a ceiling rosette?
Decorative sockets allow you to disguise the place where the chandelier is attached to the ceiling and electrical wiring elements, and also serve as interior decoration along with ceiling plinths, moldings and borders.
Previously, the traditional material for making ceiling roses and other stucco elements was gypsum, but such decor weighs a lot and can crack or split. Modern materials are free of these disadvantages. Polyurethane rosettes are durable, resistant to temperature and humidity changes, look great, and have no synthetic odor. The decor made of polystyrene foam (foam plastic) is very light, so it is easy to stick it on yourself. Such sockets are more vulnerable than polyurethane ones, so they must be handled carefully during the installation process.
When choosing a ceiling rosette, keep in mind that its size should not exceed the size of the chandelier.
Buy ceiling roses and other decorative elements in Castorama hypermarkets at affordable prices!
Category
Ceiling decor
has other useful products that you should pay attention to.
Features of installation of mortise sockets
To secure the mortise socket, the base of the product is applied to the surface and marks are made along the contour with a pencil.
Along the intended contour, a recess is cut out in the building structure to create a niche for insertion; The depth of the cut is determined based on the height of the base of the rosette and the thickness of the solution
All potholes and cracks formed during the cutting process can be easily repaired with gypsum mortar. To secure gypsum elements to a reinforced concrete base, screws supplemented with wire wrap are used.
To secure heavy structures, fastening systems called nags are used. The place for installing the nags should be level, devoid of relief ornaments.
The work is performed in the following sequence:
- To install fasteners, through holes are drilled in the socket, and grooves 15 mm deep are made in the front part of the product.
- Self-tapping screws are screwed through the holes.
- Screws of galvanized wire are screwed to the heads of the screws so that the “whiskers” diverge in different directions.
- The installed structure is covered with a layer of gypsum mortar.
- The “whiskers” diverging in two directions are inserted into the holes and secured. Excess wire is cut off. The grooves are covered with gypsum mortar.
The number of such nags is determined based on the weight of the socket and the design features of the ceiling itself.
For a socket D150-200 mm, two or three screws are enough, products with a circumference of 60 cm - three or four fasteners, structures measuring 70 cm or more - five or six nags
To avoid corrosion, it is advisable to coat the cut ends of the wire with a layer of varnish. The gaps between the installed rosette or ceiling base are filled with gypsum mortar. The grooves formed after the gypsum has hardened can be easily eliminated by sanding them down with sandpaper.
Fastening polyurethane products
Ceiling rosettes made of polyurethane foam are attached to the base with glue. For work, use “liquid nails” or a special glue created for stucco molding made of polyurethane foam.
The ceiling itself at the location where the socket is installed is covered with a layer of deep penetration primer. Working with polyurethane foam products is quite easy. The soft material is easy to cut and convenient to attach to the surface.
To install a polyurethane foam ceiling rosette in the center, use a sharp knife to make a hole in the decorative item for the electrical cable to be brought out and a hook to be installed.
The diameter of the hole is made small so that the fastening system is completely covered by the cap. The gluing of the stucco molding is carried out after the primer composition has completely dried. To do this, polymer glue is applied to the back side of the base in an even layer.
The stucco molding, with a hook and an electrical wire passed through the hole, is applied to the ceiling. To ensure adhesion strength when the glue hardens, the stucco molding must be pressed as tightly as possible to the surface. Excess glue protruding along the edges must be immediately removed with a brush dipped in water or a cotton napkin.
After the glue has hardened, the chandelier is hung on a mounting strip or hook. The wires are connected using one of the methods described above.
Decor options
While crown molding, moldings and beams can be purchased at a store, some design techniques are available at minimal cost. For example, ceiling painting, decoupage technique, stencil painting - decorations require virtually no costs, but they allow you to decorate the room in a unique manner, without limiting the owner’s imagination. Let's look at how to decorate the ceiling in an apartment with your own hands and how much it will cost.
Plaster stucco molding
A popular and sought-after type of finish. Gypsum stucco molding is used for cladding corners, joints, and the main space of the ceiling. These can be either rosettes, floral shapes, or elaborate figures.
Decor advantages:
- the possibility of renovation, restoration or complete replacement of elements if defects appear;
- good decorative qualities - moldings and lamellas successfully hide joints and ceiling defects;
- aesthetic appeal, variety of assortment;
- long service life.
The most common types of moldings include:
- cornices with ornaments or smooth;
- ceiling sockets;
- moldings are patterned, smooth;
- fragments of ornament;
- corner elements;
- domes;
- consoles;
- caissons.
Thanks to stucco products, you can quickly transform even the most modest room. Decorative ceiling finishing costs from $2-3, depending on the size and complexity of the product’s shape. The stucco molding is attached with glue; the work does not take much time and is accessible to a non-professional.
Decoupage
The technique involves decorating surfaces by applying paper patterns, for example, pictures from magazines, newspapers or postcards. The possibilities for decorating the ceiling plane are limited only by the imagination of the apartment owner.
The main advantages of decoupage:
- uniqueness;
- ease of doing it yourself;
- budget;
- the use of improvised materials.
The work requires patience, but the result will reward all efforts. Using the decoupage technique, you can decorate the entire ceiling space or apply patterns locally. To extend the life of the decoration, the applications are coated with 2-3 layers of colorless varnish.
Do-it-yourself relief decorative painting of the ceiling with textured paint
The work algorithm is simple:
- Find a print with crisp borders for your interior design style.
- Reproduce printed pictures and cut out appliqués clearly along the borders.
- You can use not only paper, but also fabric images.
- Prepare the base by perfectly leveling the surface with putty, then priming and drying the ceilings.
- Paint the base in the chosen color and dry again.
- Apply PVA glue to the back side of the applique and press it to the ceiling, taking into account the pattern placement pattern.
- Press the application and wipe with a cloth to expel the air.
- Treat the patterned fragments with varnish in 2-3 layers.
The decor is ready, you can admire the result. Patterns, flower bouquets, still lifes fit well into the Provence and Rococo styles, but for Art Deco a ceiling made from newspapers or magazine text clippings is suitable. The cost of the decor consists of the price of glue, varnish and printing of the required number of pictures.
Wooden decorative elements
Where they are used - in styles close to natural. It can be grunge, chalet, gothic, country. Most often, wooden decorative elements refer to ceiling beams. But if earlier the fragments performed practical functions, today they are more of a stylish addition. That is why solid wood is used for the manufacture of beams extremely rarely, being perfectly replaced by lining, polyurethane, and foam.
Lightweight lamellas do not increase the load on the floors; installation of a decorative ceiling using glue does not take much time; it is a budget finishing option, but at the same time it looks quite beautiful. And to give false beams the appearance of natural wood, various paints are used.
Beams are considered a universal element; they can be attached to any base: concrete, suspended, suspended ceilings. The decor will help to zone the room, frame the ceiling “window” with a stained glass installation or imitation of stained glass.
Beam structures are also suitable for decorating ceiling paintings, where frescoes, mosaics, and mirror panels are used as images. To make it more impressive, false beams or wooden slats are complemented with LED lighting and spotlights. Ceiling lights can be mounted directly into the elements, hiding the wiring inside the hollow structure.
Some tips for decorating rooms with beams:
- A small room can be visually expanded by placing beams along the short side of the room.
- Placing it in a crisscross pattern will raise the ceiling.
- It is convenient to zone a large room with one beam, separating the kitchen and living room.
- To increase the length, the slats are placed along the length of the ceiling.
- If the ceilings are too high, you can adjust the height by spacing out the beams, and the wide spacing of the slats helps balance the format of a narrow room with high ceilings.
The price of beams is from $2-5 per linear meter. – imitation, from $15-20 per piece. from solid wood.
Artistic painting
There is no need to call a professional to paint a blue sky with clouds on the ceiling. Today there are many techniques that allow you to realize any ideas for decorating the ceiling. For artistic painting, stencils or paint and brushes are used.
A stencil is a shape cut out according to the desired pattern. If you make a stencil from thick paper or plastic, then they can be used many times, creating a unique pattern on the ceiling. When making many stencils of the same theme, the owner simply places them on the ceiling (previously painted and dried) and attaches it with tape. Paint with the chosen paints, let dry and remove the stencils. The result is a unique ceiling decor.
Advice! Vinyl stickers are available for sale that stick to a flat surface.
It is also easy to create an imitation of clouds on the ceiling. You will need a set of paints, a roller and a sponge. First, the ceiling area is painted blue, then a sponge is moistened with white paint and the outlines of the clouds are made. It’s better to make the edges of the “cloud” a little whiter, and then add aquamarine in different places of the zone with a few strokes of the brush so that the whiteness shows through a little. White applied in several layers will also help make the clouds “denser.”
To lighten one side, use a sponge with white paint to treat the “sunny” side. If you dilute white with water, you can adjust the degree of “density” of the white shade. By adding a little gray color, paint over some of the clouds, you get clouds. Finally, the entire picture is covered with acrylic glaze and the decor is ready. If you hang a chandelier in the center of the sky color scheme, the picture will “play” under the light rays. But you can also install spotlights around the perimeter of the painting.
The cost of decorating with stencils or painting is determined by the amount of materials and tools and, as a rule, does not exceed $15-20.
How and how to paint a plasterboard ceiling with your own hands
Fabric decor
This finishing idea can be embodied in any room and will be appropriate for every style, the main thing is to choose the right shade of fabric.
The technology is simple and varied:
- The fabric can be stretched like a canopy from the center of the room to the edges, leaving hangers.
- Stretch the fabric tightly along the ceiling, securing it in baguettes around the perimeter
- Make a fabric “tent”, choosing lightweight silk and chiffon.
- Make appliqués using large pieces of fabric, choosing designs in the same or different styles.
There are plenty of advantages to decorating:
- no skills or expensive tools required;
- the matter will hide any defects in the base, hide communications;
- there is no need to carry out finishing work, because fastening is carried out along the edges in a baguette or on nails, which are then decorated with ceiling plinths;
- drapery can be quickly changed when changing interior or stylistic solutions.
By choosing dense material, you don’t have to worry about damaging the surface. But you will have to come to terms with the fabric’s ability to absorb odors, accumulate dust, and have low water-repellent qualities.
Which fabric is best for drapery:
- jacquard - dense material with rich finishing;
- linen is a natural material that is easy to clean;
- cotton (thick) – does not stretch and lasts a long time;
- velvet is an expensive cladding option that creates an individual decor;
- chiffon is a lightweight material that does not collect dust;
- silk is a textured fabric that easily forms folds.
There are many options for finishing the ceiling material. You can gather the fabric into a fine ribbed pattern or make the fabric even - the cost of facing consists of the price of the material and the use of additional decor. When ordering a service from a company (with your own materials), the finishing price starts from $20-25 per m2; doing it yourself will cost much less.
Testing the structure for strength
Before hanging the chandelier, you need to check the quality of the fastening for the strength of both the hook and the ceiling rosette itself. To do this, hang a load on the plaster molding, the weight of which is gradually increased.
The structure must be able to withstand a load whose mass is approximately equal to the weight of the lighting fixture being installed.
If during the 10-minute test, as the weight of the load increases, the structure does not shift or move away from the ceiling, then the fastening is strong.
Features of fastening a classic ceiling rose
Installing sockets is not difficult even for a beginner, if you follow the rules:
Important! Purchase only the specified brand of glue. The reliability of the fastening depends on this.
Follow the following algorithm:
Upon completion of installation work, check the structure for strength by hanging a weight on the stucco molding corresponding to the weight of the mounted chandelier. Ten minutes will be enough for you to make sure the fastening is secure.