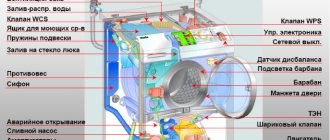
We construct a generator from a washing machine engine
A generator is an electrical device that converts thermal or mechanical energy into electric current, that is, it performs the normal operation of an electric motor in reverse order. The purpose of creating a generator from an asynchronous motor of a washing machine (any other motor from a household appliance of suitable power) can be to create:
- inverter type welding machine;
- uninterruptible power supply for a private home (apartment);
- charger and so on.
How to make a generator?
But in order to better understand how to make a generator from a washing machine engine, let’s figure out what an asynchronous motor from an unnecessary washing machine is.
How to convert an engine into a generator
The main difficulty lies in converting the rotor from a direct drive asynchronous motor. Let's look at this using the example of a 180-watt Vyatka washing machine.
- pliers;
- Screwdriver Set;
- plumber's scissors;
- cold welding;
- lathe;
- rectifier;
- neodymium magnets - 32 pieces, sizes 5, 10 and 20 mm (buy through the online store);
- tin;
- glue;
- sandpaper;
- scotch;
- epoxy resin;
- protective glasses.
Remove the rotor from the removed and disassembled electric motor of the automatic washing machine. On a lathe, cut the core to a depth of 2 mm and make grooves 5 mm deep for the magnets according to their dimensions.
For a homemade template, cut out a strip of tin according to the length of the circumference according to the size of the entire part. Use a template to mark the rotor to ensure even placement of the magnets. There will be 8 pieces per pole (and there will be 4 of them in total). Carefully and carefully use superglue or cold weld to secure it in place.
Wrap everything in several layers of paper, securing it with tape. Cut a hole for epoxy filling. After hardening, remove the casing. Use sandpaper to sand the surface.
Install the part into the motor stator.
The peculiarity of the generator is that it rotates at a higher speed than the engine. To solve this problem, use a tachometer to determine the speed of your brushed motor. Add 10 percent to the result. To achieve the calculated value, select capacitors of appropriate capacity.
How to choose and convert a washing machine engine into a generator
How to make a generator from an electric motor with your own hands? Not easy. You will need patience, as well as the ability to make some parts on a lathe.
From a conventional asynchronous motor of an automatic washing machine with a power of 170-180 W, it is possible to create a generator with a power of 1.5 kW. It is better to use the engine from the Vyatka washing machine and other Soviet-made models, since they are more powerful.
Tools and Parts
Also for work you will need:
- neodymium magnets of 20, 10 and 5 mm sizes – 32 pieces in total;
- rectifier;
- glue;
- lathe;
- sandpaper;
- cold welding;
- scissors;
- pliers, screwdrivers.
Work order
Magnets can be purchased either in specialized stores or on the Internet. If you don’t have a lathe at home, you can order the production of parts from a familiar craftsman.
- It is necessary to remake the rotor of an asynchronous motor so that magnets can be installed. To do this, the cores are removed, part of them is cut on a lathe to a depth of 2 mm.
- To install magnets, you need to make grooves in the core to a depth of 5 mm.
Core preparation is complete. Now you need to put the magnets in place. To do this, make a covering for the core from a piece of tin. This template must exactly match the located holes. Therefore, cut a piece exactly according to the diameter of the core, with holes in the right places.
Note! The magnets must be installed at equal distances from each other. Otherwise, during operation they will begin to stick together, causing the electric generator to lose power.
Installation of magnets and step-by-step assembly of the generator
Let's look at how to convert an engine into a homemade generator.
- Place the magnets on a strip of glued tin - at an equal distance. The magnets are also attached with superglue. It is important that they are all located level, without tilting. Since the magnets are strong and may come off during operation, wear safety glasses.
- Once the magnet template is positioned on the rotor, fill any gaps between them with cold welding. To do this, knead the mixture well and cover the entire space. You can also fill the space between the magnets with epoxy resin.
- Using sandpaper, sand the rotor surface until completely smooth. For convenience, you can clamp it in a vice.
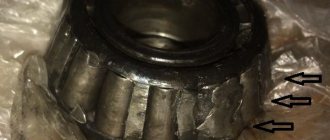
- Check the housing bolts and bearing, they may need to be replaced with new ones.
The remodeling work is completed. You have made a generator from a direct drive motor. You can start checking your homemade device.
How to make a generator from an SMA engine
Problems with electrical energy, which usually arise unexpectedly, force many consumers to think about installing an autonomous power source.
Moreover, this is also driven by exorbitant bills for using the industrial network. Installing an autonomous power source in your home is considered a profitable business. This device can come to the rescue when the industrial power grid is turned off. Its power indicator is relatively small, but this is quite enough to act as a backup power source. Purchasing a generator on purpose is an expensive pleasure, but making one yourself is quite possible. Today we’ll look at how to make a generator from a washing machine engine with your own hands.
Many people think that making a homemade electric generator from a washing machine engine is not a difficult task. Throw away all illusions, because you won’t be able to quickly cope with such a task. First of all, you should deal with three main problematic issues:
- how to remove part of the electric motor core from the washing machine, arrange special grooves on it intended for magnets;
- where to get neodymium magnets for the generator rotor;
- what material to use to make a template to secure the magnets.
Having prepared everything necessary, we can begin to carry out the work. We warn you right away that it will take a lot of patience to make the desired element from a washing machine engine. The magnets will constantly jump off and stick to each other, you will smear everything with glue, so we recommend that you observe caution and safety requirements when working with potentially harmful chemical compounds.
The algorithm of actions is as follows:
- We make a magnetic rotor for an electric motor to convert it into a generator. We glue tin templates across the engine to place the magnets;
- According to the pre-applied markings, we attach two rows of magnets using superglue;
- all free space remaining between the magnets is carefully filled with cold welding, previously kneaded with hands to a plasticine consistency;
- Sand the device with sandpaper. To make work more convenient, it is recommended to secure the housing in a drilling machine.
What is the best way to use such a device? If you install a generator on a chainsaw, you will get a small power station, the energy of which will be enough to illuminate two small rooms, run a computer and even watch TV.
Some install wind generators and generate electrical energy from the resulting mechanical energy. Generators made from not only asynchronous, but also commutator motors are suitable for this. The alternative power source is quite safe, capable of starting at a wind speed of two to three meters per second.
It is best if the windmill you install turns out to be a three-bladed one - since it is the most efficient in operation. Use a steel rod as its base, onto which attach the generator, blades and rotor. Consider protection for the generator so that it does not suffer from adverse weather conditions.
To make the generator, the author used a washing machine from modern models. If you have a car from the times of the USSR, then it most likely will not work, since they have a different type of engine. Modern cars use motors with a stator made of permanent magnets, or vice versa. Thanks to this design, we have both an engine and a generator at the same time, which does not require an initial voltage to start.
Alternatively, such a generator can be used in the manufacture of wind turbines without any problems.
List of materials: – automatic washing machine (motor with magnets); – bolts, nuts, washers and other small things; – good glue (silicone); – materials for making a turbine; – a piece of rubber (from an old car inner tube); – plywood; – plexiglass; – charging controller, batteries, etc.
List of tools: – grinder; – wrenches and screwdrivers; – scissors; – drill with a bit (you need to drill a large diameter hole); – jigsaw; – screwdriver.
Step one. How does it all work? Inside the washing machine body there is a motor shaft on which a turbine (impeller) is installed. The housing has a water inlet hole drilled into it, as well as an outlet window. When water is supplied through the inlet, the turbine begins to rotate and the motor-generator produces 220V voltage, although this value depends on speed and load. Then the current goes to the controller, which then distributes the energy to the right places.
Important! This design, according to the author, can produce enough energy to heat water, turn on a kettle and other rather energy-intensive appliances. But do not load the generator too much as it will start to heat up. For the author, overheating of the generator caused the plastic to melt and the generator simply fell out of the housing. In this regard, come up with overheating protection for the generator, or even better, make a cooling system.
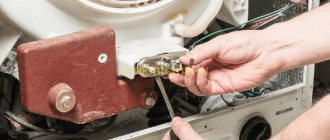
Step two. Let's disassemble the washing machine. Let's move on to preparing the components. Take a screwdriver and disassemble the washing machine. They are all understood differently, it all depends on the specific model. You need to completely disassemble and remove the top part, leaving only the container with all the filling.
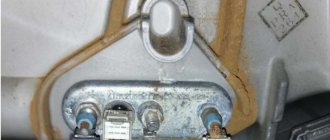
Unscrew absolutely everything from the container, there are many hoses connected, a pump, a drum, and so on are installed. As a result, you should be left with the inner part of the body with the engine. During the work, the author also removes the engine. As you can see, the stator here is a set of coils, and permanent magnets are installed on the rotor. If there are no magnets in the engine, then to start such a generator it will be necessary to apply a starting voltage to the winding.
Step three. Making a protective gasket The author decided to install a protective gasket on the shaft. Why exactly it is needed is not clear. Probably so that water pressure does not affect the seal and does not lead to its rapid wear. We make the gasket from an old car inner tube. We cut out a circle according to the size of the impeller and put it on the shaft.
Step four. Installing the impeller The author kept silent about how the impeller was made. In principle, there is nothing complicated in the design. You will need a disc of the appropriate size on which to install the blades. The blades are secured with bolts and nuts. We fasten the impeller to the motor shaft using a nut.
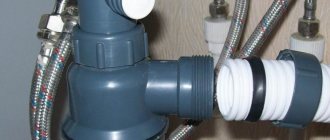
Step five. Inlet and outlet holes The author drills the inlet hole with a drill using a bit. Its diameter should be such that a pipe can be inserted here to supply water inside.
As for the outgoing hole, it is made quite large; it can be cut with a grinder. The hole should be large so that a lot of water does not accumulate inside the container. The author installs a protective shield on this window so that the flowing water does not splash in different directions. The shield can be made of thick film or other suitable material. The author fastens it with screws.
Step six. Closing the container To prevent splashes from the hydroelectric power station from flying anywhere, the author closes the container and leaves only a small window so that you can observe what is happening inside. We cut out a circle from plywood of such a diameter that it fits inside the container. Plywood needs to be painted several times, but it is better to use another waterproof material. We cut a hole in the center to install a window.
Step seven. Protective wing on the generator side To prevent splashes and rain from falling on the generator, you need to make a protective shield for it. We cut out the required piece from the remaining parts of the washing machine and screw it to the body using self-tapping screws, bolts and nuts, and so on.
We suggest you familiarize yourself with How to replace the heating element in a dishwasher?
Step eight. Installing the generator in its place It's time to install the generator in its place. First screw on the stator and secure all the necessary wires. Next we attach the rotor. It is highly advisable to manufacture and install an additional impeller for more efficient cooling of the generator.
Step ten. Electronics...We run the cable from the generator into the house and connect the controller. If you wish, you can charge the batteries and then distribute voltage from them to your household appliances. This is a good option, since in this case the current will not have surges, unlike the one just generated. If you succeeded, congratulations, good luck!
Homemade generators are nothing new. Many craftsmen make them by converting electric motors from various household appliances or construction tools. Our task in this article is to understand the possibility of making a generator from a washing machine engine with your own hands. Let us immediately make a reservation that it will not be possible to make this unit, so to speak, quickly. This is a fairly lengthy process where you will have to use the services of a turner.
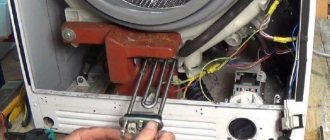
What exactly should a turner do? First, you will have to disassemble with your own hands the asynchronous electric motor from the washing machine, which is designed to operate from a 220-volt outlet. After which the motor core is transferred to a turner, who must cut off part of the element on a machine to a depth of two millimeters.
Next, grooves 5 mm deep are made in the core, into which several neodymium magnets will have to be inserted. It is better to make the grooves after the magnets themselves have been purchased, because the size of the groove is made to fit the dimensions of the magnet. By the way, the latter are not a problem. You can buy them today in a store or order them in an online store.
Preparing the template
Advantages of a homemade wind generator
The main advantage that determines the choice of most users is the difference in cost between a factory kit and a homemade windmill. For sets of equal power and performance, it can be 10- and even 20-fold. If a relatively inexpensive Chinese wind generator costs 75,000 rubles , then a homemade wind turbine will require about 3,500, or a little more. The difference is so significant that you don’t have to think long about the choice.
In addition, homemade devices have a number of significant advantages that are not noticeable at first glance, but greatly facilitate operation and increase the service life of the installation:
- high maintainability. For a person who has made a complex device with his own hands, there can be no problems with repairs, adjustments or any design changes
- possibility of changing operating parameters. Does the created device not meet the needs of users? The reasons for this are quite clear to the manufacturer, who can always change the characteristics of the installation by adding the necessary elements or parts
- The service life of homemade installations is almost unlimited. Any node that has exhausted its resource is replaced with a more recent or powerful one as needed. An installation that undergoes constant modernization and updating will, in any case, last as long as its owner needs.
Arguments are often heard about the large investment of time and unpredictable results of making a windmill with your own hands. Time is running out, that's for sure. It is also impossible to completely predict the result, since completely unknown quantities must be taken into account, and no one is yet able to predict the behavior of air flows. But most of these questions are open for a purchased wind generator, and if its power is selected with errors, then the money will be wasted, which does not happen with homemade kits.
Testing a homemade device
The process of making a generator from a washing machine engine is completed, all that remains is to test it in action. To perform the check you will need:
- rectifier;
- multimeter;
- charging controller;
- motorcycle battery;
- homemade electric generator.
Think about how the rotation will take place. You won’t be able to do this with your fingers, as you won’t be able to create the required number of revolutions. We recommend using an electric drill or screwdriver.
We identify a couple of working wires on the prepared device, and cut off the rest. We connect the wires through a rectifier to the charging controller, and then to the battery. We fix the multimeter mounts to the battery terminals - the generator is ready for testing.
We charge the generator pulley into the chuck of the power tool, with the help of which the spin will be performed, and give the speed within 800 - 1000 rotations. As a result, with moderate sticking of the magnets, you should get 270 Volts, which will be a completely acceptable indicator.
Mini hydroelectric power station from an old washing machine
We have prepared everything that is necessary to make a generator from a washing machine engine, now you can begin the assembly process. Let us note right away that only a very patient person can do this work with his own hands. Magnets constantly jump off and stick together, glue flies in all directions, getting not only on your hands, but also on your face, so be extremely careful and follow safety rules when working with potentially dangerous chemicals. We do the following:
- We begin to manufacture the magnetic rotor of the engine to turn it into a generator. We glue our tin template for magnets across the engine.
- A homemade generator needs magnets, so we, according to the risks noted in advance, put magnets on superglue in two rows.
- Carefully fill the space between the magnets with carefully kneaded cold welding. It has the consistency of plasticine, so there shouldn't be any problems.
- With our own hands we sand a generator made from a washing machine engine with sandpaper. To speed up the process, you can clamp the body in a drilling machine, but you can do it yourself without tools; it will take a little longer.
We have finished making an electric generator from a washing machine motor, now we can begin the long-awaited tests. In order to check the electric generator, we need:
- rectifier;
- Solar type charge controller;
- multimeter;
- motorcycle battery;
- the electric generator itself.
You also need to think about what you will use to power the generator. Using your fingers is not an option; you won’t be able to provide enough rotation. It is best to use a screwdriver or electric drill for these purposes. We find two wires of the working winding on our generator, and cut off the rest. We connect these wires through a rectifier to the charge controller, and in turn we connect it to the battery. We put the crocodile clips of the multimeter on the battery terminals - that’s all, and we’re ready to test the generator.
We charge an electric drill (you can use a screwdriver) and a generator pulley into the chuck and spin it up to 800-1000 rpm. At the output we get 270 Volts with moderate sticking of the magnets - not a bad result.
Many people wonder, well, we made such a generator, and what, how to use it in the household so that it brings benefits? Personally, we made this generator with an eye to making a gasoline power plant ourselves from an obsolete but working Soviet “Druzhba” chainsaw. According to our calculations, the design should have turned out to be cheap, which cannot be said about factory gasoline stations.
As a result, we managed to realize our idea. We connected the chainsaw engine to our generator through a drive belt, securing everything to the frame from the same chainsaw. I didn’t even have to cook the frame separately. Our power plant has been working properly for the second year now, supplying all energy consumers in the country house. The power is enough to illuminate two rooms, ensure the operation of a computer and TV.
There are other options for using a homemade generator. The article, a wind generator from a washing machine engine, eloquently describes the process of manufacturing an installation that, using the natural power of the wind, can supply energy to the same country house or garage. Some suggest using this generator to power a ski lift. In general, use your imagination and you will also find a couple of ways.
In conclusion, we note that making a homemade generator is fraught with certain difficulties. The main difficulty lies in gluing the magnets when creating the rotor. But you can also go the simple route - order a ready-made magnetic rotor. In this case, the generator will cost you 200 rubles more, but you will save a lot of time.
The process of making a generator from a washing machine engine is completed, all that remains is to test it in action. To perform the check you will need:
- rectifier;
- multimeter;
- charging controller;
- motorcycle battery;
- homemade electric generator.
Think about how the rotation will take place. You won’t be able to do this with your fingers, as you won’t be able to create the required number of revolutions. We recommend using an electric drill or screwdriver.
We identify a couple of working wires on the prepared device, and cut off the rest. We connect the wires through a rectifier to the charging controller, and then to the battery. We fix the multimeter mounts to the battery terminals - the generator is ready for testing.
We charge the generator pulley into the chuck of the power tool, with the help of which the spin will be performed, and give the speed within 800 - 1000 rotations. As a result, with moderate sticking of the magnets, you should get 270 Volts, which will be a completely acceptable indicator.
Devices and parts required for operation:
- Asynchronous single-phase motor from an automatic washing machine. An electric motor with a power of 170-180 watts is quite suitable. The manufacturer and production time of the engine do not matter. The main thing is that it is in working order;
- Neodymium magnets in the amount of 32 pieces. With dimensions: 20-10-5 millimeters. Photo. You can purchase magnets at a specialized electrical equipment store or order them online;
- Device charging controller;
- Rectifier of suitable power. You can purchase a ready-made one, use it from another device, or assemble it yourself using D242 diodes;
- Glue (epoxy resin, Super Moment);
- Wax paper;
- Scissors;
- Sandpaper;
- Home lathe;
- Wrenches, pliers, screwdrivers and other small items.
We suggest you read how long does cottage cheese casserole last in the refrigerator?
The procedure for doing the work yourself:
- We are remaking the rotor of the (original) washing machine motor. This operation consists of removing a layer of core two millimeters thick on a lathe on the protrusions of the side cheeks.
- Then, using the same machine, we cut recesses of five millimeters according to the number of magnets that will be mounted in them.
- We measure the circumference of the rotor we remade ourselves and, based on the measurements obtained, we make a template from a steel (tin) strip.
- Using a template, we divide the rotor into equal parts.
- Based on the fact that each of the four poles of the rotor will need 8 magnets, we divide them into parts.
- We glue Neodymium magnets into pre-made recesses, taking into account that the magnets are very strong; when gluing, sufficient physical effort should be made to hold them in the desired position. The process of installing all 32 magnets will require quite a bit of time and attention.
- After fixing them, we check the strength and correct placement of the magnets.
- We fill the free space between the magnets with epoxy resin. For this:
- We wrap the rotor with wax paper in several layers and secure it in any convenient way (glue, tape);
- We also seal the end sides, using ordinary plasticine;
- cut a hole of small diameter in the paper;
- pour epoxy resin into the resulting cavity with magnets until it is completely filled;
- leave the fixative to dry;
- After the resin has hardened, remove the paper and plasticine.
- We process the surface of the rotor with sandpaper until the desired result (smoothness) is obtained.
- If necessary, replace the screws that tighten the housing and the motor bearings with new ones.
- Of the 4 wires of the electric motor, we select 2 going to the working winding. We remove the remaining (starting) wires.
- We connect the controller, rectifier and single-phase asynchronous motor from the washing machine into one circuit and perform operational testing of a self-assembled asynchronous electricity generator.
Wind generators are rarely used as the main sources of electricity, but they are ideal as additional or alternative ones.
This is a good solution for dachas and private houses located in areas where there are often problems with electricity.
Assembling a windmill from old household appliances and scrap metal is a real action to protect the planet. Garbage is as pressing an environmental problem as environmental pollution from hydrocarbon combustion products
A homemade wind generator made from a screwdriver, a car generator or a washing machine engine will cost literally pennies, but it will help you save a decent amount on energy bills.
This is a good option for thrifty owners who do not want to overpay and are willing to make some efforts to reduce costs.
Car generators are often used to make windmills with their own hands. They don’t look as attractive as industrially produced structures, but they are quite functional and cover part of the electricity needs
A standard wind generator consists of several mechanical devices, the function of which is to convert wind kinetic energy into mechanical, and then into electrical. We recommend looking at the article about the design of a wind generator and its operating principle.
Most modern models are equipped with three blades to increase efficiency and begin to work when the wind speed reaches at least 2-3 m/s.
Wind speed is a fundamentally important indicator on which the power of the installation directly depends.
The technical documentation for industrial wind generators always indicates the nominal wind speed parameters at which the installation operates with maximum efficiency. Most often this figure is 9-10 m/s.
The main advantages of wind as an energy source are renewability and inexhaustibility. People have long been inventing various devices that allow them to rationally use the power of the elements, and a wind generator is one of the successful attempts to curb the wind
There are also parameters for the maximum permissible wind speed - 25 m/s. With such indicators, the efficiency of the wind turbine is already significantly reduced, because the blades of the installation change position. If we are talking about a homemade design, it is difficult to determine its technical characteristics.
It makes sense to focus on average indicators and calculate the amount of energy required for basic needs.
Connecting the washing machine motor
To connect the motor to alternating current, perform the following steps:
1
.
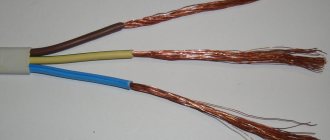
First you need to prepare a tester - this is a special device used to determine the winding wires. 2
.
To determine a pair of wires, connect the tester probe to any wire and check all the others one by one. If during connection the tester indicated a connection, then this will be a pair of wires. Accordingly, the other two wires will also form a pair. 3
.
We measure the resistance level of two windings. The winding with a higher value is the starting winding. 4
.
Wires from different windings are connected in pairs, then connected to a 220 V network 5
. It is recommended to install the switch on the starting winding wire.
In some cases, the direction in which the motor rotates must be changed. Here we swap the leads of the starting winding.
Motor from an old washing machine for a lathe
Assembling a lathe yourself is not a difficult task. All you need to do is fix the adapter on the base of the motor shaft from an old washing machine. The adapter should not be permanently secured. It is better if it is removable, since this way the lathe will become multifunctional, with the ability to turn parts, sharpen knives with a sharpening wheel, cut metal and plastic pipes with a cutting wheel, and use other attachments. The photo shows possible attachments.
You should not fix this homemade product on a solid base. To make work more convenient, it is recommended to make it portable. The basis will be a thick, durable board. To secure the resulting lathe, it is recommended to use brackets that are screwed onto the base using bolts from the washing machine. A regular switch can be used, or from a washing machine.
Grain crusher from a washing machine
With this useful homemade product, you can significantly save on the preparation of feed for domestic animals. If you choose an engine of sufficient power, it is quite possible to assemble a feed cutter, grain crusher and grass cutter, which will not be inferior in performance to factory models. In this case, it is recommended to use an engine from an automatic washing machine - they are distinguished by higher power.
It doesn't take a lot of work to turn an old washing machine into a feed cutter. You need to take an engine from an automatic machine and a body from another old washing machine - with a top load. It’s quite easy to find such a case; it costs pennies at a scrap metal collection point.
Step-by-step description of creating a feed cutter with your own hands:
1
.
The blades with knives should have a diameter such that they do not reach quite a bit to the edges of the body. 2
.
We make a hole in the bottom to remove the finished food. 3
.
We install one blade with knives in the lower part of the body, the other - 40–50 cm from the upper edge; To ensure better grinding quality, you need to use 2 different shafts for the knives, they should rotate in different directions. 4
.
We screw the motor onto the lid of the washing machine and attach it to the shafts. 5
.
We cut a hole in the lid to fill in the raw materials. 6
. We install the cover in place and test the homemade product in action.
How to make a simple feather removal machine for home use from a washing machine with your own hands
The time of slaughtering a bird is a troublesome stage. This is usually done in the fall, when the ducks and broilers have reached the desired weight, and it is no longer profitable to keep them in the winter. You need to pluck several dozen or even hundreds of carcasses very quickly. You can get rid of hard labor with the help of a feather removal machine, and it’s easy to do everything from the same parts of the washing machine.
The device does not require disassembling the washing machine. It is especially convenient to use machines with vertical loading. You just need to fix the beats in the drum so that they point inward. Before plucking, the chicken carcass must be scalded with boiling water and then simply thrown into a rotating drum. Here's what happens:
Important!
To prevent water from getting on the engine of the feather removal machine, you need to protect it with a plastic casing.
And the last point - the feather removal device must be firmly fixed, since the vibration when loading the carcass will be very strong.
Emery from a washing machine motor
An emery machine is useful for almost any household.
It can be made in a simple way - for this it is enough to prepare the engine from an automatic washing machine in working condition. When you attach the sharpening stone to the motor, some difficulties may arise - the hole of the stone may not coincide with the diameter of the electric motor shaft.
In this case, you need to take an additional part that will need to be specially machined. This adapter can be easily made by any turner; you just need to tell him the diameter of the shaft.
In addition to the adapter, you need to have a special bolt, nut, and washer.
The thread on the nut should be cut depending on which direction the motor will rotate.
In order for the motor to rotate clockwise, the thread must be left-handed; for counterclockwise rotation, the thread must be right-handed.
If you do the opposite, the stone will constantly unwind and fly off during work.
It may be that you have a nut, but the thread direction is not correct. Then we change the direction of rotation. In this case, we swap the winding wires.
We connect the working winding to a 200 V network, connect the starting pair to the working coil.
We apply the second end to the winding terminal for a short time. The commutator electric motor will begin to move in one direction.
When the locations of the starting winding terminals change, the direction of movement of the motor will change to the opposite.
The direction of rotation of the motor can be changed without using a capacitor. Here, after connecting the working winding to 220 V, we sharply turn the stone in the right direction.
After this, the motor starts and the machine starts working.
Lawn mower made from a washing machine motor
A lawn mower is another example of how you can intelligently use a motor from a washing machine. This unit will be very useful if you have a summer cottage or garden plot. To make a lawn mower, you don't need many parts; all the materials can be found among household supplies in the garage or workshop.
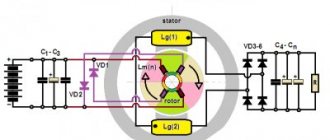
DIY asynchronous generator
Let’s make a reservation right away: we are not talking about making a generator from scratch, but about converting an asynchronous motor into an alternator. Some craftsmen use a ready-made stator from a motor and experiment with the rotor. The idea is to use neodymium magnets to make the rotor poles. A workpiece with glued magnets might look something like this (see Fig. 6):
Rice. 6. Blank with glued magnets
You glue magnets onto a specially machined workpiece mounted on the electric motor shaft, observing their polarity and shift angle. This will require at least 128 magnets.
The finished structure must be adjusted to the stator and at the same time ensure a minimum gap between the teeth and the magnetic poles of the manufactured rotor. Since the magnets are flat, you will have to grind or sharpen them, while constantly cooling the structure, since neodymium loses its magnetic properties at high temperatures. If you do everything correctly, the generator will work.
The problem is that it is very difficult to make an ideal rotor in artisanal conditions. But if you have a lathe and are willing to spend a few weeks making adjustments and modifications, you can experiment.
I propose a more practical option - turning an asynchronous motor into a generator (see video below). To do this, you will need an electric motor with suitable power and an acceptable rotor speed. The engine power must be at least 50% higher than the required alternator power. If you have such an electric motor at your disposal, start processing. Otherwise, it is better to buy a ready-made generator.
For recycling you will need 3 capacitors of the KBG-MN, MBGO, MBGT brands (you can take other brands, but not electrolytic ones). Select capacitors for a voltage of at least 600 V (for a three-phase motor). The reactive power of the generator Q is related to the capacitance of the capacitor by the following dependence: Q = 0.314·U 2 ·C·10 -6.
DIY vibration table
Using the motor from a washing machine, we can make a vibrating table for paving slabs.
Equipment of this type is constructed in a fairly simple way. A homemade vibrating table is made in the form of a plate, which is the upper part of the device, attached to a metal base using a movable connection, with a motor with an eccentric from a washing machine. When the slab vibrates, air bubbles come out of the concrete that is poured into the molds on this slab and voids disappear. Thanks to this, the finished products are characterized by high strength and quality.
Instructions for assembling a windmill from a washing machine
Let's look at how to assemble a simple installation with your own hands, using an electric motor from a washing machine as a basis.
Stage #1 – preparing the necessary materials
To create a homemade windmill from a washing machine engine, you need to purchase several parts.
Some of them will probably be found in old household appliances, and some will have to be purchased:
- rotor with blades - you can make the blades yourself;
- a gearbox that will regulate the speed of rotation of the windmill rotor;
- a casing designed to protect windmill elements from moisture and other negative environmental factors;
- a battery, the function of which is to store energy and power electrical appliances when the blades are not rotating;
- inverter for current transformation;
- the tail section, with the help of which the installation turns in the wind;
- the mast on which the structure will be attached.
All these parts cost money individually, and to assemble them into a complete structure will take a lot of time.
Stages of work
Preparing the template
The length and width of the sheet metal strip is adjusted to the dimensions of the core diameter and the width of the grooves. That is, the template must fit exactly where the magnets are installed. Pay special attention to the fact that the distance between the magnets must be the same.
Generator assembly
Everything is ready, you can proceed to assembling the electric motor-generator with your own hands. Let's say right away that this process requires special patience. There's no need to rush here. The thing is that the magnets will be installed in the grooves of the electric motor core using glue. Their small size creates difficulty and inconvenience in installation; the glue slips, its splashes will get on your hands, sometimes even on your face. So you shouldn’t neglect labor safety measures. After all, the adhesive composition is a chemical solution, quite active.
So, here is an assembly diagram on how to make a generator with your own hands:
- a prepared tin template is glued across the rotor;
- then neodymium magnets are installed in the prepared grooves, here it is very important, as mentioned above, to accurately observe the installation distance and the angle of inclination of the elements, because even a slight deviation from these two parameters can cause sticking, which will certainly lead to a decrease in the power of the homemade generator;
- now the gap between the magnets must be filled with a special material called cold welding, it is very similar to plasticine;
- and the last stage is grinding the surface with sandpaper, this can be done by placing the rotor in a vice, or on the floor or table;
- The entire electric motor is assembled with your own hands.
To check how the generator we assembled works, you need several additional elements. Namely:
- small capacity battery, maybe from a motorcycle;
- rectifier;
- multimeter to determine charging power;
- charge controller.
The generator connection diagram for testing is as follows: two generator windings are connected through a rectifier to a charge controller. The latter is connected to the battery. The multimeter is also connected to the battery terminals.
The most difficult thing to check is turning the electric motor rotor. It will not be possible to achieve the required rotation speed manually. Therefore, it is recommended to use either a drill or a screwdriver for these purposes. You connect one of these tools to the engine rotor (there are different options, and there are many of them) and start turning it at a rotation speed of 800-1000 rpm.
If the generator you made produces a voltage of 220-300 volts, then this is an excellent indicator. If the voltage is very low, it means that the rotor was assembled poorly. This mainly concerns the installation of magnets (uneven installation and not all elements are attached at the same angle).
Where to use
We managed to make a generator from a washing machine's electric motor. Testing has shown that it works. So, what is next? Where can this unit be used?
In principle, if you find energy that could rotate the rotor, then there would be no problems with electricity, for example, in a small country house. Therefore, home craftsmen offer several commonly used options:
- Install the generator to the gasoline engine. For example, it could be an old Druzhba saw or a motorcycle engine.
- Connect to a windmill, thereby making a wind current generator.
- Connect to a hydraulic turbine, which is installed in a homemade waterfall or fast-flowing stream.
The last two options are the cheapest, since there is no need to buy additional energy. These are environmentally friendly installations running on alternative fuels.
And one moment. Making a 5 kW generator out of a washing machine motor will no longer work. Therefore, do not rely on the fact that from this unit you can make a device that completely replaces the electrical network. But for a couple of rooms or for a bathhouse (garage, etc.) it will be suitable. The maximum that such a generator can produce is 2 kW. Besides, don’t expect 380 volts from it either.
We suggest you familiarize yourself with How to clean a carpet at home
Let us add that a generator can also be made from a DC motor. Moreover, in some washing machines, such units are installed. In such motors, graphite brushes are a distinctive feature.
They are classified according to several criteria:
- Features of rotation of the rotor with blades attached to it - vertical or horizontal. The former react less to negative environmental factors, while the latter are characterized by higher efficiency.
- Number of blades. Three-blade installations are considered the most practical, but there may be more or fewer blades.
- Material. For the manufacture of blades, various materials are used - hard or sailing. The former are usually more durable, while the latter are cheaper.
- Blade pitch. It can be fixed or changeable.
When making a wind generator with your own hands, you have to decide on the design yourself. In this case, it is necessary to calculate the required power and take into account the operating conditions of the installation. We discussed the detailed calculation of a wind generator using formulas in this article.
The easiest way to make a horizontal wind generator.
People without much experience choose just such a design, but some craftsmen prefer to invest in the manufacture of a low-noise and efficient vertical installation. Horizontal windmills are convenient because their creation does not require high-precision calculations, the design itself is easier to manufacture and starts at the slightest wind. Cons: loud noise during operation and bulkiness.
A vertical wind generator is suitable for people who are willing to spend time and effort on assembling and maintaining a complex but compact design. We recommend watching the step-by-step instructions for making a vertical wind generator with your own hands.
The converting devices of the wind generator transform the electric current, which leads to large energy losses. Depending on the characteristics of the devices, these losses can reach 15-20%
A wind generator operates by rotating blades attached to a rotor. The rotor itself is fixed on the generator shaft, which generates electric current. The energy is transferred to batteries. Here it accumulates and powers household electrical appliances.
The wind turbine is equipped with a controller that converts three-phase alternating current into direct current and controls battery charging. The installation diagram must take into account that an inverter must be connected after the battery.
Purchasing a ready-made asynchronous generator today will not be difficult. But this factory-made device will be quite expensive. And the purpose of creating such a device is not to waste money, but, on the contrary, to save it by using an asynchronous electric motor, free time, personal knowledge and experience.