Texture
There are many ways to create a beautiful and waterproof bathroom ceiling. However, not all of them can be called budget - not only are the prices off the charts, but they are also difficult to do on your own.
Ceiling tiles for the bathroom, in this regard, perhaps, were and remain the best option. And as for the appearance of modern cladding material for ceilings, it will not yield the palm to other types of finishing.
What is the difference between ceiling tiles?
Depending on the manufacturing method, ceiling tiles will differ significantly from each other. This article, as you probably understand, will only talk about tiles glued to the ceiling - not about suspended structures.
So, foam sheets that are obtained by casting have a significant thickness (up to one and a half centimeters), as a result of which they can have a more expressive relief, whereas on three-millimeter extruded plates you won’t get much speed with the “stucco molding”.
Next is strength. Despite the fact that “injection”, at first glance, looks noticeably more powerful, this is not at all reality. A bathroom ceiling lined with extruded tiles is more resistant to damage, easier to clean, and generally withstands operating loads noticeably better.
But on the other hand, thin laminated material is more demanding on the quality of the rough base, while cast tiles can easily hide minor defects.
IMPORTANT
Many owners are worried about the possibility of painting laminated ceilings. There is a myth that such a surface cannot be painted. This opinion is wrong. Extruded ceiling tiles are painted no worse than their cast counterparts, and most often even noticeably better, that is, the process itself requires noticeably less labor from the master.
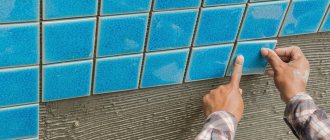
Grouting joints
After laying all the panels, you need to sand the seams. This is done as follows:
- Stir white or colored grout until the consistency of thick sour cream. Fill the joints between the tiles with the mixture using a soft spatula.
Important! Do not stir a large amount of powder at once, because it sets very quickly. To begin with, limit yourself to 1 handful.
Seams are rubbed with a soft spatula
- After 20-30 minutes, wipe the surface with natural fabric or wool.
- In order for the seam to have a “marketable” appearance, it must be corrected with your finger. Otherwise, you won’t be able to make a neat recess.
How long will it last?
“How long will tiles glued to the bathroom ceiling last?” This or a similar question can often be read on any construction forum or heard in any construction hypermarket. The answers are very varied - it all depends on the operating conditions of the material and the presence of a protective coating on it.
Expanded polystyrene has a design life of 50 years. Elevated temperature, humidity, aggressive environment, and mechanical stress can significantly reduce the life expectancy of this material, so the promises of PR people should be treated with a certain degree of caution.
Surface types
Often, it is difficult to determine the type of tile without the skills to constantly work with the material. But with proper preparation, you can understand the main differences.
The surface of the extruded blanks is smooth, the total thickness of the product does not exceed 4 mm. Any color, it is possible to find an imitation of natural material. The products do not deteriorate due to wet cleaning; they are created on the basis of polystyrene.
Tile
Stamped products look looser in structure: lack of exposure to high temperatures results in reduced density. The finish gets dirty quickly, is difficult to clean, and breaks even with little effort applied during cleaning. Finished sheets vary in thickness from 7 to 13 mm.
Among all types of tiles, there are classic white options, with a solid color or a laminated protective layer. Sometimes there is a mirror ceiling covering made of polystyrene foam tiles.
Can I use cheap pressed tiles for a bathroom ceiling?
The question of whether it is possible to use cheap tiles in bathrooms should be rephrased a little: “Will such a ceiling turn out to be really cheap”? The fact is that:
- Firstly, budget ceiling material is very fragile and you will definitely end up with excess consumption of building materials precisely because of its damage during transportation or installation.
- Secondly, due to its “tenderness”, the ceiling under such material will have to be “licked” without fail, and this is an additional expense.
- Thirdly, pressed ceiling tiles, unlike laminated ones, must be painted, and with high-quality paint at that. At the same time, it is the costs associated with the purchase of paints and varnishes that can constitute the main item in the repair budget.
As a result, cheap foam panels can often result in a rather expensive ceiling. However, if you approach the problem “smartly” and carry out all the construction work yourself, with maximum diligence and responsibility, then you can really save money on pressed polystyrene foam tiles.
Types of polystyrene foam products
There are three types of polystyrene foam boards:
- pressed;
- injection;
- extruded.
Pressed products are otherwise called stamped products and are created by crimping tile blanks. During the stamping process, a relief surface of varying degrees of depth is formed. The absence of a protective layer and small thickness make stamped products fragile, difficult to care for, but affordable.
The extruded material is reliable and resistant to moisture. The finished product has a granular structure with a smooth surface due to high temperature processing. The blanks are used to make classic white tiles or an imitation of natural material. Additional impregnation with hydrophobic agents is carried out; the pores of the products are very small. This tile is used for seamless finishing.
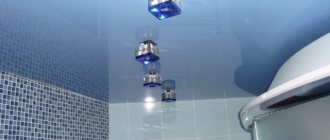
Mirror ceiling made of polystyrene foam
When creating injection materials, raw materials are poured into a mold and fired in a kiln. Firing allows you to make durable tiles with smooth edges, clear relief, and a thickness of 0.9-1.4 cm. Moisture-resistant panels are characterized by partial properties of sound insulation and thermal insulation. Durable blanks are a good basis for drawings, imitation of fabric, leather, wood or ceramic surfaces.
Which glue to choose?
Another important problem that a home master faces when deciding to install not a PVC ceiling in the bathroom, but ordinary polystyrene tiles is the choice of a good glue.
Let's make a reservation right away - there are no universal solutions. There are adhesive mixtures that are best suited for your situation and those that will not be rational to use.
- It is for the bathroom that the logical requirement for the glue will be its moisture resistance. A composition that loses its properties under the influence of moisture is definitely not needed in the bathroom.
- Another mandatory characteristic for the mounting mixture will be its chemical neutrality to styrene. That is, you need to be sure that the glue will not have a destructive effect on the ceiling tiles.
Then everything is strictly individual. So, for an uneven limestone surface, you will need a thick-layer adhesive that would “cling” well to both the plaster and the foam. An example would be a putty paste like Shitroka.
But for finishing a smooth plasterboard sheet, thin-layer polymer adhesive, such as, for example, “Dragon”, or polyvinyl acetate “Bustilate” and “PVA” is suitable.
Manufacturers
Any building materials are often purchased from specific manufacturers. Tested in different conditions, inside different houses, raw materials that adhere firmly to the base for several years and do not spoil the appearance will always be purchased. At least until the manufacturer closes the plant.
Among the brands, people identified several that showed high quality.
Chinese products under the Angara and Matrix brands are affordable and characterized by low thickness. The second type of product has a traditional white color.
The Russian one produces stamped, extruded tiles, baseboards, and corners, with which you can create a single, neat composition.
American Armstrong products show good performance. If you need slabs of non-standard sizes or an unusual appearance, you can find or order a coating.
The German brand “Ormit” presents customers with a moisture-resistant finish with an expanded range of colors and sizes.
You need to purchase finishing and building materials from construction stores, check product certificates, and save receipts after purchase.
Ceiling tiles - repair in an hour!
The statement that you can make a ceiling from polystyrene foam tiles in just a couple of hours is somewhat exaggerated. Installation of facing material is not the whole job.
There are stages such as
- Preparation,
- finishing (painting),
- installation itself
It is really possible to install a ceiling made of polystyrene material in just an hour. A standard bathroom consists of 10-12 ceiling elements; gluing them will not take much time, even if you have never done such work before.
Tips for choosing
To make the decor look beautiful, last a long time and not require large renovation costs, advice from the experts will come in handy:
- Stable shape. The dimensions and shape of the elements must match. If it is a square, check the evenness of the sides and angles. It is better to measure everything using a ruler. There is no need to buy a defective collection; more money will be spent on grouting uneven joints and eliminating other defects.
- When measuring elements, you should not adjust the lamellas to size: crumple or stretch. The creases on the tiles cannot be removed with anything, and water and dust in the cracks will quickly render the material out of use.
- A smooth surface without chips, potholes, or dents is the determining factor. And this applies to material made from any raw material. If it is polystyrene foam, then the individual cells must be strictly the same size, tiles - the pattern is observed on each tile.
- Quality of decorative coating. Textured, painted elements with a pattern of any complexity must be the same. If there are discrepancies in the patterns, the ceiling will look strange. The same applies to the color strength and protective layer: the surface of the tiles should not get dirty, peel or peel.
- It’s easy to check the quality of foam tiles: take one end and lift the element. It didn’t break, but it bent - a good product, creases or cracks appeared - put it aside and don’t buy it.
When choosing a ceiling finish, you should not save money. There are enough high-quality materials on sale at an affordable price that will withstand their intended service life. And for aesthetes, collections of original, individual design are suitable. This can be decor with gilding, origami laminated ceiling tiles, elements with an etched or embossed pattern, imitation of wild stone, wood, leather - the choice depends on the financial capabilities and preferences of the owner.
Advantages and disadvantages of textured paints
Compared to simple paint bases, textured paints have their undeniable advantages:
- painting work will not require a lot of time;
- a layer of paint will make the base of the rough ceiling even and will hide chips and cracks;
- surfaces coated with textured paint are not afraid of mechanical influences, they can be washed and repaired;
- the material is inexpensive and environmentally friendly;
- The color shades are amazingly diverse.
The main disadvantage of this finishing method is the high consumption of material. One square meter of surface will require more than a kilogram of paint.
Types of textured paints
According to the aesthetic effect, textured paints are divided into:
- classic;
- multicolor, characterized by a variety of shades or giving a luminescent glow;
- paints with a decorative effect inherent in their basis. In turn, they are also divided into separate types:
- mosaic (granite). Using original paints of this type, it will be possible to recreate an imitation of decorative plaster, natural stone or other interesting decoration on the ceiling;
- plastic masses. Their viscous texture allows you to create deep relief surfaces, under which you can hide all the imperfections of the rough ceiling.
Textured ceiling painting technology
All types of paints are universal in their technical characteristics and methods of application. Therefore, with the help of such means it will be possible to radically change the interior of the room by decorating any surface - wood, plaster, cement.
Painting the ceiling includes several successive stages, the main of which is preparing the surface for painting. At this stage, the previous finish is cleaned off, the ceiling surface is leveled and puttied.
Next, the ceiling is painted:
- the right direction is from the corner to the center of the room;
- movements should be smooth to avoid smudges;
- each subsequent layer is applied parallel to the previous one.
Important! One layer is not enough for a high-quality decorative finish. You will need to apply several layers to the ceiling, each of which must dry thoroughly before the next one is applied.
Where is wall transition technology suitable?
This design is perfect in the bedroom. Behind the head of the bed is the best place to decorate such a wall. It is possible to make a small room visually wider using a beautiful pattern against a matte white background, while at the same time a small part of the entire structure is lowered onto the wall. When decorating a child’s room, you should try to reproduce a fairy tale or cartoon. There is no need to restrain yourself here at all. The child himself can tell you what he wants.
Satin or matte texture works well. This transitional design to the wall looks like a large frame above the headboard. Above the sleeping area, the ceiling area is made into a wave, rectangle or semicircle. Such transitions look great with spotlights. The interior will be interesting, the main part of which is white and beige. And the area above the sleeping place, which goes into the ceiling, should be done in bright colors.
This finishing solution is perfect for a veranda. Well-designed options of different textures and color shades allow you to improve the veranda and organize comfort at home. This method will allow you to close the insulation layer between the decor and the base. It is also possible to make such decoration in the living room. The canvas looks great on the walls with photo prints of landscape drawings, so that some part of the drawing will transfer to the ceiling. The main thing is that it completely destroys all boundaries of the room, expanding the room.