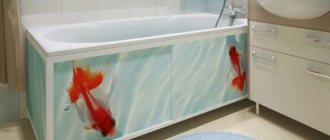
For limited bathroom space, built-in homemade structures are preferable to factory-made products. The most popular shelves are made of plasterboard in the bathroom due to the use of this sheet material for installation of installations, boxes, and false panels. They hold tiles, mosaics, porcelain tiles perfectly, and efficiently use the entire volume of the room.
Why drywall
First of all, it is worth mentioning that the drywall used for the bathroom must be special. These are sheets marked GKVL, impregnated with special compounds that protect the material from fungus and moisture. Most often they differ from ordinary canvases in blue or green. Any other drywall in the bathroom, where the humidity is very high, cannot be used to avoid rapid destruction.
Shelves made of this material have a number of advantages:
- They can be of absolutely any size and configuration. You don’t have to adapt to the assortment of furniture stores.
- The texture and color of the product can also be any. Moreover, if desired, it can be easily repainted in the desired color.
- Properly designed and installed shelves are strong enough and can support a decent amount of weight.
- The cost of the product, even if it is a very complex and large structure, is small.
- The material is absolutely safe for humans and does not emit toxic substances.
- The process of manufacturing and installing shelves is quite quick and simple.
Drywall allows you to create structures of various shapes and configurations. They can be wall-mounted, corner, semicircular or broken, as your imagination dictates.
Features of the material
Until relatively recently, the use of plasterboard for the construction of structures in the bathroom was considered irrational, since the material is not resistant to moisture.
But after the appearance of a moisture-resistant version of the material (GKLV), it began to be actively used in “wet” rooms. Moreover, GKLV is the most successful material option for performing work, as it has a number of advantages, namely:
- Using gypsum boards, you can make shelves of any size and shape. The material is plastic, it is suitable even for the manufacture of curved structures;
- plasterboard products can be subjected to any type of finishing; they can be painted, tiled or covered with self-adhesive film;
- Properly assembled gypsum board structures can be used for their intended purpose, as they can withstand quite an impressive weight;
- materials for production have an affordable price;
- drywall is an environmentally friendly material; it does not emit toxic substances;
- Working with drywall is not difficult; any home craftsman with minimal skills in using tools can handle the job.
Where to start: preparatory stage ↑
We start with the drawings. In order for them to be done correctly, you need to clearly know what the resulting shelf should look like. We schematically draw it in all details, simultaneously noting which areas need to be measured. We take measurements. We carry them out extremely carefully and correctly, otherwise there may be problems with fitting the shelf in the future. Using the obtained values, we build a drawing of the future structure. With its help you can easily calculate the exact amount of materials needed.
To make shelves you will need:
- drywall;
- galvanized profile (most often 50x25 mm);
- guide rails;
- arched profiles, if a curved structure is planned;
- dowels with spacers, self-tapping screws;
- reinforcing mesh for processing joints;
- primer.
In addition, you should prepare the necessary tools.
Materials and tools. Choosing drywall
To properly make plasterboard shelves in the bathroom, you must first choose the right material. Drywall used in rooms with high levels of moisture has a special marking GKVL. It is impregnated with a solution that prevents the formation of moisture or fungus on it. Choosing it is quite simple; manufacturers mark plasterboard sheets with this marking in green. If you choose ordinary sheets, there is a risk of rapid destruction of the structure.
In addition to moisture-resistant drywall, you will also need materials such as:
- Galvanized profile
- Mounting mesh
- Guides
- Arched profiles, if the structure is curved
- Self-tapping screws
- Dowels
- Primer
- Dye
You also need to have the following tools:
- Level
- Screwdriver
- Hammer
- Knife
- Ruler
- Bulgarian
- Pliers
- Roulette
- Hacksaw
Nuances of making shelves ↑
Standard shelves ↑
We start by making a frame, which will become the basis of the entire structure. Its shape will depend on the configuration of the future shelf. To begin with, we assemble the perimeter of the future product from guide profiles of the ud type according to the required dimensions. Then we reinforce them with cd load-bearing profiles. At the same time, be sure to take into account that the system will be covered with plasterboard on both sides. Accordingly, we install the load-bearing parts as follows: one is directed in one direction, the other in the opposite direction. This doubles the profile consumption. In this way, a frame for shelves of any geometric shape is made.
We attach the structure to the wall. If additional lighting is planned, install it inside the system. Now you can begin covering the profile with sheets of plasterboard. We cut the material to the size of the frame and fasten it with metal screws, the length of which is 25 mm. We close the corners of the structure with a perforated corner and putty the product. We clean the dried shelf with an abrasive material until smooth. Next comes the finishing touches. This could be painting or a more interesting option, for example, mosaic cladding.
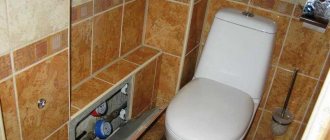
“Recessed into the walls ↑
A more complex design is shelves “recessed into the walls.” To complete them, you will need to perform the following operations sequentially:
- We mark the future building. We start from the corner of the ceiling. We draw a straight line marking the inside of the structure. From it at right angles we set off the depth of the shelves and draw a second straight line parallel to the first. This will be the outside. Using a plumb line, we transfer these lines to the floor and wall. As a result, we get two parallel lines on the floor, wall and ceiling.
- We attach guides to the resulting markings. We cut the profile and fix it to the ceiling and floor.
- We install load-bearing pillar profiles. We mount them vertically to the edges of the horizontal guides and connect them. These will be the racks to which we will subsequently attach horizontal shelves.
- We cover the racks with plasterboard. We mark the sheet and use a sharp knife to cut it into parts of the required size. We screw them to the assembled frame. A small nuance: if it is not possible to install a fragment that is integral in height, we mount an element with a joint, which must rest on the internal jumper. Otherwise, the putty in this area will always crack.
- We make grooves for the horizontal profile. We fix suitable sized fragments of guides from bottom to top along the inner sides of the racks at a distance corresponding to the size of the shelves. We make sure that the grooves of the parts are facing inward or facing each other. Using a water level, we check the horizontal position of future shelves.
- We mark and cut the supporting profile. The length of the fragments must correspond to the size of the shelves. Each of them will require two supporting parts. We insert the first one into the groove and move it towards the wall. We screw the fragment to the posts and plane. We insert the second part into the groove and secure it to the outer edge of the structure.
- We strengthen the frame for the shelves with jumpers. This operation will be required if the width of the structure is large enough, about 50 cm. We insert the profile fragments between the load-bearing ones and secure them.
- We cover the finished frame with plasterboard.
Curvilinear structures ↑
Curvilinear structures are even more difficult to manufacture. To create curved shelves or their elements, you will need to prepare a template. It must be made of durable material, such as plywood. A piece of plasterboard cut to size is pricked on one side with a special needle roller and moistened. The same side of the element is placed on the finished template and its ends are fixed. In this form, the part is left for a day until completely dry.
The result should be a smooth shape of the desired configuration. It is fixed in the right place using special arched profiles and self-tapping screws. However, if necessary, you can use a standard profile; you just need to make cuts on it and bend it.
Preparation for installation
Before you begin installation, you need to prepare everything you need, materials:
- GVL is moisture resistant;
- CD and UD profiles;
- metal screws (“fleas” and 25 mm);
- arched profile, when constructing curved shelves;
- serpyanka;
Tools for installing drywall - moisture-resistant putty if painting is planned;
- gypsum plaster;
- priming.
Each of these materials is responsible for a specific process, the combination of which allows you to get a durable and beautiful bathroom shelf. However, it is impossible to assemble a frame structure without a drywall tool. Therefore, it also needs to be prepared in advance:
- concrete drill (its diameter must match the width of the dowel);
- drill;
- hammer;
- screwdriver;
- screwdriver;
- metal scissors;
- pencil;
- knife;
- building level;
- 2 spatulas (narrow and wide).
Tools for assembling the frame Having prepared the necessary tools and materials, you can begin the actual process of installing the frame system. It is carried out according to the drawn up plan, taking into account the technical characteristics of the materials and their properties.
Final finishing ↑
Most often, plasterboard structures are puttied, thereby preparing for finishing. At this stage, you should not forget about the primer, which must necessarily precede the putty. To get a perfectly flat surface, we apply a layer of gypsum or putty to the joints of the sheets and seal them with a special reinforcing mesh. We put putty on top of it again. Don’t forget to cover the corners with special mounting corners and putty. After drying, apply the finishing coat. Let the material dry completely and use an abrasive to smooth out all surface irregularities until completely smooth. Now we apply the primer again, the shelf is ready for painting or any other decoration.
There are several very interesting original options for finishing plasterboard shelves. Playing with color is a traditional solution, but you can also play with texture. To do this, wet putty:
- processed with a large brush with fairly hard bristles, obtaining a kind of ripples
- “stroked with fingers, which gives an intricate convex pattern
- spot-treated with a small spatula, which is rotated around the axis. The result is rounded decorative fragments.
Drywall is a fairly easy-to-process material, making it possible to create almost any structure of any configuration. This statement is absolutely true for those who have some experience in working with it. For everyone else, it will be quite difficult to complete even the simplest product. Of course, everything can be learned. But if you don’t want to waste time and effort, it’s better to invite professionals and get a competent and beautiful embodiment of your own design concept.
Tool preparation
A novice craftsman or an experienced installer should always have the right tool at hand, which is prepared in advance:
- A screwdriver for screwing screws into a profile.
- A small grinder for cutting metal profiles.
- Building level, measuring tape, pencil, plumb line.
- Hacksaw, knife, scissors.
- Hammer, pliers, Phillips screwdriver, electric probe.
- Three spatulas (3, 8 and 25 cm), a roller with a ditch for primer.
- Grouting machine with a set of diamond meshes.
You need to collect the necessary materials for continuous work:
- Profile for mounting sheets type CD and UD.
- Perforated corners or plastic bendable ones for arched structures.
- Drywall for sheathing.
- Serpyanka joining tape.
- Primer, glue for processing joints, finishing putty, water-dispersed paint.
- Metal self-tapping screws for drywall, 25 mm long, flea screws connecting profiles to each other.
Frame making
The base of the frame consists of a supporting galvanized profile . The connection to the wall is carried out using a strapping profile, which is attached to the latter using “quick installation” dowels.
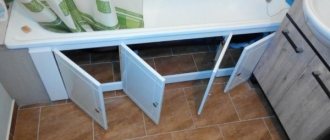
The frame can be mounted at the same time as finishing the entire wall with plasterboard; sometimes the shelves are made after finishing the sheathing. In the first case, you will get internal niches, and in the second - hanging open spaces for storing items.
Making a frame for plasterboard shelves
The wall is marked using a level and a plumb line. Build a frame from profiles , checking the verticality and horizontality of all sections of the base. For shelves designed for heavy loads, the frame is made of reinforced profiles (CW and UW). Drywall can be taken with a thickness of 18 mm. If increased strength is not expected, then all work is carried out using standard common materials. At each stage it is necessary to consult the drawing.
When arranging shelves, you can move away from standard rectangular structures and make rounded shapes , arrange niches in a checkerboard pattern and make them of different sizes. Horizontal platforms are made not only of plasterboard, but also of thick glass, metal, and wood.
If you have to attach the frame to a wall covered with plasterboard, then this must be done with special “butterfly” dowels , which, when tightened, push the tail of the dowel toward the back side of the wall. An ordinary dowel will not stick to sheets of material and will fall out at the first effort. All connections of the material must be made on the profile, otherwise over time there will definitely be a crack there, even if this place is carefully sealed with putty using a mesh.
After all the main posts are installed, transverse crossbars are installed to support the horizontal surfaces of the sheets. At this stage, it is necessary to create all the places for installing built-in lamps, if any were planned, and connect the wires, having previously insulated them with a corrugated sleeve. Such “clothing” for the wire is necessary so that it does not touch sharp metal edges, which can cut it and cause a short circuit.
Carrying out the cladding
Many builders combine drywall with other materials, using OSB boards and chipboard . To make arched elements, you can successfully use fiberboard, which bends easily. Before applying putty, they need to be carefully glued with a mesh and attached to the frame more often than usual.
Sheathing surfaces with plasterboard is done by fastening them to the profile with metal screws. Instead of using thick drywall, which is expensive, you can lay two layers of ordinary material, which will give the shelf the same strength without spending extra money.
At this stage, holes are drilled in the sheets for installing lamps with special crowns and the wires are pulled out to make sure they are of sufficient length. After this, the wire is wound in a circle, secured with a thread and placed in front of the wall, otherwise, left behind the wall, it may begin to spring, after which it will be impossible to pull out such a wire to connect to the lamp without disassembling the casing.
Final finishing
All seams and joints of pieces of drywall and its corner joints must be glued with mounting mesh , which is sold in rolls of the required width. The tape is provided with a layer of glue, but for thorough reinforcement, such a tape is attached to a special dry glue, which is diluted with water. After drying, the areas are cleaned using abrasive mesh No. 120 and the entire surface of the shelves is putty with finishing putty.
Puttying such a complex structure, in which there are many corners and transitions, requires several steps. It is necessary to clean the layers and apply new ones, achieving a flawless appearance of the product. All layers must be primed using a roller, especially the last one. The brush can leave small grooves on the surface , which will appear after painting and cannot be removed with sandpaper. Only internal corner joints that cannot be reached with a roller can be treated with a brush.
After the putty has dried and the surface has been primed again, the entire shelf structure is painted with the chosen paint .
Making plasterboard products with your own hands is very exciting. Having made such shelves in the bathroom, the owner can continue to arrange such products in other rooms of the apartment.
DIY plasterboard shelves
You can make plasterboard shelves with your own hands. Before carrying out work, it is necessary to draw up a plan, accurately select the shape of the shelves, and carefully take all measurements. Prepare a diagram, calculate and purchase the required number of drywall sheets, fasteners, wooden beams or metal profiles for the frame.
Shelves made of plasterboard are universal, they can be created in any room:
The options for placing shelves are also different - you can install them on the wall or in a niche. The advantage of plasterboard shelves is the variety of shapes; in this case, imagination is not limited, you can create absolutely any pattern and bend.
You can make an interesting shelf design with your own hands; drywall is an affordable material, so you will not have any difficulties in creating an original interior.
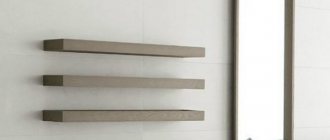
Corner three-tier design
In most cases, such shelf models are additionally equipped with special lighting fixtures, so in most cases such structures are installed in one of the corners of the shower room.
This allows you to make maximum use of all the free space in the room for placing and storing various necessary things, you should choose corner shelves.
The most popular and practical are designs equipped with a special grill and a hanger for washcloths.
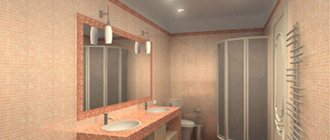
Interior of a room with shelves on a plasterboard wall
Shelves can replace furniture, such as a cabinet or rack. At the same time, they are quite roomy; books, vases, even dishes and flower pots can be placed on them.
Plasterboard shelves save a lot of space and make the room more modern and original:
- Drywall allows you to realize the most daring design ideas; shelves can be used both as a decorative component of the room and as a functional element;
- Most often, shelves are created in rooms designed in a modern style; plasterboard interior elements will complement a living room or bedroom in a minimalist or modern style;
- Drywall is an excellent material for a nursery; shelves made from this material can become the basis for the design of the room; they can be made around the perimeter of the room;
- Such shelves also look great in a library, because they allow lamps to be built into them, which is convenient for those who like to read;
- In the kitchen, plasterboard shelves can serve as a bar counter or table.
Plasterboard shelves are multifunctional, they can be created in any room - they will look creative and interesting.
How to make shelves from drywall
You can make plasterboard shelves with your own hands at home.
To do this you will need:
- Sharp knife or hacksaw;
- Wooden beams or metal profile;
- Fasteners;
- Drill;
- Corners made of plastic.
Remember that before carrying out work you must have a clear work plan and know what you want to get in the end. Take the necessary measurements, do everything without haste and very carefully.
The step-by-step sequence for creating shelves is as follows:
- Cut shelf parts from drywall using a sharp knife.
- Attach figured shelves using arched profiles.
- Make a base from the profile, a profile 50 by 25 mm.
- Drill holes according to the size of the screws, hang the profile and attach the structure. Plasterboard parts for niches and shelves can be cut with a hacksaw or a sharp shoe knife.
- Curved shelves are made from thinner plasterboard, and they are secured using arched profiles. As a last resort, if there are none, you can bend ordinary profiles by making cuts along the entire length.
If you are making shelves from thick material for heavy things, then use special fasteners for drywall. These are butterfly screws; you can also additionally secure the structure with traverses or a frame.
If the shelf consists of several parts, it is best to cover it with a mounting mesh and secure the corners with plastic or aluminum elements so that the structure retains its aesthetic appearance longer.
Preparatory work
A plasterboard shelf can be of such a configuration that your imagination allows you to create it.
For proper design, you need to know exactly how your planned shelf should look. Drywall shelves can be straight, angular, semicircular, curved, protruding or recessed into the wall surface.
- We make a detailed drawing, marking on the drawing where measurements need to be taken.
- After we take measurements, we measure out the section of the wall on which the future plasterboard shelf will be located. We show maximum accuracy, otherwise problems with fastening may arise later.
USEFUL INFORMATION: How to make an arch with your own hands from plasterboard
Using a detailed drawing, you can calculate the required materials. During manufacture and installation you will need:
- moisture-resistant drywall;
- guide and load-bearing profile (UD and CD, size 25 × 50 will be sufficient), for a curved shelf design - arched;
- self-tapping screws for plasterboard 25 mm, dowels;
- serpyanka mesh;
- primer;
- putty.
Important! To create a shelf, it is better to choose thick drywall, 15–18 mm thick, or lay plasterboard in two layers. When using sheets of standard thickness - 12.5 mm - you need to take care of the reliability of the frame: load-bearing profiles should be spaced frequently.
Shelves made of plasterboard make the interior unique, beautiful and functional.
Decorative plasterboard shelves: functions and advantages
Depending on the material chosen, shelves can be either very light or quite heavy and durable.
You can create shelves for storing:
- Books and stationery;
- Decorative items;
- Crockery;
- Toys;
- Electronics.
If you additionally secure the plasterboard shelves, you can get a really strong structure on which the TV or stereo system will firmly stand.
Drywall has several advantages:
- Availability;
- Environmental Safety;
- Ease of installation;
- It can also be painted with any paint.
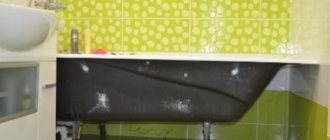
But at the same time, drywall is a rather fragile material and is completely unstable to moisture. If you want to make shelves or niches in the bathroom, buy only moisture-resistant drywall.
Types of shelves
Before you start making a composition, you need to carefully consider all the details. To do this, you will need to decide what type of shelves your shelves will be, since they can be made:
- As an independent element attached to the wall.
- Like niches recessed into the plane of the wall.
In the first case, you will need less space, but the load on such parts is limited. In the second case, much more space will be required and the area of the room will be reduced. However, such structures can withstand much more weight.
How to fix a shelf to drywall
To attach a small and lightweight shelf to gypsum board sheets, you will have to use special dowels, which tend to open up and be fixed in the hollow base.
Suitable for these purposes:
Take a close look at how much load a particular dowel can withstand and compare it with your shelf. Wall shelves in plasterboard must be secured using these dowels, as well as self-tapping screws, which should be slightly longer than the dowel itself. When screwing in a screw or self-tapping screw, the dowel head will open and take most of the load.
To hang shelves in drywall, you can use this sequence:
- Drill a hole in the wall of the required size;
- Install the dowel into the hole;
- Install the shelf mount onto the fastener;
- Hang a shelf.
If you have a heavy shelf, you won’t be able to attach it without a profile.
In this case, you need to use the following method:
- Drill holes in drywall;
- Insert a butterfly dowel or a dowel, insert a self-tapping screw;
- Clamp the structure and screw in the dowel, but be careful not to destroy the wall.
Instead of such dowels, you can use anchor bolts. The entire sequence of actions does not change, only bolts are inserted instead of screws and dowels.
Step-by-step instructions for installing a plasterboard shelf in the bathroom
Creating a shelf from plasterboard with your own hands does not fall into the category of difficult tasks. However, to resolve such an issue, it is necessary to show care and responsibility, otherwise the result of the work will be depressing. Step-by-step instructions for installing a plasterboard structure are as follows:
- According to the markings, holes are drilled in the wall for dowels. Moreover, the length of each of them exceeds the size of the dowel by at least 1-1.5 cm. To increase the load-bearing capacity of the object, the distance between the holes must be at least 10-15 cm.
Fastening the profile using dowels - Dowels are inserted into the holes and driven until they are flush with the wall. The UD ceiling profile is adjusted to size, applied to the wall and drilled according to the location of the fastening points. A washer is put on the self-tapping screw, it is threaded through the hole in the profile and inserted into the dowel, after which it is screwed in to the very end. A similar action is performed with all fixation points, and the attached profile is checked against the level.
Fastening the profile for drywall - The UD profile plays a fixing role and sets the direction of the entire structure. It is installed on 2 walls that form a corner, and sets the width and length of the future shelf. On the outside, an angle is formed from it, which is twisted with self-tapping screws. The CD profile is cut to the required length so that there are 2 longitudinal elements and at least 4 transverse strips (our shelf will be about 120 mm long, and they should be placed every 40 mm).
Installation of a profile structure - Longitudinal slats are inserted into the guide profile, with one facing outward and the other inward. They are screwed on both ends with self-tapping screws. In this form, the load-bearing capacity of the shelf leaves much to be desired, so the shelf needs to be strengthened.
Fastening the longitudinal rails of the structure - Starting from the outer edge, retaining strips are screwed to the wall every 40 cm (they are fixed with dowels and self-tapping screws). Their size directly depends on the length of the shelf and must correspond to it. After this, the lower parts of the planks should be connected to the extreme points of the longitudinal planks. A similar action is performed using a rack-mount CD profile, the value of which is determined by calculation using the Pythagorean theorem (which refers to the square of the hypotenuse).
An example of a drawing of a corner structure for a shelf - The parts of the CD profile are connected to the retaining rails and inserted flush with the outer longitudinal strip. In this position it is fixed at 3-4 points on each side. Now the frame of the rack is able to withstand heavy loads.
A properly assembled frame can withstand heavy loads - Sheets of drywall (gypsum board) are cut according to the resulting model. To cover the shelf you will need 5 parts - top, bottom and 3 sides. First, the bottom piece is screwed on and a kind of box is formed. In this case, small grooves are cut out for the retaining slats and only after that, the gypsum board is completely fixed with self-tapping screws in at least 6 places (3 each near the wall and the edge of the shelf).
An example of attaching drywall to a shelf - The side linings are made in the same way. To fix them, 3-4 screws are enough. The top piece of sheet is laid last, giving the structure a finished appearance. If desired, the holding posts can also be covered with plasterboard and painted.
The frame is covered with plasterboard - The finished shelf in the bathroom made of gypsum plasterboard requires additional processing, which consists of sealing the plasterboard seams and fastening points and will be described in detail below.
Processing joints of plasterboard sheets
Corner shelves made of plasterboard
Corner shelves made of plasterboard look very stylish. These beautiful designs look great in modern living rooms and bedrooms. Built-in lights that can be inserted into corner shelves will add coziness and warmth to any room.
Small corner shelves can often be found in small rooms, where every centimeter plays a huge role. The decoration in such rooms is light, there is a lot of light to further increase the space.
Small things are placed on the corner shelves:
- Watch;
- Books;
- Stuffed Toys;
- Small lamps;
- Vases and boxes.
Thus, corner shelves help save space, but at the same time hold quite a lot of things. This option of plasterboard shelves is best suited for a children's room, bedroom and living room. Some even create them in the bathroom to place soap, washcloths, and various body care products on them. But remember that drywall is very sensitive to moisture - choose moisture-resistant materials.
Making shelves
Project selection
First you need to make a drawing of the shelf or at least a sketch of the future interior detail. Thanks to such a sketch indicating the dimensions, it is possible to calculate the consumption of drywall in advance, and if necessary, during work there is always the opportunity to make changes to the project.
The drawing will help you figure out the dimensions of the shelf and calculate the materials for the sheathing and frame . The calculations are very simple and do not require special knowledge or extensive experience. When planning, it is important to take into account the thickness of the drywall sheet and its width and length. The width of the material is 1.2 m, the length is 2.5 m for the ceiling version and 3.0 m for the wall covering.
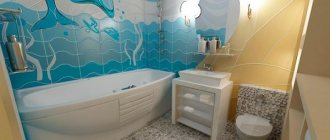
The position of the shelf in the interior of the room is determined. Although the shelves in the bathroom are made of moisture-resistant material, they need to be located away from the area of shower jets . If a single ensemble of shelves is provided, then it will be assembled on site, and a separate corner structure can be hung after the main decoration of the room.
To select sheet thickness, it is important to determine the load on the shelf in advance. There are usually no heavy objects in the bathroom except for the TV, but it is rarely installed in such a room. If you want to install something heavy on a shelf, you need to include a reinforced profile in the design.
Drywall refers to materials from which any shape, bend, arch and other original designs can be made. It looks very nice and is often used when creating built-in wardrobes.
It is imperative to take into account the presence of lighting and arrange the layers of material so that the distance between them allows you to insert a lamp there and hide the wires suitable for it. All these little things, which seem insignificant at first glance, will save the master time and nerves during the work process.
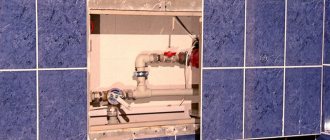
How to find a profile under drywall
You need to look for a profile under drywall in certain situations.
Namely:
- When you need to hang a picture on the wall;
- Hang a mirror;
- Attach a wall-mounted TV;
- Attach the lamp to the wall;
- Nail the baseboards;
- Attach wall cabinets.
In any of the above situations, it is necessary to find a metal profile under the drywall. If you installed drywall using a frameless structure, then the problem of finding a profile disappears by itself. Otherwise, you will have to search for the profile in different ways, which depend on the material.
In the case of a metal profile, use a regular magnet. You can use it to find the profile if the sheets of drywall are thin enough. A large and powerful magnet is best. Tie a string around a magnet and slowly move it across the drywall; when you feel the magnet not moving, make a note.
If wood was used, you can find the beams by tapping (the sound will no longer be dull above the slats), also try driving a nail.
However, the latter method is less practical; if the hole was made in the wrong place, you will have to fill it with putty. If you have a drawing of the room, study it and find wooden slats.
Sheathing
Once the frame is ready, you can begin covering it. To do this, sheets of drywall are cut to measurements and the cut-out blanks are attached in place with self-tapping screws.
The shelves need to be sheathed on the top and bottom sides, and then the end of the structure is closed using a narrow strip. The most difficult thing to do is cover a curved structure, since drywall cannot be bent so easily. To make this work, you need to do the following:
- cut out a piece of cardboard or other sufficiently dense but flexible material that is appropriate in size and shape;
- the workpiece is bent to the desired radius;
- then cut out a blank from plasterboard, moisten it with water and roll it with a needle roller, after which the blank can be bent, fitting it to a pre-made cardboard template;
- then the workpiece is fixed and allowed to dry, after which it can be fixed in place.
The drywall is secured using self-tapping screws; it is necessary to tighten the screws so that the cap is slightly recessed into the material. But you can’t overtighten, otherwise cracks will appear around the screw.