The most economical, but aesthetically pleasing and stylish are suspended aluminum slatted ceilings for the bathroom, which have attractive technical characteristics. Such ceilings are very easy to clean, and in case of accidental damage, it is just as easy to replace the required strip instead of repairing the entire ceiling.
With the help of spotlights, an aluminum slatted suspended ceiling in a bathroom can be turned into a real work of art that no one else will have! And most importantly, you can make such a ceiling with your own hands!
Aluminum ceilings, what they are
At first glance, a ceiling made of such a material does not immediately inspire confidence, but any experienced builder or plumber will tell you that aluminum will be the best solution in the bathroom. This is a practical type of finish, and the structure itself is extremely moisture-resistant and reliable. Due to the peculiarities of its appearance, such a ceiling received its own name among the people - “slatted”.
Externally, it is a structure consisting of panels, the length of which depends on the size of the room. The panels are standardly 10 cm wide and up to 4 meters long; if necessary, you can order panels with other parameters suitable for your bathroom.
The panels also have three design options: open, closed and with decorative inserts.
The aluminum ceiling in the bathroom can be of various colors and shades, and may have a laminated surface. The growing popularity of this solution is forcing manufacturers to produce panels in various sizes and colors; you will definitely have plenty to choose from.
Aluminum ceiling has three varieties:
- Rack and pinion. This is a suspended ceiling that is distinguished by its appearance and ease of installation. It, in turn, is divided into two subtypes: closed (there are no gaps between the panels) and open (there are gaps between the panels).
Slat ceiling installation diagram
- Cassette. This option is rarely used. Due to its characteristics, it is used in rooms with a large area. Its use in the bathroom is not recommended. It is a structure made of rectangular or square panels.
Aluminum cassette ceiling diagram
- Individual. This is the rarest species of all. It is usually made to order, according to an individual design project. It will not be possible to install such a ceiling on your own. It is quite expensive, and its assembly requires certain skills.
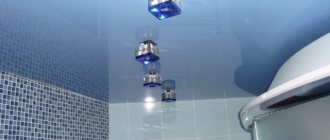
Examples of slatted ceilings in the bathroom
If you have some skills, you can easily create a spectacular finish with your own hands.
Moreover, skillful selection can correct design flaws. The glossy texture raises the ceiling, and the transverse arrangement of the slats expands the bathroom. M4034S-4211
Advantages and disadvantages of aluminum ceilings
Aluminum as a metal has a whole set of advantages, which provide the following advantages of the ceiling structure:
- Light weight. An aluminum ceiling does not require a powerful frame, it is light in weight and can easily be supported in a medium-sized room using three or four profiles.
- Lifetime. This type of ceiling, provided that it is installed without violating technology, will serve you faithfully for decades. Even if you are flooded by careless residents from above, the ceiling will not be damaged. Moisture resistance. Aluminum is completely neutral to humidity in the bathroom. Unlike other metals, it does not rust.
- Easy to care for. Caring for such a ceiling in the bathroom is very simple, just wipe it with a damp cloth and then dry it to give the surface a shine. Do not use dry detergents containing solid particles; they will scratch the surface of the panels.
- Easy to install. With due attention, using all the recommendations and rules from the instructions, an aluminum ceiling can be installed in 1 day. No special skills needed. If necessary, any ceiling panel can be replaced without dismantling the entire structure.
- Soundproofing. Aluminum itself does a good job of blocking sound, so you can relax in the bathroom without noise from the occupants above.
- Environmental friendliness, safety. Aluminum does not burn and does not emit gases when heated or in contact with household chemicals. It is fully compliant with the ISO 9001 standard.
- Variability of design solutions. An aluminum ceiling can be made with multi-level transitions both horizontally and vertically.
- Variability of lighting zones. Lighting in a room with such a ceiling has virtually no restrictions. You can highlight any area with light, and the mirror surface of the panels will create pleasant glare.
Flaws. There are few of them, but they are there:
- When installing, you need to be careful when working with panels (slats), they bend and scratch easily. Such damage will cause the panel to lose its aesthetic appearance.
- Price. An aluminum ceiling in a bathroom will not be cheap, you will have to spend money.
Characteristics of aluminum
The metal has the following properties:
- Insensitive to moisture. Aluminum tolerates contact with water well. The lamellas covered with an anodized film are not subject to corrosion, which allows them to be used when finishing bathrooms.
- Stability of the structure. Aluminum panels do not emit toxic substances. When in contact with open fire, no acrid smoke is produced.
- Inertia. The metal does not react with most substances. It is resistant to oxidation and abrasion.
- Ability to maintain surface sterility. Aluminum panels can be cleaned with any detergent.
DIY aluminum ceiling installation
Installation of aluminum ceiling. Scheme.
Suspended ceiling design diagram
Tools you will need:
- screwdriver or hammer drill;
- meter;
- ruler;
- laser level (or a regular one);
- knife;
- Bulgarian;
- screws, dowels;
- pencil.
Installation of aluminum ceiling
Fastening slats for ceiling installation
Installation of an aluminum ceiling for a bathroom is carried out in the following sequence:
- Marking and installation of guides. Using a marker and a level, we make markings in the bathroom. We mark the line of the future ceiling; it is usually 8-10 cm lower than the base one. If there are communications on the ceiling, then this figure may be higher. We decide whether the panels will be installed horizontally or vertically. We measure the room, cut and install profiles.
Attaching slats to the ceiling frame
Installation of frame for aluminum ceiling
- Installation of hangers. We make marks at the location where future support rails will be installed. The first bus should be located at a distance of 40 cm from the wall, the rest are attached parallel to the first with a distance of 1 meter. The hangers are secured with dowels and screws.
- Tire installation. This is the most important point on which the strength of the future structure depends. We install the traverses strictly perpendicular to the plane of the future ceiling, their height should be in line with the profiles.
- Installation of panels (battens). We remove the original packaging and protective film from the slats. We cut them according to size, then tuck them into the guides and secure them with clamps. If necessary, change the height of the tires. All slats must be installed end-to-end, without gaps.
A clear example of a slatted ceiling design unit
- Installation of skirting boards. Skirting boards are installed last and hide the gaps between the wall and the ceiling.
Skirting boards are installed last
Installation complete!
Preparatory work
Before going to a hardware store, you need to prepare for work:
- Measure the room;
Measurements need to be taken
- Calculate the number of panels and inserts between them, materials for the frame, lamps, ceiling plinth, paying attention to the characteristics of each ceiling element;
- We choose the type of installation - on a homemade wooden or aluminum frame (for a small room) or on a ready-made suspended base from the manufacturer (for a large room);
- Prepare the ceiling.
- You will need auxiliary building materials (screws, primer), as well as tools (screwdriver, drill, level, tape measure, metal scissors for cutting aluminum panels and profiles).
Ceiling installation tools
To install the ceiling you need two people, because it will be very difficult for one person to do it. Do not neglect preparing the ceiling for installation of the rack system. This will avoid problems such as rust stains, mold and mildew, or leakage through holes or cracks. The preparation of the ceiling includes the following actions:
- We remove from the ceiling what can easily be removed on its own; you can wash off the whitewash or lightly clean off the peeling paint, remove wallpaper or other old ceiling covering.
- We plaster deep seams and holes;
- We thoroughly prime the surface with antifungal and waterproof primer.
Ceiling primer
- If you install lamps, you need to remove the wire from the wall: this will make installation of the wiring easier.
Lighting, which lamps to choose?
For aluminum ceilings in the bathroom, a wide variety of lamps are used, ranging from spotlights to incandescent lamps.
When choosing them, you need to pay attention to several nuances:
- The lighting power and color scheme should be in harmony with the room; harsh light is unpleasant to the eyes and causes discomfort.
- The dimensions of the lighting fixture should not stand out sharply against the background of the ceiling.
- Do not buy cheap lamps, they often burn out, and to replace you will have to disassemble part of the ceiling each time, this is not difficult, but it is better to immediately buy normal lighting fixtures.
Spotlights are suitable for aluminum ceilings
Installation of lamps
The final stage of installation of the rack ceiling structure will be the installation of lamps. After all the slats are installed in their places, we mark the placement of the lamps. Using a cutter or sharp knife, make holes. To avoid damaging the slats, remove them. It will be much more convenient this way.
After this, we pass the pre-prepared wires through the hole. Connect them to the lamp and secure it to the rail. Then install the rail in place, having first checked the functionality of the lighting fixture.
This completes the installation of the slatted ceiling on your own. You can wipe the slats with a damp cloth and admire the work done.
After reading this article, you now know how to make a slatted ceiling. There is nothing complicated about this. All work can be performed by a person even with minimal construction skills. The result is a beautifully designed ceiling that will last for decades.
Maintenance of aluminum ceiling structures
Taking care of such a ceiling in the bathroom is a pleasure! For cleaning you only need a cleaning solution and two cloths. The first is to wash the panels, the second is to wipe and create a shine effect.
It takes a few minutes to clean such a ceiling, the physical costs are minimal, you won’t even have time to get tired! All the water that condenses on the panels will not leave unpleasant streaks when evaporating; this is a feature of the material. When cleaning, do not use powdered detergents; they may leave noticeable scratches on the panels.
For cleaning you only need a cleaning solution and two cloths
To create a shine effect, after wiping wetly, take a dry cloth and wipe the ceiling thoroughly
Form options
Reiki can also come in different shapes.
Cube-shaped
It has a square or rectangular cross-section. Such models look very original and non-standard and are especially popular in the design of many interiors.
The photo shows a cube-shaped wooden slatted ceiling in the interior of the room.
Plate-shaped
Flat slats are installed vertically at a certain distance from each other, due to which they create a visual effect and make the structure more voluminous.
Flat
Universal look. Panels of varying widths allow you to create a conventional, seamless, flat-shaped ceiling.
Curvilinear
The radius bent slatted structure allows you to create original and non-standard ceiling compositions. Curved panels are aesthetically pleasing and create smooth transitions between different ceiling levels.
The photo shows a rack and pinion hanging model with a curved shape.
Two-level
Such models with a difference allow you to visually divide a room into certain zones, disguise ceilings and simply transform the interior and make it truly spectacular.
The photo shows a two-level slatted suspended structure.
Aluminum ceiling cost
Before calculating the cost of a new aluminum ceiling in the bathroom, you need to accurately measure the room where it will be installed. If you hire a specialist for this, the measurements will cost 500-700 rubles.
The cost of the material varies, it depends on the manufacturing company, on the quality and dimensions of the material.
Prices for standard components:
- One strip 3 meters long costs 120 rubles, one 4 meters long costs 200 rubles.
- Guides, depending on the quality, cost 200 - 650 rubles. (thing).
- Decorative inserts and baseboards cost 200 – 600 rubles. (thing).
- Fasteners and mechanisms cost 50 – 300 rubles.
If you decide to use the services of a specialist during installation, then such specialists, as a rule, charge 500 - 700 rubles for installation of 1 m2.
Step-by-step installation instructions
You can begin installing the slatted ceiling only after completing all finishing work, during which dust may form. That is, after waiting for the leveling solutions to dry completely, after laying the tiles and floor coverings.
To complete each stage, you will need construction tools, as well as materials and components from which the frame will be formed. To determine the volume of purchases, initial calculations are carried out.
After delivering all the necessary materials and tools to the site, you can begin the first stage of work - marking.
Marking the room
Marking is the most crucial moment, so it is important to maintain perfect accuracy. Initially, the perimeter of fastening the U-shaped profile is outlined. If the project is intended to have a flat ceiling, without shaped inserts or other decorations, then the line is drawn at the required height in the horizontal projection. When marking a multi-level ceiling, miscalculations will be more difficult.
The amount of indentation from the upper edge of the wall, that is, from the rough base of the ceiling, directly depends on the inter-ceiling filling. If communications, utility networks, lighting fixtures, and ventilation ducts will not be located in the hidden space being formed, then a minimum gap of 5 cm is sufficient. If it is planned to remove lamps and other communication junctions, then the space between the main and false ceiling should be increased to 15 cm. 20 cm.
The next step will be to draw the markings for installing the stringers. When performing manipulations, it is very important to observe and control the parallelism of all lines with each other, in relation to the side wall. In this case, they must be perpendicular (90° angle) to the direction of the batten and the end wall.
Fastening the guides
Guides for slatted ceilings are presented in two versions, depending on the complexity of the design and configuration:
- L-shaped;
- U-shaped.
They are fixed with self-tapping screws and dowels according to a pre-applied level. An indent of 5 mm is made from the edge of the profile. A step of 50 centimeters is maintained between the screws. It is better to drill the profile from the outside to avoid the formation of burrs (to avoid damage to the tiles).
Depending on the wall finishing material, the appropriate type of drill must be selected. For example, for tiles, a special triangular drill bit with diamond coating is suitable.
Important! To ensure an even corner joint, the edges of the profile are cut at an angle of 45°.
Installation of stringers
Stringers are bars with grooves designed to secure the ceiling slatted panels. Their length should be such that there is a gap of 1 cm between the wall and the profile, the so-called deformation gap. Maintaining installation distances:
- from the wall – 25-30 cm;
- between stringers on the ceiling 50-60 cm.
The products are fastened directly to the ceiling with self-tapping screws. This method is most often used in practice, due to the speed of the operation, as well as the possibility of adjusting the stringer in height. The level height is controlled by unscrewing or screwing in the self-tapping screw.
Cutting the panels
For the cutting process you will need a grinder or a hacksaw. Initially, the length of the room is measured, and the corresponding mark is made on the panel, then 0.5-1 cm is retreated from it so that the rail does not rest against the wall.
At the same stage, holes are made for lamps, if they are included in the project. To do this, you need to accurately mark the hole, and then use a drill and a crown bit to make a hole of the desired size and shape.
Wiring of communications and engineering networks
The main advantage of suspended ceilings is the fact that all communication connections can be hidden in the interceiling space. After all the work on forming the frame is completed, you can begin laying wires and cables for lighting. It is advisable to place them in a corrugated pipe, pre-insulated, and fix them on the ceiling or wall.
Fastening panels
To install the first panel, you need to insert its edges into the guide profiles placed on the walls. Then, using teeth, each rail is hooked onto the stinger and snaps into place. Thus, it is possible to firmly fix the product, and also eliminate the risk of its deformation or falling out.
In practice, there is always a problem with installing the last panel; it is usually wider than the available space, which indicates the need for cutting. After the last panel is cut to width, its cut edge is inserted into the profile. This hides the cropped part. The panel is also fixed on the teeth of the stringers until there is a characteristic click.
Some craftsmen prefer to insert the cut strip second to last, with the last panel being made 1.4 cm shorter than all the others.
There are a lot of nuances to installing a slatted ceiling; it all depends on the experience of the master and his ability to solve a non-standard problem.
The listed installation steps and detailed instructions will allow installation in most domestic premises.
Article Rating
Which material is most popular?
Despite the invisible parity, people love aluminum slats a little more. The aluminum option attracts them:
- a large selection of color palettes (there are options from classic white to silver and gold);
- interesting shape;
- variability in size;
- a perforating process that provides air access between the main ceiling structure and the suspended “linings”.
Interior decoration in various styles
These products are perfect for the following styles:
- Provence.
- Modern.
- Loft.
- Scandinavian.
The photo shows a living room in a modern style with a wooden slatted ceiling.
Thanks to their varied designs and textures, slatted structures have found application in many styles.