Until recently, ceramic tiles were perhaps the only option for finishing a bathroom. The modern construction industry offers a wide range of new facing materials, of which bathroom siding is very popular. The use of plastic panels for finishing walls and ceilings allows for repair work to be carried out quickly, efficiently and relatively inexpensively. And given the high practicality and durability of the material, the popularity of siding is constantly growing.
Siding in the bathroom - practical and modern surface covering
There are plastic PVC panels (vinyl siding) designed for interior and exterior use. The first of them contain special additives that increase mechanical strength and resistance to ultraviolet radiation, however, such products are somewhat more expensive.
Performance properties of siding
Modern PVC panels (also called siding or lining) help create a different style in any room, but are most often used to decorate the bathroom. High moisture resistance, correct geometric shape, simple and reliable connection make it possible to finish a bathroom with siding without extra time and special skills.
There are several types of such material:
- Rack and pinion. Most often they are used to decorate the ceiling, but the slats are also suitable for cladding walls. The width of the slats is 100-125 mm, and the length is 3 m. The slats are connected to each other using a locking connection, which can be wide or narrow. Plain colors or colors imitating wood or other materials are common.
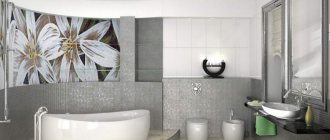
- Standard. In this case, the width of the panels is 250-370 mm, and the length is 2.6-3 m. Tongue-and-tongue locking connections allow for quick and reliable installation. The coating can be plain, imitate other materials, or have a pattern or photo printed on it.
- Sheet. The width of the lamella is 203 mm, and the length is 4.05 m. Finishing with such sheets is done end-to-end, then the seams are filled with sealant in the color of the material. They are most often mounted on a flat surface using glue, but they can also be installed on the sheathing.
Depending on the connection method, the panels are:
- Seamless. Most often they are used to decorate the ceiling. The tight fit of the panels to each other ensures minimal seams.
- With chamfer. Their difference is that there is a chamfer at the junction. They are used for finishing walls and ceilings.
- With decorative surface. Externally, such panels resemble natural lining, but cost more than previous options.
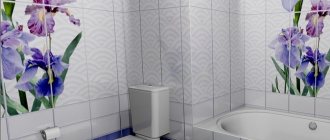
Finishing the bathroom with white siding.
Traditional whitewashing or painting
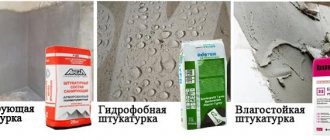
To make the ceiling in the bathroom a more cost-effective and affordable option, they resort to whitewashing. You can master this method yourself. It is important to purchase waterproof materials in the store. Where there are irregularities, they need to be corrected before whitewashing. The antiseptic properties of lime mortar will prevent mold and fungi from appearing. However, wet fumes lead to peeling and yellowing of the whitewash, and unsightly stains remain after splashes. Therefore, the coating requires updating.
Painting the ceiling with paint with antifungal and vapor barrier properties also has its strengths and weaknesses. With this method, the ceiling in the bathroom can be painted with combined colors, a pattern, or an ornament can be applied. This inexpensive coating does not lose its qualities for a long time, is not washed off with water and is easy to clean. But before painting it is necessary to carefully level the surface. It is advisable to avoid white color, which turns yellow over time and develops spots and smudges.
Advantages and disadvantages of cladding
Siding for bathroom interior decoration is made of polyvinyl chloride, which provides it with high resistance to high humidity.
In addition, this finishing material has the following advantages:
- low cost (anyone can buy it);
- a large selection of colors (this allows you to choose the material to suit any interior);
- long service life (mold and mildew do not form on it);
- high heat and sound insulation characteristics (when installing the frame, it is possible to lay an additional layer of insulation and further increase these indicators);
- environmental friendliness (the materials and technologies used in production make such material completely safe for humans);
- simplicity and speed of installation (this does not require special tools or special skills - even a beginner can cope with the work);
- ease of use and maintenance (just wipe the panels with a sponge dipped in soapy water).
Like any building material, siding also has some disadvantages:
- fire hazard (although the panels do not support open fire, they emit toxic smoke when burning);
- deformation (at sub-zero temperatures);
- reducing the space of the room (when installed on a frame);
- relatively low strength.
Bathroom finishing.
How to choose siding
This type of material is made in the form of plastic panels. Such a base makes it possible not only to qualitatively level the surface of the ceiling, but also to obtain a seamless coating. When choosing siding, pay attention to how much the panels weigh, since most of them are intended for exterior decoration and use on the ceiling would not be the best idea. Therefore, they contain metal, which is a significant weighting agent. As you can see, heavy weight material is not suitable for the ceiling. In modern production, more attention is paid to the production of two types of siding - vinyl and wood.
But we note that wood-based material does not tolerate moisture and high temperature quite well, so it is also better not to use it for the ceiling. Vinyl siding, on the other hand, has high performance characteristics - it is lightweight, non-flammable, and easy to care for. The appearance of vinyl panels is presented as planks with a solid surface or one with microscopic perforations, which provide good ventilation for the ceiling.
Advantages and disadvantages
Siding has become so popular among consumers because it has a number of undeniable advantages:
The material is heat-resistant and moisture-resistant. It can be safely used for any type of decoration, even for the ceiling in the bathroom.- It does not lose its original color for a long time.
- Steel or metal siding is not susceptible to corrosion.
- The material is fireproof, so it is often used for finishing kitchens.
- Environmentally friendly. The material used in the manufacture of panels contains only safe components that will not harm human health.
- Easy to maintain, because the siding can even be washed.
- Easy to install siding on the ceiling; you can do everything yourself without outside help.
- High resistance to external factors, which is why ceiling finishing with siding is often used on an open veranda or balcony.
- Has a large assortment of colors. The products are sold in approximately 12 shades, and the lighter the color you choose, the higher the ceilings will appear.
- Siding helps hide ceiling imperfections.
- Any type of lamps can be installed in a panel structure.
But it’s worth talking about the disadvantages. The main and significant thing is that the siding ceiling has a high expansion coefficient due to the influence of thermal factors, as a result of which the panels can begin to bulge out of the system. But, this defect can be easily corrected and even prevented if you leave 2 cm of free space between the suspended structure and the sub-ceiling. Also, the rooms where siding ceilings are made become a little lower, so this method will not be appropriate for rooms that are no more than 2.5 meters in height.
Wide range of possibilities in interior design
Siding is a universal material, so it is used to decorate any room indoors:
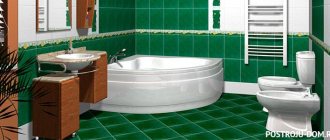
- Bathroom. Due to its availability and ease of installation, siding has replaced such a popular finishing material as ceramic tiles. A bathroom decorated with it not only looks beautiful, but is also inexpensive. In this case, all the work can be done independently. The result is a practical coating that does not accumulate dust and dirt.
- Balcony or loggia. Here, this material not only gives the room an attractive appearance and practicality, but also improves the heat and sound insulation characteristics of the surfaces on which it is installed.
- Corridor. Siding is used to cover the walls completely or half their height. Finishing the corridor with such material makes it presentable and practical. In addition, it makes cleaning easier because... There is always more dirt and dust in the hallway than in other rooms of the house.
- Ceiling. This material can be used in any room. In addition to high aesthetic qualities, siding allows you to hide existing communications (electrical wiring, pipes, etc.).
How to attach siding - recommendations
We recommend that you take into account certain recommendations, and then you can avoid mistakes associated with the choice of material and its installation:
Choose light-colored panels if the room has a low ceiling.- If you decide to install a frame made of beams under the siding, then before starting work they should be treated with an antiseptic and fire retardant so that the material is protected from fire and rotting.
- Leave a small gap (about 0.5 cm) on each side between the wall and the panels. In this case, the material will not sag or deform during use due to exposure to high temperatures.
- Carefully measure each siding panel; do not use standard cutting templates. Even with a deviation of 0.1 cm, the structure may be uneven.
- To insulate the ceiling space, use thermal insulation material in rolls, which will be securely fixed to the sub-ceiling. In this case, the load on the panels will be minimal.
- In rooms characterized by a high level of humidity, use only plastic dowels as fasteners. They are not afraid of moisture, unlike metal or wood.
- Siding should only be cut with a grinder. In this case, the material will not crumble or break, and the cut will always be neat and even.
All of the above tips and recommendations will help you create a beautiful, durable and high-quality siding ceiling covering. At the same time, you will not need to spend a lot of money and time on work, and caring for the ceiling will be extremely simple - wet cleaning.
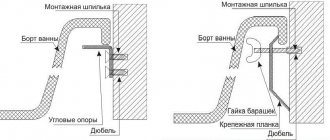
Bathroom installation options
Before finishing a bathroom with siding, you need to calculate the required material. To do this, multiply the width by the length and determine the surface area on which the work will be performed, adding a 10% margin.
If the repair is carried out without removing the plumbing, then cover the bathtub, washbasin, pipes, etc. with film. When installing the panels, the wooden frame, as well as the surface of the walls and ceiling, must be treated with antifungal agents. Old finishing material is removed from the walls. If the siding is installed on a frame, then there is no need to prepare them additionally.
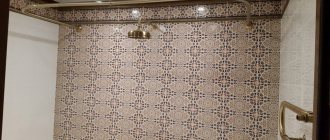
The following techniques will help to visually increase the area of a small bathroom and make its design beautiful and unusual:
- The main surface of the walls is finished with light-colored plastic, and darker colors are used in the corners.
- They focus on one of the walls - for this purpose it is decorated in a brighter color.
- Dark-colored panels are installed in places where mirrors and other accessories are installed.
- Light-colored siding is used to decorate a small bathroom.
Using an adhesive composition
If the walls in the bathroom are almost flat, then it is easier to install the siding using glue. The surface is first cleaned of dust, then sanded to ensure good adhesion of the materials, and primed. This solution allows for quick installation and does not take up free space, making it suitable for small spaces.
Frame method
If there are irregularities on the walls, it is better to choose installation on a frame. Although installing the sheathing requires additional time, effort and money, it does not require leveling the walls, which compensates for these inconveniences. Installation is carried out on both wooden and metal sheathing.
The disadvantage of this method is that the size of the room is slightly reduced, but if the bathroom has sufficient area, then it can be ignored.
Short description
Such panels have many advantages, which is why they have become so widespread:
Light weight, easy to transport.- High-strength, steam-resistant, moisture-resistant, can withstand even hot steam.
- There are many designs, there is siding with imitation stone, tile and wood.
- Ease of installation.
- You can hide pipes (electricity, drain) under it, which do not decorate the room in any way.
- They are easy to care for; to clean the surfaces, just walk over them with a damp cloth.
- Relatively inexpensive material compared to other finishing elements.
Siding comes in different textures, but for use in the bathroom it is recommended to use smooth sheets because they are easy to maintain. In addition, mold or mildew almost never forms on smooth siding surfaces in the bathroom.
When choosing a material, keep in mind that it can be used for both exterior and interior decoration. The exterior finishing material contains additional components that help provide protection from UV rays and negative environmental influences. Because of this, the cost of the material will be higher.
Selection of plastic panels
An important stage of the work is the purchase of materials.
To purchase high-quality panels, you need to pay attention to the following points:
- The more stiffening ribs there are in the siding, the stronger and more reliable it is.
- You cannot buy material if the locks or lintels on it are deformed.
- The coloring should be evenly applied to the entire surface, the design should be clear and unblurred.
- The image when joining the panels should turn out beautiful, undisplaced.
- There should be no bubbles, cracks or other defects over the entire surface of the plastic.
- Locks must provide a reliable and durable connection (gaps are not allowed).
- The dimensions of the panels must strictly correspond to the parameters declared by the manufacturer, otherwise there will be problems during their installation.
Be sure to request a quality certificate to ensure that the siding you purchase is intended for interior use and is safe for humans.
Plastic panels for the bathroom.
Or maybe wallpaper?
This type of finishing is rarely used. But if you decide to experiment, then choose waterproof wallpaper, preferably colored. The ceiling must be carefully leveled, otherwise any unevenness will protrude under a thin layer of coating. Wallpaper can be repainted over time to change the interior.
This type of finishing also has disadvantages. Pasting needs to be done by two people. When cutting, fastening and joining the fabric you need to be very careful. Mold may develop under the coating. If water leaks from above, the wallpaper will have to be replaced.
Instructions for tiling a bathroom
Installation of PVC panels is not difficult, so you can do this work yourself. If you decide to cover the entire room with siding, you should first install it on the ceiling, and then move on to finishing the walls.
Installing siding with glue
It is necessary to prepare the following materials and tools:
- antiseptic primer;
- roller and tray;
- glue;
- hacksaw and construction knife;
- tape measure and pencil;
- building level.
After cleaning the walls from the old coating, they must be properly leveled, wait until the putty dries, and cover them with a primer. On the ceiling, siding is most often mounted on a frame to hide the communications there (cable, pipes, etc.).
Work on gluing the panels begins with the installation of starting profiles (do this in the corners of the bathroom). The verticality of their installation is controlled using a level or plumb line. You can do the work without starting rails, then the joints should be closed using decorative corners.
They mark and trim the panels, which are mounted vertically, so they are cut to height.
One of the finishing options.
Further work is performed in this order:
- evenly coat the first panel with glue;
- insert it into the starting element and press it against the wall over the entire surface;
- smear the next panel with glue, insert its groove into the tenon of the previous one and press it against the wall;
- the last element is cut to width from the groove side and, slightly bent, inserted into the opposite starting profile;
- The joints with the bathroom are taped with a special tape or a border is installed, and a plinth is installed.
It is necessary to remove the protective film from the panels only after installation is complete, otherwise they may be damaged.
Frame installation
This method allows you to hide all the irregularities on the wall and does not require additional preparation.
You will need the following materials and tools:
- metal profiles, brackets, etc.;
- wooden blocks (they must fit into the metal profile);
- primer;
- metal scissors;
- hacksaw;
- tape measure and pencil;
- screwdriver
Creating a frame is similar to what is prepared for drywall (only the profile is installed horizontally), and consists of the following steps:
- Guide profiles are installed in the corners.
- Places for mounting horizontal elements are marked on the walls and brackets are attached.
- The profile is inserted into the guide elements and fixed using brackets.
- In places where shelves or other furniture are installed, the profiles are reinforced with wooden blocks.
- Mark the panels and cut them to size.
- The profiles are mounted in the same way as in the previous case, only instead of glue to the frame they are fixed with self-tapping screws.
The popularity of siding when covering bathroom walls is explained by the fact that its installation is much easier and faster than ceramic tiles. If everything is done correctly, the result is a smooth, beautiful and practical surface.
Planning and marking
To quickly and correctly assemble the frame and mount the panels for installing the siding ceiling in the bathroom, you need to draw a diagram.
For this:
- Measure the length of all walls, the size of the corners, and enter all the data on the plan.
- Measure the distance between the ceiling and the level at which the siding is planned to be placed.
- Draw your plan, taking into account the pitch of the ceiling profile (80 cm) and the step of fastening the guides (30 cm).
Using a level, the lowest corner of the ceiling will be taken as the starting point. Retreat at least 5 cm from the main ceiling and place a mark on the wall. A horizontal line is drawn from this point along the entire perimeter of the room - the basis of the future frame. The distance may be more than 5 cm, especially if insulation or installation of spotlights is planned.
At this stage, if necessary, the ceiling is insulated. Next, lay the cable for the ceiling lamp.
Practical design of space with panels
A suspended ceiling in a bathroom is recognized as one of the most practical designs. The coating lasts for a long time without changing its inherent properties and external characteristics. The material provides high sound and heat insulation. However, installation requires the installation of sheathing, which will take up several centimeters of height. The installation of the panels itself requires experience and tools, which means calling a specialist, which affects the final cost.
Siding cost
The price of the material depends on its type, color scheme and texture. High-quality vinyl siding costs from $7-10 (650 rubles). If you order work from a company, then if you have your own materials for the frame and finishing, the craftsmen will require from $7 (400 rubles) per 1 m2. The price will be higher when laying out the cladding on high ceilings, in a patterned pattern. Turnkey finishing with laying out insulation, forming a frame, installing lamps and other work starts from $35-40 (2,300 rubles) per 1 m2.
Installing siding on the ceiling yourself will cost less. The profile for the frame costs no more than $15 (950 rubles) per 1 m2, complete with hardware and hangers, insulation can also be purchased cheap, tools are available at home or are available for rent, for example, a hammer drill for rent will cost from $2 per day. As for ceiling lamps, if the installation of wires does not require a separate power cable, then together with the devices the price will not exceed $2 (100 rubles) per piece.
Laying technology
When considering how to line a ceiling with siding, you should take into account that the form of laying is only on a frame made of wooden or metal elements. The choice depends on the purpose of the room. Wood is not recommended for use in rooms with high humidity; metal slats are acceptable for any room.
Advice! When using wooden beams, it is first dried well, then treated with a fire retardant, bioprotective impregnation and antiseptic, then dried again. Undried and untreated timber will quickly become unusable.
The frame formation technique is selected based on the type of base:
- If the base surface is made of wood, the frame is formed onto the base. Fixation with dowels, self-tapping screws on the plane itself, floor beams.
- Suspensions are used for arranging a frame on concrete floor slabs and when there are significant differences in the height of the ceiling plane. Using hangers, it is easy to adjust the evenness of the finishing layout.
To hide communications, wires, and lay out insulation, the frame structure is lowered to the appropriate height. The calculation of the indicator is simple - the thickness of the insulation or the size of the network pipelines plus the width of the base base for the lamp.
Multi-level plasterboard ceiling
The basis of this solution will be metal slats of various configurations and levels. They are sheathed with sheets of plasterboard with increased moisture resistance.
In this design you can hide electrical wiring, pipes, and irregularities. The sheathing is not afraid of moisture, temperature changes, or fungi. Attractive and presentable panels are easy to clean.
But at the same time, access to communications is blocked, the frame reduces the space, and partial repairs become problematic.