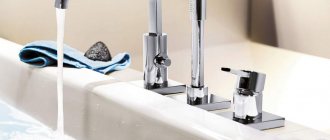
Poor water quality and long-term use cause rust stains, cracks and chips to appear on the surface of the bathroom. To completely replace a bathtub will require a lot of time and additional financial losses. The old product will have to be dismantled, and this is not always possible or advisable. Often, after dismantling the bathtub, it is necessary to carry out complex construction work to restore the previous appearance of the room.
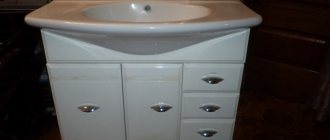
Old bath
Why is it beneficial to fill a bathtub with acrylic without dismantling it?
| Name of the breakdown | Cause and solutions |
| Damage to the lining around the bathtub | The bathroom walls are decorated with ceramic tiles, plastic panels, artificial stone and other modern expensive coatings. When removing the bathtub, they are necessarily damaged at the joints. It will not be possible to find materials of the same quality and appearance in the store; too much time has passed since their purchase. You will have to purchase finishing materials for the entire wall area or come up with various decorative inserts around the perimeter of the bathtub rim. Both the first and second options require quite a lot of money and time. |
| Drain and overflow problems | It is especially difficult to dismantle bathtubs in old buildings; all communications in them are made of cast iron pipes. In addition to the fact that there will be big problems with removal, you will have to solve the issue of connecting new systems. This is long and expensive and often requires the involvement of professional specialists. You will have to purchase additional plastic pipes, adapters, etc. |
| Large amounts of construction waste and dust | Completely replacing a bathtub means a lot of construction debris, dust and noise. It is difficult to live in an apartment during such work; you will have to look for temporary housing. |
| Long period of time | Replacement will require a minimum of two to three days. To fill a bathtub with acrylic, you need several hours for direct repair work, plus time for the material to harden. Can be done within a day. |
Even a cursory comparison of various bathtub repair technologies leaves no doubt which one to give preference to.
Restoration of bathtubs with acrylic - quick restoration of the surface
What is liquid acrylic for a bath
Liquid acrylic for baths
Stakryl - liquid for restoration
A two-component substance made from acrylates (esters) and hardeners. Acrylates are polymerized in special installations into polyacrylates and are colorless and odorless. Mineral dyes are added to give them a white color. For the production of liquid acrylics, butyl acrylates, the safest substances, are most often used. Sanitary control authorities have approved acrylic coatings for use in all premises without exception.
During mixing with the hardener, chemical reactions begin to occur, as a result of which new solid intermolecular bonds are formed. Strictly speaking, liquid acrylic for a bath is a particularly resistant polymer paint and has nothing to do with enamel. Comparing its physical properties with enamel coatings is a common but effective advertising trick by manufacturers. All polymeric substances and epoxy resins cannot be considered absolutely harmless to the human body. Coating surfaces with liquid acrylic is not enameling, but painting; this knowledge is needed to understand the technology of production.
Self-leveling acrylic
Important. Never use products from unknown manufacturers, they do not pass mandatory tests by government regulatory organizations and may cause skin irritation or deeper damage. In addition, such coatings do not have sufficient adhesion to the surface of the bathtub; after just a few months of intensive use, they will begin to peel off. And one last thing. In terms of hardness and resistance to mechanical loads, they are significantly inferior to products from licensed enterprises. Buyers are tempted by the low price of counterfeits, but the desire to save money by using low-quality materials most often leads to a double increase in costs. And this is at best; sometimes the consequences can be very sad.
liquid acrylic for bath
Varieties of acrylic enamel
Before purchasing acrylic, you should understand the variety of types of this product.
The materials have differences in composition. To get a good result, you need to be able to choose the right composition.
The acrylic mixture is based on a base substance and a hardener. All manufacturers include various components that improve the properties or change the color of the product.
Acrylic is sold in packages that are enough for one bath. How to mix the composition correctly is indicated in the instructions.
Before purchasing the product, you should study the composition of the material.
The following composition options are available:
1.Stacrylic is a flowing type of acrylic. This type is the first option to create a new restoration technology. The mixed components do not form a homogeneous mass, so the substance lies unevenly. It is not recommended to use a solvent for the product so as not to damage its structure and reduce the result to a minimum. Acrylic is sold in white, but using colors such as Epoxy-51 or Stakryl, you can change the shades.
The advantages of the coating are its long service life, which reaches twenty, its snow-white tint, and the high strength of the resulting layer.
The disadvantages are the long drying time - 4 days, but the suitability of the solution itself for work reaches only seventy minutes and emits strong odors.
Attention! The product is reliable and durable, but is not very convenient for use.
2.Lux – a more advanced type of composition, manufactured by Ekovanna. The drying time is twenty-four hours, has no pungent odor, and has high adhesive properties to the surface of the bathtubs. During application, the appearance of bubbles is practically eliminated, the material spreads well and is very plastic.
This type can only be mixed with colors of the same brand. The coating will last about fifteen years.
3.Plastol is considered the newest development, which is produced by a Russian-Slovenian company. The product is suitable for covering a bathtub with your own hands. The composition does not include solvent. The polymer composition is easy to apply, no bubbles or swelling are formed. The material hardens in 1.5 days, the acrylic layer lasts up to twenty years.
Important! Plastol is manufactured in accordance with European quality standards.
The composition can be used to coat bathtubs made of steel, plastic or cast iron.
If you follow the instructions strictly when applying, the positive properties of the material will manifest themselves in full.
It is recommended to buy materials for work only from well-known companies in order to avoid fakes. You should also observe the expiration date of the composition, since an expired product will not give a good result.
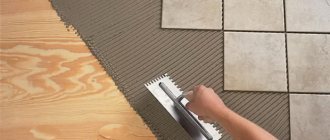
How to fill bathtubs with plastic inserts with acrylic
Plastic liners are used for quick repairs of bathtub surfaces. They are bought by size and simply inserted into them with glue. Advantages: minimal loss of time for repairs. Disadvantages - plastic liners peel off from surfaces and crack. Water gets into the free space, an unpleasant odor appears, fungi multiply, etc. Those who have already used plastic liners no longer have the desire to repeat their mistakes. An excellent alternative to liners is filling the bathtub with acrylic. But to do this, you first need to remove the old liner; this is not so easy to do. How to get it out with minimal damage to the surface?
Step 1. Review the state of the element. Pay attention to ways to seal the space between the wall and the bathtub. Most often, the detachment of the liner occurs at the bottom, where there are greater loads and an increased likelihood of water getting into the cracks.
Step 2. Remove the decorative element of the overflow hole. Do not turn off the drain yet; water trapped under the liner will flow through it.
Step 3. Remove the waterproofing between the bathtub edge and the wall. If the edging is made with a ceramic belt, carefully remove it. To do this, you need to pry up one edge with a sharp, hard tool, carefully increase the chipping force, and do not allow damage to the materials. If a plastic-based sealant is used, the work is simplified. The sealant can be removed with a knife or screwdriver; small residues can be scraped off or sanded. The seal must be removed; it holds the side of the liner in place.
Step 4. Prepare a grinder with a thin cutting disc. The most difficult work begins - cutting the plastic liner into small segments.
Acrylic liner. Dismantling
Important. Do not cut through the plastic all the way; you may damage the enamel coating. Make only grooves a few millimeters deep. It is difficult to regulate the cutting depth; you need to have extensive experience working with an angle grinder. First, tap the surface; there will be a dull sound in the areas of peeling. Start working with them. This way you will not only prevent damage to the enamel, but also find out the thickness of the insert.
During cutting, a through hole is sure to form in some place. Start removing the insert from there.
Step 5. Insert a screwdriver into the gap between the tub and the insert and carefully pry it up. The plastic will begin to crack along the cut lines, insert the screwdriver deeper and move it along the cracks. The hole has become wider - use a chisel or other tool with increased dimensions. Continue shooting each segment one at a time. If some areas are firmly glued and do not come off, no problem. Let the plastic break off around them, remove those parts that do not create great difficulties.
Removing the liner
Step 6. Only firmly glued pieces of plastic remain on the surface. Place a chisel at the contact point and lightly tap it with a hammer to remove them. Shallow scratches on the enamel or small pieces of an unremoved plastic insert are not critical; they will either be sanded off when cleaning the surface with sandpaper or simply covered with liquid acrylic.
Next, you need to follow the algorithm described above - clean the surface from dirt and calcium deposits, degrease, dry and cover with liquid acrylic for the bath.
Surface cleaning
Degreasing the bath
Pour acrylic onto the sides
Continue pouring
The bath can be used after 36 hours
Preparing the surface to be restored
The quality of a new coating significantly depends on the thoroughness and correct preparation of the surface to be restored. The work is carried out in a certain sequence.
Renovating an old bathtub
- The bathtub is thoroughly washed using specialized cleaning products.
- Remove the covers near the overflow and drain hole. These places must be cleaned with sandpaper. Particular attention is paid to areas with rust. If necessary, you can use an electric drill with an attachment (abrasive wheel).
- Defects are removed from the entire surface. The exfoliated enamel is removed with a spatula; not the slightest swelling should remain. All chips are sanded with sandpaper.
- Noticeable potholes are filled with putty. You can use epoxy resin or polyester quick-drying automotive putty, which is sanded after complete drying (≈ 20 minutes).
- After the preparatory work, the entire inside of the bath is washed with running water.
- Subsequent treatment with baking soda will allow additional degreasing. A solvent can be used for this purpose.
- Then a full bowl of hot water is collected, which is drained after ten minutes.
- The surface is dried. This operation must be done quickly to prevent cooling. You can use a hairdryer or wipe with a cloth. Make sure that no lint remains.
- A container of suitable size must be placed under the hole for collecting flowing acrylic. If it is not possible to place it under the drain from below, then the hole is sealed by sealing it with adhesive tape, and a small, suitable-sized container (for example, the bottom of a plastic cup) is inserted onto it flush with the bottom.
How to make a color fill
White bath color is considered universal, but everyone has their own preferences. Green ones look original, water seems warmer in yellow ones, etc. We will not touch on design issues, this is not our topic. Let’s just consider what methods can be used to make liquid acrylic for a bathtub colored.
Mixing base and color
There is nothing complicated. We sell a wide range of special additives in various colors. They do not affect the quality of the coating; the surface remains as durable and smooth. Buy the color you want and make the coating original. Saturation depends on the amount of dye. Only one condition must be observed - the additive is diluted in the main component before adding the hardener, and not vice versa. All components must be mixed very thoroughly.
Colored bathtub, restoration of bathtubs with liquid acrylic
Application
When purchasing liquid acrylic, it is important to consider certain nuances. The dark color of the hardener, from brown to red, gives an unpleasant tint to the coating solution. Coloring pastes from the same manufacturer will help you make the right choice.
It is better to determine the appropriate shade in the room, taking into account the level of lighting and the color scheme of the interior. It is better to stick to pastel colors; they remain unchanged over time.
Bright colors may gradually fade in patches. An important point: the volume of dye should be no more than 3% of the composition, so as not to violate the technical properties of the material.
You should not strive to buy liquid acrylic with a quick hardening period. In practice, a long-drying layer forms the strongest and most reliable coating with a long service life.
Restoration work is not recommended to take longer than 4 hours. Long stops and breaks are unacceptable. Experienced craftsmen can complete the coating in a couple of hours. But even beginners in this business should strive for accuracy and efficiency.
The bathtub is prepared in advance for restoration. Surface cleaning products required:
- sandpaper;
- brush;
- baking soda or other cleaning agent;
- putty knife;
- latex gloves.
First you need to clear the drain hole and the overflow area from all linings. There is no need to remove rust. It is enough to clean the bathtub with sandpaper and wash it with the addition of a degreaser.
If there are small cracks or potholes, you need to fill them with regular car putty. Clean and rinse again. The final stage of preparation is warming up the bath. It is enough to fill the container with warm water for 10-15 minutes, drain and dry the surface with a hair dryer.
Defects and ways to eliminate them
Unfortunately, they can occur in inexperienced craftsmen. Eliminating some will require a minimum of time, while others will require a complete refill of the bath. Sometimes it will be necessary to first remove the defective one. In this regard, we never tire of reminding you that it is easier to prevent all problems than to eliminate them later.
Bathroom restoration without mistakes
| Defect detected | Supposed causes of the defect | Remedies |
| Liquid acrylic slowly flows down vertical surfaces, the coating layer is too thick, and overuse of material is possible. | Viscosity too high. May result from prolonged or improper storage conditions. | Add xylene thinner. Add carefully, pour in portions with constant stirring. The consistency is determined by eye; for this you need to have practical experience. The area where the acrylic is laid down in a thick layer needs to be smeared with a spatula or brush, and then refilled. |
| On the surface there are types of joints between fills. | Gross violations of recommended technology. Several factors may be present at the same time: high temperature, long pouring process, too viscous material. | Refill required. You can use more liquid acrylic, this will reduce the amount of material while maintaining high quality coating. |
| After hardening, soft areas remained on the surface. | The ingredients are not mixed well. | You will have to remove soft areas and carry out repair work. Keep in mind that patch marks will always be visible. If not immediately, then after a short period of use they will definitely show up. The defective coating should be removed and a new one should be poured. |
| When it hardens, the surface of the coating wrinkles. | The percentage of hardener was violated, the temperature regime was not observed, and poor-quality mixing. | Requires a complete refill. The defective layer is first removed. Carry out all technological operations carefully. |
| Some areas began to peel off. | There are greasy stains on the surface of the bathtub. | You can try to repair problem areas, but it is better to immediately refill the bathtub. |
| There are yellow spots on the surface, and the hardness is good. | Ingredients are not mixed well. | You can try sanding and polishing these areas first. If the yellow spots have not disappeared, you will have to refill the entire surface. |
| Lumps and small roughness are visible on the surface. | The surface of the bathtub was poorly cleaned of solid particles; the work was carried out in a dusty room. | If the particles are small, they can be ground and polished. If after these steps the surface is not leveled, refill the bath. |
Practical advice
Never try to speed up the hardening of acrylic by ventilating the premises. Firstly, the material does not dry out, but hardens as a result of chemical reactions. Secondly, the longer the hardening process takes place, the better the quality of the coating. In this regard, it is not recommended to use quick-setting compounds. Thirdly, drafts can cause dust to enter the surface, and this is a very big problem. Fourthly, chemical compounds will get into all rooms, and this should not be allowed.
If you do not have a special device for mixing the components, then you can make it yourself. Moreover, it will work no worse, but better than the factory one. The fact is that the design features of the factory mixer provide for capturing liquid from the surface and directing it to the bottom. During this process, bubbles appear - an extremely negative consequence. The bubbles will then have to be removed. You can make a primitive stirrer from a piece of straight wire with a diameter of approximately 4 mm. Bend one end into a P shape, insert the other straight end into the cartridge and feel free to use a stirrer. Even such a primitive device is much more effective than manual mixing of components.
Do-it-yourself construction mixer from a screwdriver or drill using scrap materials
Never use mixture that remains near the sides of the container. In these places, mixing is always insufficient; acrylic has little hardener. As a result, soft areas will appear and will have to be removed and repaired or completely refilled. Don’t be afraid that there may not be enough mixture; the manufacturer provides a reserve volume. If for some reason it is not enough, then you can remove a little from the bottom with a rubber spatula and apply it to the right place. The thickness of the layer at the bottom always allows this to be done.
The better the surface is prepared, degreased and cleaned, the better the coating. Take your time, use all measures to prepare the surface of the bathtub for coating with liquid acrylic.
If you have any material left, do not expect that you will be able to save it for repair work. No matter how tightly the container is closed, chemical reactions cannot be stopped; the liquid will thicken in any case.
Liquid acrylic for bathtubs has good performance indicators, it’s true. But it is also true that it is much inferior in quality to enamel. Conclusion - use the bathroom carefully, do not allow heavy loads, protect from impacts and other mechanical damage. When cleaning, use only approved detergents.
Use the bathtub carefully
Detected drips are much easier to clean up immediately. Use clean rags or paper for this. Wipe off marks thoroughly and do not leave white streaks. You can’t wash it off with anything; work only with dry rags. It is advisable to work with gloves; acrylic that gets on your hands is difficult to remove. In addition, it may cause allergic reactions in some people.
If possible, dismantle the old bathtub completely. This will greatly facilitate the filling work, and it will be possible to ensure high-quality control of the coating and timely elimination of detected problems. There is no way to remove the bathtub - treat all technological operations very responsibly. Learn how to install a heated towel rail in the bathroom yourself using the link.
Features of material selection
When choosing enamel for bathtub restoration, pay attention to the expiration date of the product when purchasing. Acrylic compositions lose their characteristics during long-term storage. The result is loss of adhesion and rapid destruction of the restoration layer. The timing is indicated only on the basis; this indicator is not important for the hardener.
Key factors for buyers:
- Whiteness, color . Almost all compositions give a white coating. If you need color, it is better to entrust the selection of shade and tinting to specialists; it is difficult to find the right tone on your own.
- Presence of odor . You can’t do without it at all; the mixtures differ only in the intensity of volatile chemical compounds. Allergy sufferers, pregnant women and children are advised to leave the apartment or house while the bath is being updated.
- Ease of application . A professional can handle any complex material. The home craftsman should purchase less capricious acrylic.
The color of the coating also depends on the color of the hardener. If it is initially a bright orange, red or brown tone, yellowness will appear after polymerization.
While working, it is important to remember about the toxicity of acrylic: wear a respirator and gloves to avoid damage to the respiratory tract and skin
If you plan to update the bath yourself, take a look at easy-to-apply compositions - “Ekovanna”, “Plastol”. For professional use, you can choose “Stacryl” or FINNACRYL. They are more difficult to work with, but provide more reliable coverage.
Another important indicator is the drying speed. The smaller it is, the more the mixture contains plasticizers and hardeners, which increases the fragility of the coating.
Keep in mind that the bathtub will dry completely only after 3-4 days. It is advisable to wait and ensure the containers are properly dried indoors. If dust or debris adheres to the surface, the appearance will deteriorate.
Remember, to restore the attractive appearance of the bathtub, restoration alone is not enough. Careful operation and care of the surface is important.
The liquid coating technology has a practical alternative - an acrylic liner. A comparison of both options is provided here, we recommend that you familiarize yourself with the very useful information.