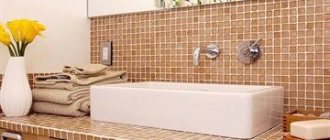
In the bathroom it is planned to install some furniture items, the main ones being a vanity unit.
Despite the fact that it is quite easy to purchase a cabinet in a store ready-made, some craftsmen prefer to make it themselves.
The advantages of making your own bathroom vanity include:
- the ability to select any manufacturing materials;
- make unique and original shapes;
- accurately choose the color scheme of the furniture;
- choose the dimensions of the cabinet yourself.
In this article we will look at how to properly make a sink cabinet with your own hands, so that it becomes the highlight of the room and delights all residents with functionality and practicality.
Variety of design features
Before making a vanity cabinet, you should carefully think through everything down to the smallest detail. According to the installation method, cabinets are divided into:
Hanging.
They are distinguished by their original appearance and ergonomics. Such models do not clutter up the free space and bring lightness to the interior. Hanging products are used in rooms where it is not possible to install a floor stand due to the characteristics of the room. Keep in mind that when making a hanging cabinet, you need to make sure the strength of the walls.Such furniture cannot be mounted on plasterboard walls..
- Floor-standing. These are the most popular and widespread models, which are distinguished by their functionality and ease of use. Floor structures are distinguished by their stability and the ability to accommodate various objects. For reliability, it is recommended to additionally fix the cabinet to the wall.
- Angular. They are available as floor-standing or hanging. As a rule, corner models are installed in small rooms, since they practically do not take up free space.
Also, bathroom cabinets differ in the type of washbasin. There are cabinets for:
- Recessed sinks. Here the washbasin cuts into the surface of the piece of furniture. When making it yourself, you need to make sure that there are no gaps between the sink and the countertop .
- Overlay bowl. It is attached to the surface of the structure, forming a small barrier outside the perimeter of the tabletop.
Features of the corner cabinet type
To save space in the bathroom, you can use a corner cabinet with a sink. Install a corner washbasin in the corner where the risers run, if the layout allows it. This will allow you to get rid of unnecessary connections to the washbasin.
The spacious shelves of the corner bedside table can significantly expand the possibilities of the storage system in the bathroom.
It is better to purchase a nightstand that has a table top, as this will give you an extra shelf for bathroom accessories. In addition, corner models, due to their depth, allow the use of fairly massive plumbing fixtures.
Selecting a material based on humidity
The quality of a piece of furniture directly depends on the materials used to make it.
Attention : when making your own sink cabinet, you should take into account that there is high humidity here. Therefore, the materials must be moisture resistant.
Various building materials are used to make a sink cabinet:
Tree.
Such furniture is distinguished by its nobility and aristocracy. But it will cost much more than products made from plasterboard or other lumber. In addition, when choosing a natural array, you must have certain skills in making furniture items . Since different types of wood have some difficulties in processing.If you choose wood, the assembled cabinet will delight apartment residents with its high technical qualities and luxurious appearance. To protect wood from increased moisture, the material will need to be treated with antiseptics and various impregnations. It is recommended to coat the finished cabinet with several layers of varnish or waterproof paint. This will protect the wood and add aesthetics to the furniture.
- Drywall. Such a piece of furniture will have an attractive appearance. The main thing is that assembling such a cabinet will not cost much at all. When choosing drywall, preference should be given to moisture-resistant sheets. But drywall also has its drawbacks. It is not able to withstand too much load and is quite fragile. It is not recommended to make the tabletop on the cabinet from plasterboard . More wear-resistant materials are suitable here.
- Plastic. This material is not afraid of moisture or sudden temperature changes. But it also does not differ in its ability to withstand heavy loads. Also, this material is easily scratched under the influence of negative factors and scale from water can form on its surface.
- Glass. This material looks stylish and trendy in modern bathroom interiors. Making a glass cabinet with your own hands is quite easy. The main thing is to purchase special glass that will be resistant to mechanical stress.
- Combined materials. When making an original cabinet, you can use several materials at once. For example, the tabletop can be made of plasterboard, the sides can be made of MDF, and the doors can be made of tempered glass.
After you have chosen the materials for making the cabinet, you will need to select the facing materials. Typically, people cover plasterboard, plywood or chipboard surfaces. Facing materials include:
Self-adhesive film.
It is distinguished by a wide range and ease of use. In addition to positive characteristics, such as a favorable price and a large selection of textures and colors, self-adhesive film also has its disadvantages, for example, a short service life.- Varnishes and enamels. Thanks to a large selection of paints and varnishes, the cabinet can be given absolutely any design. Showing their imagination, craftsmen can apply ornaments and patterns to the cabinet using a stencil. The main advantage of modern paints and varnishes is the absence of an unpleasant odor, durability and ease of use .
- Veneer. This finishing material is expensive. On the other hand, a cabinet decorated with veneer will practically not differ in appearance from furniture made from natural solid wood.
Materials used
Various materials are used for the cabinet and its component elements. When choosing, you should take into account the high level of humidity and the expected load.
There are several main options.
- Drywall. There are special sheets that are suitable for wet areas. But the material is fragile, and therefore will withstand only small loads. You definitely need a strong frame that will take the main weight of the sink;
- Tree. A wooden cabinet looks beautiful and expensive, but it also costs a lot. An unjustified investment, since specially treated wood is required for use in the bathroom;
- MDF. These sheets can fully replace wood. At the same time, MDF is not afraid of moisture, is very strong, durable and has good decorative properties;
- Plastic. No fear of moisture, low price. But over time it gets scratched, is too fragile, and is easy to damage;
- Glass. Stylish, original, but expensive and complicated. It is better to buy such cabinets from well-known manufacturers. Taking care of the glass in the bathroom will be very difficult;
- Combination. An excellent option for those who want to save money and use existing materials left over from a previous renovation or lying in the garage.
It is not difficult to choose the material for the main structure.
If the base itself does not have decorative properties, then it will need to be additionally coated.
See also:
Rocking chair made of plywood: do it yourself, simple and affordable
For these purposes use:
- varnishes;
- paints;
- enamels;
- films;
- veneer;
- stickers, etc.
The choice is huge. Basically, you just have to decide what color, structure or patterns the cabinet will be. And it’s not difficult to select materials for this.
Drawing with dimensions
Before you start making the cabinet, you will need to decide on its location. The dimensions of the furniture will directly depend on this.
Advice : experts recommend purchasing a sink before starting all work.
When calculating the size of the cabinet, the following measures are taken::
- the free space near the washbasin is measured;
- the sink is measured;
- the height of the sink is measured;
- measurements of communications are made (here it is important to pay attention to the length of the section with pipes, the diameter of the pipes and the dimensions of their exit from the walls).
After all these activities, you can begin to create a diagram of the future piece of furniture. Standard sizes:
- height – 820 mm;
- depth – 430 mm;
- width – 580 mm.
Preparatory work
Before planning the construction of a cabinet with your own hands, you need to carry out a number of activities that will facilitate and help resolve issues related to how, what kind and what to make a cabinet product from:
- To choose a suitable design, you need to decide on the location of the cabinet and sink in the bathroom. If the room is small, maybe you should think about a corner set or hanging options;
- check water and sewer lines;
- The design of the cabinet is chosen depending on the type and size of the sink that is planned to be installed, as well as on its method of fastening;
- Measurements are taken of the free space around the washbasin. Afterwards the sink itself and the height of its location are measured. You also need to take measurements of communication accessories, the length of the section with pipes, the size of their exit from the wall, the diameter of the pipes themselves;
- if you plan to make a cabinet with fastening it to the wall, you need to provide for cladding the section of the wall where the structure will be adjacent;
- based on all measurements, a diagram of the cabinet is created, in which it is drawn what parts it consists of and their sizes, as well as the height and size of the sink;
- after a sketch has been created, a location has been chosen, you need to decide on the materials for production;
- Having purchased and prepared the necessary materials, tools and other accessories, you can proceed to the installation process.
Tools required for making a cabinet:
- drill;
- hammer;
- electric jigsaw;
- screwdriver;
- hacksaw;
- pliers;
- screwdriver;
- sanding paper;
- roulette;
- pencil;
- chisel;
- grinder.
Manufacturing and assembly of the cabinet
Any vanity cabinet will consist of the following elements:
- Frame. As practice shows, it is most often assembled from timber.
- Top surface. Various materials are suitable here: plastic, drywall, glass, wood.
- Sidewall. They can be made of plasterboard or plywood.
- Component parts (shelves, drawers, hanging elements).
The process of making the cabinet itself will be carried out in the following sequence:
The individual components of the cabinet are prepared. First, patterns are made on paper, and then the dimensions of the parts are transferred to materials chosen by the master and cut out with a jigsaw.- First of all, the frame of the product is assembled. During this furniture assembly process, all elements are protected with sandpaper and treated with moisture-proofing agents.
- When installing an undermount sink, a hole is made in the countertop using an electric jigsaw. Next, the overlay strip for the top of the cabinet is cut out. It has a purely decorative role. Its dimensions should be calculated depending on the dimensions of the doors, so that there are no gaps or distortions between the decorative panel and the doors.
- Next, the sidewalls are attached to the frame using self-tapping screws and glue. The joints of the frame are additionally reinforced with metal corners .
- Now we install the sink into the countertop and adjust the frame of the cabinet to the washbasin.
- Next, you can proceed to installing the doors and other attributes of the bedside table (shelves and drawers).
- The last stage of assembly is installing the bottom. If the bedside table will stand on legs, the bottom will need to be attached at a distance of 10 cm from the floor.
Attention : the shelves are installed in the washbasin cabinet taking into account the size of the communication pipes.
To install them, special profiles or fasteners for shelves are used.
Design elements
[adv2]
If you want to make your own cabinet for the kitchen or bathroom on which the sink will be placed, there are no difficult tasks for skilled hands here. You need to develop a drawing, think through all the details and assemble the structure.
Moreover, such a cabinet necessarily consists of several main components. Namely:
- Frame. Usually made from wooden beams. You can also use a metal profile, and the sheathing can be made of plastic or plasterboard;
- Tabletop. The upper part of the cabinet, which serves as a tabletop, should be made of moisture-resistant material. You can use laminated chipboard, granite, artificial stone, etc. There are cheap and quite expensive materials. The main thing to remember is that the countertop will be actively exposed to water and moisture;
- Side designs. This is the trim for the sides and back wall. Again, it is better to take moisture-resistant materials. High strength is not needed, since the load on them is not strong;
- Shelves, drawers, doors and fittings. These are additional elements that provide the necessary functionality, zoning and access to the internal space. Don't skimp on accessories.
We have decided on this. Next you need to decide what materials you will use.
Some can afford to spend a substantial amount of money on the purchase of expensive material. Others have to look for solutions in the budget segment. But everyone can get what they need with the current assortment.
Installation
After manufacturing and assembling the sink cabinet, you need to install the washbasin in the cabinet. Before starting this process, the sink is assembled with all its components (siphon and mixer).
Also at this stage, the water pipes are connected to the mixer, and the mixer itself is fixed. Once the sink is fully equipped with all its components, you can install it on the cabinet.
Next, the washbasin is carefully treated with silicone or sealant along the edge.
Depending on the type of design of the cabinet, it is hung on the wall or simply installed in a pre-prepared place. Now all connecting seams are treated with sealant and after a day you can begin finishing decorative work. If the cabinet was made of plasterboard, then it can be decorated with mosaic tiles or covered with self-adhesive film.
Tip : You can also add a functional cabinet to your bathroom. And, tired after work, relax on a comfortable sofa or armchair.
What you need to know to create a sink cabinet with your own hands
Today, there are 4 main types of washbasins that require a cabinet: built-in, semi-built-in and surface-mounted.
The design of your future bedside table directly depends on which sink you choose. Thus, a built-in washbasin for a bathroom is mounted under a special countertop, which as a result will slightly overhang the cabinet. As with semi-recessed sinks , you need to cut a hole for it in the cabinet lid, because it will be located inside it. In the photo below you can compare these types of sinks installed on bathroom cabinets with your own hands.
The other two types of sinks are less fancy and can greatly simplify the process of creating a vanity cabinet. The first of these is a ready-made sink with a countertop , which is simply laid over the base of the furniture. There is no need to cut any holes - the cover is simply removed, as you can see in the step-by-step instructions in the following photo:
Finally, a cabinet for an overhead sink in the bathroom will be especially good to create with your own hands, since you can easily turn any old chest of drawers or table into it. At the same time, there will be much more space inside such a bedside table than when it has to accommodate most of the sink. And the modern design of overhead washbasins is very pleasing.
We've sorted out the sinks, and now as for the design of the bedside tables for them:
- You can make a wood cabinet from scratch, although remodeling and restoring an old chest of drawers, table or kitchen cabinet will be much easier;
- Wall-mounted vanity cabinets, like cabinets with high legs, simplify the process of cleaning the bathroom and make the interior look larger;
- A closed cabinet or chest of drawers will hide all plumbing fixtures and pipes, and also provide you with additional storage space;
- A table or cabinet will make the pipes visible, so you will have to worry about their design. Traditional white plastic does not look very aesthetically pleasing and its appearance only deteriorates over the years. But metal pipes can give your bathroom additional shine and charm.
Pros and cons of making your own cabinet
When making furniture yourself, you can plan the design according to your own taste, take into account the size of the room and the subtleties of the placement of communications, as well as many other factors. This will result in a more practical and profitable option for many reasons:
- Significant budget savings. The finished product will undoubtedly cost many times more, and you can often overpay just for the brand.
- You can also save on labor fees, since furniture manufacturing services are also not cheap.
- Choose any material at hand or the most suitable material, according to your discretion and pocket.
- Gain or hone your own skills, realize the most daring and creative ideas: equip the bedside table with additional shelves, niches or hanging structures.
Making your own cabinet has both pros and cons.
There is also a flip side to the coin - the disadvantages of making a kitchen set include the following:
- It is required to have at least minimal experience and skills in many areas: carpentry, carpentry, plumbing and the ability to develop drawings.
- You may need to purchase or rent expensive equipment: an electric drill, a circular saw, etc.
But if the master expects to continue making furniture on his own, any financial investment will definitely pay off. Of course, the first steps are taken by trial and error, so it is better to start with simple designs and not the most expensive material. Even if you have to redo it, the damage will not be so great.
Photo
Ideas for the final design of the resulting result can be seen in the following photos:
Types of cabinets
Before preparing drawings and creating a cabinet for your washbasin, you need to think about what kind of design you want to see in the bathroom.
Depending on the method of installation of the cabinet, they can be divided into several categories.
- Floor-standing. A very popular and widespread option. It occurs more often than others. The easiest to make, yet functional and attractive;
- Hanging. It is also in demand, but it is somewhat more difficult to install. But under it you can maintain cleanliness, which is important;
- Corner. In turn, it is divided into suspended and floor-mounted. Suitable for small spaces as it takes up unused space and also visually expands the bath.
Also, the progress of the work will be influenced by the fact which washbasin is used.
There are 2 options being considered here.
- Recessed sinks. The cabinet under them should have a corresponding cutout where the washbasin will be inserted. When making it, it is important to carefully cut the hole to avoid gaps;
- Overhead bowls. They are easier to install, since you don’t have to cut the tabletop of the cabinet. Beautiful and original.
To finally make a decision, you can look at photos and videos of options for making a bedside table. Think carefully, since the design is not created for several months.
Whether it will be a cabinet for an overhead sink or for a more classic mortise bowl, decide for yourself. We are moving on.
The nuances of choosing a sink
When making a kitchen cabinet for a sink with your own hands, you need to pay attention to the existing types of sinks:
- When using overhead sinks, the cabinet is considered a separate additional element. The sink is placed on the top of the cabinet; this sanitary fixture is fastened to the edges of the furniture. Any user can handle this installation option. How to attach a sink to a kitchen cabinet? You should simply place the sanitary fixture on top of the furniture.
- Many city apartment owners are trying to figure out how to attach a sink to a cabinet in the kitchen if it is built-in. In this case, it is necessary to cut a hole in the tabletop according to the dimensions of the product. These operations are carried out using a jigsaw according to a pre-designed diagram and markings. To prevent moisture from entering, the seams are coated with a sealant compound, silicone. Tabletops made of wood, chipboard and MDF are suitable for insertion. You will not be able to cut countertops from natural or artificial stone yourself. In this case, you need to seek help from specialists.
Important ! Particularly noteworthy are integrated products, in which the sink and bedside table form a single whole. Such elements can be purchased to order according to user-suggested sizes.