For high-quality laying of tiles, a flat plane is required, without dents or bulges. The surface of aerated concrete masonry is usually quite flat, which makes it possible to perform cladding without preliminary plastering of the surface.
Laying tiles is a process that requires compliance with technological rules, otherwise the cladding will not stay on the base. The main condition for a high-quality result is the presence of a flat plane, providing a neat and attractive coating. As a rule, walls made of piece materials are pre-plastered in order to eliminate defects and obtain a high-quality base. However, the masonry of aerated blocks itself is a fairly high-quality and even surface, especially if it was carried out by qualified workers. Therefore, to seal small surface imperfections, the thickness of the adhesive layer used when laying tiles should be sufficient. But does this work in practice, will the tiles peel off from the specific material? Let's take a closer look at this issue and understand the intricacies of aerated concrete cladding.
General rules for laying tiles
Tiling surfaces is usually carried out using the same technological schemes. Laying tiles is a sequence of certain actions that give an optimal result. Regardless of the base material and other work conditions, the following requirements must be met:
- a flat surface of the base that does not have height differences (protrusions are especially undesirable);
- the wall must be thoroughly cleaned of dust and construction debris resulting from preparation or as a result of other previous procedures. This will allow you to obtain maximum adhesion of the glue to the surface;
- for better contact between the glue and the wall, it is necessary to apply a layer of primer, which ensures a better connection of materials;
- the adhesive layer must be continuous and uniform in thickness;
- all materials used must be of sufficiently high quality and correspond to each other in terms of technical indicators.
These standards must be observed in any case, since they provide the necessary conditions for high-quality installation of tiles. However, during the execution of work, difficulties often arise due to the specific nature of the foundation. For example, aerated concrete is a hygroscopic material that actively absorbs moisture from adhesive solutions. Therefore, working with it using only general rules is inappropriate. The conditions for crystallization of the glue are changed, therefore, often the lining does not stick to the base and peels off. Therefore, before laying tiles on aerated concrete blocks, it is necessary to perform a number of preparatory steps.
As a rule, before laying the cladding on masonry made of piece materials, preliminary plastering is performed. This requirement is due to two factors:
- the surface of the masonry is usually replete with small flaws, there are many seams or potholes on the edges of the blocks;
- the plaster layer has good adhesion to adhesives and provides optimal adhesion for cladding.
However, applying plaster is a labor-intensive process that changes the configuration of the walls and changes the position of its planes. If you also take into account the thickness of the tiles and the adhesive layer, the changes can be quite large. Sometimes this is unacceptable - plumbing fixtures are recessed into the wall, or pieces of furniture and household appliances do not fit into the reduced partitions. In addition, the surface of aerated concrete itself is quite smooth and does not require additional geometry adjustments. If we also take into account the work time, labor costs and cost of materials, the need to apply an underlayer comes into question.
Therefore, many craftsmen try to lay tiles on aerated concrete without plaster, with minimal preparatory treatment of the walls. This is fully permitted by technological standards, but requires taking into account the properties of the material and performing certain actions to ensure a strong connection of all materials.
Facing aerated concrete blocks with facade tiles
Let's move directly to the features of bonded masonry cladding made of autoclaved aerated concrete. How can you effectively protect the base from getting wet?
Research has shown that for this it is necessary to use a special “formula” that allows one to estimate the parameters of the vapor flow.
- Vapor flow passing through the entire layer of facing material = flows passing through the tile + flows passing through the seams.
- The specific flow, in turn, depends on the ratio of decorative elements and the area of the seams.
When facing with facade tiles, air exchange occurs mainly through the seams - this is why the durability of the finish is so strongly influenced by their area (at least 25% of the total area of the walls) and the quality of workmanship (it is necessary to use reinforcing mesh when installing the tiles).
With correct calculations and installation, in the summer all condensate formed has time to dry, and moisture does not cause any harm.
When to finish?
Several options are possible.
- After the masonry loses the main volume of water - that is, after 2-3 months. In reality, even more time usually passes, since the cladding is most often simply postponed to the new construction season.
- Immediately after the completion of masonry construction . However, in this case, everything is not so simple - you first need to putty the outer walls with special sanitizing compounds and ensure the highest possible vapor permeability.
There are also requirements for temperature conditions - the ideal range for finishing aerated concrete with tiles is from +5 to +26 °C. Otherwise, you will need to purchase special mortars that protect against overdrying.
Technology of facing blocks from autoclaved aerated concrete
Let us give as an example one of the options for installing clinker facade tiles on masonry made of autoclaved aerated concrete.
- Preparation of aerated concrete . The base is covered with two layers of primer and one layer of plaster, approximately 15 mm thick. After complete drying (about 2 weeks), another coat of primer is applied.
- Installation of the base facing layer . First, a 5 mm layer of plaster is applied to the masonry along with a reinforced reinforcing mesh. The mesh is laid overlapping. It is recommended to use additional strips at the corners of door and window openings - this will avoid the occurrence of cracks and other defects.
- Installation of facade tiles . The composition is applied in a layer of at least 3 mm - not only on the plastered wall, but also on the surface of the tile.
- Filling seams . This stage can be started no earlier than after 2 weeks. It is important to choose a solution suitable for the appropriate type of tile (rough or glazed).
As a conclusion, let’s look at the question: is it necessary to additionally insulate walls made of autoclaved aerated concrete? The need for additional insulation may arise only if the aerated concrete masonry has a thermal resistance of less than 2 m²×C/W (when using D500 grade gas blocks with a thickness of 300 mm or more).
Otherwise, you can add an insulating layer of mineral wool or any polymer insulation. The main thing is to correctly calculate the thickness of the layer - it should, under any circumstances, provide at least half of the total value of thermal resistance. This is an important condition to avoid waterlogging of the concrete behind the insulation.
Features of aerated concrete that you need to know about
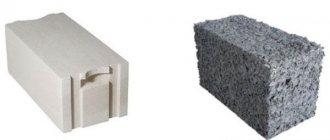
Aerated concrete is a lightweight and warm building material. He received these qualities thanks to the porous structure that appears at the production stage. The composition of the material contains the usual components of dense concrete - sand, cement and water. However, there are additional components that contribute to gas formation - aluminum powder and lime. It is they that, in the presence of water, react with the release of carbon dioxide. When all the components are mixed, the mass is placed in molds and allowed to mature for a certain time. The reaction of aluminum powder with lime begins, the mass swells and rises, like dough. The volume of the material increases due to a huge number of carbon dioxide bubbles measuring 2-4 mm. After the reaction is completed, the mass is removed from the mold, cut into blocks and sent for finishing treatment with hot steam under pressure (autoclaving).
The resulting material differs significantly from conventional grades of concrete. The porous structure makes it warm and light, but there are also negative qualities - aerated concrete is quite soft and fragile, as well as a hygroscopic material. These qualities must be taken into account when performing finishing work, since in the preparation process it is necessary to use intermediate compounds. Some of them (for example, the well-known “concrete contact” primer) create a significant tightening force on the surface, often leading to rupture of the top layer. It results from excessive application of primer (2 layers is already too much for aerated concrete).
In addition, the ability to actively absorb water (hygroscopicity) makes aerated concrete unable to work with conventional tile adhesives. The adhesive layer applied to the wall rapidly loses water, which changes the crystallization conditions. The strength of the layer is lost; it is not able to fully hold the cladding. In some cases, the result is complete peeling of the tiles and a loose and crumbling adhesive layer.
Another working point that you need to know about when finishing aerated concrete is shrinkage. In the first 6-18 months after completion of construction, the material cannot be finished. It shrinks - changes linear dimensions, takes on the load and gives off excess moisture. Any work performed during this period may be spoiled, as the base changes its parameters. The connection of materials is broken, the surface is covered with a network of cracks and does not hold the adhesive layer. Therefore, tiles can be laid only after the shrinkage processes have been completed.
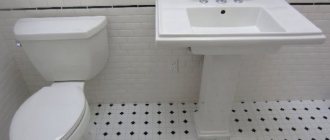
Features of the premises
As a rule, tiles are used to decorate the walls of bathrooms, bathrooms and kitchens. All these rooms are classified as wet, i.e. they contain an excess amount of water vapor. This means that aerated concrete walls will absorb moisture, accumulating it in the pores. Even if these rooms have one (rarely two) external walls from which steam can escape to the outside, the remaining walls are internal. There is nowhere for moisture to escape from them; it will gradually accumulate and destroy the aerated concrete.
Such processes are possible if you do not pre-treat the surfaces and cut off possible contact with water vapor. Tile itself is a good waterproofer, but the seams between individual elements can allow steam to pass through. Therefore, it is necessary to organize the cutting of aerated concrete and apply a layer of special impregnation to it, making the surface impermeable to moisture. This procedure will not only help avoid getting the walls wet, but also promote normal hardening of the adhesive composition. Water from it will not go into the wall, which will ensure normal crystallization conditions.
Since the structure of aerated concrete is porous, there is no reason to worry about poor adhesion of the adhesive to the wall. However, if there are concerns, additional primer can be used to improve adhesion.
Laying tiles in residential (dry) premises does not require special measures to cut off aerated concrete from atmospheric moisture. here only measures are needed to ensure adhesion and eliminate excess water absorption from the adhesive composition. These goals are easily achieved by applying a coat of primer. Sometimes they resort to applying a preparatory adhesive layer (without tiles). It is made thin, as experts say - “to tear off”, only to obtain a contact base. This cannot be called plastering, since no leveling or flattening is done here. However, you can simultaneously repair some defects in the masonry, eliminate waste areas and get rid of cold bridges.
Laying tiles outside
Tiling walls made of aerated blocks can be done not only from the inside, but also from the outside. This is a good option for installing a protective coating that protects aerated concrete from contact with rain or melt water. However, direct wall cladding is allowed only when finishing non-residential premises, otherwise the process of removing water vapor present in the atmosphere of residential premises from aerated concrete is disrupted.
The installation technology is practically no different from standard methods. Preliminary plastering of the surface is not necessary if the masonry is done by a qualified craftsman and does not have differences in heights or flaws. Small potholes can be sealed with an adhesive layer. The main task will be the correct choice of tiles and adhesive mixture, as well as preliminary surface preparation. For this purpose, water repellents, impregnations and primers intended for use in these conditions are used.
In addition, climatic conditions must be taken into account. They are important both for installation (usually it is carried out at air temperatures from +15° to +35° in dry, windless weather) and for the further operation of the cladding. The tile gets very hot from the sun's rays, has high thermal conductivity and contributes to the creation of sudden temperature changes. This becomes a serious test for the adhesive layer, therefore, it is recommended to choose compounds that can withstand such changes. If there is no confidence in their suitability, you can use polymeric materials - liquid nails or titanium-type polyurethane adhesive. These compositions are elastic and tolerate all temperature fluctuations well. In addition, they are reliable and connect well to almost all types of bases, including aerated concrete.
Is it possible and how to properly lay tiles on a foam block?
Correctly laid tiles on a foam block or aerated block can increase the strength and moisture resistance of the structure. And such work is most often performed on the walls of bathrooms and kitchens, also providing decoration for their interior.
Foam blocks are a building material characterized by high heat and sound insulating properties, lightness and a relatively affordable price. That is why they are increasingly used for housing construction.
However, in addition to its advantages, the material also has a small drawback - the need for finishing that can preserve its characteristics and increase its service life. The internal surfaces of blocks in living rooms require plastering and painting.
And sometimes it becomes necessary to lay tiles on a foam block - both in order to protect the enclosing structures from high humidity, and to decorate the interior.
Glue selection
Before purchasing tile adhesive, you should pay attention to its increased elasticity. And when choosing a method for laying tiles on foam blocks in the bathroom, pay attention to such a characteristic as resistance to high moisture. For the working wall in front of the kitchen stove, you should give preference to tiles, the operation of which is possible at elevated temperatures.
Suitable materials for finishing dry rooms (corridors, living rooms or offices) are compositions based on a conventional cement-sand mixture of type CM9. And among the special options for tile adhesive, mosaic adhesive stands out separately, intended for sticking mosaics on walls. Due to the presence of white cement in the composition, this material does not have its own shade and provides increased strength of the cladding.
Before preparing foam blocks for tiles, you should evaluate the evenness of the wall surface. If the foam concrete laying was done correctly, practically no additional finishing is required. If there are significant irregularities, the contractor will have to do serious work preparing the base and plastering the foam block.
Since the foam block strongly absorbs moisture, it is ideal for wet rooms to waterproof the walls and ceiling.
The next stage is priming the blocks. For this purpose, specialized materials are used, and a wide range of primers is available. When decorating bathrooms, it is worth additionally waterproofing the walls; in the kitchen such work is not required.
Having finished with the preparation, they move directly to the question of whether it is necessary to plaster the foam block under the tiles - as a rule, they choose the option with plaster, which is more expensive, but also provides increased strength to the walls. Tile adhesive is quite suitable for these purposes.
Having plastered the surface on which the tiles will be laid, proceed to the main part of the work.
The first stage of laying tiles on a foam block or aerated block (the principle of gluing ceramics to both materials is the same) is preparing the solution. To do this, add a dry adhesive mixture and water to a pre-prepared container, mixing them using a hammer drill with a special attachment. Mixing proportions are usually indicated on the glue packaging.
Despite the instructions for preparing the adhesive mixture, it is advisable to independently control the mixing process. The finished substance should not be too liquid and without lumps, but also not very hard, so as not to impair the adhesion of the tiles and the wall.
Continuing work, you should:
- Apply the prepared adhesive mixture using a notched trowel;
- Place the first tile against the wall and press firmly;
- Check the horizontality of the material with a level and, if necessary, level the tiles. It takes no more than 10–15 minutes to level the tiles after applying the adhesive. If this time is over, the glue should be removed and reapplied;
- Repeat the same steps for the next tiles. In order to leave tile seams of equal thickness, plastic crosses are used;
- If it is necessary to cut tiles, use a tile cutter, running the cutting part of the tool along the marked surface of the tile;
- Plastic corners are placed in the corners of the room to ensure even seams. And to bypass the water, gas and heat supply pipelines, holes are cut in the tiles.
After laying all the tiles and drying the material (about 24 hours), the crosses are removed and grouting is done. The material for these works is selected to match the tone of the tiles. Excess grout is removed with a sponge. And after 2–3 hours, the lining is wiped again, removing traces of the grout mixture. This completes the tiling of the foam block.
By deciding whether it is possible to glue tiles onto foam blocks, and by giving preference to this option, you get high-quality finished walls, the repair of which may not be done for many years. At the same time, the surface of the enclosing structures is reliably protected from external influences both with the help of plaster and tiles. And such a result can be achieved only with the help of a responsible attitude to work and strict compliance with all requirements.
: Plastering and puttying of aerated concrete WE BUILD FOR OURSELVES: Laying tiles in the bathroom - part 2/Exhibiting the first row: Plastering aerated concrete, preparing the base
Homeowners who are renovating a foam block house often have a question about whether it is possible to lay tiles on a foam block. The answer to this is positive - however, due to the increased fragility of such a base, pieces of material may begin to fall off along with the tile over time. This situation is prevented by first using a primer and then plaster or special tile adhesive.
Most often, the need to lay tiles on foam blocks arises when finishing the enclosing structures of a bathroom and kitchen. Indeed, in addition to the fact that the humidity here is noticeably higher than in other rooms, there is a possibility of water getting on the foam concrete and, as a result, destruction of the blocks and the appearance of mold.
We invite you to familiarize yourself with the description of the stages of building a bathhouse from blocks with your own hands with video
It is worth noting that ceramics can also be laid on the floor in such rooms, however, work with foam blocks is carried out only when finishing the walls.
High thermal insulation rates, lightness and affordable price characterize the properties of aerated blocks. Due to its characteristics, cellular material is in demand in the construction industry.
For facing façade walls, putty and special paints are often used. Clinker tiles are laid on the gas block according to the manufacturers' recommendations. It is simultaneously a facing and protective layer of the base.
Proper installation will increase the strength and moisture resistance of the structure.
Home owners often ask whether it is possible to glue tiles onto gas silicate blocks. When facing walls outside or inside a building, it is necessary to take into account the following features:
- High vapor permeability. When there is a difference in outside temperature and a warm room, accumulated moisture is absorbed into the walls. This occurs due to the structure of aerated blocks. Covering the surface with ceramic tiles contributes to the accumulation of moisture due to poor ventilation. Accumulation of factory humidity and wet construction work must be taken into account.
- Relatively low flexural and compressive strength. Depending on the brand of gas silicate block, it is B3.5-B5. During construction, the basic rule is followed: all subsequent finishing layers on a stone structure are durable if the strength is less than or equal to the base.
- Preliminary surface preparation. To level the surface, use only special compounds. A mixture that meets the following requirements is suitable:
- The deformation parameters of cellular concrete and plaster must be the same.
- The plaster mortar contains additives that form a porous surface.
- High moisture retention rates. For this purpose, plasticizers are added to the composition.
The purpose of interior decoration of a house made of aerated blocks is to reduce the permeability of walls from the room side. To ensure that the product adheres well to the surface, it is recommended to use a primer and then plaster or tile adhesive.
Tile selection
To maintain a good indoor microclimate and decorative finishing, tiles, bricks, artificial or natural stone are used. Facing material has a number of advantages:
- Large selection of products in texture, color, shape. You can create a unique interior.
- No finishing plaster required.
- Good vapor barrier is easy to achieve.
- Due to the additional finishing layer, thermal insulation is improved and the penetration of extraneous noise is prevented.
- The shortcomings of walls made of gas silicate blocks are hidden.
Block decorative masonry also has negative aspects:
- Wrong choice and poor-quality masonry leads to the material lagging behind the surface.
- The room must have good ventilation.
- The use of thick decorative blocks reduces the usable area.
When choosing tiles for a bathroom or kitchen, you need to take into account the volume and height of the ceiling. Laying tiles on a gas block in a small room from floor to ceiling visually reduces the area. Therefore, it is recommended to leave at least 40 centimeters from the upper ceilings and use a square shape measuring 100x100 millimeters.
The selection of decorative blocks depends on the size, furniture and style of the interior.
Glue selection
It is difficult to unambiguously determine the best adhesive composition. The choice is influenced by many factors. Any glue is suitable for work inside the house. The exception is the bathroom. Due to the high humidity in the room, you should choose an adhesive composition with high elasticity and resistance to water.
In the bathroom, the seams between the tiles must be sealed with waterproof grout. This will help prevent the formation of mold and mildew.
Before installing finishing tiles on interior walls, you should evaluate the evenness of the base. Properly executed laying of gas silicate blocks requires minimal preparatory work. Only the surface is primed. The solution deeply impregnates the gas blocks and a more durable base is obtained.
- increase the adhesion of the subsequent layer;
- prevent the formation of fungus and mold;
- increase the durability of the repair.
In case of significant defects (deviation is 0.5-1.0 centimeters), the walls will have to be plastered. The surface is covered with waterproofing paste. Each layer must dry well. Then, using plaster: gypsum, cement-sand, lime, the base is leveled. To strengthen the base, use fiberglass or metal mesh.
Possibility of installation
Glue selection
The choice of adhesive composition must take into account the characteristics of the room. If you plan to install it in the bathroom, you need a composition with plasticizer additives to obtain an elastic tile-block bond. There are two types of tile adhesive suitable for laying aerated concrete:
- cement-based compositions;
- polyurethane adhesives.
Cement-based adhesive is made from the same materials as aerated concrete. This means that adhesion to the material must initially be good. Many experts claim that aerated concrete can be laid on tile adhesive without any undesirable consequences. However, gas blocks are made by different manufacturers who use their own fillers and additives to the base composition of the material. Aerated concrete and adhesive mixtures may contain various additives - plasticizers, modifiers, etc. These components sometimes conflict with each other, react or, conversely, stop it. Therefore, it is recommended to carefully study the instructions on the packaging. In particular, it is necessary to check whether this composition is suitable for laying tiles on aerated concrete.
A special feature of tile adhesive for aerated concrete is the presence of moisture-retaining additives (the same ones that are present in masonry adhesive for aerated concrete blocks). Some craftsmen use building mixtures for aerated concrete to lay tiles, which are quite capable of holding the cladding.
Polymer adhesive is universal and suitable for laying tiles on any substrate - wood, metal, concrete, etc. In this regard, the material is preferable to cement mixtures. In addition, synthetic glue is sold ready-to-use, which significantly speeds up the work. However, its consistency does not allow it to compensate for differences in height or to repair surface imperfections. The glue flows, so you need to apply it in sufficient, but not excessive quantities.
There is polyurethane adhesive in the form of foam. It is sold in cans and looks like polyurethane foam. It's easy to work with, but you have to get used to it and apply enough glue so that it doesn't come out of the seams. This is an important point, since cleaning gaps is a labor-intensive and time-consuming procedure that requires accuracy and thoroughness.
Most finishers prefer to work with cement compounds. They are more familiar and have a long shelf life. During work, there is no risk of staining the floor or other surfaces with indelible drops of glue. In addition, cement compositions are much cheaper, which often becomes a key factor in the choice of material.
Is it possible to lay tiles on aerated concrete blocks?
Aerated concrete is a fairly convenient material to work with, as it has large dimensions and is light in weight.
However, when laying it, it is still necessary to follow a certain technology, otherwise the structure will not be strong enough and durable enough. Therefore, next we will look in detail at how to lay aerated concrete with your own hands. Laying aerated concrete
General information
Laying walls made of aerated concrete has recently become very popular due to the cost-effectiveness of such construction. The price of this material is much lower than, for example, brick.
In addition, aerated concrete has many other advantages:
- Possibility of arranging a lighter foundation;
- High speed of wall construction;
- The blocks have a precise geometric shape, which allows them to be laid almost close to each other (when using glue).
- Environmental friendliness;
- Good thermal insulation properties;
- Vapor permeability;
- Durability – a structure made of aerated concrete does not lose its properties for at least 100 years;
- Fire resistance;
- Frost resistance;
- Resistance to biological influences - this material does not have the ability to accumulate mold, fungi or other microorganisms.
| Porosity, resulting in increased moisture permeability. | To eliminate this drawback, the structure is waterproofed, in particular, a waterproofing layer is laid on the foundation. |
| Tendency to cracking. | If construction technology and reinforcement are followed, cracking ceases to be a problem. |
Adhesive for aerated concrete
Glue or solution
There are two ways to lay aerated concrete:
- For ordinary cement mortar;
- With special glue.
As a result, builders often face a question of choice. It should be noted that the thermal conductivity coefficient of cement mortar and glue is higher than that of blocks. Accordingly, the thermal conductivity of the walls will depend on the thickness of the seams.
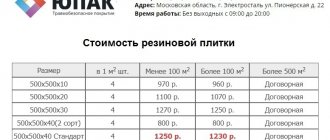
When using cement mortar, the thickness of the joints is at least 6-10 mm. When using glue, the thickness of the seam can be 1-3 mm.
Of course, the cost of glue will be higher, so at first glance it may seem that when using it, the cost of laying aerated concrete blocks will also increase significantly. However, due to its insignificant consumption, the costs actually practically do not increase, and the structure turns out to be warmer. It follows that it is more advisable to use special glue than cement mortar.
The easiest way to build walls is to invite specialists. However, the cost of laying aerated concrete blocks is quite high. Therefore, it makes sense to do the work yourself, having first familiarized yourself with all its nuances.
So, the laying is carried out in several stages:
- First of all, the foundation is prepared;
- A solution (glue or cement) is made;
- Blocks are laid.
Now let's take a closer look at all these stages.
Waterproofing concrete
First of all, it is necessary to ensure a flat foundation surface. If there are serious bulges or irregularities, they must be eliminated. In some cases, even cutting reinforced concrete with diamond wheels can be used.
As mentioned above, before laying aerated concrete blocks, it is necessary to waterproof the foundation. To do this, you can use waterproofing polymer-cement compositions or rolled bitumen materials.
Advice! When preparing the foundation, it is necessary to make holes for communications. If they were not provided for during pouring, diamond drilling of holes in the concrete should be used.
To prepare cement mortar you will need M300 cement and sand. First, the dry ingredients are mixed in a ratio of 1:4, and then water is added to the mixture and the composition is thoroughly mixed.
If glue is used, then water is added to the dry mixture and mixed thoroughly with a mixer. Detailed instructions for making the solution are available on the packaging.
Applying glue to a concrete block
Laying blocks
So, the construction of masonry from aerated blocks is carried out in the following order:
- First of all, the material must be cleaned of dust, dirt, snow, etc. Blocks with loose areas should be set aside. They can be used as additional elements by cutting them with a regular hacksaw.
- The laying of blocks begins from the corners and is carried out in rows along the entire perimeter. To do this, glue or mortar is applied to the base using a trowel, after which the block is installed. If the wall is plastered on both sides, then the vertical seams between the blocks are not filled, but if at least one side is dry finished, the seam is half filled with mortar.
When laying blocks, it is necessary to ensure that the rows are horizontal using a building level. You can also stretch the thread horizontally, which will serve as a guide.
In the photo - reinforcement of aerated concrete masonry
- The second row is performed with dressing, the displacement should be 8-12 centimeters.
- Every 3-4 rows of aerated concrete should be reinforced with two reinforcement rods with a cross-section of 8 mm. To lay the rods in the blocks, grooves should be made. It must be said that at the corners the rods should not bend at a right angle, but with a rounding; accordingly, the grooves should also be made rounded.
- After the box is ready, the walls are finished. There are a lot of options, for example, you can lay tiles, plaster or use “dry” technologies.
Finishing - laying tiles on aerated concrete
Advice! If it is necessary to make stiffening belts, for example, under window openings or ceilings, you can use U-shaped blocks, into the tray of which reinforcement is inserted and then the solution is poured.
Here, perhaps, are all the main nuances of laying aerated concrete.
The technology for laying aerated concrete blocks is quite simple, however, it requires strict adherence. Therefore, the most important thing when building with aerated blocks is accuracy and adherence to the above sequence.
You can get more information on this topic from the video in this article.
Recently, brick as a building material has been gradually losing its position under the pressure of more modern market representatives. The construction of private houses and public multi-storey buildings from aerated concrete is becoming increasingly in demand.
In this case, the external facade walls can simply be puttied and painted, although the manufacturers of aerated concrete blocks themselves advocate mandatory cladding with clinker tiles, bricks, siding or thermal panels.
Aerated concrete is a type of building material consisting of cement, sand and special gas generators.
When water is added to the mixture, a chemical reaction is formed, releasing hydrogen gas, which in turn foams the cement mortar. The mixture, increased in volume, is poured into molds until completely solidified.
After this, the monolithic slabs are removed from the molds and cut into standard blanks (blocks, panels, bricks, etc.).
Then the aerated concrete blanks are treated with water vapor in an autoclave or dried in electric chambers. This gives them special strength, allowing the construction of 3-4-story buildings without metal reinforcement or frame.
Main characteristics of aerated concrete blocks:
- strength and durability with relatively low weight (no need to pour a capital foundation);
- environmental friendliness compared to conventional concrete slabs containing granite and mica, which can carry natural radioactive elements;
- easy to process (sawn, drilled), easy to install, install and operate;
- retain heat well, but at the same time the material is “breathable”;
- fireproof (does not burn);
- are not subject to rotting, corrosion, fungal and mold damage;
- economical compared to brick.
The only disadvantage of aerated concrete is its increased absorption of moisture. Therefore, when using it in climatic zones with high atmospheric humidity or precipitation, it is recommended to cover the facade of buildings with clinker tiles or bricks (which are as moisture resistant as possible) on ventilated sheathing.
It is not recommended to use foam-based panels for cladding external walls made of foam blocks or install them on cement-adhesive mortars. This will entail a loss of vapor permeability of the structure and the humidity generated indoors will accumulate in the walls, causing a feeling of constant dampness.
We suggest you familiarize yourself with How you can repair cracks in concrete
The cladding of the facade of a building built from aerated concrete must “breathe” and release steam and moisture out. Therefore, simply covering the blocks with clinker tiles will not work.
They will very quickly draw out all the water from the adhesive solution, and the tile will fall off after a short time.
The working surface of aerated concrete is plastered with cement-sand mortar with the addition of adhesives. This will to some extent close the “pores” of the masonry, prevent them from quickly absorbing water, and on the other hand, will not prevent moisture from being removed outside the building.
When applying the first layer of plaster composition, the wall is reinforced with metal or fiberglass mesh, after which it is covered with another finishing layer of plaster and leveled. All layers of the solution must be completely dry.
For better bonding of aerated concrete and ceramic plates, it is recommended to intermediately reinforce the layers with metal (plastic) dowels, ordinary nails or stainless steel screws, which are driven into the concrete masonry, and the caps are masked in the seams between the clinker. There should be 4-5 such connection points per 1 m2, which will ensure greater reliability of the cladding.
Walls made of aerated concrete are sheathed with a wooden or metal frame with an air gap of at least 60 mm, but not more than 150 mm. The entire structure must support mounting brackets, horizontal support bars and vertical profiles. The lathing is fixed to concrete blocks with expandable plastic dowels, nails or self-tapping screws.
Tile selection
Almost all types of wall tiles are suitable for laying on aerated concrete. There are many varieties on sale, differing both in appearance and source material. For an unprepared person, the choice may not be easy, although in this case you can be guided by the usual external data of the material. However, for a more confident choice, it is useful to know the types and features of facing tiles. The following varieties exist:
- ceramic tile;
- PVC;
- glass;
- porcelain stoneware;
- clinker;
- cotto tiles;
- cement tiles;
- mosaic, etc.
PVC or glass slabs can only be glued with polyurethane glue - cement compounds do not adhere to waterproof materials. In addition, clinker and porcelain tiles also require specialized adhesive compounds. The mosaic can be made of glass or ceramic elements on a mesh, therefore, the adhesive composition for it is selected individually. Other types of tiles can be glued to standard compounds intended for ceramic types of cladding.
The choice of color and surface type is a matter of personal preference. Some people like light colors with a glossy and smooth surface, others like dark matte elements with a slight relief. When choosing a material, you should take into account the size of the room - the smaller it is, the lighter the cladding should be. Dark walls in a cramped room put psychological pressure on a person and create the effect of lack of air. Conversely, a light coating expands the room, creating a feeling of volume and abundance of air.
As a rule, glazed tiles with a smooth surface are laid on the walls. Relief surfaces actively glare and create a ripple effect. This is sometimes dangerous, especially in the kitchen - working with hot appliances or boiling water does not allow the presence of distractions. Therefore, when choosing cladding, it is necessary to take into account the purpose and specifics of the premises being finished.
Technology of laying tiles on aerated concrete
It is necessary to make a reservation - this is only one of the acceptable options, which is optimally suited to most cases. Before you start laying tiles on gas silicate walls, you need to prepare them for applying the adhesive layer. To do this, you need to perform a number of operations, and you need to approach the procedure with maximum attention and care. The procedure for preparing walls with smooth and high-quality aerated concrete masonry:
- 2 layers of deep penetration primer are applied (for example, Ceresit or other similar material). The first layer must be completely dry, and only then apply the second.
- Tile adhesive is diluted. Its consistency should be more liquid to compensate for the loss of water due to the hygroscopicity of the base.
- Applying a thin (“scrape”) adhesive layer of tile adhesive. Completely dry.
- Checking the surface with the rule. If deviations from the plane do not exceed 1 cm/m, the cladding can be laid under the comb. Notched spatulas of different sizes are used (depending on the consistency of the adhesive and the size of the tile.
The recommended spatula teeth size is 8-10 mm for thick glue and 5-8 mm for liquid glue. The bottom row is installed using a straight strip pre-fixed to the wall. Subsequent rows are aligned with the bottom row using special plastic crosses. It is recommended to use moisture-proof compounds for grouting joints.
There is another way to install tiles, with preliminary notches for better adhesion. They are made using a grinder and provide better adhesion of the tile adhesive to the base. However, when making notches, a huge amount of dust is generated, which must be carefully removed.
Bathroom tiles on aerated concrete
I couldn't find it by searching. =(
Tell the experts - New building. In the bathroom, one wall is solid, the rest are aerated concrete. I have never encountered before how (what kind of preliminary work) to lay tiles on aerated concrete. The walls are relatively smooth, with only unevenness at the junctions of the blocks (glue protrudes).
- Is it necessary to plaster the walls?
- Is it possible to lay tiles directly on the blocks?
- Which glue is better? And how (what) to hang a large mirror on such a wall (as if “embedded” in the tile).
It’s time to stop experiments with laying tiles on layers, at least in the apartment. My advice is to plaster with rotband, having thoroughly primed it first.
waw0375 wrote: It's time to stop experiments with laying tiles on a layer
I primed it a couple of times with acrylic primer and Brozex KS-11 glue, an analogue of the simplest Ceresite.
It's been 3 years and everything is fine.
- Only you can say that, or your master
- Can. If water gets on these aerated concrete walls, I would waterproof them.
- depends on p1 and p2.
master? - I’ll do it myself =)
serge78master? - I’ll do it myself =)
If you have no experience in laying tiles and the wall is crooked, then it is better to plaster it. For example, a rotgang. It is good to prime before plastering. Afterwards, waterproof the plaster with coating waterproofing and glue the tiles onto a comb using glue like Ceresit 117 (which is stated to have good adhesion to non-absorbent surfaces).
The experience is small, but it is there. I just haven’t encountered walls made of aerated concrete, so I’m asking about the features.
serge78Message from waw0375 It’s time to stop experiments with laying tiles on a layer
The person is referring to the so-called Armenian method of tiling with ceramic tiles - this is when the surface is uneven, some comrades consider it advisable not to first level the wall or floor, but to glue the tiles on a thick layer of glue, thereby avoiding surface unevenness. I’ll be honest: there are such masters, there are !Which can tile floors with a thick layer of glue, and very well. These are very experienced guys of powerful build (in order to press the glue from under the tiles, mass is needed) with a very good eye and apparently a built-in self-leveling brain device. We often work with them when there is no way to pour screed when time is running out. Even these talented comrades tile the walls with a comb, because the Armenian way is hardly easier and faster when it comes to walls. Why am I in such detail - because I have long wanted to say about this , this never happened. I fully support waw0375, there is only one simple and quick way for tiling - we plaster the walls using the beacons, the screed on the floor also follows the beacons, and on a perfectly flat surface without straining, we work with tiles very beautifully and with high quality. I add IMHO , but I think many tilers will support me. Good luck to everyone in their tiling business!
You know better what quality of bathroom geometry is needed. When laying tiles on a thick layer of adhesive, you will most likely spoil the appearance of it, and therefore the materials. If you don’t need strict vertical lines and the walls are even in plane, which is not always the case with foam concrete partitions, then knock down the protruding mortar, prime it with a penetrating primer and glue it along the existing plane. But you will regret that you didn’t try harder. Listen to the advice above.
justis1 wrote: knock down the protruding mortar, prime it with a penetrating primer and glue it along the existing plane. But you will regret that you didn’t try harder. Listen to the advice above.
I’ll add: prime it 3 times, putty it with glue. This is if the walls are smooth (vertical, flat, corners 90 degrees, at least in the place of the bathtub). If you decide to plaster and the dimensions are critical (the bathtub is “screwed up with soap”), then it is better to use rubbed beacons.
About plastering - what's better? I read that a mouthbow is not recommended in the bath. Something might happen to it due to humidity (although I doubt it myself). Cement-based plaster is recommended.
You can even plaster the walls in the bathroom with Rotband.Tsem. plastering is time consuming and expensive if done well. Rotband is suitable for plastering wet rooms; after drying, do not skimp on treating everything with deep penetration primer with moisture-repellent properties (Aquastops from different manufacturers, Ceresit ST-17, etc.) For greater reliability It makes sense to treat with coating waterproofing the junction of the walls to the floor 10 cm in height, and the places where the water intake pipes exit the wall, the requirements for the waterproofing composition are that after drying, the slab adhesives should stick and set without any problems.