The atmosphere in home decor is conveyed through a combination of textures and colors. If the room already has stylish furniture, original textiles hanging and diffused lighting installed, you can take care of the pleasant little things: decorate sockets and switches with various decorative elements. This way they will not stand out from the overall picture of the room and will become the highlight of the interior.
Frames and moldings
It's easy to turn a simple switch into a work of art. A photo frame or a light plastic curtain rod will help with this. You can easily paint it any color and stick beads, stones or rhinestones on top. Molding for plaster and molding is also suitable. It should be purchased at any craft store. It is customary to sculpt from plaster or special plastic.
When choosing a photo frame, it is better to give preference to wood products. They are easier to install by nailing them. It is better to install frames made of plastic or plaster with glue, since it can crack when driving nails.
Disguise
Among all the methods of masking cables from equipment, there are several that are the most convenient and therefore popular. When deciding where to hide the wires from the TV, you can choose from the following options:
- hide in the wall;
- put it on the floor;
- disguise with a cable channel;
- buy furniture for equipment.
into the wall
During repairs, you can hide the wires from the TV in the wall. To do this, you need a hammer drill, an angle grinder, plaster, a construction spatula and a console for outputting communications. Work progress:
- Make grooves for laying electrical cables.
- Fold the wires into a corrugated structure and secure them with staples.
- Place the laid cables in the groove.
- Output communications to a common console with the required number of outputs.
- Plaster the grooves or level the wall with plaster and apply a decorative coating.
Keep in mind that the process is labor-intensive and requires certain skills.
If the walls are covered with plasterboard, then the wiring can be hidden behind it. To do this, make two holes - one immediately behind the TV, the other at the junction of the wall and the baseboard. Skirting boards need special ones with cavities for cables. Pass the cords behind the wall through the first hole, and the second is needed to connect the device to the network.
To the floor
You can also remove TV cables to the floor. One of the options is plinths with a niche for laying communications. The whole process is quite simple - you need to remove the top panel of the plinth, place the wires in the niche, and close the plinth. This option is convenient for both an apartment and a home.
In private homes, sometimes it is necessary to pull the antenna cord across the entire room so that the signal quality does not suffer. Here it is better to use the second option - you need to make holes in the floor with a hammer drill, place the cables in a corrugation and lay them in the holes. You can level the floor with cement mortar.
Street sockets: features and installation rules
In cable channel
An easier way to disguise electrical cables is to install a cable channel. You can secure it with dowels or liquid nails.
The stores have a large selection of such boxes that can fit into any interior. They come in plastic, aluminum, and MDF. There are also models with decorative trim.
To furniture
Without much difficulty, the wires from the TV can be hidden in furniture. These can be cabinets for appliances with holes for communications or wall sets with niches. In addition, it is quite possible to find furniture that will fit well into the design of the room.
Book spines
It’s easy to make an original aristocratic switch cover from old, tattered books. At the same time, both spines and waxed pages are suitable for decoration. You need to cut blanks from old books or magazines of a suitable shape, leaving indentations along the edges for folding. Glue the workpiece to the plastic cover and return it to its place. For greater durability, cover the surface with a transparent matte or glossy varnish.
Decor ideas for sockets and switches
Have you, dear readers, ever thought of decorating sockets and switches? Until a certain moment, I could not even imagine that I would ever do this.
One day, by some miracle, foam got on the switch. A small drop, which, as it turned out, cannot be washed off with anything. I had to think about how to make this “decorative element” invisible. I didn’t want to buy a new switch, since we bought this one just recently.
I thought that if I couldn’t fix the situation, only then would we replace the switch with a new one. I found the easiest way to cover up a stain was to paint over it.
Since my stain was raised due to the foam drying, I sanded it thoroughly. I degreased the surface of the switch, prepared acrylic paints, brushes and a simple pencil. I decided to draw a sakura branch on the switch, and I’m not such an experienced artist that I could draw without sketches.
Then everything is simple. I made sketches and painted the drawing with acrylic paints. All. I got the original switch. So original that a friend asked me where I bought it :) As you can see, there is nothing super complicated in the decor of such things. If you don’t know how to draw, you can use a ready-made stencil (buy or print on the Internet).
Dear readers, tell me, have you ever had to decorate sockets or switches?
To receive the best articles, subscribe to Alimero's pages on Yandex Zen, VKontakte, Odnoklassniki, Facebook and Pinterest!
Decoupage
Tear off a design or pattern from a beautiful napkin and apply it to the switch with liquid white or PVA glue. After drying, coat the area with varnish on top. If there are pieces of bright wrapping paper left after the holidays, it can be easily used for original decor. You need to remove the plastic panel of the switch, cut out the paper with an allowance of 5 cm, glue it and return it to its place.
Creative approach to problem solving
Well, for dessert, we offer you several options that can not only be effective, but will also allow you to additionally decorate the room.
Decoration
A very interesting way out of the situation would be not to hide the wires from the TV on the wall, but to decorate them, that is, to make them part of the interior.
Here are some interesting examples:
There are a lot of decoration options, and even manufacturers offer their own solutions. And if you have enough experience and imagination to create and implement your ideas, you can create a real masterpiece for mere pennies.
The simplest methods of artistic decoration will be the following options:
- Parts of the wires can be placed behind the furniture, attached to it on the reverse side with tape or staples;
- Install live plants under the TV;
- Use varnished driftwood;
- Make a necklace out of wire by putting large beads on it;
- Use ready-made plastic fasteners from the manufacturer;
- And much more.
Decorative boxes
If the wires themselves do not bother you much, but massive tees and extension cords are an eyesore, then an original solution to the problem would be to place them inside a decorative box, which you can make yourself, or purchase a ready-made version. By the way, instructions for assembling one of these solutions will be given in the video attached to the article.
Various devices are also very effective, allowing you to hide and secure the largest parts in inconspicuous places.
Here are some photos with similar solutions:
That’s basically all we wanted to tell you about how you can hide or disguise the antenna wire for a TV and other cables. No need to put up with reality! Approach the matter wisely, and the result will not keep you waiting!
Polymer clay
Polymer clay is an ideal material for sculpting enthusiasts. With its help it is easy to create a custom relief design with an interesting texture. For children you can choose cartoon characters, and for adults - patterns, inscriptions, curls. This is a great chance to captivate all family members with creativity, gathering them around a large table. You can mount figures on a flat surface or create texture by making an impression on a damp clay surface.
How to hide
Choose the same color for walls and outlets
Most of the sockets are made in white; this model is more popular and in demand, easily fits into any interior and color scheme. But when the outlet needs to be disguised, the easiest way is to choose the same color as the walls/wallpaper.
Hide the outlet behind wall decor
The ideal option is a painting. For greater convenience, it should be attached not in the classical way, but on the side. So, you can open it like a door and easily charge your devices.
Use attachments
Although the attachments do not make the rosettes invisible, they do improve the overall appearance, making it look neater. Plus, they provide safety, which is especially important for families with small children.
Place furniture in front of an outlet
A great idea – it doesn’t require any expense or special effort. Place a desk, small bedside table or chair in front of the outlet. The main thing is not to forget the place for the wires, and not to place furniture end-to-end.
Integrate them into furniture
In order not to spoil the interior with an abundance of wires, it is enough to place the block with sockets in a closet or build it into the surface of the desktop and open it when necessary. The only disadvantage of this idea is that furniture with such built-in units is not cheap.
However, this solution is not always suitable, as it depends on many factors: the height of the furniture, the layout of the room, the area of the room.
Cover the sockets with a cloth
An idea for those who want to hide sockets located under the table. It is enough to attach the fabric to the edge of the table that is located against the wall. It will hang down to the floor and cover all sockets and wires. This is also an excellent decor - just choose an interesting print that matches the overall interior.
Paints
Particularly durable paints for home decor on plastic are acrylic options. They dry quickly, remain bright longer and do not turn yellow. The materials are non-toxic, so they can even be used for decoration in a children's room. The easiest way to paint switches is to completely paint them. In more advanced cases, patterns are printed on plastic, images of flowers or any other pictures of your choice are applied according to a template.
Decor ideas for sockets and switches
Have you, dear readers, ever thought of decorating sockets and switches? Until a certain moment, I could not even imagine that I would ever do this.
One day, by some miracle, foam got on the switch. A small drop, which, as it turned out, cannot be washed off with anything. I had to think about how to make this “decorative element” invisible. I didn’t want to buy a new switch, since we bought this one just recently.
I thought that if I couldn’t fix the situation, only then would we replace the switch with a new one. I found the easiest way to cover up a stain was to paint over it.
Since my stain was raised due to the foam drying, I sanded it thoroughly. I degreased the surface of the switch, prepared acrylic paints, brushes and a simple pencil. I decided to draw a sakura branch on the switch, and I’m not such an experienced artist that I could draw without sketches.
Then everything is simple. I made sketches and painted the drawing with acrylic paints. All. I got the original switch. So original that a friend asked me where I bought it :) As you can see, there is nothing super complicated in the decor of such things. If you don’t know how to draw, you can use a ready-made stencil (buy or print on the Internet).
Dear readers, tell me, have you ever had to decorate sockets or switches?
To receive the best articles, subscribe to Alimero's pages on Yandex Zen, VKontakte, Odnoklassniki, Facebook and Pinterest!
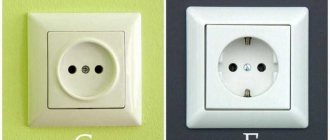
Types of sockets
According to the installation method, products are divided into:
- built-in;
- invoices.
Illuminated sockets above the floor
Built-in models merge with the wall, recessed into it. If such a rosette is matched to the color of the walls, it will be practically invisible. Modern designers often use this laconic method of home decoration.
Built-in sockets in the kitchen
Overlay models, as the name suggests, are placed on top of a finished wall, so they stand out against its background and stick out. They can be matched to the color of the walls or, conversely, highlighted with contrasting decor. It looks interesting, for example, when the walls are white and the sockets are black, and vice versa.
White sockets in the bathroom
Based on functionality, products are divided into the following types.
- Moisture-proof. As is clear, these electrical appliances have external protection against the penetration of water and dampness into them.
- Dustproof. In this case, the products do not absorb dust.
- On the control panel. A remote control is a handy thing, especially when there are children in the house. It allows you to turn off the power to sockets or, conversely, turn them on at the touch of a button.
Black socket with electronic panel
Ceiling decorative rosettes are also an excellent option for decorating your home. They perform a purely decorative role and do an excellent job with it. It is impossible not to pay attention to such a ceiling decoration; it becomes a real semantic center of the interior composition. This rosette is essentially stucco, so it will fit organically only into the appropriate interior.
Black plastic sockets under the TV
Ceiling rosettes in the interior are suitable for historical styles: Empire, Rococo, Baroque, classical. If the apartment is decorated in a minimalist or high-tech style, this ceiling decoration will look out of place.
Decorative ceiling rosette
Electrical access points for TVs and computer equipment
It is almost impossible to imagine a modern apartment or house of more or less wealthy people without a TV and computer. Accordingly, they require separate sockets, and, as a rule, not one, but at least two or three.
The supply is usually carried out in grooves along the walls or ceiling, less often in baseboards (cable ducts). In this case, it is necessary to connect not only a regular electrical cable, but also an antenna, “twisted pair” (network cable), and accordingly there will be two or three connection points.
In the photo from left to right: two ordinary points, sockets for connecting an antenna cable and a twisted pair cable.
A group of nests can be arranged in different ways, as shown in the diagram (along with the dimensions - distances to the floor and corners of the room).
Thus, the height of sockets for a TV on the wall can be 15...30 cm (if they are located open or behind a TV stand, and 800...1200 mm (if the group is hidden behind a wall-mounted TV or placed next to it).
Those using a home theater will need even more power outlets. At the same time, to avoid wire confusion, it is better to place the groups separately.
For computer scientists, things are even more complicated. Considering the number of peripheral devices, outlets may require five, seven, ten, or even more. In this case, a special socket for connecting a twisted pair cable will almost certainly come in handy. Often, sockets are placed not on the wall, but on a special table or under it, depending on how the equipment is located.
Special stands, table legs, and overhead elements with groups of sockets of different types are very convenient in this regard.
In this case, you must immediately take into account the need to mask a large number of wires, since regardless of the location of the sockets on the table or under the table, they simply get in the way.
To do this, they use cable ties, special fasteners, attach strips with cable channels, order furniture with prepared places for fastening - in general, there are a lot of options.
Miniature doors
This is an overhead structure that covers the socket. So it performs not only a decorative, but also a practical function. For example, such a door will guarantee safety in a room where children play, or in a kitchen where there is constant humidity.
You can make miniature doors with your own hands, in which case it will be more pleasant to look at the sockets. Instructions can be obtained on the Internet. The style options are also varied, so don't be afraid to experiment.
Ideas for design or how to hide things that are an eyesore in the house
Take a close look at the interior of your home. Surely there is something in it that constantly catches your eye and spoils the whole picture of coziness and comfort that you are trying so hard to preserve. Where should I put the wires from my computer and other equipment? How to get rid of the eyesore of a ventilation grill that sticks out in the living room and disrupts all feng shui?
Hide laundry baskets in deep dresser drawers.
The router can be hidden in a beautiful box from under expensive shoes.
Or the cover of an old book.
The washing machine can be decorated using regular electrical tape or colored tape. Turn on your imagination! And when you get tired of the design, you can easily change it!
Do you want your refrigerator to sparkle with new colors? It can be covered with self-adhesive tape.
You can also paint the refrigerator with special paint. Then you can leave chalk notes on it.
A roll of paper towels is “hidden” under this beautiful shelf.
Skin/hair care products, etc. can be poured into beautiful transparent bottles to remove “visual noise” in the bathroom.
The vent or electrical panel can be hidden behind a nice doormat. The main thing is to pre-paint it with spray paint in any color suitable for your room.
Video text
Today we are opening a new section on the channel: “About repairs.” As usual, the theme was inspired by life. For my renovation, I wanted outlets and switches that looked like very old, oxidized brass things. Not sleek, polished and polished by a butler, but natural, with scratches and abrasions left from the fact that they were simply used for a very long time by an absent-minded and short-sighted bachelor.
Electrical stores, naturally, could not help me with this. So I bought 2 of the cheapest built-in sockets and started scoffing at them. 1. Removed the housing from the sockets. 2. Using fairly coarse sandpaper (P80), I made the surface rough and at the same time slightly smoothed all the edges: brass is a soft metal and there could be no sharp edges left on the product after tens or even hundreds of years. 3. I tinted the acrylic paint a dull dark-dark brown color and painted the body of each socket in 3 layers. 4. Using light golden acrylic paint with a metallic effect, it took a long time and tediously to apply “scratches” and “scuffs.” First with your finger, then with a fan synthetic brush. Here we follow the logic - small scratches and abrasions are everywhere on old soft metal, but more of them are on protruding parts (corners and edges). Why a fan brush, and not a dense bristled one, as is most often done in the “dry brush” technique? With dense bristles, you get an even, “polished” shine, but I needed small, chaotic scratches. Therefore (you can see this in the video if you look closely) I applied the first paint to a fan brush, beat it a little and put it aside so that the paint would lightly grab on the thin nylon and get sparse and elastic thin hairs, which will continue to paint those very fine hairs. scratches. 5. Since I didn’t have a matte varnish on hand, I used semi-matte alkyd-urethane, adding matte to it in a homemade way - by mixing it with starch. You can also use tooth powder. You can't get a silky matte finish this way, but in this case I was very pleased with the result. I did not varnish the resulting mixture in the full sense, but rather wiped the surface with an almost dry brush.
I could have stopped there, but the result seemed a bit small to me, so I made decorative overlays. Here, too, everything is simple: – I cut out shapes from an unnecessary cardboard box; – glued it with two layers of pre-layered paper towel; – additionally primed with undiluted glue; – covered it with gypsum putty, and used it to form rather large patches in the corners; – after drying, I slightly smoothed the surface with sandpaper and sharpened the blotches so that they looked like old rivets, corroded by time; – primed with glue again; – and, as in the case of the sockets, dark brown paint + metallic “scratches” and “scuffs” + wiped with the same artisanal matte varnish.