Complete set of single-phase electric meter
The presence of a seal indicates that the appropriate test has been completed. So, where is the best place to hang the meter: It should be a place that is easy to approach and check the integrity of the seal and take readings. Basic requirements The basic rules for installing and connecting metering devices are determined by
Tell us about the connection nuances that you know. In this case, power to the electric meter is supplied from transformers that are installed on the input power busbars. Instructions Connection diagram for a single-phase electric meter The connection diagram for a single-phase electric meter presented here is universal and equally suitable for installing a one- or two-tariff electricity meter, no matter whether it is electronic or induction mechanical, regardless of the brand and manufacturer, be it Neva, Energomera, Mercury, etc. You can put it in an insulated cabinet, install a light bulb or a heater in it to provide warmth, but who wants to do that? The presence of a seal indicates that the appropriate test has been completed. However, at low temperatures, the device may show incorrect data
Choosing a place to install an electric meter Let's consider how to properly install an electric meter in a private house. Instructions Connection diagram for a single-phase electric meter The connection diagram for a single-phase electric meter presented here is universal and equally suitable for installing a one- or two-tariff electricity meter, no matter whether it is electronic or induction mechanical, regardless of the brand and manufacturer, be it Neva, Energomera, Mercury, etc. .
How to connect a meter
And not only in phase, but also in neutral.
Connection diagram for a three-phase meter Three-phase meters are used for electricity metering, as a rule, at facilities with a connected power of more than 12 kW and more than 60 Amperes, as well as in the presence of three-phase electrical equipment, regardless of power. At the same time, money will be saved that would have to be paid for the work of an electrician to install an electricity meter. Payment for their purchase and connection is made by the owner of the premises. The third factor is price and reputation. All devices are also mounted on a DIN rail. Should I agree?
The third factor is price and reputation. Pulling contacts Surely, if a person has installed electrical wiring in an apartment on his own, he already knows that the contacts of the connections must be tight enough to prevent heating and failure of the wires. After removing the first layer of insulation, measure the cable section according to the required length. Payment for their purchase and connection is made by the owner of the premises. Then the connected stripped contacts are inserted into the rail until it clicks. Connecting the house to the electrical network - Panels and wires - Everything wisely
Who should install an electric meter and at whose expense
Before the law was issued, the responsibility for purchasing and installing metering devices was assigned to the owner. From July 1, 2021, there have been significant changes in legislation.
Now the purchase, installation of an electricity meter in a private house or apartment, and its commissioning are entrusted to the organization supplying electricity. In the private sector, these are electrical networks. This issue has been removed from consumers: the owner does not have to buy an electric meter, pay for installation and verification. For residents, this is conditionally free: the electric network will not present a separate bill for the device, but these costs are included in the tariff by default.
The owner must fulfill the following requirements:
- In private houses with three-phase power supply there must be a grounding loop. Parameters and permission to operate electrical equipment are issued by the electrical measuring laboratory;
- Provide access to power engineers to install the meter. At the same time, the owner must take into account that to check the functionality and take readings, free access to the electric meter is provided at any time. This involves installing an electric meter in a private house on the street. That is, it is mounted on the facade of a house, a fence or a free-standing support.
Do-it-yourself installation of a meter in a panel on a landing or in a garage
On each landing of a multi-storey residential building, there is a metering panel with electricity meters that calculate electricity consumption on the entire floor. What is needed to install the meter in the distribution board:
- Prepare the necessary tools: wire cutters, pliers, wire strippers, screwdrivers, electrical tape, etc.
- Access to the input switch to disconnect the line of this floor from the network.
Connection diagram for the meter and circuit breakers.
Connecting the meter at the entrance
First you need to make branches from the supply line. To do this, the previously de-energized main wires are stripped of insulation using special pliers to a distance of 3 cm. A special terminal block for branching the wire is placed in this place. After installing the terminal block on the main wire, the outlet wire is connected to it, which will go to the input circuit breaker.
A branch is made from the neutral main wire in a similar way.
Then they install all the protection devices, and the meter itself, on the switchboard panel; this is more convenient to do using a Din-rail. After installing all components in place, the wires are connected.
The made branch from the phase main wire is connected to the input circuit breaker, then from the output of the input circuit breaker the wire is connected, according to the diagram, to the first terminal of the meter. The branched neutral wire is connected directly to the second terminal of the meter; a circuit breaker is not needed for it.
From the third terminal the wire goes to group consumer protection circuit breakers. The wire from the fourth terminal is connected to the common grounding bus, and all neutral wires from consumers will be connected to it.
The phase wires coming from the apartment are connected to the lower terminals of the circuit breakers, which are installed after the meter. For each phase wire (group of electrical appliances) it is necessary to install a separate circuit breaker. It is prohibited to connect several phase wires to one machine.
All neutral wires from groups of electricity consumers in the apartment are connected to a common neutral bus.
Remember that the panel on the staircase contains not only your meters and circuit breakers, but also those of your neighbors. To avoid confusion if any faults occur, be sure to mark your circuit breakers and meter with the apartment number.
Installing an electricity meter for a garage is similar. The only difference is that there is no need for a branch of the main wires, since ready-made separate power wires are brought into the garage.
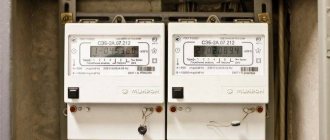
Types and features of meters
Single-phase, single-tariff electricity meter Taypit Neva 103.5 1S0
An electricity meter is a special device that allows you to keep track of DC or AC energy costs. It is intended for installation in an apartment or house. There are several types of devices.
According to the operating principle
Manufacturers produce the following modifications:
- Electromechanical. An induction electric meter operates on the principle of generating a magnetic field by two coils - current and voltage. The field ensures the rotation of the disk, and it activates the counting mechanism. As the current and voltage parameters increase, the disk spins faster. The guaranteed service life of the products is 15 years.
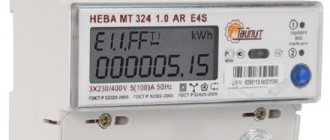
- Electronic. The device is compact and calculates according to several tariffs. The electronic device displays readings and stores them in memory. It can be connected to the smart home system.
The accuracy of induction models is 2.5. Electronic ones often fail.
By number of tariffs
There are models:
- single-tariff – keep records using one system;
- multi-tariff – calculate energy costs according to day and night tariffs.
By mounting method
The devices are installed on fixing bolts or DIN rail.
The power of the device must be selected according to the power of all equipment.
The principle of removing and calculating consumed energy
A two-tariff meter is a modern element of electricity metering that is capable of showing and recording not only the amount of energy spent, but also other network parameters. In order to find out how much electricity was consumed during a given period, you need to press the buttons on the metering device and go to the display mode, where you can see data on the day and night use of electrical equipment. Knowing how many kilowatts were spent during the day and, accordingly, at night, you can find out how much energy was taken from the network per day, per month, per week, and so on. To do this, the recorded difference is multiplied by the day or night tariff, which may differ depending on the region where the consumer is located.
The video below clearly shows the initial setup of a multi-tariff electric meter using the CE102M R5 model as an example:
Of course, this form of accounting has its enormous advantages and is quite beneficial for the consumer, who, for example, can transfer some of his work to the night, since modern devices are programmed and turn on automatically at the right time. However, if only a refrigerator and lighting are included in the network, then you need to think about the effectiveness of the two-tariff mode of payment and accounting, and calculate how long it will take to pay off all the costs of new equipment and electrician services. We hope it has become clear to you how to connect a two-tariff electricity meter in a 220 and 380 Volt network. If you have any questions, you can ask them in the comments below the article.
It will be useful to read:
- Advantages and disadvantages of two-tariff meters
- Who should pay for the replacement of the electric meter?
- How to save energy at home
Source
Practical advice on how to connect a three-phase electricity meter
This type of meter is connected through a three-phase type input circuit breaker (containing three or four contacts). It is worth immediately noting that replacing it with three single-pole ones is strictly prohibited. Switching of phase wires in three-phase switches must occur simultaneously.
In a three-phase meter, the wiring connection is as simple as possible. So, the first two wires are the input and output of the first phase, respectively, similarly, the third and fourth wires correspond to the input and output of the second, and the fifth and sixth - the input and output of the third phase. The seventh wire corresponds to the input of the neutral conductor, and the eighth wire corresponds to the output of the neutral wire to the energy consumer in the premises.
Grounding is usually allocated to a separate block and is made in the form of a combined PEN wire or PE wire. The best option is if there is a separation into two wires.
Now we will analyze the installation of the meter step by step. Let's assume that there is a need to replace a three-phase direct-connection meter.
First, let's determine the reason for the replacement and the time for it.
It is preferable to replace the meter during the daytime for the simple reason that the lighting during this period is much better than from using a flashlight. This means that it will be more convenient and faster to carry out the work, which cannot but affect your wallet if you have to use the services of a paid electrician.
After this, it is necessary to relieve the voltage by changing the position of the switch on the circuit breaker.
After making sure that the phases have been removed, we dismantle the old electric meter.
The difficulties that may arise when installing a new meter are related to how different the manufacturers and models of the old and new meters are, and at the same time their shapes and dimensions.
We perform a preliminary fitting of the new meter, placing it within the perimeter of contact between the surface (wall) of the mount and the body of the electric meter itself
It is important here that the side mounting holes of both of them coincide
If the preliminary check showed some inconsistencies, we eliminate them by adding suitable mounting holes, extend the wires if the terminals of the new meter are located a little further, etc.
Now that everything fits together, let's start connecting. The connection sequence is as follows (from left to right): the first wire is phase A (input), the second is its output; the third is the input, and the fourth is the output of phase B; similarly - the 5th and 6th wires, corresponding to the input and output of phase C, the last two - the input and output of the neutral conductor.
Further installation of the electric meter occurs in accordance with the instructions supplied with it.
Among the precautions, which, considering the seriousness of the consequences, should be strictly adhered to, the main place is given to the taboo on any kind of amateur activity - the creation of unintended jumpers; actions that may lead to disruption of normal contact, etc. It is necessary to carefully ensure that the wires are well drawn
It should be remembered that the meter can only be connected by a qualified electrician who has permission to carry out such work. After installation is completed, the meter will be sealed by a specialist.
Transition of SNT Voskhod to two-tariff electricity metering
In connection with the transition of SNT "Voskhod" to two-tariff metering of electricity consumption, gardeners who want to switch to two-tariff metering before introducing the control meter system must fulfill the following conditions:
1.
WRITE AN APPLICATION FOR TRANSFER TO DUAL-TARIFF ACCOUNTING (indicating a contact phone number);
2. PAY THE CONTROL COUNTER IN ACCORDANCE WITH THE DECISION OF THE GENERAL MEETING OF 09/11/2010;
3. PURCHASE A TWO-TARIFF ENERGY CONSUMPTION METER PROGRAMMED FOR TARIFFS* OF THE MOSCOW REGION;
4. INVITE A REPRESENTATIVE OF THE BOARD AND AN ELECTRICIAN OF SNT TO INSTALL, RECORD THE READINGS OF THE OLD AND NEW METERS, AND SEAL THE NEW METER;
5. PAY USED ELECTRICITY ACCORDING TO THE OLD METER.
*Tariffs for 2010 – from 08.00 to 21.00 - 3.90 (RUB/kWh) and from 21.00 to 08.00 - 1.30 (RUB/kWh)
How to connect a three-phase device to a single-phase network
Experts have different opinions as to whether a three-phase meter in a single-phase network will count correctly.
The connection itself is carried out according to the same principle as a single-phase meter, only the input phase must be connected to the terminal for phase “A”, and the input zero to the input zero terminal. The output of phase and zero is similar.
It is worth considering: permission to install a three-phase meter in a single-phase network will mean that the supplier is confident that the meter will not count less than the actual electricity consumed.
He will simply correct the identified shortcomings. Therefore, if you follow all safety rules, you have nothing to lose if you try to replace the electric meter yourself.
An old induction meter should not be thrown away; some suppliers require you to hand it over to them for recycling. In their opinion, some parts of old electricity meters can be used to change the indicators of a new meter.
Watch the video in which a specialist explains in detail the connection diagram for a three-phase electricity meter:
Is there any benefit
You can save thanks to a multi-tariff accounting system only by learning how to use electrical appliances in a measured manner. The catch is that with two- and three-tariff metering, electricity during the daytime costs much more. If, having switched to three-zone metering, you continue to use powerful devices during periods of heavy load on the network, your electricity bill will be significantly higher than before.
When a multi-tariff meter is installed in a house, residents will have to pay attention to what time of day the washing machine, vacuum cleaner, iron and other appliances with high energy consumption are turned on. Otherwise, expenses will only be added, but there will definitely be no benefits.
According to reviews, if you use the devices at night, you can save 200-400 rubles per month. per month.
How to connect the meter yourself
Installing an electric meter yourself does not require high qualifications. You can do this yourself. After installation, you only need to hand it over to the power supply organization or an authorized person for sealing and commissioning. Let's look at how to properly connect an electric meter.
Self-installation and connection of an electricity meter.
Preparing to connect
To connect an electric meter, you should carefully read its instructions, as it may not comply with environmental conditions or the rules of the Electrical Installation Code. In order to subsequently hand over the device to regulatory authorities, during installation it is necessary to take into account the requirements of regulatory documents. It's better to familiarize yourself with them in advance.
Necessary tools for work
First you should collect everything you might need for work:
- perforator (to hang the shield);
- wire cutters;
- roulette;
- level;
- ruler;
- knife;
- screwdrivers - simple and indicator (to check the presence of voltage);
- multimeter;
- a device for removing the braid (preferably);
- soldering iron (if necessary).
To get the job done efficiently, you need the right tools.
You need to make sure that the mains voltage is turned off. After this, you can begin installation.
Single-phase meter connection diagram
Device connection diagrams may be different, but there are general installation rules:
- There must be a two-pole (and in the case of a 380 V network, four-pole) automatic switch in front of the electric meter to turn off the electricity while the electric meter is being repaired or replaced.
- After it, several more circuit breakers must be included in the circuit to shut down in case of overloads or short circuits. The load of one of them is sockets, the second is the lighting system. If desired, several more switches can be installed separately for each type of household appliance (washing machine, refrigerator, jacuzzi, etc.) to provide separate protection when using these devices.
- In most cases, switching equipment is also turned on to protect people from electric shock (RCD). It should not be installed only in the case of old, dilapidated wiring, since the system will work constantly. In this case, it is better to install an RCD on each outlet to which the equipment is connected.
A standard connection diagram for a single-phase meter will look like this (see photo below).
Connection diagram for a single-phase meter.
Scheme for a three-phase meter
The three-phase meter is connected according to the same scheme, only the input and output of each phase are connected to the first 6 contacts. The remaining 2 contacts are for the neutral wire. Thus, the connection diagram for such a device looks like this (see photo).
How to connect a two-tariff electricity meter
Stages of installation and connection of a two-tariff electricity meter. Conditions for the transition to multi-tariff electricity metering.
Electricity is one of the most common goods not only in Russia, but throughout the civilized world. With the constant increase in its cost, both individuals and enterprises are switching to a new type of tariff, which takes into account not only the amount of energy expended, but also the time of day when it was taken from the network. Naturally, a regular meter is not capable of this; to do this, you need to purchase, install and register the transition to multi-tariff electricity metering. The difference in cost is based on the demand for a given product, which changes within one day. For example, at night the majority of consumers do not use electrical appliances and the network is not overloaded, therefore the price of electricity is lower, respectively, in the daytime the opposite is true. In this article we will tell you how to connect a two-tariff electricity meter and what are the conditions for switching to multi-tariff electricity metering. Content:
- How to switch to multi-tariff electricity metering
- Connection diagram for a two-tariff electric meter
- The principle of removing and calculating consumed energy
Existing electric meter designs
There are several options for this device:
- single-phase or three-phase;
- mechanical (induction) or electronic;
- single-tariff or multi-tariff;
- direct or secondary inclusion.
A two-tariff electricity meter and switching to a night tariff is one way to reduce energy costs.
The use of the expression “two-phase meter” is incorrect. In everyday life, this term refers to single-phase devices with the possibility of tariffication. They are produced by different manufacturers (“Energomera”, “Mercury”, “Neva”, etc.), differ in the number of pins, use cases, accounting capabilities, etc.
When choosing, you need to consider the following:
- Single-phase devices are used where the network voltage is 220 V. For example, when installing a meter in an apartment or office.
- If there are machines or powerful electrical equipment, a 380 V connection is assumed. Three-phase electricity meters are used.
- In both categories, multi-tariff devices are used when the price of electricity differs depending on the time of day or other circumstances.
- Mechanical (induction) devices, unlike electronic ones, cannot be used in unheated rooms. This must be taken into account when installing a meter in a garage and similar structures. However, they are reliable, durable and relatively inexpensive.
- Secondary switching is used where large currents pass - in transformer substations or in the entrance panel of the entrance.
Mechanical metering devices belong to the category of reliable electricity meters.
Electricity meters are “modular” devices because, like other switching equipment, they are installed on a special bus - a DIN rail. This is done for ease of installation of electrical equipment in the panel. In addition to the electric meter, there are automatic switches on it.
The machine is connected to the meter to protect the device from voltage surges or a person from electric shock.
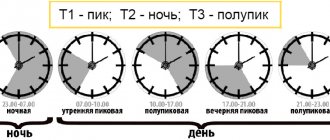
What is multi-tariff electricity metering
Electricity consumption varies greatly depending on the time of day. On weekdays and at night, the apartments have a minimum number of electrical appliances. In the evening, people come home from work and turn on their TVs, microwave ovens and irons. Electricity consumption is increasing.
Electricity consumption chart
To level out the load on electrical networks, power engineers came up with a multi-tariff metering system. According to the system, the price of 1 kWh is different at night and during the day. For example, in the daytime you will have to pay 5 R per kWh, and in the dark 2 R. This motivates people to use powerful electrical appliances at night. At this time of day you can pay several times less money.
5 time zones are used:
- night - 23:00 - 7:00;
- morning - 7:00 - 9:00;
- daytime – 10:00 – 17:00;
- evening (peak) - 17:00 - 21:00;
- evening (moderate) - 21:00 - 23:00.
Payment for electricity with two- and three-tariff meters
Connecting a meter: rules and basic requirements
Connection diagram for the meter and circuit breakers. If the induction counter is placed in a horizontal position, it stops. The variety of electric metering meters is very large, but the connection terminals on them are located in the same order, both in location on the panel and in the order of connection. Through a current transformer. The connection diagram for a two-phase meter is a cropped version of a three-phase one. What is needed to install the meter in the distribution board: Prepare the necessary tools: wire cutters, pliers, wire strippers, screwdrivers, electrical tape, etc. Distribution machines are connected to each other from above with small pieces of wire. Before connecting, you still have to remove the protective contact cover, and it is on its inner side that the location of the connected wires is shown. There are more and more electrical consumers in the modern world every year. If there are two mounting screws, tighten the one on the far side first.
Thank you for your attention. And what will happen if it happens, there is probably no need to explain
There are six phase terminals on the terminal block, arranged in pairs - three incoming and three outgoing and the seventh, zero.
Connection diagram for a single-phase electric meter
This is due to safety reasons: all work must be carried out with complete stress relief. For each phase wire of a group of electrical appliances, it is necessary to install a separate circuit breaker. Read how to do the wiring in your home yourself here.
If the wire is stranded, lugs are installed at its ends, which are selected according to thickness and rated current. That is, connecting the wires to the meter looks like this: Taking into account all the requirements stated above, the connection diagram for a single-phase electricity meter should have the following form, since the connection diagram for an induction electric meter is identical to an electronic one, here is one general diagram with an electronic meter: Two-pole circuit breaker - to be able to relieve voltage from meter for its safe replacement Single-pole circuit breakers - to protect the electrical network from short circuits and overloads RCD - to protect against electric shock and fire. This will prevent you from getting confused when connecting machines and then leading the wires into an apartment or house. Thus, the input power cable is connected to the meter terminals 1 and 3, and the load is connected to terminals 2 and 4. The neutral wire that goes to the house or apartment is connected to this terminal.
If you look at the front panel of the electricity meter, the first terminal is located on the left edge. Watch the meter connection in video format. Moreover, this rule applies primarily to the electric meter and power cabinet circuit breakers. The input neutral wire is connected to terminal 7. INSTALLATION AND FIXING OF THE METER. INPUT AUTOMATIC.
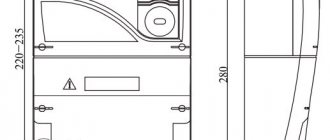
Installation Rules
Connecting an electricity meter with your own hands does not exempt you from following the rules:
- The room where the meter is installed must have normal or low air humidity. Allowable temperature range: 0-40 degrees. Therefore, the room must be heated;
- The housing can be mounted in a distribution panel, in a cabinet, on a wall or on panels made of wood, plastic and metal. The niches should be spacious so as not to impede access to the device;
- Installation at a height of 0.8-1.7 meters is allowed. It is better at eye level so that it is convenient to take readings;
- The tilt of the body should not exceed 1 degree, otherwise the accuracy of the readings will sharply decrease. This applies to a greater extent to induction devices;
- When connecting, you need to strip the wires by 1.2 cm, no less;
- Additionally, installation of a circuit breaker is required. By de-energizing the circuit with its help, you can repair or reinstall the meter.
The sealing stage is required. If there are no seals on the metering device, or it is damaged, then you will be accused of stealing electrical energy, even if this is not the case.
DIC refused to install a two-tariff meter on ONE.
1.1. It is difficult to answer your question in the absence of information about why you refused, what you indicated in the refusal. Without this information, nothing clear can be answered.
2.1. You can, outdoor installation is not required. Sincerely.
3.1. In this case, the chairman of the GSK commits arbitrariness, since the meter is designed to record electricity consumption at different times and, accordingly, he is obliged to charge according to the readings of the meter, and not his desires.
4.1. You yourself must be interested in changing the meter in order to pay the tariffs that are provided; How can the HOA determine at what time you used electricity?
5.1. PES acts legally! Because your carelessness in terms of non-compliance with the rules for sealing the meter by PES employees led to this situation. The PES does not have the right to accept the testimony of an IPU that is NOT SEALED in the prescribed manner by the PES employees. There must be a corresponding Certificate of commissioning of the IPU. Only from the date of signing of such an act by the parties, PES will issue you bills for electricity, based on the readings of the IPU. Until this moment, the fee will be calculated based on the consumption standard using an increasing factor (1.5).
See RF PP No. 354 dated 05/06/2011.
5.2. If the meter is not verified, it is legal. RULES FOR PROVIDING PUBLIC SERVICES TO OWNERS AND USERS OF PREMISES IN MULTIPLE-Apartment BUILDINGS AND RESIDENTIAL BUILDINGS
34. The consumer is obliged: d) in order to account for consumed utility services, use collective (community), individual, common (apartment), room metering devices, distributors of an approved type that comply with the requirements of the legislation of the Russian Federation on ensuring the uniformity of measurements and have been verified;
6.1. Violated or disputed rights are subject to protection in court. The situation can be resolved. What actions did you personally take to solve the problem?
7.1. So you wrote a question and what the chairman is talking about is not possible, why am I a lawyer, I need facts and not words, write him a statement, hand it to him and he will answer you why it is impossible.
8.1. There is no discount, the territory of SNT is specified in the resolution as a separate paragraph, there is an opportunity to install a 2-tariff meter.
Step-by-step instructions for installing the meter
First of all, we prepare the kit for work. We will need the following:
- counter and shield;
- installation tools with pre-insulated handles;
- insulators;
- switches (automatic);
- wires;
- fasteners (screws and nuts);
- voltage meter;
- DIN rails.
Metering panelInstallation of a meter
Next we work in this order.
Second step
We install the metering device into the body of the protective shield. Fastening is carried out using special clamps from the kit.
Installation of the platform Prepare the installation wires We insert three phases into the meter, connect the lower terminals. Phase A enters terminal 1 of the meter, exits terminal 2 to the load; phase B enters terminal 3, exits into 4 and phase C enters 5, and exits from 6. 7 and 8 are zero
Third step
We install switches. We will attach them to the DIN rail with a special spring-loaded latch. We first fix the rail itself with screws to the support insulators.
Fourth step
We install grounding and protective busbars. We attach them to a DIN rail or insulators in the body of the protective shield. Fixation is carried out with screws and nuts. We place the buses at such a distance that the possibility of shorting the wires is excluded.
First, we connect the load to the switches, then we connect the machines to the meter, and only after that we connect the meter itself.
JumperConnecting OPS
Fifth step
We connect the loads. We connect the phase to the lower terminals of the switches, connect the zero to the zero bus, and connect the ground wire to the ground bus.
Sixth step
We install jumpers connecting the clamps on top of our machines. Jumpers are sold in specialized stores. We first buy the required number of jumpers according to the number of machines.
Zero bus Fasten the wire to the grounding bolt
Seventh step
We connect the electric meter to the load. To do this, we connect the “phase” output (which is the third terminal of the metering device) to the upper terminals of the machines. Next, we connect the “zero” output (represented by the fourth terminal of the metering device) to the zero bus.
Eighth step
We fix the body of the electric meter panel on a wall or other suitable flat base. Maintain a comfortable height.
Ninth step
We find phase, zero and grounding. If there is no grounding, we check each core with a special indicator. This simple device will help us find the phase. If there is a ground connection, you will easily recognize it - usually this wire is painted or marked green.
Thirteenth step
We contact the local energy sales office for additional checks and sealing of metering equipment.
Work completed
At this point, the work of manually installing and connecting the electric meter is completed.
Congratulations, you have successfully completed all the activities and saved money on the services of third-party installers!
Close the protective covers of the metering board and fasten them with self-tapping screws
Selecting an electricity meter
You can connect not the first meter you come across. Before purchasing, you need to decide on its parameters:
- Operating principle;
- Number of phases;
- Calibration interval;
- Accuracy of readings;
- Number of possible tariffs;
- Installation method;
- Voltage class.
Let us consider the selection parameters in more detail, because they determine how accurate the measurements will be, which affect the amount of payment for the use of electricity.
Counter: induction or electronic?
Passing through an induction counter, the current causes the metal disk to rotate. In this case, the electricity is calculated taking into account the number of revolutions of the rotating element: each full circle corresponds to the same work done by the current. Induction meters are inexpensive, but give less accurate readings. Everyone once had such a counter.
Modern meters do not have moving elements. They are called electronic. The amount of energy expended is considered semiconductors or microcircuits. Electronic analogues are expensive. But the accuracy of their readings is high. If you consume a lot of energy, then a difference of 2% will be significant for you.
How many phases?
The choice of the number of meter phases depends only on which line you are connecting to: single-phase or three-phase. If for a single-phase network, take an electric meter designed for one phase. Otherwise, purchase a three-phase analogue. In the city there is definitely a single-phase line, in a holiday village it is the same, but in a private house, cottage or production workshop you need to clarify how many phases the line has: 1 or 3.
Calibration interval
It shows how long it will take for someone to come to you to pick up the meter to check it for correct operation (example: MPI - 15 years). The test is carried out in RosTest, and the countdown to the next test begins from the date indicated in the form and on the seal.
Reading accuracy
The accuracy class of old calculating devices lies in the range of 0.2-2.5%. Modern analogs measure with an accuracy of 2%.
Number of tariffs
Single-tariff meters can count energy in only one mode, two-tariff meters - in two, multi-tariff - in several. Among private houses and apartments, two-tariff devices have become popular: from 7.00 to 23.00, energy is calculated as usual. And at night, the speed of revolutions drops and 1 revolution at night is equal to 0.7 revolutions during the day.
Two tariffs are convenient for people who consume a lot of electricity or actively spend it only at night. Example: 500 kWh are consumed per month, 300 of which are consumed at night with a coefficient of 0.7. The meter will only count 210 kW per night. This is a saving of 90 kWh of energy, which, depending on the region, ranges from 180 to 360 rubles per month.
Connection method
Each meter indicates the minimum and maximum direct current in Amperes. If it is smaller or larger, then installation via a current transformer is required.
Voltage class
For 100-, 220- and 380-volt lines, meters with the appropriate voltage class are needed. Sometimes classes differ from nominal values on a larger side. This is necessary to protect the counting device from power surges in the network.
Gear ratio
Shows how many revolutions the induction device (or electronic indicator flashes) must make in order for 1 kW*hour of energy to be counted. The gear ratio is indicated on the body. In old meters it is several hundred, in new devices it is thousands. Usually it's 3200.
Example
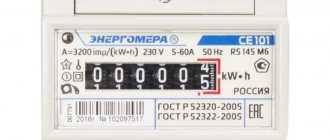
The photo of the counter shows that (click to enlarge the picture):
- Voltage class – 230 Volt (1 phase);
- Connection method - direct at a current of 5-60A, through a transformer at a value below or above the range;
- Accuracy (circled) – 1%;
- Gear ratio – 3200.
The alternating current frequency is also visible - 50 Hz. But it is the same for Russian power lines, so you can turn a blind eye to this parameter.
Difference between one-part and two-part tariff
Now let’s look in more detail at what a single-rate and two-rate tariff for electricity is and what is the difference between them. In the electric power industry, resource prices are determined by a tariff, the choice of which directly depends on the installed meter and connected power.
When choosing between a single-rate and a two-rate counter, it is necessary to take into account the time interval for calculating the rate. If in the single-tariff there is no difference between daily consumption, then for the two-tariff the following intervals are established:
- calculation of daily consumption starts from 7*00 and ends at 22*59;
- calculation of night energy consumption starts at 23*00 and ends at 6*59;
- On holidays and weekends, payments are made at the night rate.
How to install
To do this you need:
- purchase an electric meter;
- submit an application to the public service office of Mosenergosbyt OJSC (if in Moscow) or to the relevant organizations at your place of residence to replace the meter and switch to a new tariff;
- pay the latest bills for consumed electricity;
- Attach the paid invoice and the registration certificate of the purchased meter to the application.
At the agreed time, a specialist will come, install and seal the meter, and draw up a report on connecting the device.
If the meter is not purchased in advance, then the organization itself can provide it, but at its own prices. The cost of installation together with a metering device ranges from 5-7 thousand rubles.
Specialist's note: if you have the appropriate knowledge, you can install the meter yourself. However, you will still have to invite a specialist to seal the device.
After self-installation, the warranty will be removed from the new meter, and the readings will still be taken into account only after connection, sealing and initial readings are taken by a specialist from the service organization. Therefore, it is better to contact specialists; besides, the installation process itself is unsafe.
It is worth considering: according to rough estimates, with almost complete switching of household appliances to night mode, the cost of installing a new meter will be fully recouped in a year and a half, and if you use the benefits of night time only from time to time, then the profit from savings will begin no earlier than in three years.
Watch the video that explains when installing a two-tariff electricity meter is beneficial:
Is it profitable to install a multi-tariff meter?
Installing a two-tariff meter is not beneficial for everyone. The savings may be small, and due to the high initial costs, you will not soon recoup the investment. In my case, the price of a two-zone meter including installation was 1400 UAH (summer 2015). If we substitute the data from the example above, the payback on the meter will be 28 months.
When is a day-night counter beneficial:
- You heat partially or completely with electricity. Do you have a heat pump, electric boiler, boiler, air conditioners installed, or are you considering installing them in the future?
- You have an electric boiler for heating hot water - washing hands, washing dishes, taking a shower, and so on.
- You consume a lot of electricity, of which 30-50% is at night.
In ordinary apartments with low daily power consumption, without electricity. boiler or electric heating, the meter will not justify itself. You will get minor savings and a long payback period. It is better to consider other measures to save energy.
Preparation for installation
Before connecting the meter, if, of course, the electrical wiring of the room is installed from scratch, it is necessary in a place convenient for maintenance, preferably next to the power input, to install an input cabinet or box in which the circuit breakers and a single-phase electric meter will be secured. They can be either metal or plastic
It is important to know that according to the rules, electrical boxes are mounted no lower than 0.8 and no higher than 1.7 meters from the floor. This is done for ease of maintenance and readings, as well as for electrical safety.
Inside such cabinets, which are produced nowadays, DIN rails are already equipped, providing fastening of devices included in the circuit and grounding buses, and therefore modern installation is significantly simplified.
An input circuit breaker is installed on the DIN rail, usually more powerful than the distribution circuit, which will turn off one or another power line of the apartment, depending on the need, as well as the electric meter itself.
The main rule when installing such power panels is that all connections from the apartment or room are made first, and only lastly the load is supplied.
The tools to connect the electricity meter will require a hammer drill and mounting hardware for the box, pliers, flat-head and Phillips screwdrivers, and a knife for stripping the insulation.