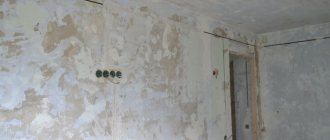
When hidden wiring is not acceptable
First you need to understand the two main types of hidden electrical wiring. It can be non-replaceable, embedded in the wall or replaceable (in pipes placed in the wall). Serious difficulties arise when installing the system inside a concrete wall. The process is accompanied by gating, but in panel houses there are special restrictions on this. It is much easier to make grooves for wires in a brick wall: it is easy to cut, the cable is conveniently attached inside such grooves.
The permissibility of installing hidden wiring is regulated not only by electrical safety rules, but also by building codes. For example, it is strictly forbidden to groove a single brick of the M-150 brand, since this process will lead to the destruction of the corrugated part of the material. It is also prohibited to place hidden wires inside log houses.
Hidden wiring on combustible bases is prohibited
Hidden cable routing along the ceiling
Mostly, modern ceiling decoration involves the installation of suspended panels or structures, as well as suspended ceilings made of fabric or film. In this case, open electrical wiring is mounted in a PVC cable channel or a special sleeve, corrugation, which is attached to the surface with dowels.
It is extremely rare that grooves and channels are cut into concrete floors for laying cables. This approach is possible and rational in the case of installing a central lighting device in the center of the room - a chandelier, or if it is necessary to install several such devices!
What are the advantages of hidden wiring
To begin with, pay attention to the following: hidden wiring in a frame house or apartment implies destruction of the cladding on the walls and ceiling, the floor surface may be damaged, so you should think about the need for its installation or partial replacement every time a major renovation of the room is carried out. It is much more convenient to carry out the process at new facilities.
The main advantages of organizing hidden cable routing:
- All parts of the system are hidden under a facing layer of plaster or plasterboard sheets, so the appearance of the premises does not deteriorate.
- A high level of fire safety, provided that the walls are made of concrete or other material that does not support combustion. Even if ignited, the fire will not spread, since there will be no oxygen or flammable atmosphere in the walls.
- The cable hidden in this way is well protected from ultraviolet radiation and mechanical shock, which increases the service life of the entire system.
With hidden wiring, the appearance of the walls does not deteriorate.
The disadvantages of this method are primarily related to the complexity of installation, the need to destroy walls and the difficulties that arise when repairing and maintaining the wiring. The cable and other elements are hidden under a layer of plaster, so if necessary you will have to remove it every time. All this cannot be said about electrical systems equipped in an open way.
However, hidden wiring is the most relevant, reliable, safe and correct solution for any permanent housing. In log houses, garages, bathhouses and similar buildings, you can use open electrical wiring.
Exposed retro wiring in a wooden house
Installation of hidden wiring of electrical cables throughout the apartment
When everything is ready to go, you can begin installation. First of all, a distribution panel is installed at the point where the cable enters the apartment. If the house is new and you will subsequently plaster the wall, then you can attach the cable directly to the surface. The supply line from the main line can be covered with a plinth, provided that you plan just such a route. But it’s still easier to attach to the wall, followed by plaster.
The width of the groove must be of the appropriate size. The hidden electrical wiring cable must be placed freely. Usually a depth and width of 8–10 mm is sufficient. Sufficient for laying wires, fastening and plastering.
Places for sockets are prepared with a “crown” of the appropriate size. There is no need to measure the diameter; hardware stores have specialized tools specifically for cutting out seats.
Having prepared the seats, the cable from the panel is laid throughout the apartment. Fastening is done every 20–30 cm. The ends of the supply to the sockets should be no more than 10 cm, but no less. Having previously installed the sockets, the cable is tucked into them.
Branch points are protected by boxes. For installation, a hole is also drilled for the box, connections are made, and then the connection point is covered with plaster. After laying the entire line, the general finishing of the walls is carried out according to the chosen decor.
Hidden wiring device
Hidden wiring can be done using two methods. The first, classic option is to place cables and network elements inside the grooves or under the casing. The second option, which has been gaining popularity recently, is the use of special pipes and cable ducts. In fact, the wires are hidden from view, but not located inside the wall.
Wiring can definitely be called hidden only in the first case, when the cable is hidden inside building structures. The latter include partitions, various ceilings, floors, walls and ceilings. In most cases, this option involves making special grooves. To make them, use a wall chaser or grinder, but you can get by with a hammer drill or a scarpel with a hammer. The same pipes and channels from the second method should also be present in the first: they are laid in grooves to increase the protection of the wires.
Laying wires in grooves
Attaching cable ducts to the surface of walls and ceilings and then placing wires inside is more of a method of organizing open electrical wiring.
What is hidden wiring?
This type of electrical wiring involves laying wires and cables inside building structures, into existing or prepared cavities of walls, ceilings, floors and ceilings. Hidden wiring is installed during the construction and assembly phase of the facility, strictly according to the design. Another case is work during repairs, when it is necessary to replace old electrical wiring. Here the task becomes somewhat more complicated, because laying cables and installing junction boxes, as well as installing switches, sockets and other standard devices will require work with a preparatory stage. In addition, a specific plan and sketch of the future wiring is a mandatory requirement!
Requirements for hidden wiring in the house
The main requirement when installing hidden wiring in a residential building is an increased level of fire safety. Therefore, if work is carried out in a wooden house, it is important to use special steel or polyvinyl chloride pipes to place the wires. In a brick or concrete building, the cable can be hidden in ordinary grooves or a corrugated pipe located behind cladding made of plasterboard and other materials.
The second important requirement is the accessibility of electrical wiring and the ability to quickly replace it. It is necessary to create a system that will make it possible to easily replace or modify the line without removing wall cladding or other damage.
However, there are often situations when, due to some unplanned circumstances, this requirement is not complied with. It is difficult to imagine a situation in which it becomes possible to punch a groove in the wall, the dimensions of which are suitable for placing a pipe. Therefore, to ensure replacement, it remains to use corrugated pipes hidden under the sheathing (and not plaster) or under the floor.
The use of corrugated pipes allows you to quickly replace wiring
The most specific requirement for the installation of hidden wiring is related to the route of the cable line. Chaotic laying of the cable in the wall is unacceptable: avoid situations where in one place the route moves parallel to the wall, and in another it unexpectedly turns diagonally.
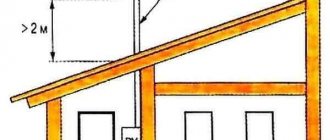
On the one hand, this way you will save materials and time, on the other hand, you will ignore an important rule, which will complicate the task of finding wiring in the future. The cable line must be located strictly vertically or horizontally under the ceiling or at a height of 2.5 m. The wires under the floor must run parallel to a pair of walls. In the future, you may have to drill into the walls to hang a picture or shelf. If the cable is positioned as you please, the risk of an error associated with the drill hitting the wire increases. The electric drill will break, the functionality of the wiring itself will be impaired, and in rare cases you can get a serious electric shock.
When organizing hidden or open electrical wiring, you need to think about electrical safety. When arranging systems like TN-S or TN-CS, it is important to have a third conductor (PE). In situations where its switching is impossible due to the lack of a corresponding cable in the distribution panel of the entrance, it is still recommended to lay a cable line of three wires. The yellow-green conductor used for grounding will come in handy later when the wiring in the house is finally grounded. In rooms with increased danger (bathroom or kitchen), it is recommended to install residual current devices or differential circuit breakers.
Organization of wiring in a private house according to the TN-CS scheme
Technical requirements when planning cable installation inside walls and partitions
Electricity first of all requires adherence to fire regulations. By installing hidden electrical wiring in brick or concrete walls, you will protect yourself from unnecessary work, because stone is not considered a conductor of current and is not susceptible to fire. Wooden structures require special attention. Cable laying in flammable materials is carried out by installing lines in steel or polyvinyl chloride pipes.
Understanding the complexity of the upcoming work and hoping for long-term operation of the electrical wiring, one should not forget about the nuances and leave room for cable maintenance. Few people ask this question and, when faults are identified in the electrical wiring, they later blame themselves for such connivance, breaking the partition in search of a junction box.
On a note. Construction stores have various boxes that will fit into the overall design without disturbing the aesthetics. Therefore, think about this in advance so that you don’t have to dismantle the wall later.
The first step is to draw up a plan for installing hidden electrical wiring. Places for wiring, installation of sockets and switches are worked out in advance. Electrical safety is equally important. Today it is customary to lay cables from three cores, with a ground connection. Previously, this was only done by connecting the general power supply at home. Today, even sockets are equipped with grounding outlets, which increases the service life of devices several times and reduces the risk of short circuits.
Hidden wiring diagram
The first stage is preparation for installation of hidden wiring. You need to decide on the type of branching of the electrical network, which can be boxed or daisy chained. In the first case, one cable is allocated per apartment area. Then branches are made from it to separate rooms, and special junction boxes are installed.
The loop branching is organized according to European standards. This option involves laying two cables. One of them is used for switching sockets, the other for lighting fixtures. The wires are connected from the distribution panel and laid to each room where there is a switch.
Electrical wiring diagram in the cottage
The second stage is drawing up a diagram of the location of lighting fixtures and branch boxes for switches. It is necessary to draw a schematic representation of the cable line along which the wires will be laid. They are installed at a height of at least 150 mm from the floor and with a distance from the ceiling of 100 mm or more. A similar distance should be to windows and doors. The rise of the route to the locations of sockets and switches is carried out strictly vertically, perpendicular to the floor.
Other recommendations:
- make sure that the wires do not cross in any places;
- Load-bearing walls cannot be tapped, so hide the wires under a thick layer of plaster;
- first draw up a diagram on paper, then transfer it to the surface of the floor, walls and ceiling.
Marking the electrical wiring route on the walls
Determining the type of electrical wiring and working out the laying routes
Again, recalling modern devices and the variety of cables used for laying open and hidden wiring, we can distinguish two installation options:
- Boxed;
- Trailed.
The first option involves installing a single cable throughout the entire apartment. When the wire is routed through the rooms, separate lines are taken from it to connect devices. The connection of each tap is protected by a junction box.
The loop gasket is a European type installation option. There are two wires running around the apartment: one powers the sockets and switches, the second powers the lighting fixtures. The connection for each cable comes out of the instrument panel, where a switch is installed on a separate cable line.
Actually, the choice of gasket type does not change anything. The only difference is that instead of one wire you need to pull two. Some will say it's more complicated. Yes, but it is much easier to make outlets for devices with separate wires than to power the devices from one cable.
Having decided on the installation option, you need to outline the installation locations for lamps and branch boxes and work out the routes for supplying cables to them. There are certain technological requirements for that part:
- The wires must be “guided” no closer than 15 cm from the ceiling or 10 cm from the eaves beam;
- Distance from door and window openings – 10 cm;
- The route to the outlet is laid at its level;
- It is better to make lifts to the lamps perpendicular.
Important! When planning the layout, remember that there should be no bevels or cuts for the sake of saving. Only horizontal or vertical laying. The cable should not intersect, and if it is otherwise impossible to lay a hidden part of the electrical wiring, then a gap of at least 3 mm must be made between them.
Materials and equipment for hidden electrical wiring
You don’t need to think long about choosing a cable: a regular one, brand VVGng, will do. If budget allows, NYM wire can be used instead. Both of them are characterized by a long service life and have high strength, due to which they can withstand wet sealing in grooves.
The cable cross-section must comply with the standard:
- lines for lighting devices - 1.5 sq. mm;
- connection of sockets - 2.5 sq. mm;
- electric stove - 4 sq. mm.
Selecting the cable cross-section for open and hidden wiring
You can take any distribution boards. Even products that are formally used in arranging open wiring are suitable. The situation is similar with switches and sockets. However, special devices for hidden installation take up much less space, look miniature and do not violate the integrity of the interior. However, in this case you will have to install socket boxes and junction boxes. There are components for solid and cavity walls.
Making a wiring diagram
Like any business, installation of electrically conductive systems in a room should begin with design. Experts advise putting markings on the walls that will indicate where the wires, lighting fixtures, connecting conductors and sockets will be located
In addition to your own preferences in planning room lighting, you should take into account the individual characteristics of the room and the following rules:
- Conducting cables are located strictly horizontally or vertically;
- Cable turns are formed at right angles;
- The distance between cable bundles and ceilings is 150-200 mm;
- The distance between cable bundles and window or door openings is at least 100 mm;
- Light switches are located on the side of the door handle at a height of 0.8 meters or 1.5 meters from the floor;
- Electrical sockets are located at any height convenient for the user;
- The number of sockets is usually calculated from the ratio of 1 element per 4 linear meters of wall;
- The location of sockets in adjacent rooms in adjacent recesses is acceptable;
- Distribution boards are recommended to be located close to the point of entry of power cables at a level of 1500-1700 mm from the floor;
- Be sure to provide the ability to connect protective grounding to the panel body.
When you have decided on the places for laying cables and installing electrical elements, make a wiring diagram with your own hands on paper, observing the scale relative to the size of the room. This will be useful to you in the future if you need to repair electrical wiring.
Hidden electrical wiring installation technology
After drawing up the diagram, it needs to be transferred to the surface of the walls. This applies to cable locations, sockets, switches, boxes and lighting fixtures. Be sure to mark the area where the electric stove will be placed, if one will be used. When measuring the height from the floor, take into account future work on laying tiles, laminate or other materials.
The third stage is to use a tool to make grooves for the cable and recesses for the socket boxes. Immediately after this, you can proceed to laying and fastening the wires. The latter can be easily done using dowel clamps (UW), also called “lashes”. The dimensions of the fastening element directly depend on the thickness of the insulation of the mounted conductor.
Fastening the cable using dowel clamps
They are easy to use: at the attachment point you need to drill a hole of a certain depth and appropriate diameter. Then you should wrap the cable with a dowel clamp, after which its antennae should be placed in the hole. Those who want to save money can use a simpler method: after laying the wire in the grooves at a certain distance, it is smeared with alabaster.
Before attaching the wire, it should be straightened to avoid bending or twisting. Where the line turns, the wire should bend smoothly. At the points where the boxes are located, you need to leave a cable reserve of 15–20 cm.
The fourth stage is the installation of distribution boxes and socket boxes. But first, be sure to make sure they are working. Also check that the box fits freely into the recess. It must be completely hidden. Moisten the installation site with water and spread a layer of alabaster. On the side of the box where the wire will be, remove the partition, thread the cable and insert the product into the niche.
The box should be flush with the wall. Otherwise, the switch or socket will stick out from the wall surface, which will compromise aesthetics and safety. At the end, finishing work is performed, wires are connected and power is connected.
Wall chipping
A groove is a special groove or rectangular hole in the wall in which the cable is placed. The gating process takes a lot of time and effort. For increased safety, wear goggles and a respirator mask to protect your vision and breathing, respectively.
The ideal solution to the problem would be to use a wall chaser. The tool is not cheap, so not everyone will want to buy it for repairs in one apartment. You can replace it with an electric grinder, equipping the device with diamond wheels or discs for concrete.
Chasing walls for electrical wiring
Cut two strips parallel to each other, then use a chisel and hammer to knock out the rest of the wall between the slots. The width and depth of the groove depend on the number of cables being installed. In this case, there should be a margin of about 10 mm in each direction.
When operating a hammer drill, you need to drill several holes of a suitable diameter at a distance of 5–10 mm. Then the partitions between them are removed with a hammer and chisel. For recesses under boxes and socket boxes, you need to use a hammer drill equipped with crowns with a drill in the center. If there is no crown, then use a regular drill to make several holes in a circle, and then remove the partitions.
Laying grooves using a hammer drill
Laying electrical wiring in pipes
To increase the safety of future electrical wiring, you can use special tubes. This installation method is usually used for rooms with high levels of humidity or rooms with significant temperature changes: baths, basements, bathrooms.
In addition to the high level of security, this method is also good because it provides the ability to replace the cable. The installation process is practically no different from the usual method. The only exception is the need to create wider and deeper grooves. The pipes are fastened inside them using “welds”, alabaster or staples.
Plastic pipes for cable laying
Cable laying in partitions, floors and ceilings
A suspended ceiling made of plasterboard mounted on metal structures can greatly simplify the task. In this situation, there is no need to groove the walls horizontally, and the wiring will be hidden under the finishing sheets, from where it is brought to the walls and lowered vertically to the connection points for sockets and switches.
Junction boxes can be installed in the same place, which will avoid drilling holes for them. However, this option involves installing plastic hatches with a pointer directly in the drywall, through which you can get to the boxes. The wires are attached to the ceiling using “hooks” or ordinary clamps.
Installation of wires along the ceiling in corrugated wires
The wiring can be placed in plastic pipes, which are attached to the ceiling using clips. This method increases the level of fire safety. An alternative solution is to lay the cable in the floor if it is lined with wood or gypsum fiber boards. For the first option, you can drill or cut holes directly in the joists, then insert plastic pipes with cables through them; for the second, lay the wires on the floor, secure them with brackets and cover them with expanded clay or other filler. The flooring is laid on top.
Electrical wiring can be hidden in pipes and then covered with cement screed. If the solution layer is too thin, then this option is undesirable.
Note. It is forbidden to connect wires behind cladding, partitions or in the floor. When using one of the listed methods, switching is possible strictly in junction boxes.
Installation of the junction box
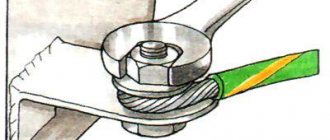
When installing distribution boxes in concrete walls, making a hole with a hammer drill, use a diamond-coated drill bit. Conventional components with a pobedit drill wear out too quickly, and you will be forced to buy new ones. On the other hand, it is not possible to use diamond drill bits for finblocks.
Before you start milling, make a hole in the center of the mounting location, the diameter of which corresponds to the drill. The diameter of the installed boxes should be about 60–70 mm, which is enough for six conductors.
Distribution box for hidden electrical wiring
Installation of socket boxes
Having created the holes, install socket boxes and switch boxes. For reliable fixation, use alabaster, which ensures good fastening of the plastic to the concrete. The edges should be mounted flush to avoid difficulties in the process of decorative wall treatment.
Mounting strip for socket boxes
Finally, we emphasize that hidden wiring is done for several decades in advance, so saving on the quality of the materials used is highly not recommended. After purchase, perform a preliminary inspection to ensure there is no damage and that there are no insulation problems. Play it safe once again, since getting to the wiring in the future will be problematic. Wall, floor or ceiling cladding should be installed only after checking the functionality of the electrical network. Don't forget about safety precautions.
Hidden cable routing on the floor
Installation work is greatly facilitated by the availability of special decorative skirting boards on the market, which are designed for the interior of electrification cables, fiber optics and other types of cables.
If it is necessary to route the cable to the locations of floor lighting fixtures or household appliances, the concrete screed is chipped and the cable is laid in a protective channel to prevent mechanical damage!
Peculiarities
Hidden electrical wiring requires serious preparatory work to prepare grooves (grooves) in the walls of the apartment. Grooves are needed for laying wiring cables in them. You also need to prepare niches in the walls for installing sockets and switches. It is especially difficult to create passages (through holes) between rooms for laying cables if the house is concrete or the thickness of the walls in the house is very large.
For work on drilling and cutting concrete, brick, reinforced concrete, special tools and work skills are required. Inviting specialists would be a good option to speed up and simplify the work of drilling and cutting stone walls. The cost of cutting and drilling work is not so high, the cost can be found at https://arix.su/almaznye-koronki.html to save on speed, silence and safety of work.
Installation: step by step instructions
Let's consider the procedure for laying electrical wiring using the example of a house with concrete or brick walls.
Creating a scheme
Creating a diagram involves drawing a special plan, which marks: the path of the power line, the location of sockets, switches, power boxes and lighting devices in each individual room. This diagram is also useful for calculating the volume of materials used. An illustrative example for a one-room apartment or house:
Electrical wiring diagram in a one-room apartment
When drawing up an electrical wiring diagram, we recommend:
- ensure that the cable runs exclusively in vertical and horizontal positions, and that a distance of 15-20 centimeters is maintained from the route to the floor or ceiling;
- remember that the installation of a distribution box is always carried out at the entrance to the room, and the location of sockets and switches (although not regulated by any GOSTs or other regulatory documents) should be as convenient as possible for a person (for example, in the kitchen, sockets are mounted behind the countertop, in the living room - behind the TV and so on.);
- take into account that the distance from the power line to the batteries, pipelines and ventilation ducts must be at least 50 centimeters (this is stated in the PUE).
Preparing materials and tools
This stage involves counting the number of switches, sockets, required cable length and other network elements. It will also be necessary to calculate the cross-sectional area of the wire in order to determine the diameter of the cores.
In no case should you neglect the calculation - this risks the fact that a conductor that is too thin will not cope with the load coming to it from powerful household appliances.
When the calculation is completed, select the necessary switches and sockets (for example, only waterproof product models are installed in the bathroom).
The minimum set of materials is as follows:
- gypsum mortar;
- insulating tape;
- terminal blocks;
- protective corrugated pipe (optional);
- cable - VVG cable is usually used;
- distribution wiring;
- socket boxes;
- sockets;
- switches.
The minimum set of tools, in turn, looks like this:
- Master OK;
- a simple pencil;
- building level;
- screwdriver;
- special tool for removing insulation from wires;
- multimeter;
- hammer;
- chisel;
- a tool for wall grooves (both a wall chaser and a hammer drill or grinder are suitable).
We make grooves for wiring
When the entire necessary set of tools and materials is ready, we begin gating. To do this, special markings are applied to the walls, thanks to which you can conveniently navigate when making recesses. By the way, the procedure can be simplified by using chalk-painted rope or a special marking cord.
When the markings are applied, we take the tool and use it to make grooves in the walls. If you have a grinder in your hands, you need to cut two parallel lines with a distance of 3-4 centimeters between them, after which all that remains is to drill the groove using a hammer and chisel. The depth of the groove depends on the cross-section of the cable and is determined taking into account a small margin (it is associated with subsequent plastering).
Of course, the best device for chasing walls is a specialized tool, also known as a wall chaser. The wall chaser will make the indentations quickly and without unnecessary hassle. The only catch is that the cost of the tool is quite high and it makes no sense to purchase it for one-time use.
The last step of the gating stage is the creation of special recesses for sockets and distribution boxes. A drill with a crown attachment with a diameter of 6.8 centimeters will come to the rescue here. And when the recesses are ready, we move on to installation. For reliability, socket boxes and boxes “sit” on a gypsum mortar, which reliably attaches the plastic to the concrete wall. In this case, the edges of the products are placed flush with the surface - this will facilitate the procedure for decorative wall finishing in the future.
Cabling
Next, we lay a line, placing the cable along the grooves. First, the conductor mode is for segments of the length we need (for example, a segment from the distribution box to the socket, and so on), leaving a reserve for connecting the cores. Next, we fix the cable in the gypsum grooves with mortar. When the work is done, all that remains is to test the hidden wiring to check the correctness of the connections, as well as the overall functionality of the network. Are you sure everything is fine? This means you can safely putty the wall!
I would like to make a separate reservation regarding the use of corrugated tubes when laying cables. The protective corrugation is intended to preserve the line from all kinds of harmful mechanical loads, impacts and the like. However, the use of such material is a purely individual matter.
This is where hidden wiring in a house or apartment ends. We can make sure that there is nothing particularly difficult or unclear in the procedure. The main thing is to be careful and also follow the color coding of the wires when making connections. At the end, all that remains is to install sockets with switches, as well as protective automation in the panel (after which you can begin installing chandeliers and arranging the premises).
Installation of electrical wiring in the floor
Mounting the mounting box.
Installation of electrical wires in the floor is carried out before construction work or before installation of floor slabs. You can lay pipes with wires between the support beams of the floor. If, during repairs or construction, you make a floor with dry backfill (expanded clay), then solving the problem of laying pipes with wires will become much easier. It is enough to fix them in the floor, pour out and level the expanded clay - and you can start laying the flooring. If the floor is poured with concrete manually, we do the same. We fasten, fill with concrete, level and lay out the flooring. If your entire process is automated (that is, expanded clay or concrete is supplied using special machines under pressure), then fasten the wires as follows: lay the wires one next to the other (do not forget that low-current wires, even those laid in pipes, must be on distance from electrical ones at least 10 cm), align all pipes. You should end up with a single bundle of wires with outgoing rays to the electrical installation products. Then take punched paper tape, measure a piece corresponding to the width of the bundle of wires, cut it and secure it with dowels. And so on throughout the entire electrical wiring. Why fasten it so thoroughly? The answer to this question is simple: since the process is under pressure, there is a possibility that the pipes may float to the surface and then it will be much more difficult to lay and secure them. But before installing electrical wiring in the floor, try to fulfill a number of prerequisites:
- Before starting work, carefully inspect all pipes. They must not be damaged during work.
- Pipes recessed into concrete should not have branches or connections along their entire length (that is, they should be single).
- If there is a heated floor, pipes with electrical wiring should be placed as far as possible from the heating element.
As before, we provide you with several drawings.
Attaching the mounting box, continued.
How to install hidden electrical wiring?
Electrical wiring in any room is divided into three types:
1. Hidden wiring.
2. Open type wiring.
3. Wiring using special electrical products - plastic boxes and baseboards.
In the next article we will try to cover all the nuances of laying and installing hidden electrical wiring.
Hidden wiring is technically the most complex and labor-intensive, but at the same time it is the best option from an aesthetic point of view. The difficulty of installation lies in the need to recess insulated wires or cables in tubes in the walls.
Hidden electrical wiring is installed before, during and after construction work. In the latter case, it will be a sidebar. However, there is one limitation - it is prohibited to insert hidden wiring into an existing floor. This operation can only be done during construction work or before it begins. This is due to the fact that scoring the floor screed will significantly weaken it and subsequently it will begin to crack.
Before carrying out installation work, special attention should be paid to pipes that will be installed in a hidden way. They must not have any deviations from the norm or other damage.
The grooves must be sized to allow the wires to be secured in them and to be completely sealed with plaster mixture.
Pipes recessed in channels should not contain any auxiliary fittings in the form of connections and branches. Concealed electrical wiring connections are made exclusively in junction boxes.
For convenience and understanding of the principles of laying electrical wires, we will present below a table with installation rules.
The advantage of this option
The advantage of wiring in metal and PVC pipes is as follows:
- Electrical wiring is reliably protected from mechanical damage and adverse weather conditions (if the electrical network is installed outdoors).
- The PUE clause 7.1.37 “Electrical wiring in the premises should be carried out in a replaceable manner: hidden - in the channels of building structures, embedded pipes; openly - in electrical skirting boards, boxes, etc.” That is, you can replace the wiring without opening the wall cladding, by tying a new cable to the old cable, for example.
- There are a number of requirements for electrical wiring in wooden houses, clause 15.15 and others in SP 256.1325800.2016 (this is an updated version of SP 31.110) and other regulatory documents on electrical installations and fire safety.
- When laying wiring underground, the electrical wiring will be protected from rodents, as well as from damage by solid objects contained in the ground.
As you can see, it is necessary to use this method of electrical installation for reasons of electrical and fire safety.
Electricity supply. Open and hidden wiring.
The terms “open” and “hidden wiring” will not surprise anyone now.
There are, however, disagreements regarding their definition. For example, what is wiring under plaster? Open or hidden? Anyone will say: hidden. And he will be right. And if the wiring in the corrugated pipe is fixed to the wall, is it hidden or exposed? Everyone will say: open, and again they will be right. Here's a tricky question: the wiring is hidden above the suspended ceiling. Is it hidden or open? And the one under the drywall on the walls? What do the PUE (Electrical Installation Rules) say about this? And the PUE says this:
2.1.4. Electrical wiring is divided into the following types:
1. Open wiring - laid along the surface of walls, ceilings, along trusses and other construction elements of buildings and structures, along supports, etc. . 2. Hidden wiring - laid inside the structural elements of buildings and structures (in walls, floors, foundations, ceilings), as well as along ceilings in floor preparation, directly under a removable floor, etc.
Whether to consider drywall part of the wall or not – opinions vary. And in my opinion, open wiring is one that is easy to access and does not require dismantling structures (walls, ceilings.). And if repairs require breaking plaster or drywall, this is hidden wiring.
What is good about one and bad about the other? Here, too, everything is ambiguous. If I live in a one-room apartment in a common shelving unit, then it would be better not to see it, this wiring. Let it hide in the walls without killing the already dull design of the living cell. I got an outlet for the TV and refrigerator - and I don’t need anything else, either today, or tomorrow, or in the foreseeable future. Because you can’t move the refrigerator to another corner, you can’t plug the TV into another place.
Having your own home is a completely different philosophy. Today I arranged the furniture like this, tomorrow I completely swapped the bedroom and kitchen. Yesterday I didn’t have a microwave, today I got a dishwasher. Previously there was one TV, now there are two and each has its own receiver. A computer has appeared, or some other device - you also need power, and other cables.
The bathroom was renovated - an automatic lighting switch with a motion sensor was installed. And so almost every year, all my life. My wiring in the house has probably been changed dozens of times. Everything changes, something new appears, the old is thrown away. New sockets appear and then disappear out of sight. What kind of hidden wiring is there?
Open wiring socket. But even the so-called open wiring can, in most cases, be hidden from view, leaving fairly quick access to it for monitoring and repair. For example, after the last renovation, the wires are almost invisible in my house. They are hidden somewhere in baseboards, somewhere in cable ducts behind furniture or even inside built-in cabinets.
Metal hoses are laid in wooden partitions and throughout the attic from switches to ceiling chandeliers. And only where there is no way to hide it, it is forced to be in plain sight in cable ducts.
Open wiring from the baseboard There are no distribution boxes at all. All necessary connections are made in cable ducts and baseboards using soldering. I talked about connection methods in the article Connecting wires. Terminal blocks or soldering? For powerful consumers (electric stove, heating elements) - separate individual wires from the machines without any intermediate connections.
At any moment, if some new synchrophasotron suddenly appears in the house, there are no problems connecting it to the home network. And even if a rearrangement or redevelopment occurs, it is not difficult to change the wiring. Because it is available.
Questions like “what are the pros and cons”, “which is better” are very common. And there are numerous attempts to create a sort of list of pros and cons. Someone baselessly claims that in one case the aging of insulation occurs faster, someone talks about some kind of protection from accidental damage - believe me, this is all from the evil one. But everyone agrees on one thing: they say, open wiring violates the design.
Basic requirements for wiring installation
When carrying out installation work, it is necessary to adhere to a number of requirements:
- Ensuring fire safety. First of all, this concerns the materials used (all wiring components must have fire safety certificates), as well as the installation technology. It is in connection with strict fire safety requirements that the wiring is laid in a corrugated pipe, a rigid structure made of steel or PVC.
- Modular type of system. This requirement is intended to make it easier to replace system components if necessary.
- Having a clear plan for locating cables and other system elements. In emergency situations, the diagram will help you quickly find the required section of cable.
- The use of three-core cables with the obligatory connection of a ground wire. This requirement is regulated by the Electrical Installation Rules.
- The need to have the ability to automatically turn off the power supply in the event of a breakdown in the system.
- Wiring must be installed clearly vertically or horizontally. Deviations are not allowed.
- Intertwined cables should be completely avoided. As a last resort, if intersections cannot be avoided, it will be necessary to provide at least 3-meter distances between the outer layers of wires.
- According to the rules (PEU), you need to maintain a distance of 15 centimeters from the wires to the ceiling, and at least 10 centimeters from the window openings and doors.
- Do not fasten cables with twists. Connections can be made using terminal blocks or plastic caps.
Advantages of hidden electrical wiring
Hidden electrical installation is an excellent option for major repairs or complete replacement of wiring in the house.
The most tangible benefits lie in the following:
- as mentioned above, the interior of the rooms is preserved, because all the wiring is hidden in the walls or in a space hidden from view by plasterboard sheets;
- higher fire safety (after all, if the walls are made of non-combustible materials - gypsum, concrete or brick, then ignited wiring will not cause a fire);
- increasing the service life of the network, because it is properly protected both from mechanical influences and from other negative external factors (for example, from ultraviolet radiation).
However, there was also room for shortcomings. The most noticeable of them are some labor-intensive installation compared to the open method (although it is worth it), as well as the difficulty of carrying out repair work when necessary. The reason for this, of course, is clear - in the event of any malfunction (for example, a wire break or burnout), the wall decoration will have to be destroyed. But whatever one may say, the closed wiring method is much more reliable. So, we have sorted out the disadvantages and advantages - this means that we can get down to business.