Sooner or later, any household item becomes unusable or simply stops being liked. An ordinary chandelier in the living room or bedroom can simply get boring and the apartment owner is faced with a pressing question - how to change the chandelier on a suspended ceiling on his own? During the preliminary installation of the stretch ceiling, professional craftsmen worked on the installation of electric lighting equipment, so no questions or difficulties arose. Replacing a lighting fixture under a ready-made stretch ceiling yourself can cause some difficulties.
Basic rules for successful installation
The most important rule for successful installation is to completely cut off the power supply from the ceiling lamp. Only after the voltage in the electrical panel has been completely turned off can work on replacing the chandelier begin.
When removing an old, outdated lighting fixture, you should pay attention to the design of the fastening fittings. There can be only two mounting options. This is a regular mounting hook, securely screwed or cemented into the floor slab or mounting strip with two or four screws.
If the new device uses the same mounting method as the old one, then we can consider that the home-grown installer is lucky and will only need to disconnect the current supply wires and simply hang the new lamp in place of the old one.
The ceiling hook will pass through a hole in the stretch ceiling, specially made and secured by professionals, and the appearance of the coating will not change at all after replacing the lamp. When attaching a lighting fixture of a different design, some professional skill will be required in installing the strip or mounting hook. In addition, to carry out such work you need a drill, screwdrivers and insulating tape.
Removing a chandelier from a suspended ceiling
When removing an old lamp from the ceiling to replace it, you should pay attention to the way it is attached to the floor slabs and decide whether it is worth using the same fastening device. There can be two design options: a threaded hanging hook screwed into rough concrete or a strip with several pairs of screws. If the owners decide to hang a new chandelier in the same place, using the same fasteners, the replacement task is greatly simplified: they only need to switch the wires and hang the lamp.
To remove the lamp from the mounting hook and change it, you need to remove the decorative cap and carefully remove the product by inserting your hand into the hole. Having pulled out the device, you need to carefully disconnect the wires and insulate the exposed ends. To perform this work, you don’t even need a screwdriver: all actions can be easily performed without a special tool. Removing a chandelier from a cross-shaped strip will require more skill, because such a fastening system itself is much more complex.
Before replacing an old chandelier on a suspended ceiling, you will need to remove all fragile elements from it that could fall and break:
- lampshades,
- glass pendants,
- light bulbs, etc.
After this, you need to use a screwdriver to unscrew the nut or locking screw holding the protective cap. The fastener itself is hidden there. The pendants to which the lamp clings are screwed to the concrete base using screws. By unscrewing them, you can remove the entire structure, including the bar, and then disconnect the individual parts. After removing the lamp, as in the previous case, you need to sequentially disconnect all the wires and process their ends. Before this, you can make sure that there is no voltage in one of them by using a special indicator screwdriver.
Quick replacement of a ceiling light
The convenience of a tension covering made of fabric or film lies primarily in the fact that the new light source can be installed in a completely different place. Having made a hole in the film or fabric surface of the ceiling tension covering, you must immediately carefully secure it from spreading and changing the degree of tension.
For this purpose, there are special mounting rings made of durable plastic on sale, to which the edges of the cut hole for the new lighting fixture are glued along the contour.
When changing the location of the electric light source or installing additional lighting lamps, the ceiling tension fabric covering can be removed and a new electrical wiring made along the ceiling. With a ceiling covering made of PVC film, it will be somewhat more difficult to make such a reorganization of lighting. The film is installed under heat and without the help of specialists, replacing a chandelier on a suspended ceiling or installing it in another place will be quite difficult.
By removing the old lighting fixture, the installer gains access to the mounting structure. If a stationary ceiling hook was used as a hanging element, then under the chandelier you will find an already installed single ring that holds the suspended ceiling in its place. If there is a strip under the lighting fixture, two mounting rings can be located with ready-made places for screwing in mounting screws.
The size of the strip must be completely identical to the old fastener. Installing a longer strip may cause distortion of additional installation equipment and damage to the integrity of the tension covering.
A good practical tip would be to film or video the entire process of removing old lighting fixtures. Then you will probably be able to avoid mixing up the electrical wires and install the new lamp in exactly the same way as the old one. Based on the footage, all work on installing a new device must be carried out in reverse order.
When hanging a lamp on a hook, problems almost never arise. By connecting the wires and covering the connection point with a decorative element, the replacement of the lighting fixture can be considered complete. Knowing how to remove a chandelier from a suspended ceiling means quickly figuring out how to install a new one.
Moving the lamp to another location
The situation is more complicated when installing the lamp in a new place. Any suspended ceiling is quite expensive for consumers and experimenting after the final installation of the entire structure by changing the placement of ceiling lamps is not the easiest task. If you need to change the interior lighting and add or move a lamp, it is best to turn to professionals. Accidental damage to the ceiling covering and its repair will cost the consumer much more than installing additional light by an experienced worker.
Stage 1. Preparation
Before changing a chandelier on a suspended ceiling, you need to study the safety rules during electrical installation work and prepare all the necessary tools and materials. First, the technician must turn off the electricity to avoid electric shock. Be sure to check that the room is de-energized. Then you can start removing the old ceiling light.
We select tools and materials
Before dismantling, you need to prepare the tools and accessories that you will need during work. All you need is an indicator screwdriver, insulating tape, pliers, a flathead and Phillips screwdriver and a knife. The master will also need a stepladder with which he can get to the lighting device. This kit is enough to remove the old lamp.
Also during the work you may need a drill or hammer drill, terminal blocks, fasteners, self-tapping screws with dowels.
De-energizing and checking for lack of voltage
Any work related to the installation of electrical networks is life-threatening. To avoid electric shock and wiring failure, you must follow these recommendations:
- First of all, turn off the power to the room. To do this, automatically turn off the switch in the panel or lift the switch on the power supply panel, which is responsible for the current in the room where dismantling will be carried out.
- Make sure that the room is de-energized by simply pressing the switch.
- Check again that there is no current using an indicator screwdriver. To do this, simply attach the tip of the tester to the wire or insert it into a socket; if the LED does not light up, then the power is turned off.
Attention! It is strongly recommended to carry out electrical installation work wearing protective gloves that protect against voltage from 220 V.
Stage 2. Dismantling the old chandelier
The process of dismantling a lighting device differs depending on the method of its attachment. There are 2 ways to attach it to a sub-ceiling: on a hook or a mounting strip (with 2 or 4 screws).
To dismantle the lamp from the hook, follow this plan:
- De-energize the room in which the lamp to be replaced is located. Be sure to check that there is no voltage.
- Remove the trim to reveal the hole in the trim.
- Stick your hand into the hole in the ceiling, carefully remove the lamp from the hook, and pull it out along with the wires.
- To remove an old chandelier, ask someone close to you to support it. Remove the electrical tape from the wire connection areas. As soon as you see exposed wiring, apply a tester to it; if the light does not light up, then there is no power supply.
- Disconnect the wires from each other, wrap the bare ends with electrical tape.
To remove the lighting structure from the bar, perform the following steps:
- Turn off the power, make sure there is no voltage.
- Unscrew the cap nuts and remove the decorative trim.
- Remove the screws that secure the plank to the platform on the sub-ceiling.
- Remove the device along with the bar, ask an assistant to support it.
- Then disconnect the wiring strands and process the ends as in the previous case.
Important! Before removing the old chandelier from the ceiling, remove all parts from it (shade, lamp, various decor) that can be accidentally broken.
During dismantling, be extremely careful to avoid damaging the tensioned fabric.
How to change a chandelier on the ceiling: dismantling technology
To remove old lighting equipment, you should:
- stand on a stepladder and lower the decorative cover, under which the twisted wires and hook are hidden;
- cut the wires and remove the old chandelier from the hook.
When replacing a chandelier, the mounting hook is most often left in place. Subsequently, new lighting equipment is attached to it. However, there are also lampshades on sale today, the installation of which must be done on a special strip. If you plan to install just such a chandelier in your house, the hook, of course, will also have to be dismantled. Otherwise, it will simply interfere with the installation of a new lighting fixture.
To remove the old mounting hook, you must first gouge out the plastic plug that it is attached to. Next, you should unscrew this element itself from the plate. If you decide to leave the hook, it should still be checked for strength. To do this, you just need to pull it harder. If the hook is loose or loose, it should also be removed. Next, you need to mount either a mounting plate on the ceiling with dowels or a new hook on a plug, depending on the type of chandelier purchased.
Stage 3. Installation of the fastener
Professionals advise buying a new lighting structure only after dismantling the old one. This is necessary to find out how it was attached to the main ceiling. You need to choose a new lamp with the same mount. Then all that remains is to connect the wires coming from the chandelier and the ceiling, hang the product on a hook or attach the strip to the embedded platform on the rough ceiling. This option is considered the easiest.
If the old chandelier clung to a hook, and you purchased a model that is fixed to the bar, then the task becomes more complicated. In this case, you need to dismantle the decorative ceiling covering, pull out the hook and install a new platform from a wooden block or piece of plastic. It is attached to the old ceiling using metal hangers.
You can remove the tension fabric covering with your own hands. If the canvas is made of PVC film, it will be more difficult to reorganize the lighting, since it is mounted under heat. Then you need to call the experts. If the PVC ceiling is installed using the harpoon method, then you can partially or completely remove it yourself.
After dismantling the decorative fabric, you can change the arrangement of the fastening fittings or prepare a platform for the lamp in a new place.
The chandelier is attached to an anchor hook according to the following plan:
- A hole with a diameter of 6 to 14 mm is drilled in the rough ceiling, a hook is inserted, and a nut is tightened.
- Then the decorative coating is installed.
- When the ceiling canvas is dry, you need to feel under it for the place where the hook is located.
- Then you need to cut a hole in the canvas with a knife. Plastic rings are used for this. It is smeared with glue, applied to the place where the hook is located (the rim should completely cover the hook), then you need to wait until the glue dries.
- Then a hole is cut in the ceiling inside the rim, through which the wires are pulled out, and the chandelier is connected.
Is it possible to replace a chandelier on a suspended ceiling?
Stretch ceilings are considered a universal coating that has not lost its relevance for several decades. This finish can last a very long time, however, even the most original and fashionable ceiling design can become boring over time. Replacing the central chandelier will help change it and transform the interior. Also, such a measure may be required if the old lamp fails. In these cases, you will definitely try to find the answer to the question of whether it is possible to replace a chandelier on a suspended ceiling with your own hands.
Is it worth calling specialists?
In many countries, replacing light bulbs and carrying out basic electrical wiring work is carried out only by specialists who have the appropriate licenses and permits for this type of activity. Although there are no such requirements in our country, such a responsible job as replacing a chandelier on a suspended ceiling should be entrusted to specialists with relevant experience. Is it possible to cope with it on your own? Of course you can, but you risk running into some difficulties. Let's look at the most common of them.
- Wrong choice of chandelier . As you know, a stretch ceiling is thin and is a fairly “delicate” coating. Therefore, in order to mount any lighting fixture on it, you must first install a special embed on the rough ceiling. It is this element that will bear the main weight of the chandelier. The mortgages used today by craftsmen can be designed for chandelier models with different fastenings. This can be a hook that is fixed to the rough ceiling, or a plastic platform. To determine which option was used in your case, you need to partially dismantle the installed chandelier and gain access to the mounting. Only after this can you go in search of a new lighting fixture. Very often, ordinary people do not take into account the need to match the fastening with the mortgage. As a result, they choose a chandelier that is not possible to mount on a suspended ceiling.
- Short circuit and fire . If you are planning to replace a chandelier on a suspended ceiling, we recommend that you first understand whether you can connect the electrical wiring correctly. Without experience working with electricity, you run the risk of short circuits and even fires in the wires. As a result, you will have to change not only the chandelier, but also call specialists to dismantle the stretch ceiling and replace the wiring. In the worst case, the melted blade will also have to be replaced.
- Damage to the coating . Any careless actions when replacing a chandelier can lead to damage to the stretch ceiling. You can pierce the fabric with a screwdriver or other tool. As a result, you will lose the warranty on the structure and will be forced to repair the ceiling.
Based on all of the above, we can conclude that it is still better to entrust the replacement of the chandelier to specialists who have extensive experience working with tension structures. Only craftsmen will be able to accurately determine how the chandelier was secured to the mortgage, correctly connect the wiring and maintain the integrity of the ceiling covering.
How to choose the right chandelier?
If you are confident in your own skills and theoretical knowledge, and are wondering whether it is possible to replace a chandelier on a suspended ceiling with your own hands, we offer you some tips and recommendations from professionals. So, before you start replacing, you need to do the following work.
- Turn off the power supply . You can turn off the light on the common panel, which is most often located in the vestibule. In some houses and apartments, the shield is installed indoors. It can be divided into several power branches. In this case, it is important to turn off the one that supplies current to the chandelier being replaced.
- Determine the type of mortgage . To find out what type of mounting was used and to choose the right new chandelier, you need to gain access to the ceiling space. This can be done by removing the decorative base. If a metal hook is visible through the resulting hole, then a new chandelier should be purchased with just such a fastening. If there is a plastic or wooden platform in the ceiling space, then you need to give preference to a chandelier with a mounting strip.
Do not forget that different lighting fixtures may differ in size and number of shades, as well as decorative elements. This significantly affects the weight of the chandelier and, accordingly, requires the use of certain mortgages. Therefore, the new chandelier should not be much heavier than the old one, because its installation will require a reinforced mortgage, for the installation of which the suspended ceiling will have to be dismantled.
How to install a new chandelier?
So, now you know whether it is possible to replace a chandelier on a suspended ceiling yourself, and how to choose the right new lighting fixture. But how to cope with the replacement yourself? To do the job correctly, we recommend following the instructions below.
- First of all, turn off the power supply to the chandelier. Remove the base of the chandelier. To do this, you need to unscrew the decorative nuts.
- We find the terminal block in the ceiling space to which the wires coming from the chandelier are connected and disconnect them.
- If the chandelier is attached to a hook, simply remove it from it. If a mounting strip was used, you need to carefully unscrew the mounting bolts.
- Having removed the old chandelier, you can begin installing the new one. First, observing polarity, connect the chandelier wires to the terminal block. You can then secure the lighting fixture to a hook or mounting strip.
- All that remains is to screw on the decorative base of the chandelier, which will fit tightly to the surface of the ceiling and give the structure an aesthetic appearance.
Please note: if you choose a new chandelier with a different mount, it is recommended to call specialists to replace it. They will dismantle the ceiling, prepare and install the appropriate embed and return the canvas to its place. However, this option is only available if the ceiling was installed in profiles with harpoon fastening. In other cases, along with the chandelier, the suspended ceiling will have to be completely replaced.
See also:
- Correct placement of lamps on a suspended ceiling
- How to close the technical gap on a suspended ceiling?
- New fashion: light lines on a stretch ceiling
- Secrets of photo printing on the ceiling from Asta M (video)
- Lamps on the kitchen ceiling: the right choice and location
- High-quality photo printing on the ceiling from (video)
Stage 4. Installation and connection of the chandelier
You can connect the chandelier to the network yourself, the following instructions will help:
- Turn off electrical power.
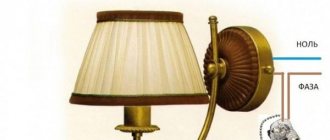
- Disconnect the wires so they don't touch. Sign them this way: N – zero, L – phase. To check which wire is which, turn on the light for a while, attach an indicator to the cable, if the light comes on, then this is a phase, mark it.
- Strip the ends of the wires by 6 mm, connect the wires coming from the lighting structure and the ceiling, and secure them with terminal clamps. You can also twist the cables and put protective caps on their connections. It is not recommended to use electrical tape for this purpose, as there is a risk of it delaminating.
You can connect the lamp in different ways; the choice of method depends on how many wires come out of the lighting device and the inter-ceiling space.
If 2 cables come out of the lamp and the ceiling, then connect both phases and neutral.
In modern buildings, wiring consists of three wires of different colors. Two of them are phase, and the third carries zero charge. If 3 wires come out of the interceiling space, and 2 from the chandelier, then one of the phase cables should be insulated and the rest connected, as in the previous case.
Sometimes it happens that 2 wires come out of the ceiling, and 3 or more from the lamp. Then you need to connect all the wires with zero charge, and you should do the same with phase cables.
If 3 or more cables come out of the lighting structure, and 4 from the ceiling, then you are dealing with a phase, neutral and ground wire. Simply connect the wires of the same name coming from the chandelier with the ceiling wires. If the lamp does not have a grounding wire, then connect the phase to zero, and insulate the excess wire from the ceiling.
After completing the electrical installation work, close the junction box and complete the installation of the luminaire.
Then connect the power supply and check the operation of the lighting device.
DIY chandelier replacement
Sometimes a situation arises when it is necessary to replace a lamp or chandelier on your own. How to do this will be discussed below. For work you will need the following tools: - a ladder (stepladder), - an indicator screwdriver, - a screwdriver with an insulated handle, - pliers, - wire cutters, - electrical tape, - a flashlight, - a knife.
The process of replacing a chandelier consists of the following steps.
STEP 1. Turn off the voltage at the circuit breakers.
STEP 2. Climbing onto a stepladder, move aside the decorative protection of the chandelier (looks like a glass), which is located under the ceiling. There are wires underneath it.
STEP 3. Remove the insulation (electrical tape) from the connected wires. To do this, without removing the chandelier from the hook, use pliers to unscrew the wire connection. Now remove the chandelier from the hook.
STEP 4. After making sure that the ends of the wires are spread apart, turn on the voltage using the switch that supplies voltage to the chandelier wires.
STEP 5. Climb onto the stepladder and, WITHOUT TOUCHING the wires with your HANDS, use an indicator screwdriver to determine the wires to which the phase fits. The indicator light on the phase wires will light up. Remember or mark the wires with the phase.
STEP 6. Turn off the circuit breakers (voltage).
STEP 7. Look at the number of wires on the chandelier and how many at the exit from the ceiling. The chandelier can have three wires (two wires of the same color are phase wires and one of a different color is zero) or two wires (one phase, the other zero). If three wires come out of the ceiling (two phase and one zero), connect the phase wires of the chandelier to the phase wires from the ceiling, zero to zero. If two wires come out of the ceiling (phase and neutral), and there are three wires on the chandelier, you need to twist the two phase wires on the chandelier into one. In this case, connect the wires from the chandelier and from the ceiling phase to phase, zero to zero. It happens that three wires come out of the ceiling (two phase, one neutral), and there are two wires on the chandelier. In this case, one phase wire from the ceiling must be insulated. Connect the remaining two to the wires on the chandelier.
STEP 8. Having decided on the phase and neutral wires, hang the new chandelier on the ceiling hook. And connect the wires depending on their number. To make the connection of the wires more tightly, you need to use pliers. Isolate the zero separately from the phase. If there are two phase wires, then they are insulated separately from each other. Slide in the decorative trim covering the wires.
STEP 9. Turn on the circuit breakers (voltage).
When you may need professional help
The help of craftsmen is necessary if you want to change the location of the chandelier. Covering with PVC film is an expensive pleasure, so stop experimenting.
You need to turn to professionals if you want to supplement the lighting in the room with lamps or install another chandelier. The risk of damage to the decorative canvas during work is quite high, so do not skimp on the services of an experienced craftsman.
If you are not sure that you can cope with electrical installation work, then it is also better to call a specialist, because such work requires professional skills and accuracy.
Tips for choosing a lamp for a suspended ceiling
If you decide to install a chandelier on a tension covering, then choose the device responsibly. The ceiling lamp must meet the following requirements:
- Buy a chandelier in which the shades point down or to the sides. If the lamps are directed upwards, then over time unsightly stains may appear on the PVC film. In addition, there is a risk of damage to the canvas.
- Buy lamps whose housing has a high level of thermal insulation. If the base is metal, the ceiling will constantly heat up and may become deformed.
- Suitable for suspended ceilings are products with universal shades into which LED lamps can be screwed. Such light sources practically do not heat up, create high-quality lighting, and help save electricity.
- Buy chandeliers with closed shades that will block the light source. Otherwise, use LED bulbs only.
- The distance between the lamp and the PVC sheet should be 20 cm.
- Buy lighting designs with rounded shapes. Lamps with a complex design and sharp edges can damage the ceiling covering.
When choosing a chandelier for decorative covering, consider the size of the room.
Main conclusions
Replacing a chandelier on a suspended ceiling with your own hands is only possible if the fastening of the old device and the new lamp is the same.
Before dismantling the lighting structure, you need to disconnect the room from the power supply, prepare tools and materials, and study the safety rules during electrical installation work.
If the fastening of the old and new lamps does not match or you want to move it to a new place where there is no hook or strip, then you should contact a professional. In such cases, it is necessary to dismantle the PVC coating; doing this yourself is not recommended, since it is quite easy to damage it. The services of experienced craftsmen will cost you less than replacing damaged fabric or troubleshooting electrical wiring problems.
Installation with transfer
How to change a chandelier on a suspended ceiling if a new installation location has been chosen for it? To perform this procedure, the old lampshade is also first dismantled. Next, the suspended ceiling itself is removed for a while. Of course, you should not carry out this procedure yourself. To do this you will need to hire professionals.
After the suspended ceiling is removed, wiring is pulled to the new installation location of the chandelier. Next, hang the PVC film in place. To install the chandelier in it, of course, you will need to make a hole and reinforce it with a plastic ring. After access to the reinforced concrete ceiling slab is opened, a hook is hung on it:
- drill a hole in the ceiling using a hammer drill;
- screw a hook into it (such elements are supplemented with threads);
- secure the hook with a spring latch.
Next, a new chandelier is hung on the ceiling using standard technology. Before performing this procedure, the film must, of course, be carefully leveled in height.