- 1 Tools for work
- 2 Types of chandelier fastenings to concrete ceilings
- 3 On the hook
- 4 Anchor
- 5 Using a mounting plate
- 6 Safety precautions during operation
- 7 Useful tips
- 8 Conclusion
A chandelier lighting fixture is both a decorative element with great weight and a complex design. Fastening the lighting fixture requires special attention, since the safety of the occupants of the premises depends on the strength of the installation. Installation of the lamp can be done in several ways, but in any case it is important to follow safety precautions for mounting the device and check the grounding of the electrical wiring.
Types of chandelier fastenings to concrete ceilings
The types of fastenings of chandeliers to a concrete ceiling are different. The chandelier is installed using the following fasteners:
- The hook is a reliable and popular type of fastening. It is not difficult to install and has the ability to replace the lighting fixture with another.
- Anchors are used when it is necessary to attach large, heavy chandeliers to a concrete ceiling.
- When attaching a chandelier with a mounting strip, a thin strip is installed, screwed close to the ceiling. This type of installation is a complex process, but it will allow the chandelier to fit tightly and firmly to the ceiling and hide the wiring.
Return to contents
Stages of installing a chandelier using a metal strip
1. Turn off the power supply to the apartment or house.
2. If there is an old hook in the ceiling, it should be removed.
3. Attach the metal strip to the place where the lamp is fixed and mark the drilling points for the dowels with a pencil.
4. Using a drill, drill holes of the required diameter.
5. Screw the dowels into them.
6. Insert the mounting bolts into the bar and secure them with nuts at a distance corresponding to the gap between the drilled holes.
7. Install the bar on the ceiling plane and secure it with self-tapping screws.
To connect the chandelier, you will need the help of a helper or a family member, since doing the work alone will be too problematic.
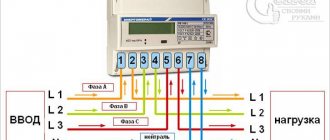
8. Connect the wires of the chandelier and the switch using a terminal block.
9. Place the decorative box of the lamp against the bar so that the mounting bolts fit into the holes in the box.
10. Press the box against the ceiling and screw in the decorative nuts located on the outside of the structure.
On the hook
Before attaching a lighting fixture to a concrete ceiling with a built-in hook, the first step is to check the strength of its installation. To do this, select a weight the size of the selected chandelier, secure it, and then pull it with force. A poorly installed fastener will begin to wobble or fall out completely; in this case, the hook will need to be replaced.
To install the hook, you need to make a hole in the ceiling using a hammer drill and install a collet, followed by mounting the fastening element into it. A pin is placed in the collet and a hook is hung; it is also possible to screw the hook directly into the collet. Before screwing the hook into the thread, you need to lubricate the hole with a thin layer of thick lubricant and screw two copper wires. Next, one hundred grams of gypsum solution is prepared, which in consistency will resemble thick sour cream. After which the hole is filled with a stick, it is important to remember that the gypsum mixture hardens quickly, so the filling of the solution into the thread should be carried out accordingly.
The hook is immediately placed into the solution before it has time to harden and the excess mixture is removed. Wait until the solution cools to room temperature; this will happen after 2 hours or more. After the final setting of the gypsum mixture, they begin to fasten the lighting fixture.
Return to contents
Stages of installing a chandelier on a hook
When thinking about how to attach a chandelier to the ceiling with an already installed hook, first of all check its strength: hang a load of the same weight as the lamp you have chosen, or pull it strongly. An unreliable hook that falls out or becomes loose must be replaced. It is important to remember that fasteners for heavy chandeliers are mounted only on the main ceiling, since no type of suspended plasterboard can withstand such a load. To install the collet, a hole is drilled with a hammer drill into which the fastener is inserted. A pin is screwed into the collet, onto which the anchor hook is hung, or it is screwed directly into the collet.
Mounting the collet on the ceiling
A hole in the drywall is also needed to drive a metal anchor into a concrete base or screw a self-tapping hook into a wooden base. To overcome the distance separating the base ceiling from the suspended ceiling, a chain is used: it is hung on a hook and the chandelier itself is attached to it.
As for light fixtures that are mounted on plasterboard ceiling profiles, fastening is carried out as follows: a butterfly hook is inserted into the hole in the plasterboard, which corresponds to the hole in the ceiling frame profile, which automatically opens and locks.
The principle of “opening” and adopting a T-shape also applies to “butterfly” dowels on which console lamps are mounted. At least two of these dowels are needed. They are inserted into holes in the ceiling and profile and secured with a self-tapping screw, after which they are automatically fixed.
Butterfly hook installation
Back to contents↑
Anchor
Anchor fastening.
Anchors are used to work with durable concrete ceilings that can withstand heavy lighting fixtures. A large chandelier weighing more than five kilograms is hung on an anchor hook, having first drilled a hole of the required diameter. The fastening element has a spacer, which after installation will move apart and fix the lighting fixture.
Such a fastening element has a sloppy appearance and thereby spoils the design of the premises. To hide protruding and protruding connecting elements, installation of chandeliers is carried out using decorative bowls, which will hide the mounting fittings. The anchor fasteners are made of metal, which allows them to withstand heavy lighting elements.
Return to contents
Using a mounting plate
The lighting fixture is mounted using a mounting strip on a plasterboard ceiling, which is not designed for heavy loads. In order not to disturb the weak supporting structure, it is necessary to strengthen the mounting location of the lamp. They think about the future type of fasteners even at the stage of installing the frame. Depending on the size of the fastening elements of the lighting device, the form of installation of the profiles is selected, which can be laid parallel or in the form of a square or rectangle.
Before you begin installing the fasteners, mark the places where the holes will be located in accordance with the locations of the screws in the plank. Dowels are installed in the recesses and the bar is screwed. If there is a previously installed hook in the concrete ceiling, you should not remove it, as it will come in handy if you need to change the lighting fixture. The lamp is fixed to the bar with screws. Light weight chandeliers are fastened with long self-tapping screws. For heavy-duty devices, fasteners are installed on a ceiling made of concrete or wood.
Mounting the lamp has the following sequence:
Place the lamp at the place of future installation, so that the place where the fasteners and wires are closed fits as closely as possible to the ceiling.- If there is a hook in the ceiling, it is advised not to dismantle it, but simply bend it to the ceiling so that it does not interfere with further work.
- Next, mark future fastenings under the mounting strips and install the ceiling clamp for the lighting fixture. It is important to install the mounting strip so that it does not interfere with further electrical wiring. The marks are made with a pencil and holes are drilled along them. Dowels are inserted into the resulting holes and the plank is secured to the ceiling using screws.
It is worth remembering that before installing the lamp, the device is analyzed, i.e. the weight, size and type of fasteners are determined. After the fasteners are installed, proceed to connecting the chandelier to the electrical network.
Return to contents
Attaching a chandelier to a hanging hook
In old high-rise buildings, chandelier pendants were installed during the construction stage. Installing a hook is also not a problem if you select the right hardware depending on the floor material. For wood, a regular hook-screw is sufficient.
In the case of a concrete floor, the following options are possible:
- installation of a hook on a transverse steel rod through a cable channel;
- installation of a hook with a spring butterfly lock in the standard opening. When passing through the cable channel, the wings of the “butterfly” spread, creating a support for the suspension, after which the structure is fastened with a washer and nut;
- in the absence of a standard opening, the function of the fastening element is taken over by a steel anchor with fastening at the free end. The place for drilling the opening for the anchor is located as far as possible from the wiring so that the drill does not touch the cable;
- If an internal cavity is found in the concrete, use skirted dowels for hollow-core structures.
Installing a chandelier on a suspended ceiling has its own specifics. The hook cannot be screwed into a plasterboard sheet, otherwise the entire structure will one day collapse under its own weight.
Installing a heavy chandelier on a suspended ceiling: arm yourself with knowledge before starting work
The situation is resolved as follows: a hole is drilled in the plasterboard sheet with a diameter slightly smaller than that of the chandelier glass, then a second hole is drilled in the ceiling in the center of the resulting opening for an anchor dowel with a pin. The anchor is screwed in all the way and secured with a ring nut. If the weight of the chandelier is less than 3 kg, it is permissible to use gypsum board dowels.
After finishing the installation, hang a load on the hook that weighs twice as much as the lamp: if it can hold it, there will be no problems with fixing the chandelier.
When the test is passed, wrap the protruding end of the rod with electrical tape or put a heat-shrink tube on it, which you then need to warm up well. Then turn off the power to the room, hang the chandelier on the hook and start connecting the conductors. Remember that when connecting lighting fixtures, only terminals are used; the twists will soon begin to spark.
In order to prevent electric shock, it is recommended to carry out electrical installation wearing protective gloves and shoes with rubber soles, and place a stepladder or stool on a dielectric mat.
Safety precautions when working
During the installation of the chandelier, it is important to follow safety precautions to avoid electric shock. Therefore, before installing the lamp, the room is de-energized. To do this, open the switchboard and lower the switch. Check the lights are turned off and the voltage in the electrical wires using an indicator screwdriver. If you fix the fasteners incorrectly, this will damage the power supply.
Another safety measure when installing a lamp is a mandatory check of the grounding of the electrical wiring.
Return to contents
Useful tips
By listening to the recommendations of experts, you will be able to make a reliable, durable and safe mount for many years. According to the advice of experienced builders, the hook in the ceiling is not removed, but left for possible future replacement of the lighting fixture. To prevent the hook from interfering, it is bent close to the ceiling.
When working with a rotary hammer, it is important to avoid dust getting into it, as this will lead to damage to the device. When connecting the device to the electrical network, you need to determine the phase, zero and grounding. Before choosing a fastening element for a chandelier, you need to analyze the lamp, namely, study its weight and dimensions. You should not try to save on fasteners, because the safe living of people indoors depends on their quality.
Return to contents