With the advent of cheap LED light bulbs on the market, the question of replacing them arises more and more often. To replace, you must first know the type of base. The figure below shows examples of LED type: E-27, E-14, GU-10, GU-5.3, G-9, G-4, GX53.
When replacing a light bulb, you need to pay attention to what type of lamp was installed in the spotlight. There are several types of spotlights:
- LED lamp MR-16 is used in luminaires DL-11;
- LED lamp minion E-14, used in recessed spotlights of the R-63 brand;
- GX-53 closed type lamps.
Let's look at examples of how to change an LED light bulb in spotlights.
Always turn off the mains power before replacing!
Replacing a GU5.3 or GU10 LED Bulb
Such a base is often secured with a retaining ring. They are secured in the socket with two conductive pins until they click (GU5.3) or by turning 90 degrees (GU10). Replacing them is quite simple using the following instructions.
- Turn off the network power;
- Before replacing, check the power of the lamp being replaced. It must correspond to the burnt-out power. If you install a more powerful lamp, you can damage the controller or transformer, if installed. When installed, they are calculated for a certain power indicator of the connected load;
- remove the retaining ring, which is located along the diameter of the body. Pull it gently and the light bulb will easily come out of the spotlight. If the ring has two tendrils sticking out inward, just squeeze them;
- remove the light bulb from the socket, holding the base with your other hand, install a new one;
- return the retaining ring to the groove.
How to replace a light bulb in a suspended ceiling - halogen and LED. Replacing spotlights
In order to correctly replace a light bulb in a spotlight on a suspended or suspended ceiling, you do not need to resort to the help of specialists.
The process itself is quite simple and will not cause you any insoluble difficulties. It is enough to know the basic principles of installing such lamps.
However, note that not all lamps in spotlights have the same types of mounting. Therefore, when choosing a new copy instead of a burnt one, pay attention to the type of base.
Here are several varieties of individual models:
Lamps with a threaded base, like regular standard ones, have no replacement secrets. They are removed by unscrewing and twisting. But other types are more popular in suspended and suspended ceilings.
Bulbs with two pins that click into place - GU 5.3, MR16
There are models that lock when rotated around an axis by 90 degrees - GU10.
Type GX 53 or tablet:
Let's look at the process of replacing all these lamps.
Suspended ceiling lamps have two main parts:
By functional we mean the frame and clamps. The lamp replacement process itself takes 4 steps step by step:
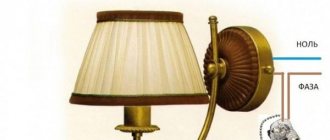
First of all, it is necessary to de-energize the room in which the replacement will be made. To do this, turn off the circuit breaker for the lighting circuit of the room in which the lamp is located.
You can, of course, simply turn off the light switch itself, but if you are far from electricity, you may not know that often (due to an error by installers), these same switches break not a phase, but a zero.
The phase wire continues to be energized on the wires and contacts, even after the lights are turned off. Therefore, in order not to take risks, it is better to do all disconnections in your electrical panel.
Remove the main retaining ring, which acts as a retainer. To do this, squeeze two antennae
and the light bulb itself will fall out of the housing, hanging on the contact socket.
After which, you easily pull it out of the contacts by pulling it towards you (MR16) or turning it counterclockwise (GU10).
Before installing a new one, be sure to check the power and voltage data on the old bulb. For example, for products of the same shape, the supply voltage may not be 220V, but 12V.
And the power should match or at least not exceed the previous one. Otherwise, the lamp may overheat or the power supply may overload (if provided).
If everything matches, plug the plug connectors of the new light bulb into the contact sockets of the socket.
- all that remains is to install it in the old place and fix it there
Fixation occurs using the same locking ring. To do this, squeeze its ears again, insert them into the grooves and release them.
The light bulb is fixed, you can turn on the light. There are models without locking rings. In this case, you will have to remove the entire lamp from the suspended ceiling.
How to do this will be discussed below.
Some people sometimes have problems with the fastening steel rim. For some reason he doesn’t want to hold on and constantly falls out.
This happens because the lamp does not sit in its place in the lamp. Accordingly, the grooves for the ring are closed by the body itself. There may be several reasons:
- deformation of the lamp body by springs
- the springs are of the wrong size and rest heavily on the body
This often happens during a massive replacement of several light bulbs, when the rings get confused and then installed on non-original spots.
- the suspended ceiling is fixed at too short a distance from the main one and the lamp together with the socket rests against the plaster
Replacing lamps type GX53 (tablet)
The easiest way to change them is:
- hold the lamp body with your left hand and turn the lamp very slightly (up to 20 degrees) counterclockwise until it clicks
- then pull it out by pulling it down
- installation and fixation in place of the new one occurs by aligning the contacts and turning clockwise. At the same time, a characteristic click should also be heard.
There is no need to pull out and dismantle the lamp itself.
Replacing light bulbs with E14, E27 sockets
Here the whole process is no different from the usual replacement of a standard chandelier or sconce socket.
Unscrew the old one counterclockwise and also screw in the new one. The main thing is not to confuse the size of the socles - E14 and E27.
When replacing lamps of any size and base, it is very important to consider their type.
For example, halogen lamps should not be touched with bare hands.
Since there may be traces of oily fingers on it. Firstly, this will cause dark spots to appear when illuminated. Well, secondly, this will lead to its burnout in the shortest possible time.
Most often these are models with a G4 or G9 base, but not only.
They (G4-G9) do not have any additional fasteners to the lamp body. To replace the light bulb, simply pull the bulb down.
When working with such products (halogen), be sure to use gloves or wipes.
You can also wrap part of the flask with paper tape.
Replacing a lamp in a suspended ceiling
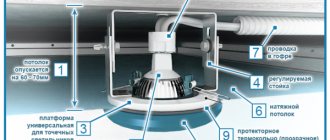
If you are planning to change LED lamps, then you should take into account that some lamps and the lamps inside them are a single whole. In this case, you will have to change the lamp itself. The procedure is as follows.
First, remember that it is not held in the ceiling film itself, but in a special mounting platform.
Using your hands, carefully bend the lamp to see two expanding springs, due to which the fastening occurs.
These springs will need to be held during dismantling so as not to catch and tear the ceiling itself.
- press the springs inward and pull down to pull out the lamp
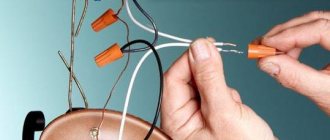
- disconnect the power connector and connect a new spot in its place
- now bend the springs inward with your fingers and insert them into the ring of the mounting platform
Replacing E-14 and E-27 lamps
For this type, replacement is even easier. You need to unscrew the old light bulb counterclockwise and screw in the new one clockwise, while de-energizing the room in advance. It is necessary to screw in all the way, without applying any effort.
Pay attention to the base. E-27 is a well-known standard, the diameter is the same as that of a regular incandescent light bulb. E-14 – base with a smaller diameter. If in doubt, take the burned out light bulb with you when purchasing.
Base G9 and G4
These miniature light bulbs are similar in design, they differ in size, but their installation principle is the same. Due to their low weight, they are attached only to the socket with the base. Additional fastenings are usually not provided. Let's look at how to replace such a light bulb in a spotlight.
- De-energize the lamp by turning off the mains power;
- if there is a decorative light diffuser, remove it;
- We take the body of the light bulb and pull it out with a slight force;
- install a new one by inserting the pins into the socket. If you have a halogen, when installing, handle it only with gloves or a cloth.
Replacing light in furniture lighting
Any spotlights on furniture and kitchen equipment are replaced in 99% of cases using one of the above methods. The whole difficulty of replacement lies in dismantling the decorative lamp diffuser.
Strict requirements for the appearance of the lamp force designers to hide the fastenings as much as possible and you need to use your imagination to understand how to remove this or that lamp.
What lamps are used in spotlights?
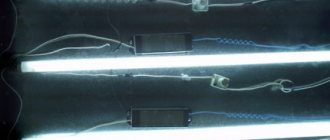
Traditionally, a spotlight produces a relatively small round or ellipse-shaped light spot on the illuminated surface. This is achieved by using special reflector lamps as a light source. In them, the light does not spread in all directions, as in a traditional incandescent lamp, but in a rather narrowed beam. Its width can vary from 30 to 60 degrees, sometimes more. To concentrate light, a reflector is usually used, which is made of glass, like the lamp bulb. In modern LED lamps, the bulb is made of transparent or matte impact-resistant polycarbonate. Whatever the lamp bulb and its reflective reflector are made of, its inner surface is metalized - covered with a thin layer of metal. The shiny surface, usually of sprayed metal, is a good reflector of almost all light that hits this metal.
Halogen incandescent lamps were made as reflectors. After the mass use of LEDs began, LED retrofit lamps began to be produced to replace them. They had all the external dimensions of the previous lamps, but small, ultra-bright LEDs were used to produce light. In the base part of such lamps there was a small-sized, highly stable direct current source for powering the LEDs.
Choose a new LED lamp for your spotlight on our website.
The task of replacing an LED lamp in a spotlight can arise in two cases - when the lamp fails and if there is a need to change the luminous flux from long-installed lamps.
Precautionary measures
- When replacing, always turn off the mains power;
- Before replacing, try to wait until the lamp has completely cooled down (read: do LED lamps get hot);
- Twist light bulbs in glass housings with extreme care. Over time, under the influence of temperature changes, the material loses its strength. Take special care of your eyes;
- If there is insufficient contact between the conductor and the socket, under the influence of high temperatures, the light bulb body may “stick” to the base. In this case, it is better to disconnect the cartridge itself from the wiring and continue dismantling below.
Please rate the article. We tried our best:)
Did you like the article? Tell us about her! You will help us a lot :)
How to change a light bulb in a spotlight on a suspended ceiling
Depending on the type of socket, light bulbs are removed differently. Let us consider in detail the replacement process for each type of base. Before starting work, it is better to turn off the power supply at the panel, otherwise there may be an electric shock.
It is not very convenient to remove light bulbs of this type from spots, since the outer part is recessed into the lamp body and is located above the plane of the stretch ceiling. In the lampshades they are held in place using a special retaining ring or a wire clamp with antennae at the ends. Such lamps are compatible with LED and pin-type halogen elements.
To change a light bulb with a G5.3 socket, you need to squeeze the two antennae and pull out the fixing bracket. If a retaining ring is used as a retaining part, it is simply unscrewed. The lamp falls out. Then you need to disconnect it from the contacts by pulling it towards you. After this, a new lamp is connected, inserted into the lamp body and the fixing ring is installed in place.