Process Details
Determining the purpose of the wires in the chandelier
The simplest option would be to use a specialized electrical circuit, which you can find in the data sheet for the lighting device. There, as a rule, the purpose of all types of cables and step-by-step connection instructions are indicated. According to normal standards, cable color markings should be done as follows:
If there is no documentation for the chandelier, and the color marking of the wires does not clearly indicate their identity, you need to determine their purpose using a multimeter.
Find the phase wire. To do this, you need to place the multimeter probe on the middle contact of each of the cartridges, and next touch the two wires that remain. Using a sound signal, you need to identify the phase wire, mark it, or simply remember it.
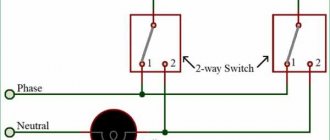
Let's look at how to connect a double-circuit chandelier to the network.
How to connect a double-circuit chandelier to the network
How to connect a chandelier with 3 wires? To do everything correctly, and two of the three are phase, you need to inspect the switch and the wires coming out of the ceiling. The simplest option is when the switch is a two-button type, and only 3 cables come out of the ceiling. You can find out the purpose this way:
Turn off the breaker. All three wires need to be checked again and the lamp should never light up.
If the switch is a single-key type and only a couple of wires come out of the ceiling, then you need to check them with the switch connected with a voltage indicator and find the neutral and phase wires. The latter need to be connected to each other and to the phase wire of the electrical wiring, and the neutral wires are also connected. Check switching on and off. If the switch is a single-key switch, and there are three wires in the electrical wiring, you need to find out the purpose of the third wire. To do this, turn on the switch and check for voltage on all wires. If a phase is detected on two wires, the chandelier can be connected using a three-wire circuit. If the phase is on only one wire, and the third wire is yellow-green, then the connection is made as in the last case - connect both wires of the chandelier phases to the phase wire of the electrical wiring, and the grounding type conductor must be insulated and removed.
How to connect chandeliers with a ground wire
If the lighting device has a metal body, it must be grounded. In new apartments, all electrical networks, including lighting, according to standards, must have a yellow-green grounding conductor. If your electrical network meets this requirement, then to connect the chandelier it is enough to connect wires with the appropriate color markings using an adhesive pad or even twisting.
If the network is old and the insulation of all wires is the same color, then it is important to proceed in the following sequence:
Helpful information
Let us immediately point out some features that can help:
- Breaking the circuit with a switch is carried out only through the phase line, and the neutral conductor and grounding conductor (if any) go directly to the consumer;
- For each branch, a separate phase wire is laid at the output of their switch (It is separated in the switch itself. A single-key switch has one phase conductor at the output, a two-key switch has two, a three-key switch has three). This affects the wire used leading from the switch;
- On the terminal blocks of the chandeliers you can find the designation of the terminals, which makes the connection easier (the marking “L” indicates that the terminal is phase, “N” is neutral, “PE” is grounding).
Now directly, how to connect the chandelier to the switch.
Let's assume that the line is made in advance, the switch is in place, and 2 or 3 wires stick out from the ceiling (with the third wire being “ground”).
In general, the connection diagram is the simplest - “one-key switch - 1 lighting fixture.”
If the chandelier is armless (with 1 lamp), then the connection method does not differ at all from powering a simple light bulb.
Also, connecting a chandelier to one or more bulbs is greatly simplified by a multi-channel wireless switch.
Precautionary measures
Be careful when connecting any electrical devices. All connections and connections must be made only with the switch turned off after checking that there is no voltage on the wires. Places where there will be twists must be insulated with insulating tape or special caps. If you doubt that you can connect a chandelier with three wires correctly, you should entrust this task to professionals.
Source
Preparatory work before installing the switch
To connect the light switch, preliminary preparations must be made. Installation is carried out from the nearest distribution box, to which power is supplied - network cables for supplying electric current.
How to connect a single-key switch: simple instructions for dummies and not so Powerful to the switch and lamps is supplied from the distribution box
Three lines are laid - one from the junction box to the lamp, the other from it to the switch. The third one comes from the shield. As a rule, two- or three-core wires of the installation type are used, i.e., with a copper (or aluminum) conductor made of solid metal. In everyday life, such a wire is called hard, in contrast to soft, in which under the insulation there are pigtails of small hair conductors. On the marking, a rigid cable is designated by the letter “U”. The cross-sectional area of the conductor is selected in accordance with the load. For an ordinary lamp or chandelier, which combines up to 3 lamps, a wire with a cross-sectional area of 1.5 mm 2 is sufficient.
If energy-saving or LED light bulbs are used, the cross-section of the conductor can be reduced to 0.75 mm 2 in order to save money.
The type of wiring installation can be of two types - internal (hidden) and external. Hidden wiring is installed in the thickness of the wall or ceiling. The outer one runs along their surface, the cable is packaged in a corrugation or cable channel, which is attached to the wall with special brackets or other fastening material.
After the wires are separated, you can begin installing the switch.
Single-key switch connection diagram
The principle of operation of the switch is based on breaking the power supply circuit of a light bulb or any other device. Switching the toggle switch activates a contact pair, which disconnects the power wire from the current consumer.
How to connect a single-key switch: simple instructions for dummies and not so much The switch usually opens the phase wire
When assembling the circuit, you should pay attention to the reliability of the contacts. If the wires have large gaps, then at one point a so-called electric arc may occur, the temperature of which is sufficient to melt and ignite the insulation. This can lead to smoke in the living space and even a fire. In order to avoid such phenomena, the following connection methods are used:
- electrical terminal blocks. Connection with terminal blocks is especially recommended in cases where it is necessary to connect wires with cores made of different materials, for example, aluminum and copper;
How to connect a single-key switch: simple instructions for dummies and not so much. When connected through the terminal block, strong, reliable contact is ensured, so the wires will never spark - twists. Made using pliers. After removing 1.5–2 cm of insulation with a knife, intertwine the wires into a tight connection. After this, they are soldered with tin and insulated with electrical tape (not tape!). If one lamp is connected, there will be 3 such connections. If the home network is equipped with grounding and a three-core cable is used, all the ground wires are connected into one node inside the junction box. How to connect a single-key switch: simple instructions for dummies and not so much The wires are twisted tightly using pliers and then soldered
Twisting of copper and aluminum wires is also possible. But if the connection is overloaded, aluminum can melt because it has a lower melting point than copper. The contact will be interrupted.
Tools and materials for connection
To connect you will need the following tools:
- Knife.
- Electrical screwdriver.
- Household voltage indicator.
- Pliers.
The materials on hand should be:
- Wires of the required length.
- Junction box.
- Terminal blocks or electrical tape.
- Lamp socket (and the lamp itself).
- Single key switch.
Photo gallery: materials for switch installation
How to connect an LED lamp to 220V
The main advantage of such lamps in comparison with those operating on 12 Volts is that they can be directly powered from a switch. As a result, no additional financial costs are required for the purchase of a power supply, and installation is also straightforward. There are several ways to install LED lamps:
Each is used in different situations and has its own advantages and disadvantages.
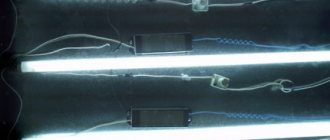
Sequential
Serial connection is used when it is necessary to save cable footage, and there are no special requirements for the premises. The implementation will require several double or triple wires. No more than six LED bulbs can be installed in one circuit, otherwise the brightness will be low. If one lamp fails, you will have to check the functionality of each one in order to eliminate the breakdown.
The connection itself should not be difficult. A phase is drawn from the switch to the first lamp, then from the first switch the cable is pulled to the next device. A zero is laid to the last lamp, which comes from the distribution box.
If a mistake is made in the circuit and the power and zero are reversed, the lamps will be under constant voltage, which is unsafe.
Parallel
Parallel connection is more practical and is used more often. During the implementation process, each lamp will produce the brightness declared by the manufacturer. The only drawback that can be identified is the increased conductor consumption compared to a serial connection.
It is recommended to give preference to the VVG ng cable 2*1.5 or 3*1.5. The designation indicates the presence of a PVC shell - a high-quality insulating material. The marking indicates that the model is non-flammable. If there are special requirements for the room, sometimes wires with the additional marking “ls” are used, which means that a small amount of smoke is released when ignited.
To connect the lamp, a cable is pulled through the switch from the junction box. It is connected in turn to each lamp. After the first lamp, the cable is cut and fed to the next one until all devices are connected into one common system.
The advantage of the parallel connection method is that even if one lamp fails, the circuit will be fully operational.
Radial
By its nature, the beam circuit refers to a parallel connection, often used for chandeliers. The principle of implementation is to lay the cable to each lighting fixture individually. This method is the most labor-intensive and requires large financial costs due to the large amount of wire used. To save money, the cable from the distribution panel is routed to the center of the room and from there to each lamp. Next, single-core wires are connected to the phase and zero, which are laid to the lamps.
We analyze in detail the connection diagram, how to connect a light bulb and switch
Let's go through the wires again.
The wire on the left is the power supply.
The wire suitable from above goes to the lamp (chandelier). In our example, for a socket with a light bulb.
The bottom wire goes to the switch.
We start wiring the circuit for connecting the switch with the wire going to the switch. We clean it and remove the first layer of insulation. There is no need to cut the wire too much; at least 10 cm of each wire should remain in the box.
We remove the insulation from the copper core of the phase and neutral wires, approximately 4 cm.
Let's move on to the wire that goes to the lamp. We remove the top insulation, strip 4 cm each on the phase and neutral wires.
Now we can start connecting the wires.
Zero comes to the light bulb directly from the supply wire, and the phase is made into a gap. The switch will break it; when you press the power button, it will close the circuit and supply a phase to the light bulb; when you turn it off, it will open and the phase will disappear.
We connect the phase white wire going to the light bulb with the outgoing blue wire of the switch.
There are different types of wire connections; in our example, the connection is made in the simplest way, by twisting. First, twist the wires together with your fingers.
Then we stretch the connection using pliers and tightly twist both wires together.
We bite off the uneven end of the twist.
In this circuit, we do not use ground wires, so we insulate them and place them in a distribution box so that they do not interfere.
Now let's move on to the power wire. We clean it and prepare the phase and neutral wires for connection.
We insulate the grounding wire and place it in the junction box.
Now, we supply power to the switch. We connect the phase core of the supply wire with the phase core of the wire going to the switch. Twist the two white wires.
And at the end of the circuit, we connect the neutral core of the supply wire to the neutral core of the wire going to the lamp (lamp).
The connection diagram for the single-key switch is ready.
Now, we need to check the operation of the circuit in action. Screw the light bulb into the socket.
Apply voltage. Turn on the circuit breaker.
Using a voltage indicator, we check the correct connection of the circuit, make sure that we have not mixed up anything, there should be a phase on the phase wires, and zero on the zero.
And only after that we turn on the switch.
The light comes on, the circuit is connected correctly. Turn off the voltage, insulate the twists and place them in the junction box.
The installation of the circuit is completed, the question of how to connect a light bulb and switch is disassembled and explained in detail.
In this work we used:
Material
- distribution box - 1
- socket box - 1
- single-key switch - 1
- lamp - 1
- wire (measured according to the specific measurements of your room)
- circuit breaker - 1
- ground contact - 1
- insulating tape - 1
Tool
- knife
- pliers
- wire cutters
- flat screwdriver
- crosshead screwdriver
- voltage indicator
How much we saved by doing the connection diagram ourselves:
- specialist visit - 200 rubles
- installation of an internal distribution box - 550 rubles
- installation of a ceiling lamp - 450 rubles
- installation of an indoor socket box (brick wall, drilling, installation) - 200 rubles
- installation of a single-key indoor switch - 150 rubles
- installation of a two-pole circuit breaker - 300 rubles
- installation of a grounding contact - 120 rubles
- installation of wires open up to 2 meters (1 meter - 35 rubles), for example, let's take 2 meters - 70 rubles
- installation of wires openly above 2 meters (1 meter - 50 rubles), for example, let's take 8 meters - 400 rubles
- wall gating 8 meters (1 meter - 120 rubles) - 960 rubles
TOTAL: 3400 rubles
*Calculation performed for hidden electrical wiring.
- Two-key light switch 03/22/2015 | No reviews
- Single-key light switch, working principle. 02/12/2015 | No reviews
- Light switch with motion sensor - where is it? 02/07/2014 | No reviews
- Detailed connection diagram for the pass-through switch. 08/12/2013 |
Thank you very much for your work. If possible, show me the diagram: single switch, two lamps, distribution box
Hello Sergey! The connection diagram “single switch, two lamps, distribution box” differs from the diagram presented in this article only by adding one more wire to the lamp. As in the case of one lamp, the second one also uses two wires (blue - zero, white - phase). If you look at the very first picture at the beginning of the instructions, the wires of the second lamp will be added to the existing connections in this way, blue - zero in the general twist of all zeros (three blue wires), and the phase (white wire) is connected to the white and blue twist. As a result, it turns out that the phase arrives at the switch and goes from it to both lamps at the same time, and there is already a zero on the light bulb, since it comes directly from the supply wire.
thank you very much, very useful!
Isn’t it safer to make the zero directly into the lamp, and the phase through the switch? Otherwise, when replacing a light bulb, you risk getting a phase in your hand?
Hello, Alexander! That's right, the zero should go directly to the lamp, or more precisely to the threaded connection of the socket, so that when screwing in the light bulb you will not get an electric shock if you accidentally touch its thread. The phase is supplied into the gap through a switch to the central contact of the cartridge. It’s still better to do the assembly sequentially by hand and look at everything yourself, since even on factory Chinese chandeliers and lamps there is no guarantee that the blue wire is zero. I speak from my own experience.
Thank you for a quality product.
Thank you Evgeniy! I try to do it for people.
Sergey, thank you very much for the comprehensive information. Since 13-00 I’ve been looking for instructions on the Internet, and then I found you in the evening, it’s already the first hour of the morning - I’m reading))))
Thanks Nikolai for your comment! I am very glad that my work is useful!
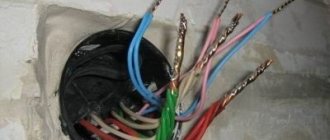
Hello. I'm faced with a problem. Could you write how to correctly do the wiring in the hallway. Three-core cable - one-color. Bathroom lamp, kitchen lamp - through a two-key switch. Bathroom hallway - single-key switch - and socket.. completely confused)))) From I just remember from my physics course that current flows only in a closed circuit. From the two-key switch there are two wires to the lamps - bathroom, kitchen. I twisted the remaining two with one wire from the three-wire one. I put the second one from the three-wire into the two-key one. Then from the second wire it goes to the one-key-hallway and the third there. The bathroom doesn't light up. and the socket does not work (where should I screw it? Admin, before I burn my neighbors, explain in what order where to connect)))
Hello Andrei! I’m glad to help you, but to be honest, the description of the situation is not entirely clear. If you write more precisely, I can help. Are you making new wiring yourself or are you trying to add something to the old junction box? In a good way, everything should look like this. There are 7 wires coming to the junction box: 1. power wire, two or three wires 2. wire for a two-button lamp switch for bathroom and kitchen lamps, three-wire 3. wire for a single-key lamp switch for a hallway, two-wire 4. wire for a kitchen lamp, two-wire 5. wire for a lamp bathroom, two-wire 6. wire to the lamp hallway, two-wire 7. wire to the socket, two or three wires We look for zero and phase on the supply wire (this can be done using a voltage indicator), we note where what is. Turn off the electricity. Next, we take the neutral core of the supply wire indicated in the list as number 1 and take one core each from wires numbered 4-7 and connect them together - this will be zero. Now we take a phase from wire number 1, and take one strand of wires numbered 2, 3, 7 and twist them together. Next we connect the remaining wires, 2 with 5 and 2 with 4. Now, 3 with 6. It turns out that the phase and zero come directly to the socket. All lamps are zeroed directly, phases are broken through switches. If you don’t figure it out, write me, I’ll definitely tell you.
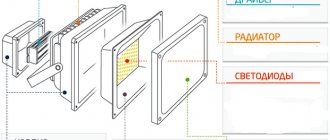
Features of fastening and connecting ceiling lamps
Lighting devices with LED lamps are most often produced in housings that are equipped with everything necessary for mounting.
Difficulties in installation rarely arise, since LED lamps are quite lightweight. For these purposes, plastic or metal dowels and turboprops are usually used. Depending on the appearance and design features, installation of a particular model on the ceiling may vary. Algorithm for installing a lighting fixture on the ceiling:
The final stage is a mandatory check of the functionality of the lighting devices.
How to connect a one-key switch to two light bulbs
If you need to turn on two light bulbs located in different places simultaneously from one switch, the same connection diagram is used.
The current supply to the lamps is controlled by a single switch, but the connection options for the lamps themselves may vary.
New cable in box
Another cable is inserted into the junction box. The ends of the conductors are stripped and connected to the same terminals as the first lamp. This will take up some additional space inside the box, but if there is enough space, then nothing bad will happen.
How to connect a single-key switch: simple instructions for dummies and not-so-dummies One way to connect two light bulbs to one switch is to connect both pairs of wires to the same contacts
Cable from an existing device
A tap is mounted from an existing lamp, which is connected to it in parallel. To do this, two additional contacts (“zero” and “phase”, red and blue) are inserted into the socket of the first lamp and extended to the second lamp.
How to connect a single-key switch: simple instructions for dummies and not so much The advantage of a parallel circuit for connecting lamps is the ability to use them in any quantity
The choice of connection is selected depending on the situation. The second option is used more often, since there is often not enough space in the distribution box to insert additional cables. In addition, in this way you can connect not only two lamps, but also a larger number of them. The main thing is to follow the principle of parallel connection of wires.
When installing household electrical equipment, you need to remember to comply with safety standards. Before starting work, be sure to turn off the power supply. It is better to use tools with dielectric coating and cables of the appropriate cross-section. Do not throw bare ends of conductors onto radiators or water pipes. In addition, the standard connection parameters must be observed.
Source
How to connect an LED lamp
LED lamps have entered our lives firmly and inevitably - unlike the good old mercury lamps, they are more energy-intensive and efficient: they consume less electricity and do not fail for tens of thousands of hours. Other advantages include attractive appearance and compactness. They do not form carbon deposits, are easy to install, and are environmentally friendly. In this article we will try to figure out how to connect an LED lamp to 220V, and most importantly, how to do it correctly and safely.
How to connect 3 sockets and 1 switch from one junction box
Sometimes you need to connect one or more additional sockets to the existing wiring. This can easily be done by running another cable into the junction box.
It should be noted that for sockets it is customary to use connecting wires with a larger cross-sectional area. This is due to the fact that a variety of household appliances are plugged into the outlet. This could be a kettle or, for example, a vacuum cleaner. Their power consumption is higher than that of a simple light bulb, and therefore the thin wires can heat up, which is undesirable. Therefore, sockets are connected with cables whose cross-section starts from 2.5 mm 2.
The connection process consists of connecting the wire to the power line that comes to the distribution box from the switchboard. As with the installation of the switch, all work should be carried out only with the plugs turned off.
- As in the first case, the sockets are first installed on the wall. Theoretically, you can install any number of sockets by connecting them together in parallel. How to connect a single-key switch: simple instructions for dummies and not so special jumpers are used to connect sockets to each other
- Next, a cable is laid from them to the junction box. The cover is removed and the conductor is inserted inside.
- Two wires are connected to the main line coming from the panel. If everything is done correctly, the indicator will show the presence of voltage in the sockets (the red LED will light up).
- After this, all the wires are put back inside the box and covered with a lid. How to connect a single-key switch: simple instructions for dummies and not so much The line of sockets is connected directly to the phase and neutral wires coming from the panel
When connecting wires using twists, it is advisable to thoroughly clean all contacts with a knife or fine file. Sometimes old wiring oxidizes at the connection points and the contact becomes unstable. When adding new wires, twisting is done using pliers.
To avoid a short circuit, the insulation must completely exclude possible contacts of wires with different poles.
Video: connecting a single-key switch and socket
Connecting an LED lamp to 220V
Installation methods can be divided into three types. Each has its own characteristics, advantages and disadvantages.
Sequential
Used in rooms where there are no high lighting requirements in order to save cable length. The installation uses several double or triple wires. You should not connect more than six LED bulbs in one circuit, otherwise the light from them will be dim. The disadvantage of this method is that if one lamp breaks down, you will have to check each one - this is the only way to determine and fix the breakdown.
How to implement it? Pay attention to the connection diagram. Such a connection should not cause any difficulties. A phase is drawn from the switch to the first lamp, then from the first switch the cable is pulled to the next device. To the last lamp you will need to lay a zero, which is launched from the distribution box.
Be careful! If you mix up power and zero, the lamps will be under constant voltage - this is unsafe.
Parallel
This connection is used more often - it is more practical. Each lamp will be as bright as stated by the manufacturer. The downside is that you will have to spend a lot more on the conductor.
Pay attention to the VVG ng 2*1.5 or 3*1.5 cable - it is non-flammable and has a high-quality PVC insulating layer. In rooms with high requirements, you can buy a cable with the ls marking, which means that when ignited, the cable will not emit a lot of smoke.
To make such a connection, pull the cable from the junction box through the switch and connect it to each lamp in turn. Cut the cable after the first one and pass it on to the next one until all the lamps are connected to a common network. The advantage of this method is that if one lamp breaks down, the network remains operational.
Radial
The most labor-intensive and expensive connection method. The cable is laid individually for each device.
From the distribution panel we run a conductor to the center of the room, and from there to each individual lamp. Then draw single-core wires to zero and phase; we also run them to each lamp separately.
Connecting protection, control and lighting devices
Let's start by connecting a protection device that will protect the circuit from overloads and short circuit currents. In our example, this role is played by a two-pole circuit breaker.
Also, devices such as RCDs, automatic circuit breakers and voltage limiters are used as circuit protection devices. To get to know these devices better, find out how they work and what they are intended for, you can follow the appropriate links.
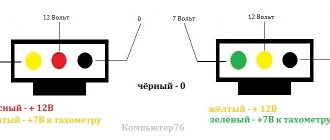
Before starting installation, we need to determine the color of the wires. Our wire comes in blue, black and yellow colors with a green stripe. The blue wire is always used for zero, yellow with a green stripe is ground, white is phase.
Using a knife, carefully remove the first protective insulating layer.
Now we remove the required amount of insulation from the phase and neutral conductors for connection, approximately 1 cm.
We insert the stripped wire into the contact terminals and tighten the clamping screws. We check the reliability of the wire by pulling it up from the contact clamp and swinging it left and right. If the wire remains motionless, the contact is good.
Similarly, we connect the outgoing wires to the junction box. Be sure to follow the color scheme of the wires; if on the suitable contacts of the machine the zero is on the top on the right, then on the bottom on the outgoing contacts it should be on the right. Accordingly, the phase will be on the left.
Please note that on the outgoing wires the color of the wire has changed slightly, the phase wire has become completely white. Different manufacturers color the wire cores differently, the phase and ground wires are most often subject to changes, the zero is invariably blue. For ease of installation and to avoid confusion, I would recommend using wire from the same manufacturer.
We remove the first outer insulation, measure out the required amount of wire needed to connect to the machine, strip it and connect it. We check the reliability of the wire fastening in the contact clamps; if everything is in order, we move on.
We remove the insulating layer from each core.
We connect the wires to the contacts of the circuit breaker.
In our example, a three-core wire is used and this is not accidental, the fact is that this wire is universal. For example, now you want to hang a lamp in the room that is turned on by a single-key switch, but time will pass and after 3 years of making another renovation, you will want to hang not a lamp, but a chandelier. To connect it, you will need another switch, a two-key one, and it requires not a double, but a triple wire. Having a three-core wire in the junction box, you can easily change the circuit with just one additional twist. Also, if necessary, the third wire can be used as grounding. This option is suitable if you are installing a lamp with a metal body in a room with high humidity; a grounding contact is usually provided on such lamps.
To connect the grounding wire we use a special contact clamp.
We measure out the required amount of wire, strip it and connect it. We check the reliability of the contact connection.
We do the same on the outgoing contact.
The circuit breaker is connected. All the wires necessary to complete the circuit are in the junction box.
Let's move on to connecting the lamp. In our case, a socket with a light bulb is installed. We prepare the wires for connection, remove the outer insulation, measure out the required amount of wire for connection.
We strip the phase and neutral conductors for connection.
In the case of a light bulb and socket, a grounding wire is not needed; we insulate it and bend it to the side. When connecting a lamp or chandelier, do the same; there is no need to cut it off; it may be useful in the future.
How to connect a chandelier with 3 lamps to a switch with 2 keys
Before installation begins, you need to decide which lamps will be turned on by each key. In this case there are very few options. As a rule, one key turns on one light bulb, and the other turns on two at once. You can also change the functions of the keys among themselves for ease of use.
Typically there are 3 conductors or a three-core cable coming out through the floor slab. In modern houses, 4 yellow ground wires with a green stripe are added to them. The remaining wires are determined using an indicator screwdriver with the switch in the on position. The wire on which there is no voltage will be zero, and all the rest will be phase.
In the chandelier itself, the phase wires can be combined in advance into groups. Of the three bulbs, two are connected to each other to turn on simultaneously. If this is not done, the wires must be distributed independently. Next, the neutral wires of the chandelier and the network are connected to each other. Then the phases of the chandelier and the switch are connected. After this, a functionality check is performed.
If you need to change the functions of the keys, just swap the wires. If both keys are turned on at the same time, all the lights will light up at once. All connections are made with the protective device disabled.