01/26/2017 master
The most popular type of lighting today is LED lighting. Many people in this matter prefer LED strip, which is very easy to install with your own hands.
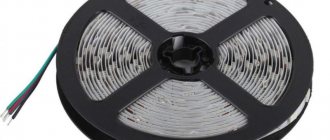
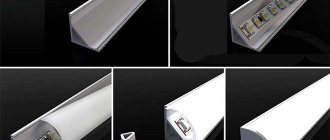
LED Strip Light
Typically, such LED products are connected to a 220-volt network using a power supply. But it is possible to power a small backlight of this kind from batteries. In this article you will learn how to power an LED strip from a battery.
Advantages of this connection method
For LED strip, the traditional option is to connect to the network via a power supply. This need is dictated by the fact that the standard voltage network is designed for 220 volts. At the same time, the tape is powered from a voltage of 12 or 24 volts. Moreover, such power supply of the lighting device has the following disadvantages:
- you need to correctly calculate the power of the voltage converter;
- The connection diagram for the power supply and additional devices (controller with power remote control) is not always simple and clear;
Connection diagram of the LED strip to the power supply
- the presence of a sufficient number of wires that need to be masked. When lighting a cabinet with this product, the wires can be hidden quite easily, but in other situations you will have to tinker with their disguise;
- the need to have an outlet near the backlight through which the lighting installation will be powered;
- During operation, the voltage converter heats up, which is a common cause of its breakdown. Therefore, to extend its service life, the power supply should be properly cooled and ventilated. And this requires additional time and effort.
But the LED strip can be powered not only from a 220-volt network, but also from batteries. This method of connecting this type of LED product has the following advantages:
- there is no need to calculate the power of the power supply required for a particular type and length of illumination;
- no dependence of the placement of the LED strip on the location of the sockets;
- the ability to place lighting not only in the closet, but also to create high-quality work surface lighting for the kitchen;
LED work surface lighting
- The number of wires required to ensure optimal power supply to the light source is reduced significantly.
At the same time, making such lighting yourself will be much easier than creating a traditional connection method.
Connecting an LED strip to a 220 V network without a power supply
Most LED strips require a power supply of 12 V DC. Less common are strips that require 24 V. In both cases, the connection principle is the same - a power supply is used that rectifies and converts the mains voltage into direct current with the required parameters.
There is another option that allows you to connect the LED strip to 220V without a power supply.
It allows you to solve the problem of placing the power source, but requires compliance with certain rules.
When it might come in handy
Powering the LED strip from any batteries will be the right solution in situations where you need to create small-length and low-power lighting.
Note! If the LED backlight is long, you will still have to use the traditional method and connect it to the mains voltage via a power supply.
Cabinet lighting with LED strip
Using a small battery-powered LED strip, you can quickly and easily power your cabinet. At the same time, you can illuminate the closet with clothes in the bedroom, as well as wall cabinets in the kitchen. In addition to kitchen units and cabinets, such lighting can be arranged for shelves, whatnots, paintings, etc. It is independence from the mains that is the main advantage of operating an LED strip on batteries. This method of powering the light source frees up your hands and allows you to create more original and non-standard lighting for various interior elements. It is worth noting that this connection method will be relevant for rooms in which, for some reason, there is no wiring. Also, connecting the tape to the battery can be organized in situations where there are power outages. In this way, you can not only illuminate such non-standard rooms, but also create an atmosphere of celebration and comfort in them.
Note! By using waterproof and sealed models of these LED products, you can create spectacular lighting for the kitchen, bathroom or balcony.
In addition to furniture (for example, kitchen units and cabinets), such a lighting installation can be placed:
- on clothes when creating light suits;
- on sports equipment;
- built into cars and other vehicles (motorcycles, mopeds, bicycles);
- lighting in apartments and houses in hard-to-reach places.
As you can see, the use of autonomous light sources of this type can be used in a wide variety of situations, and not just to illuminate a cabinet or organize lighting for the kitchen. By using your imagination you can always find a new and non-standard use for such seemingly familiar lighting products.
Connection diagrams for LED strips to a 220 V network
If the strip is made of SMD 5630 LEDs, its power consumption exceeds 10 W per meter of length. Installation of such a tape is carried out on a metal base for effective heat removal. The flickering of light, which negatively affects a person’s well-being, can be completely eliminated by connecting a capacitor to the lighting network.
The 220 V RGB color LED strip is connected via an RGB controller that controls the brightness and light of the strip. According to the standard diagram, the controller is connected to the low-voltage output of the power supply. Then the LED strip is connected to the corresponding terminals of the controller. Of the four wires, three are for color control, and the fourth is needed for power supply. Restrictions on the length of the RGB tape are no more than 5 m on each segment. It is possible to parallel connect two 5 m sections at once to a powerful power supply.
High power LED strip is connected using AC/DC converters. This method is not only very simple, but also economical in cost, and also very convenient to use.
The general connection diagram is as follows:
The following connection options require special attention and careful installation work:
Tape length is more than 5 m
Serial connection of segments in this situation is excluded. As you move further away from the power source, the voltage will drop and the last sections will receive less power, resulting in weaker light. If you increase the voltage, the load on the tape will increase and its service life will sharply decrease.
It is recommended to connect the sections in parallel using wires with a cross-section of at least 1 mm. You will also need one powerful power supply or several power supply models of lower power, the power wires of which are connected in parallel.
You need to connect a dimmer to the network
The light brightness control device is connected to the network between the power supply and the LED strip, correctly placing the input and output contacts: the first to the power supply, the second to the light source. If you need to connect several segments to the dimmer at once, the total power of which is higher than the power of the regulator, it is recommended to use a signal amplifier.
If connected correctly, LEDs will be an excellent alternative lighting option that does not require large installation and operating costs.
Source
Additional connectivity options
Any LED strip, whether it is connected to a battery or a network, can be connected to additional equipment - a controller with a remote control.
Controller with remote control
The controller will allow you to control the luminous flux emitted by the lighting installation using a remote control. If you connect it to an LED strip, you can not only change the brightness of its glow, but also control the modes, creating the effect of blinking, flickering, etc. Of course, in a situation where the tape is connected from batteries, such a variety of effects will be impossible due to the limited power of the power source. Therefore, you need to connect the controller to a lighting installation powered according to a traditional circuit. To connect additional equipment of this type with a control panel to the LED strip with your own hands, you need to be guided by the following diagram:
Connection diagram of the controller to the tape
Having the ability to control lighting allows you to make your stay in the house more comfortable, as well as save on utility bills for electricity consumption. And this despite the fact that LED products are already the most economical of all light sources existing today.
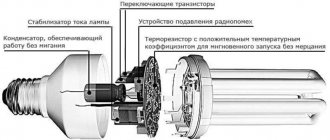
How does an LED work?
Before you grab wires and plugs, trying to build a lighting circuit with your own hands, include a motion sensor for the house and other elements in it, you need to understand what its key elements are. What is their principle of operation and how to properly connect the LED strip. Any LED is a semiconductor device (despite its small size), which is actively used in electronics, as one of the elements of microcircuits in various devices.
If an electric current is passed through it in the forward direction (the positive potential is maintained on the anode side), then optical radiation will be observed. If voltage is applied from the reverse side (potential to the cathode), then due to the properties of semiconductors, the resistance will be significantly higher than the current, that is, it can be conditionally assumed to be zero. That is why any instruction for connecting an LED strip insists on observing polarity (otherwise there will be no light).
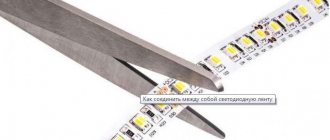
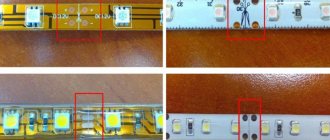
The peculiarity of the LED strip is that it actually does not have the usual wires for connecting to a 220 Volt network. If you look closely, you can find repetition of identical groups of elements with a constant step. Each group includes 3 LEDs and resistors (one or more). Between the groups you can see a dividing line, additionally indicated by a scissors symbol. There are contacts on both sides of the line, that is, by cutting off a separate section, you can connect it to 220V through them with your own hands. In this way, the required length of the tape is corrected (shortening or extending). Cutting this board (standard length is 5 m) in any place other than the one indicated is not allowed, as the circuit will break.
The number of contacts on a standard 12V tape can be 2 or 4. The first combination is typical for a traditional single-color tape, the second is for an RGB tape, which can change the color of the glow due to a combination of red, green and blue diodes. For it, a contact is allocated for each color channel and additionally for the general power circuit.
How does offline connection work?
Before connecting the tape to the battery, you must remember that the most important point here will be the charge of the power source.
Note! All LED strips that exist on the lighting market operate on the same principle. Therefore, they can all be connected and the cabinet, any other furniture or element of the interior of the room (bedroom, kitchen, etc.) can be illuminated according to a single scheme.
LED strip connection diagram
When lighting a closet or any other furniture in the house, you can use any type of battery to power the tape. You can even use rechargeable batteries. This power source has the following advantages:
- is reusable. This means that when the accumulated charge is depleted, they can be recharged and used again to power the backlight. At the same time, in order for the lighting to always be on, you only need two batteries. When creating lighting for the kitchen, it is recommended to use battery-type batteries, since the lighting here should always be on. This will help reduce the frequency of power supply replacement;
- despite the high cost in relation to conventional batteries, batteries actually turn out to be much more profitable;
- high-quality lighting power supply.
For power, you can use both finger and little finger batteries, as well as “tablets”.
Product marking
Understanding the LED strip connection diagram, you need to understand what the markings of different models mean. The correct installation and operation depends on this.
| Designation number in the marking (numbers or letters) | Designation | Decoding |
| 1 – type of light source | LED | Light-emitting diode |
| 2 - shade of glow | R | Red |
| G | Green | |
| B | Blue (cyan) | |
| RGB | Color | |
| CW | White (bright white) | |
| 3 – type of pins on the chip | SMD | Leadless chip mounted directly on PCB |
| 4 – geometric dimensions of the diode body | 2835, 5050, | The length and width of the case are indicated in tenths of a millimeter, marking 2835 means size 2.8x3.5 mm |
| 5 – number of diodes per 1 linear meter of tape | 30…240 | Indicated in pieces |
| 6, 7, 8 | IP20…IP68 | The degree of protection of LEDs from external influences is not indicated for non-sealed tapes |
The security of the tape is determined as standard, as for other electrical appliances. The first number after the IP designation means protection from solid particles (including dust), the second – from moisture.
LED strip protection levels
Additionally, the glow temperature of the diodes can be indicated (in degrees Kelvin). The higher the temperature, the cooler the glow.
There are other types of markings.
The table will help you better understand the density of placement of diodes on a flexible strip and understand how the dimensions of the element housings relate to the use of the strip. The number of luminous parts is indicated per linear meter.
The power consumption of the tape also depends on the number of diodes. This parameter must be taken into account when selecting a power supply for a lighting device.
When connecting a larger length of tape or several tapes at the same time, the power consumption must be recalculated, taking a safety factor of 1.1...1.3.
Step-by-step connection instructions
To connect an LED strip to a battery and illuminate a closet or any other place in the house with it, you will need the following tools and materials:
- batteries with a voltage of 8 or 12 volts. Remember that the higher the voltage at the power source, the brighter the backlight you created yourself will shine;
- soldering iron with flux and solder;
- a couple of wires. It is best to take flexible wires that bend well without damaging the conductive elements. You can use products made of aluminum and copper;
Note! The cross-section of the wires is selected depending on the current that will flow through them. Since diodes consume little current, the cross-section can be taken as small as possible.
- toggle switch;
- LED Strip Light.
When everything is prepared, you need to cut the product into pieces of the required size and solder the wires to them. The most difficult part of connecting LED products to a battery is soldering the wires. This process is carried out as follows:
- First we clean the metal contacts on the plus and minus. Sandpaper is suitable for these purposes;
- then carefully solder the wires to them that will go to the battery. They must first be tinned;
- After this, we repeat the procedure for the wires to which the toggle switch will be connected. In this case, one wire must be taken from the battery;
Soldering wires and toggle switch
- then the wires soldered in this way should be soldered to the selected LED strip. The wire going to the positive of the battery must be soldered on a tape to the +12V contact, the second wire is soldered to the GND contact.
Soldering wires to LED strip
After the work done, you should have the following:
LED strip connected to a battery
At this point, the connection work is considered complete.
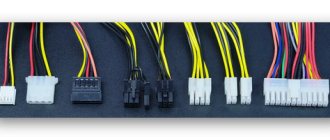
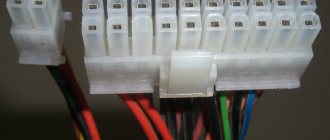
Why are all these devices needed?
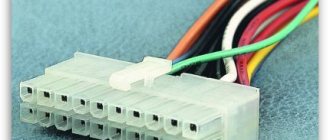
Everything is clear with the tape. Both ends of the tape end with contacts with which you will connect it to the network. For multi-colored ones, it’s not just “plus” and “minus”. Three-color ribbons contain “plus”, “R”, “G”, “B”, corresponding to the three main colors of the ribbon. A power supply is needed to convert the voltage. The LED strip only needs 12 volts (very rarely 24 volts), and our network has 220 volts. In addition, the voltage in the network is variable, which is completely unacceptable for the operation of LEDs. The power supply will make it permanent. Accordingly, it has contacts for both incoming alternating voltage and contacts for output voltage, marked “plus” and “minus”. A dimmer is needed to adjust the brightness of the LEDs. Very convenient and useful. It connects between the tape and the power supply. As for the controller, it will control the color and brightness of your multi-color ribbon. The amplifier is created to help the controller. For example, if the power of the tape is higher than that of the controller or dimmer.
What you need to know about soldering
The most important thing in working with LED strips is cutting them correctly into separate fragments and soldering them. In order for everything to go well, you should know the following nuances of carrying out this type of work:
- The product needs to be cut only in special places. Otherwise, the conductive contacts will be damaged and the device will be damaged;
Place for cutting tape
- you need to solder carefully, applying the soldering iron tip to the contacts and wires for just a few seconds;
- the wires must first be tinned;
- After soldering is completed, the contacts should be cleaned of solder residues.
By adhering to these recommendations, the process of soldering individual fragments of the product and connecting to a power source will be as easy and quick as possible.
Main conclusions
LED strips connected to 220 V without using a power supply allow you to reduce the amount of equipment used and do without expensive devices. However, in return, the user receives significant restrictions regarding the connection area and the level of security of the backlight. The specificity of finished high-voltage products makes them suitable for outdoor installation for advertising and design purposes, but practically eliminates their use inside buildings. You can ask questions or share your own opinion in the comments.
Source