More information about connectors
A standard power supply has only 5 wires with different characteristics. More details about each:
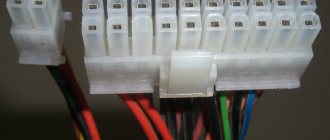
- A 20/24-pin wire is needed to power the motherboard itself. It can be distinguished by its characteristic size - it is the largest module of all that come from the power supply;
- The 4/8-pin module is used to connect to a separate power supply for the cooler with the processor;
- 6/8-pin module for powering the video card;
- The power cable for SATA hard drives is the thinnest of all and, as a rule, has a different color from other cables;
- Additional power supply cable according to Molex standard. Necessary for connecting old hard drives;
- Connector for powering the drive. There are power supply models that do not have such a cable.
For normal operation of the computer, you must connect at least the first three cables.
If you have not yet purchased a power supply, then you need to make sure that it best matches your system. To do this, compare the power of the power supply and the energy consumption of your computer (primarily the processor and video card). You will also have to find a power supply that matches the form factor of your motherboard.
Stage 1: Installing the power supply
Initially, you just need to attach the power supply to the inner surface of the computer case. For this, special screws are used. The step-by-step instructions look like this:
- To begin, unplug your computer, remove the side cover, clean off dust (if necessary), and remove the old power supply. If you just bought a case and installed the motherboard with the necessary elements in it, then skip this step.
- Almost all cases have special places for the power supply. Install your PSU there. Be sure to pay attention to the fact that the fan from the power supply is located opposite the special hole in the computer case.
- Try to fix the power supply so that it does not fall out of the system unit while you secure it with screws. If you can’t fix it in a more or less stable position, then hold it with your hands.
- Tighten the screws on the power supply from the back of the system unit so that it is well fixed.
- If there are holes for screws on the outside, then they also need to be tightened.
Stage 2: connection
When the power supply is secured, you can begin connecting wires to the main components of the computer. The connection sequence looks like this:
- Initially, the largest cable with 20-24 contacts is connected. Find the largest connector (usually white) on the motherboard to connect this wire. If the number of contacts is suitable, then it will be installed without any problems.
Now connect the wire to power the CPU. It has 4 or 8 contacts (depending on the power supply model). It is very similar to the cable for connecting to a video card, so to avoid mistakes, it is advisable to study the documentation for the motherboard and power supply. The connection connector is located either near the largest power connector or next to the processor socket.
- If necessary, you can also power the drive by connecting the required cable(s) to it. After connecting all the wires, try turning on the computer using the button on the front panel. If you are just assembling a PC, then before that do not forget to connect the front panel itself.
Connecting the power supply is not too difficult, but the process requires care and patience. Do not forget that the power supply must be selected in advance, adapting to the requirements of the motherboard, in order to ensure maximum performance.
Thank the author and share the article on social networks.
How to choose a replacement power supply
How to choose a power supply to replace an old or faulty one? This matter, in principle, is not difficult. First of all, the form factor. There are several of them, so you will have to pay attention to this, otherwise you will need to attach a new one with wires.
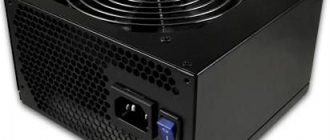
If we have a “Tower” form factor case, which is now the most common, then we need an ATX power supply (pictured above, top left).
Now the power. If we change the old unit because it does not support the computer after an upgrade, then we take a new one that is 150–200 watts more powerful. If we replace a burnt one, then we can use the same power as it was installed.
Expert opinionAlexey BartoshSpecialist in repair and maintenance of electrical equipment and industrial electronics. If, as a result of the upgrade, the computer acquired a high-performance video card, then an even more powerful power supply will be needed. The GTX 590 card, for example, will increase power consumption by 250 (!) Watts.
And the most important thing is the presence of all the connectors necessary to connect peripherals. Moreover, you need to look not only at their presence, but also at a sufficient quantity. There is, for example, a power supply with two SATA connectors. If we have a SATA CD drive and 2 hard drives, then one power device will not be enough. You can, of course, buy an additional MOLEX/SATA adapter and insert a SATA drive into the MOLEX, which is hanging around idle (and there are usually a lot of them hanging around). But, firstly, it's extra money. Secondly, this is an unnecessary connection, which means it is a weak link.
Attention should be paid to the additional power connector of the motherboard and the video card connector, if you have one that is powered via a separate cable. These are the most critical connectors that power energy-intensive devices and it is very undesirable to assemble them from adapters. Let's look at examples of such connectors in more detail.
Connect the power supply to the main PC connectors of the motherboard
Hello friends, and Happy New Year! Connecting the power supply to the computer is the final stage of assembly: if you did everything correctly before, it should start. All that remains is to install the operating system and enjoy the latest movies or games.
p, blockquote 1,0,0,0,0 –>
In today's post I will not just tell you step by step how to do it correctly, but also show you in pictures. Also at the end you will find a thematic video explaining all the intricacies of the process.
Power supply for car radio from a computer power supply
Secrets of car radio repair
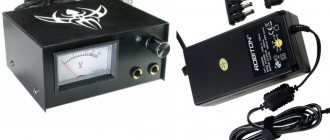
The topic has already been stated in the title, so let's get straight to the point. So what do we need? First, a working car radio or car CD/MP3 receiver. I happened to have a Panasonic CQ-DFX883N car CD/MP3 receiver in my hands.
Secondly, a computer power supply in AT or ATX format. Nowadays there is a lot of computer hardware from old PCs, including power supplies.
Where can I find it for free or for minimal money?
- Pull out your old PC that's collecting dust in the closet;
- Buy for pennies at a flea market - these are 100% available on any radio market;
- Repair and improve a faulty computer power supply.
Connecting the motherboard
Regardless of the form factor and brand (MSI, ASUS, Gigabyte or any other), only a couple of connectors are connected from the power supply to the motherboard - powering the motherboard itself, as well as the processor.
p, blockquote 3,0,0,0,0 –>
This is not a serial, but a parallel connection, since all consumers are powered simultaneously, and the voltage on each of the connectors does not depend on the others.
p, blockquote 4,0,0,0,0 –>
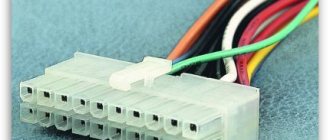
In order to supply power to the motherboard of older models, 20-pin connectors were used. Today, predominantly 24-pin connectors are used, sometimes collapsible (designated 20 +4). If you are meticulous in purchasing components and order compatible models, there will be no problems with connection.
p, blockquote 5,0,1,0,0 –>
This connector is difficult to confuse with others - there is usually only one on the power supply unit, just like the socket on the “mother”. To power this board, just insert the plug into the socket and gently press it until it clicks so that the latch bracket fits into the corresponding groove.
To remove the plug, just press the latch, releasing the bracket from the groove, after which it can be removed.
p, blockquote 6,0,0,0,0 –>
Processor connection
In order to power the CPU, a voltage of 12 volts is supplied through a four-pin connector. For powerful processors, a collapsible plug is sometimes used, which also has 4 additional pins (denoted as 4 + 4). There is also only one such slot on the motherboard, as well as the corresponding wire on the system unit.
p, blockquote 7,0,0,0,0 –>
It should be connected in the same way as the “female” - carefully press it into the socket until the latch clicks. It is removed in a similar way - we press on the latch, releasing the bracket, and carefully remove the wire.
p, blockquote 8,0,0,0,0 –>
If the design of the motherboard and case allows, you can connect the power supply to the processor even before installing the main board in order to run a wire behind it and thereby free up some space in the case in front of the motherboard.
p, blockquote 9,0,0,0,0 –>
p, blockquote 10,0,0,0,0 –>
In addition, some power supplies, for example, 500w from Chieftec, may have a similar plug for powering the video card. It is difficult to confuse it with a cable from the processor, since it has at least 6 pins, and it is physically impossible to insert it into the wrong port.
A little about mAtx and Mini-ITX
This scheme for connecting the power supply to the processor and the “mother” is designated 24 + 4 (on older computers, respectively, 20 + 4). This can be useful when choosing a power supply, so as not to delve into the characteristics of the device for a long time.
p, blockquote 12,0,0,0,0 –>
Connecting mAtx and Mini-ITX motherboards is not much different - they usually use a similar circuit.
p, blockquote 13,0,0,0,0 –>
The difference lies in the somewhat reduced functionality of the last two form factors: usually such modifications have smaller dimensions compared to ATX, and therefore they accommodate fewer different ports and interfaces.
p, blockquote 14,0,0,0,0 –>
However, when assembling a computer of this form factor, still check what power supply circuit is used on such a motherboard - you may need a completely different type of power supply.
p, blockquote 15,0,0,0,0 –>
The videos presented are not mine, as I see no point in repeating the same thing. But I confirm that everything was done correctly on them. Enjoy watching and be careful.
p, blockquote 17,0,0,1,0 –>
p, blockquote 18,0,0,0,0 –>
Let me remind you that you will find any components for your personal computer at the best prices in this popular online store.
p, blockquote 19,0,0,0,0 –>
p, blockquote 20,0,0,0,0 –>
Thank you for your attention, friends, and once again, Happy New Year! I would be very grateful to everyone who shares this publication on social networks. Till tomorrow!
p, blockquote 21,0,0,0,0 –>
p, blockquote 22,0,0,0,0 –> p, blockquote 23,0,0,0,1 –>
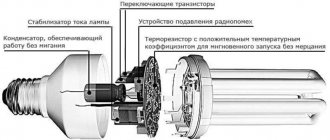
What functions does the power supply perform?
This component is a source of electricity that:
- converts current from alternating to direct to provide energy to the computer;
- stabilizes electricity, protecting system components from combustion during voltage surges in the network;
- Helps maintain optimal temperature as it is equipped with a fan.
Note : if the system is assembled in a case with a power supply located at the top, then its cooler hardly cools other elements, but if it is placed at the bottom, the air circulates better, covering a larger number of computer parts.
How to connect the power supply to the motherboard
This is done in three short steps. It is better to take a photo of the connected power supply that needs to be replaced before removing it from the motherboard. This will help you remember which cable goes where.
Disconnect the old power supply
If the user is not assembling a new system unit, and the task is only to change the power supply, then first you need to dismantle the previously installed device.
How to do:
1. Before removing the device, you must completely de-energize the system unit, and then remove the network cable directly from the power supply. It is recommended to wait 3-5 minutes until the accumulated electrical energy dissipates, and also to wear an electrostatic wrist strap - all this will ensure safe dismantling.
2. It is better to remove the power supply by placing the PC case on its side. Then, when the clamps are loosened, the power supply will not fall on other elements.
3. Open the case and disconnect all the wires that go from the power supply to the components and adapters.
Note : there is no need to remove any wires from the block itself.
4. Unscrew the fixing screws that are located on the back of the case and remove the device.
Installing a new power supply
The power supply circuit is almost identical to the dismantling process, only everything is done in reverse order:
- Place the device into the housing.
- Fasten the mounting screws.
- Connect all cables to the required connectors on the motherboard and do not forget to connect the wires to devices that require power: processor, video adapter.
Connection
All power supplies have a standard set of cables. What is intended for what is in the table.
Purpose 6 or 8 pins For a discrete video card. Not always used, since low-power graphic devices do not need additional power. It is often necessary for top gaming models released by ASUS, GIGABYTE and other leading manufacturers. 4 or 6 pins Serves to power the central processor. 20 pins Powers the motherboard. Sometimes it may be paired with a four-pin connector. SATA connector for connecting drives. FDD Interface that powers the card reader.Note : MOLEX is an obsolete connector. which was previously used to connect hard drives with PATA. It is rare, but can be found on modern power supply models.
What does “power supply” mean in a computer and where is it located?
The vacuum cleaner did not help, rebooting, replacing the battery and resetting CMOS and it was time to test the power supply. Like any household device, the computer is powered from a 220 volt outlet. But its filling works with much lower voltages - from 12 volts and below.
To reduce the voltage to the required values and ensure reliable and safe operation, power supplies are installed in computers. These are smart devices equipped with various protection circuits - short circuit, power surges, incorrect connection. If there are malfunctions on the motherboard regarding power supply, the unit may not turn on and will go into protection.
But most often the unit itself has to be replaced due to failure of its internal elements. It all depends on the quality of the parts and in what conditions the equipment is operated. Over time, parts lose their performance characteristics and, although it starts, it no longer produces factory characteristics. And all we get is a dark monitor and spinning fans.
In IBM-compatible computers, the power supply can be easily replaced with a new one. They are removable, compatible and easy to change. On monobok devices, or from Apple, you need to look for blocks for a specific model.
So, the power supply on a regular home system unit can be seen on its rear panel. It is secured with four or five bolts for a Phillips screwdriver. Full size looks about the same everywhere:
What to do if the computer does not turn on
If the computer does not respond to attempts to turn on after replacing the power supply, something may have been done incorrectly: the cable is not fully connected or not all components are connected to the power supply.
It is important to check the correct connection of all elements of the assembly, and also pay attention to the position of the button on the power supply itself: it must be on.
You need to see if there is voltage in the network by connecting any other electrical appliance. In models with enhanced protection against voltage surges, for example, Proton 850W, blocking may occur if the voltage is very low or too high.
It is worth opening the case and visually inspecting the “insides”, checking the reliability and correctness of the connection of the system components. You can try turning off all peripheral devices and starting the computer again.
Tip : It’s a good idea to regularly clean your PC from dust, which can lead to unstable operation because it interferes with cooling. It happens that it simply clogs the contact part, which is why the power supply will not be able to interact with the motherboard.
As you can see, connecting the block to the “mother” and other internal components of the PC is not difficult. The main thing is to act carefully and remember what each cable is intended for.
Power supply in a laptop - what does it mean and where is it located?
The laptop's power supply is an external part that is included in the kit and supplies voltage to the connector from 18 to 20 volts. It looks like a black rectangle that always lies on the floor, or like in new models a kolobakh that plugs into an outlet.
Quite reliable devices. They rarely fail, they always heat up during operation. This is normal, as it should be... Inside the case there is a full-size metal plate that removes heat.
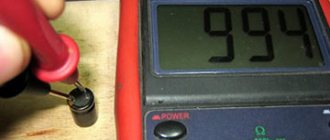
If you have any doubts about its functionality, measure the voltage with a multimeter on the connector that is inserted into the laptop. It should be 18-24 volts. In my practice, the most common cause of failure was worn connectors or wires bitten by a dog. The power supply will fit into another laptop if the power connector fits. As a last resort, you can cut off the wire with the connector and screw it onto the working unit.
Another source of power for a laptop is the battery. It is vulnerable and has a certain service life. After the expiration date, it stops holding a charge and needs to be replaced. It happens that the laptop does not start due to a faulty battery. In this case, it is enough to remove it from the case and turn on the laptop from the power supply.
When choosing a laptop, pay attention to its battery. On modern cheap ultra-thin devices, it can be located inside the case and can only be replaced in a workshop.