A properly functioning power supply is the basis for proper computer operation. If it is faulty, the software will not be able to function normally. Therefore, it is important to know how you can test the power supply with a multimeter. A more serious study of the problem involves disassembling the device and checking its circuitry. This is recommended to be done when the person is an experienced specialist in this field.
Why do you need a power supply?
With its help, several types of alternating voltage are converted into direct voltage, designed to ensure the operation of the computer. Regardless of the brand of power supply used, its parameters at the device outputs must comply with standard indicators. If in at least one case the output voltage in the power supply does not correspond to the standard, this may cause a computer malfunction.
The initial check should include determining the magnitude of all types of output voltage. It should differ from the stated one by no more than 5%. When making a power supply with your own hands, you need to control what output voltage it provides.
The charger is suspect
It is very easy to find out that it is the adapter that is broken.
To do this, you need one “little thing” - another power supply from the same laptop. You connect a working adapter to your laptop. If it turns on and is charging, the problem is 100% in the charger. Everything is elementary, as Sherlock Holmes said, but there is one catch - few people have a second power supply of the same type in their house. A spare adapter is usually left at work as a safety net. Therefore, further you will learn how to check the status of the charger in other ways.
- Inspection of connectors. Check that the cable that leads from the plug to the “black box” is tightly plugged in. At the same time, look at the condition of the input hole for the plug in the laptop itself. It should not wobble, have cracks or chips on the body.
- Appearance of the power supply (black box). Look to see if there are any signs of melting or cracks. A working adapter should have a light on when turned on (some models, for example, Asus chargers, are equipped with such indicators).
- Condition of cables. We are looking for physical damage. It could be a broken or torn cord. This problem arises due to our negligence - we placed heavy furniture, crushed the cable with a table drawer, or pulled a laptop connected to the network into another room. The “risk zone” is the place where the connector is inserted into the laptop, where the cable sheath most often frays and exposed wires appear.
A common cause of cable problems is poor quality insulation and wires. As a result, they can break and tear even with little effort. And at sub-zero temperatures, a low-quality wire simply crumbles. Such a nuisance is excluded if you use original power supplies from Apple or the Japanese concern Toshiba.
If the cable or case is damaged, the adapter can no longer be used. Repairing at home is unreliable, and in a workshop it is unprofitable. Therefore, it is better to immediately select a new power supply. Adapters from well-known brands such as Acer are easy to find in any computer store. If you are the owner of a laptop from a not very popular company, then the Internet will help solve the problem.
Is there voltage: testing the power supply
We offer two more ways to find out what’s wrong with the charger itself – that same “black box”. You will need a tester (multimeter) or a small car light bulb up to 24 Volts.
Option 1
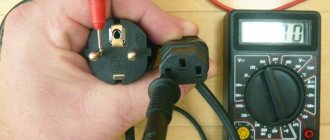
Plug in the adapter.- Take a multimeter and set it to DC diagnostics. To do this, look at what output voltage is indicated on the label of the power supply (after the word OUTPUT, denoted V). If the standard value is shown from 15 to 20 Volts, set the tester to 20; if the parameter is greater than 20, switch the multimeter to 200.
- Insert the red pin of the tester (plus) into the adapter connector. Place the black tester (minus) on the outer metal part of the plug.
- See what the multimeter shows. A working power supply will show the declared output voltage or slightly higher. If the multimeter gives 0 or small numbers, it means that the power supply has died.
Option 2
Let us warn you right away: to prevent such diagnostics from leading to dire consequences, it is advisable to have at least a little understanding of electrical engineering.
This method is suitable when there is no tester, but the light bulb is available. Take a small car light bulb and two wires. Connect the wires to the light bulb and insert them into the power supply plug. The light comes on, which means the adapter is working. But it may be that when connected to a laptop, the voltage drops and is not enough for normal charging.
If the check shows that the power supply is working normally, look for the cause of the problem in the laptop itself. Try turning on the laptop without an adapter, only on the battery. When the result does not give anything, the problem may be in the BIOS. If you are not a computer geek, it is better not to go there - take your laptop to a service center.
How to start checking
Before you check the computer's power supply for functionality, you need to inspect its appearance. If there are torn or burnt wires, they must be replaced. When there is dirt and a thick layer of dust inside, cleaning is required. If there is a smell of burnt silicon, it is necessary to check the serviceability of diodes and transistors.
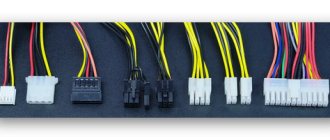
If the power supply is working, then before checking it with a multimeter you need to start it, but you should know that modern power supplies use a 24 pin connector. Older models mostly use 20 pin. It is necessary to check the voltage to ensure compliance with standard values.
Checking the entire circuit
After replacing the faulty elements, alternating current is connected to the power supply and everything is measured again with the tester. If there is no signal, then its presence is checked along the entire circuit from the connector to the output stage of the transistor that produces this voltage. This can be seen in the lamellas (strips of copper on the board).
If there is no voltage on the transistor, its presence is checked on the zener diode and capacitor. If it is missing there too, then the condition of the pulse transformer is checked. The power supply is disconnected from the network, and the resistance of its windings is measured using a multimeter.
If there is no voltage at all contacts of the output connectors, then the test should begin from the point where the network cable is connected. The tester switches to 750 volt AC mode.
Then the presence of 220 volts is checked at the output of the network cable, then at the input of the diode bridge. Since the output voltage will be rectified, the tester must be switched to direct current. This way you can identify the problem and then fix it.
This completes the check of the computer power supply. Current sources in most other devices are designed in the same way as the power supply discussed above.
The difference may be in the output voltage ratings. If a person has disassembled and tested a computer power source with his own hands, then it will not be difficult for him to figure out the rest.
Source
Functionality check
When checking the power supply, you need to make sure it is working. If you connect it to the network, then the standby voltage should be equal to 5 V. Otherwise, you need to carefully inspect the wire used to connect to the power source. You need to check it with a multimeter.
You need to check that the power button is working correctly. To do this, connect the PS-ON and COM contacts. Their location can be seen in the diagram. The first wire is green, the second is black. To close the contacts, you can use a paper clip or other tool, for example, tweezers. If the power supply is working properly, it should turn on immediately after connecting.
Diagnostics with a multimeter
If during a visual inspection you do not notice any damage, then experts recommend using a multimeter - a portable device with which you can check the voltage. To do this you need:
- connect the power supply to the network;
- Connect the voltmeter terminals to the adapter plug. The black wire is placed on top of the plug with the metal end, and the red wire is inserted inside the connector;
- set the value to 20 on the device. If the tester shows 19 V, then everything is fine with the power supply, but if it does not stabilize and shows 0, then the power supply is burned out;
- check the cable. We apply black and red probes to one and the other end of the wire. If the tester does not show anything, then the cause of the malfunction is in the cord; if a beep is heard, everything is fine with it.
A laptop charger is a common consumable item that can be changed at any time. Therefore, there is no need to be upset if you could not fix the charger.
Checking the output voltage of the power supply
The 24 pin output connector uses wires of different colors. Each of them must have a strictly defined voltage:
- on blue -12 V;
- orange +3.3 V;
- yellow +12 V;
- gray +5 V;
- red +5 V;
- white -5 V;
- violet +5 V;
- the black wire is ground.
Each wire must be checked to ensure the correct voltage is being used. The most common values are shown here. Depending on the manufacturer and model of the power supply, they may differ. Before you begin the inspection, you must read the technical documentation.
To check the power supply with a multimeter, you need to do the following:
- Turn on the computer. It must be assembled in accordance with the usual configuration. You need to wait 30 minutes for the power supply to warm up sufficiently.
- Next, you need to launch an application on your computer that will load it almost completely, for example, a test program or a game. This step will allow you to check the power of the power supply, whether it will be enough to fully supply the computer with energy.
- You need to prepare a multimeter for work. The mode switch should be set to the position corresponding to checking the constant voltage. This is necessary in order to check the output characteristics of the device.
- You need to select the measurement range where 20 V is indicated. It is suitable for all output voltage measurements.
- The black probe needs to be connected to the black wire that corresponds to ground. Connect the red one to the colored wire on which the voltage needs to be measured. Thus, the voltage test is performed in relation to zero.
- When checking the microcircuits used in the power supply, for example, a PWM controller, special skills will be required. It is better to entrust this part of the work to specialists.
- Now you need to see the device readings. For example, if the voltage on the yellow wire is measured, then it is known that its nominal value should be +12 V. If the value shown by the multimeter deviates by no more than 5%, then this output is working properly. If the measurement shows 9 V, then the power supply is faulty.
The voltage must be measured on all output wires. If its deviation does not exceed 5%, you can be sure that the power supply is working properly.
How to check a laptop battery?
If problems occur in the power supply, you can use various methods for assessing defects. Of course, it is worth carrying out an external inspection to identify mechanical damage. If this does not give results, you should use a tester. To use it, you must complete the following action plan:
- Ensure that the power supply is connected to the network. Inspect the integrity of the outlet and the quality of the wires.
- After this, you need to ensure that the tester is connected. Depending on the model used, you can run the device along the block (wireless testing method); when using wires, you need to connect special terminals to the equipment.
- The connection begins with the red wire, which is inserted into the plug, after which the black wire is brought with the tip up next to the power supply.
- After this, evaluate the readings on the main screen of the device. If there is a sharp deviation and a pendulum-like swing of the needle, one can judge that the equipment is malfunctioning; in this case, it is worth replacing the elements.
- If the readings on the device are not recorded, this may indicate an incorrect connection of the multimeter, or damage to the wires connecting the power supply to the laptop. In this case, you will have to change the wiring, which is much cheaper compared to changing all the equipment.
Important! If you manage to detect a malfunction, you can repair it yourself or seek help from professionals. To receive free assistance under warranty, you cannot repair the device yourself.
The frequency of inspection largely depends on the intensity of use and operating mode of the equipment. If you notice various malfunctions in the operation of some equipment components, you should pay attention to the power supply. To check, you can use another type of battery; if the laptop functions normally with it, it is worth changing the element.
It is also recommended to carry out diagnostics as planned at least once a month; this will help to identify problems at an early stage and eliminate them in order to extend the service life.
Using a Multimeter When Testing a Power Supply
Understanding the operation of the device, you will need to carry out various types of measurements with your own hands, so working with the device circuit requires appropriate knowledge and skills.
In each case, you must be able to adjust the multimeter accordingly. You may need to perform the following procedures:
- Voltage measurement. If you have a device diagram, the voltage value at certain points is usually indicated. In this case, you should set the device to the desired scale. For a working power supply, the values indicated on the diagram must correspond to those being measured.
- If you test the circuit, you can determine the presence of a contact or short circuit on the board. In this way, you can also detect a broken contact track on the board.
- Before measuring amperes, you will have to unsolder one end of the part to make the multimeter part of the electrical circuit.
An experienced technician, having a good understanding of what he is doing, can take measurements of the computer's power supply in its working condition. It is better for a novice specialist to unsolder the radio components before checking their serviceability. If the user does not feel confident enough to check the operation of the circuit in detail, it is better to turn to professionals to perform this part of the work.
How to check the power supply with a multimeter?
See also reviews and articles:
- What can a multimeter do? Comparing the capabilities of different types of multimeters
- How to use a multimeter correctly so that it doesn't turn into a pile of junk
- How to test a capacitor with the simplest, cheapest multimeter
- How to test a transistor with a simple multimeter
- Which multimeter to choose for your home, workshop, enterprise
- DIY laboratory power supply
- Laboratory power supply KORAD KA3005D – precision, rigor and quality
- Laboratory power supply BAKU BK-1502D+
- Laboratory switching power supply YIHUA 3005D captivates with its accuracy
- What is the difference between a laboratory power supply and a network adapter?
Test the system unit with an avometer
Current strength and resistance value - these two parameters are of primary importance when it is necessary to measure the power supply with a multimeter. Of course, ideally such manipulations should be carried out with an oscilloscope or other specialized narrow-profile devices, but such a multifunctional device can be handled with certain skills.
For example, to check a laptop's power supply with a multimeter, you need to find out its current and voltage. The device must be connected to an open circuit, taking into account that the maximum permissible value is only 10 amperes. The device is not designed for more. Close the circuit on the tester, which will require disassembling the unit. Remember that measurements should not be taken for more than a couple of seconds - the contacts get very hot.
How to check a computer's power supply with a multimeter?
If we are talking about a stationary model with a system unit, then in this case it is necessary to measure the voltage. First of all, you need to remove the cover from the box and disconnect the side cables. There should be 12 of them, and each has its own voltage. In yellow - 12, in orange a little more than three, in red - 5, in blue and white - minus values. On the other contacts there is about 5 volts, and on the purple wire there is voltage only when the system starts.
To check the operation of the power supply with a multimeter, you need to place the black contact probe on the common conductor, and pierce the terminals with the red one. Select a voltage range of up to 20 volts on the device.
SUITABLE PRODUCTS
- Universal multimeter UNI-T UT55 + thermocouple 4 reviews
Buy
960 UAH
Code 67
in stock
- Universal multimeter UNI-T UT50C + thermocouple 2 reviews
Buy
1099 UAH
Code 61
in stock
- Universal multimeter UNI-T UT50A 4 reviews
Buy
897 UAH
Code 60
in stock
- Universal multimeter UNI-T UT39C + thermocouple 1 review
Buy
710 UAH
Code 59
in stock
- Universal multimeter UNI-T UT39B 1 review
Buy
585 UAH
Code 58
in stock
- Universal multimeter UNI-T UT53 1 review
Buy
770 UAH
Code 65
in stock
- Universal multimeter UNI-T UT52 1 review
Buy
651 UAH
Code 64
in stock
- Universal multimeter UNI-T UT51 1 review
Buy
768 UAH
Code 63
in stock
- Universal multimeter UNI-T UT50D + thermocouple 3 reviews
Buy
1347 UAH
Code 62
in stock
- Universal multimeter UNI-T UT20B 2 reviews
Buy
190 UAH
Code 47
in stock
- Laboratory power supply BAKU BK-1502D+ (digital) 2 reviews
Buy
899 UAH
Code 1853
in stock
- Laboratory power supply BVP AB 14.5V 60A 1 review
Buy
12644 UAH
Code 1847
in stock
- Universal multimeter UNI-T UT39A 1 review
Buy
521 UAH
Code 57
to order
- Universal multimeter UNI-T UT54 1 review
Buy
708 UAH
Code 66
to order
- Laboratory multimeter UNI-T UT803 0 reviews
Buy
5566 UAH
Code 253
to order
- Laboratory power supply BAKU BK1501A+ 1 review
Buy
807 UAH
Code 1842
to order
- Laboratory power supply PS1502A (15V 2A) 1 review
Buy
1164 UAH
Code 1843
to order
- Laboratory power supply 15V 1A PYI-1501T 1 review
Buy
1277 UAH
Code 1844
to order
- Laboratory power supply 12V 1A RF-1201T 1 review
Buy
1164 UAH
Code 1846
to order
- Laboratory power supply BAKU BK-1502DD (digital) 1 review
Buy
716 UAH
Code 1854
to order
Share on social networks
Comments on the article “How to check a power supply with a multimeter?”
- Leave your comment on the article...
Leave your comment
Error