The power supply is an integral part of any computer, and is no less important for operation than, for example, the processor or motherboard. Its main task is to generate the necessary currents for the operation of all PC components.
It often happens that the computer does not turn on, the operating system does not load, and a malfunctioning power supply may be to blame. How to check the PC power supply for functionality, what are the main clinical manifestations of some of its malfunctions - this is the main topic of our publication.
Using a multimeter to check the power supply
Many users ask how to test a computer power supply with a multimeter? It’s very simple, knowing what voltage and where it should go.
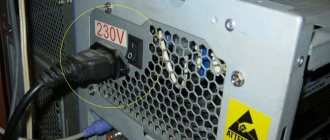
Before opening the PC case, make sure that it is not connected to a 220 V network.
- Open the PC case.
- Disconnect the connectors from each device in turn, having first photographed or sketched the installation diagram.
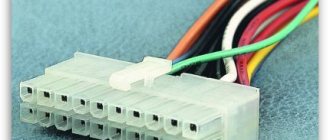
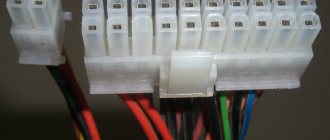
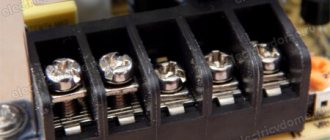
- Take the connector that connects to the motherboard (usually the largest one) and make a jumper wire between pins 14 and 15 on the 20-pin connector and 16 and 17 on the 24-pin connector. Usually, a green and a black wire go to them. When green, a control signal is sent. The black wire is ground.
- After that, connect the PC to a 220 V network.
If the power supply is turned on, then you can start measuring the voltage at its contacts, according to the diagram presented above. If the computer's power supply does not turn on, it means that it is faulty and requires repair or complete replacement.
When checking with a multimeter, there should be - 5 V between the black and red wires on the connector connected to the motherboard; between black and yellow – 12 V; between black and pink contacts – 3.3 V; between black and purple - standby voltage is 5 V.
If you do not have sufficient knowledge in electronics, then it is better to entrust device repair to specialists.
How to check the power supply
If your computer has one of the symptoms listed above, you should not immediately blame the power supply. A malfunction may also occur for other reasons. To make sure there are problems with the power supply component of the system, it is necessary to carry out diagnostic work. There are 3 methods for checking your computer's power supply yourself.
Step 1: Check the Power Supply Transmits Voltage
To ensure that the power supply turns on, you must perform the following test:
- Remove the side cover of the computer to access the internal components.
- Completely disconnect the computer from the network - we recommend not only unplugging the power cable from the outlet, but also pressing the power supply switch on the power supply, setting it to the off (0) position.
- Disconnect all computer components from the power supply - motherboard, hard drives, video card, and others.
- Take a paper clip that can act as a jumper and close the contacts. It must be bent into a U-shape.
- Next, find the largest possible wiring harness with a 20- or 24-pin connector that comes from the power supply. This contact is connected to the motherboard during normal computer operation, and is easy to identify.
- On the connector, identify two contacts, the closure of which is a signal for the power supply to connect to the motherboard. These contacts are very easy to find. They can be marked with numbers 15 and 16, or they can be connected to the green and black wires from the power supply, located next to each other. Please note that there may be several black wires on the connector, while most often there is only one green wire.
- Insert a paperclip jumper into the detected pins to simulate the process of connecting the power supply to the motherboard. Make sure the paperclip is inserted firmly and that it presses against both pins. If this is the case, release the paperclip (since voltage may flow through it) and turn on the computer's power supply (do not forget that it can be disconnected not only from the outlet, but also by its own off/on button).
- If you did everything correctly, and the cooler of the power supply began to work when voltage was supplied to it from the outlet, then the computer’s power supply does not have problems turning on.
It should be noted that this test shows the functionality of the power supply to turn on. But even if, according to its results, the power supply cooler begins to rotate, this does not mean that the device is fully operational. Proceed to the next steps to check the power supply.
Step 2: How to Test the Power Supply with a Multimeter
If you are sure that the power supply receives voltage from the network and is working, you need to check whether it supplies the required constant voltage. For this:
- Connect any external resistance to the power supply - floppy drive, hard drive, coolers;
- Next, take a multimeter set to measure voltage and connect the negative lead of the diagnostic tool to the black pin of the 20/24-pin power supply connector. When connected in this way, the black contact is considered grounding. Connect the positive probe of the multimeter one by one to the connector contacts to which wires of the following colors are suitable, and also compare the values with the ideal voltage:
- Pink wire – voltage 3.3 V;
- Red wire – voltage 5 V;
- Yellow wire – voltage 12 V.
During measurement, errors of ±5% are possible.
If the measured values differ from the ideal values, you can diagnose a faulty power supply and the need to replace it.
Step 3: How to Visually Check the Power Supply
If you don’t have a multimeter (or if you need additional diagnostics), you can visually check the power supply for a malfunction. For this:
- Disconnect the power supply from the computer case by unscrewing the 4 (or 6) screws that secure it;
- Disassemble the power supply by unscrewing the screws located on its case;
- Visually inspect the power supply chip. You need to pay attention to the capacitors. If they are swollen, then their failure could cause a breakdown of the power supply. In such a situation (if desired), you can resolder the capacitors, replacing them with ones of similar rating.
When there are no problems with the capacitors, it is recommended to remove all dust from the power supply, lubricate the fan and reassemble the device, and then try to connect it.
( 443 votes, average: 4.60 out of 5)
How to replace thermal paste on a video card
How to choose a processor for your computer
Related Posts
Paperclip method
There is a simple method among users to check the power supply with a paper clip. Our resource will not stand aside and will tell you what this method is, especially since almost the same thing was discussed in the section on using a multimeter. This is the simplest, one might say, home method, which cannot show the quality of operation of the voltage source, but will reliably make it clear whether it turns on or not.
- Disconnect your PC from the network.
- Open the case and disconnect the connector from the motherboard.
- Make a U-shaped jumper from a paper clip, which you need to short-circuit the green wire of the connector and the nearby black one.
- Connect the power supply to a 220 V network.
If the fan starts working, then the power supply is theoretically in working order, if not, it’s definitely in repair.
Repair of switching power supplies
Of all possible types of power supply, pulsed models are considered the most unreliable. This is due to the fact that all the power consumed by the electrical circuit of the device passes through it.
Read also: How to check the operation of a transistor
Impulse power block
They are often used to power modern household appliances and devices.
Note! Most switching power supplies are created using simple circuits. This is not only cheaper, but also makes it easier to repair this device yourself at home.
Repair in this case involves the following algorithm of actions:
- searching for the cause of the breakdown;
- eliminating it by replacing, for example, a burnt part with a new one. Remember that you need to replace all failed parts at the same time. Otherwise, connecting a power supply with a faulty element to the network will damage the already replaced elements;
- checking the device for functionality.
Repairing such devices is not difficult.
Main symptoms and malfunctions
A faulty power supply, most often simply does not work at all. But sometimes, the user encounters problems that, by all indications, are manifestations of problems in the RAM or motherboard. In fact, the microcircuits receive power from the power supply, so failures in their operation may indicate a malfunction of the power supply. How to check the power supply in this case, and whether there is any point in repairing it, only a specialist can tell. Next, problems will be described in which the cause may be BP.
- Freezes when turning on the PC.
- Sudden system reboot.
- Memory errors.
- Stop HDD.
- Stopping the fans.
The power supply is outside the computer case. There are also characteristic faults that the PC itself “speaks” about:
- Not a single device works. The malfunction can be either fatal, requiring the purchase of a new device, or simple, requiring replacement of the fuse.
- There was a smell of smoke. The transformer, chokes burned out, and the capacitors swelled.
- The computer power supply is beeping. The fan may need to be cleaned and lubricated. A squeak when turned on is also caused by a crack in the transformer core and swelling capacitors.
In all cases, it is best to contact a service company in your city, where specialists will make a more accurate diagnosis and tell you whether there is any point in further repairing the device.
Special equipment is required for diagnosis
Diagnostics of the computer power supply is carried out using an electrical measuring instrument such as a multimeter. It must have probes of the required thickness, they must penetrate the cable from the back of the connector. This is the type of device that service workers use. ″[/img]
There is no need to unscrew anything. The power supply will be checked when it is turned on and there is a power connector in the motherboard.
The procedure for diagnosing the power supply itself has the nature of a step-by-step test, and the test steps must be performed one after another in a certain sequence. They are:
- Voltage diagnostics.
- General testing for breakdowns.
- Checking the power supply circuit.
- Testing the motherboard directly for breakdowns.
Repair of computer power supplies
Troubleshooting a computer power supply looks like this:
- First you need to remove the case from the device;
- This is followed by a thorough visual inspection of all components of the electrical circuit of the device. The first thing that catches your eye is blackened and swollen parts, as well as broken wires and contacts;
- if obviously damaged parts could not be found, then we check the functionality of all elements of the circuit using a multimeter;
- Some problems, such as unstable operation of the supply voltage or its ripple, can only be determined using an oscilloscope. Here you need to pay attention only to large pulsations, and small ones can be ignored;
Note! The issue of ripple is most acute for power supplies that are used to connect computers, monitors and televisions. It is not relevant for small and simple devices.
- Be sure to use testing equipment (multimeter and oscilloscope) to check the fuses, power cord, transistors, rectifier bridge and chokes, as well as zener diodes;
Ringing of electrical circuit components
- First, the test is carried out without soldering the component of the electrical circuit. As soon as a faulty part is discovered, it must be desoldered immediately. Any suspicious parts that behave in an uncharacteristic manner when tested are also subject to replacement. Their work may be only partially disrupted, but in the future they may cause a PSU malfunction;
- If a burnt part is detected, you need to more carefully check the circuit components connected to it. Very often, burnout of one part leads to damage to nearby elements;
- It is imperative to ring the terminals of the filter capacitor for the mains power supply to check for a short circuit.
Very often it is possible to detect a blown fuse (in 80% of cases). But this is more a consequence than a cause of the breakdown. After all the damage has been detected, the repair looks like this:
- removing all rejected elements from the electrical circuit;
- installation of new and functional parts in their place;
- soldering;
- cleaning soldering areas from solder and flux residues;
- returning to the place of the body.
After this, you need to check the result of your work. Instead of a mains fuse, you need to install a 150-200 Watt light bulb or connect less powerful light bulbs in series. Such protection will be able to protect the power supply from combustion in a situation where the problem of its malfunction has not been completely eliminated.
Note! After repair, the power supply must be tested for an extended period of time under normal load. This way you can be sure that it works as it should.
Step-by-step procedure for diagnosing a power supply using a multimeter
So, if the computer is unstable, suddenly turns off, a blue screen appears, or problems arise when loading, it’s worth checking the power supply. This process occurs in several stages. First you should examine the cooling. To do this, you can touch the top of the system unit, where the power supply is located. If you feel obvious heat, then the power supply overheats. The reason for this is a breakdown of the cooling fan in the power supply. After a little testing with a screwdriver, which can easily spin the blades a few revolutions, if the fan is working properly, we decide on further actions. If everything is fine, clean the fan from dust and start the computer. If the fan malfunctions, it should be replaced. Now that we've put this part in order, let's figure out how to check the power supply without a computer.
But for convenient work, you can still take it out.
Checking the voltage supply
- Turn off the computer - we finish the work, wait for the device to completely turn off, then on the back wall of the power supply you need to turn off the switch. Now we leave the network.
- Open the computer lid - disconnect the power supply from other components of the device. The cables must be removed one by one, and it is important to capture a picture of the correct position of the cables using a photo or video.
- We do the load - the computer turns off, but the test occurs under load. To do this, connect the cooler with a special connector. Don't forget about the 220V cable.
- We take a wire substitute - a paper clip in the shape of the letter U is inserted into the power supply after turning it off, you can also use a wire of a suitable diameter.
- We press the largest connector (20/24) - it is usually connected to the motherboard.
- We find contacts 15, 16 (green and black) - in order to touch these contacts with a paper clip.
- Insert a paperclip into contacts 15,16 - then be sure to release it and you can connect the power supply to the network and turn on the switch.
- Check the operation of the fan - if the cooler turns on, it means that the power supply is conducting current, it is working properly. If it doesn’t work, check the contact with the paper clip again and try again. If there is no result, the power supply does not work.
This is not the end of checking the computer power supply. This was a current conductivity diagnostic. Next, you need to test the operation of the power supply. The computer power supply tester is based on the use of a multimeter.
Testing the unit's operation
- We switch the multimeter to continuous current mode (voltage up to 20 W).
- Disconnect the power supply from the network.
- Using a handy device - a paper clip - we bring the power supply into working condition, connect the load through the optical drive. If the cooler does not spin, the power supply is faulty.
- We measure the voltage with a multimeter - we plug the black probe into the Molex connector, which is located opposite the black wire (middle connector). We insert the red probe one by one into the contacts on the wide cable and monitor the readings on the multimeter.
Measuring the voltage in the power supply using a multimeter
- In accordance with the pinout diagram of the power supply contacts, we determine the required voltage indicators in the operating state of the power supply. If the indicators do not match, this is a sign of a malfunction of the unit.
Read also: Homemade wood lathe video
For ease of verification, we present a pinout diagram of the power supply contacts.
As an example, the voltage on the red wires is 5V, if your reading is 4V, this is a clear sign that the power supply test showed a negative result and your power supply is faulty.
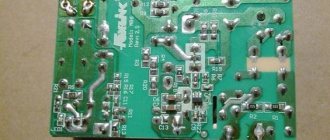
If you find a breakdown in the power supply, you can disassemble it and try to repair it. To do this, you need to have a basic knowledge of the operation of electrical devices. So, remove the cover, remove the dust and begin visual testing. What should you pay attention to? We are looking for elements that have blackening, swelling of capacitors, and looking for broken wires. It is necessary to inspect the inductor (inductor). A fuse or resistor may also blow.
Visual inspection of the computer power supply if it is not working
Didn't find anything? We turn the board over and look at the solder tracks and connections. We are looking for sealed elements that could simply come off due to overheating or a manufacturing defect. The tracks that conduct current could burn out. In this situation, we simply replace the faulty components, and the device will be in working order. If you cannot fix the problem, contact a specialist. But don’t forget, if the power supply is under warranty, you should take it to a service center without opening the box.
Upon completion of testing, it is important to collect all contacts and connect according to the previously taken photograph. Remember, if your power supply is working properly, but problems with your computer continue, the reason for such operation of the device may be hidden in other components. Test the system further until you find the cause and eliminate it.