Power unit. General information. Standard power supply startup
Using an electrical power supply helps protect your computer from frequent power outages. A mandatory element that comes with the Power Supply is a fan (other names: cooler, cooler). It constantly cools the PS and protects it from overheating, which can lead to breakdown.
The standard process of turning on Power Supply involves pressing the “Start” button on the motherboard, which activates the process of powering the unit. There is a widespread belief that it is impossible to turn on a power supply without a motherboard, because it does not start without voltage, but this is just a misconception.
If when you press the computer's power button it does not turn on and does not react in any way, then we can assume that the motherboard is most likely faulty or the Power Supply is broken. Before buying new expensive components, you should diagnose the operation of existing ones.
Causes and symptoms of power supply failure
As a rule, the reasons why power supplies fail can be:
- low quality of network voltage (frequent voltage drops in the network, as well as its output beyond the operating range of the power supply unit);
low quality of components and manufacturing in general (this point is relevant for cheap power supplies);
You can determine whether the power supply or some other component has failed by the following signs:
- after pressing the power button of the system unit, nothing happens - there is no light or sound indication, the cooling fans do not rotate;
the computer turns on every other time;
Checking the power supply can be done in several ways.
We will talk about the sequence of each check below, but now we will just limit ourselves to short information to understand what we will do.
The essence of the first method is to check the voltage supply and at this stage we perform a rough check to see whether there is voltage or not.
The second method is to check the output voltage; we have already mentioned that the voltage must be strictly within certain limits and deviation in any direction is unacceptable.
The third method is to visually inspect the power supply for swollen capacitors.
For ease of understanding, the algorithm for each check will be presented in the form of step-by-step instructions.
How to turn on the power supply without a computer?
The computer won't turn on is a very common problem that can be caused by anything. In such a situation, most often the culprit of the “triumph” is some component. Most often this is the power supply or processor. It is quite difficult to test the CPU at home for performance. To do this, you will need to find an analogue that will fit into the motherboard socket. And then, using the method of elimination, you can come to the conclusion that the processor is not working. But how many of you have several stones lying around at home that fit into one socket? Same thing.
But checking the power supply on a home operating table is quite possible. There are several ways to do this. And you don't need a PC itself. That is, if you have an unconnected unit, then it is not necessary to insert it into the case and connect it to the rest of the components. Today we will tell you how to check the power supply without a computer.
How to start a power supply without a computer: preparing for the “operation”
As we have already said, there are several ways to check the power supply. Depending on your specific situation, you can choose a method that will be convenient and accessible to you. But regardless of the chosen method, you must perform the following steps before starting diagnostics:
- Turn off your computer. Disconnect the power supply from all components. The unit itself can not be removed from the body and diagnostics can be carried out right inside the “carcass”. Later we will need some connectors. So if the cables inside the case are pulled very tightly, free them for further manipulation to make it more convenient for you.
- Connect any working hard drive to the power supply. But you don't need to connect it to the motherboard. If this is not done, then after the procedure has been completed, malfunctions may occur in the operation of the power supply unit. If the hard drive fails, then a CD/DVD player can take its place.
How to turn on the power supply without a computer: jumper
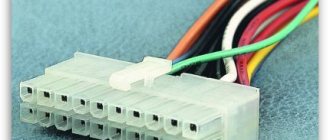
The essence of the method is to force the power supply to start without connecting to the motherboard. In theory, no matter how many secondary devices you connect to the power supply, it will not start. You will definitely need a connected main 20 or 24-pin cable. But you can bypass this rule. To do this, we will need to make a special jumper from any material that conducts electricity. A paperclip or copper wire is best suited for this role. But you can use what you have at hand.
Next, you need to take a 20 or 24-pin connector and insert a jumper into it as follows: insert one end into the fourth pin (the green wire from the power supply is connected to it), and insert the other end into the fifth pin (the black wire from the power supply is connected to it) ). The green contact in the diagram is usually depicted as “PS-ON” (“Power Supply ON” - turning on the power supply), and the black one as “COM” (“Common” - common) or GND (“Ground” - grounding).
Don't forget to connect a secondary device, which can be a hard drive or a solid-state drive. After this, you can start the power supply. The cooler on the power supply should start spinning, and the hard drive will heat up and hum slightly. But this is provided that you connected the jumper correctly.
If you are sure that everything was done correctly, but the power supply does not start, then we can say that the component is faulty. Just because it started working doesn't mean everything is fine.
If you have a voltmeter at home, it is recommended to use it for further diagnostics so that you can say with confidence that the power supply is functioning correctly.
How to start a computer power supply without a computer: voltmeter
In order to make an accurate diagnosis, you need to use a voltmeter, which shows the output voltage at the connectors. Each type must have a specific meaning. If this value does not deviate too much from the norm, then everything is in order with the power supply. If deviations are more than 5% from the recommended figures, this means that there is a problem with the power supply. And it is better to either replace such a component or take it to a service center. But, as practice shows, it is much easier and faster to buy a new power supply and not wait for the old one to be repaired, because many of us need a computer every day.
We remind you that the power supply is a component that supplies electricity to other components. If it malfunctions, he can easily take with him “to the next world,” for example, a video card or motherboard. Therefore, you should not neglect such a simple diagnosis. It can save you money and time if the problem is detected early. We understand that not everyone has a voltmeter at home. But we still recommend purchasing it. With its help you can diagnose not only the power supply, but also other components. Moreover, at a price it is accessible to absolutely everyone. Here's a good option:
So, turn on the power supply as described above. Using the device, measure the indicators of a number of black and pink wires. The recommended value should be around 3.3 volts. Do the same for the black and yellow wires. Here the numbers should already be about 12 volts. And for black and red - 5 volts. If everything is within normal limits, then the diagnosis can be completed. After this, you can say with confidence that everything is fine with your unit.
If you do not have a voltmeter, then you can always conduct a visual inspection. To do this, remove the cover from the power supply and first check the condition of the capacitors. If they are swollen or cracked, everything is bad. The block needs to be changed. Of course, this procedure must be carried out with the power turned off. Also, at the same time, clean the inside of the power supply unit. Dust can cause short circuits and other unpleasant incidents.
Problems with the computer and power supply
First of all, you should make sure that voltage is still supplied to the computer's power supply. If there is voltage, then first check the health of the power supply:
Disconnect all connectors coming from the power supply
Disconnect all connectors coming from the power supply: to the video card (if any), motherboard, disk devices. To force it, connect pins 14 and 15 of the main power supply connector with a jumper. These pins are located next to each other and the black and green wires go to them.
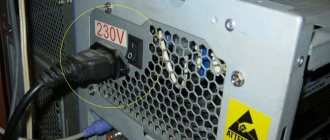
We turn on the 220V network. If the power supply fan starts to rotate, then the power supply is functioning. You can verify the supply voltage ratings using a tester by connecting the common wire to any black wire and then:
- orange – 3.3 V;
- red – 5 V;
- pink (purple) – 5 V (deux);
- white – -5V;
- yellow – 12V;
- blue – -12V;
Connector colors
The voltages may be slightly higher, because... the unit operates without load. It is not advisable to keep it in this mode for a long time. A faulty power supply must be repaired or replaced.
Pull out all the components from the motherboard: processor, video card, memory modules, other devices from the expansion slots, disconnect the data cables from the hard drive, floppy drive, etc., leave only the cables leading to the power button and the “Reset” button connected.
- Turn on the computer using the power button.
- If at the same time the power supply fan starts to rotate and does not stop, then we can conclude that the motherboard, at least, does not create a short circuit for the power supply. In this case, go to step 5
- If the power supply fan does not rotate, or stops a few seconds after being turned on, this indicates a malfunction of the motherboard, namely a short circuit in any node.
The motherboard should be replaced or, if possible, repaired. A common cause of this is poor-quality electrolytic capacitors - this can be visually determined by their swelling.
Insert the processor into the socket and install the processor cooler. Before this, you need to remove any remaining old thermal paste on the processor and cooler, replace the thermal paste with new one, and clean the cooler from dust. After installing the processor, turn on the computer; the system speaker (PC-Speaker) should be working properly and connected to its connector on the motherboard.
If, after turning on the PC, the power supply and processor fans rotate and do not stop, and long beeps alternating with pauses are heard from the system speaker, this indicates that the processor is in working condition and you can proceed to step 6.
If you hear no beeps after turning on the power, and the fans stop after a few seconds, this indicates that the processor is faulty (burned out and causing a short circuit)
The beeps are heard, but after a few seconds the power supply turns off - the processor overheats and the thermal protection is triggered. Check that the cooler is installed correctly, if everything is normal, replace the processor.
If the fans rotate when you turn on the computer, but there are no signals from the system speaker, you can try to reset the BIOS using the appropriate jumper; if this does not help, remove the BIOS battery from the motherboard.
If, after removing the battery, you hear beeps from the speaker when you start the computer, this means that your battery is faulty and should be replaced. This usually happens with motherboard batteries that have already been used for 3-5 years, and sometimes happens with new motherboards that have been stored in a warehouse for a long time. A typical sign that the battery is about to expire is the system time resets and the computer does not want to start the first time you press the power button.
It will be interesting➡ DIY switching power supply
Now let's check the performance of the RAM. First of all, you need to do a little prevention. Take an ordinary office eraser, and with careful but confident movements, clean the contacts of all memory modules that mate with the motherboard connector on both sides to a metallic shine. When cleaning, do not touch the electronic components of the memory module with the eraser. It is also worth using a brush to clean the module connectors on the motherboard from dust. Then, using a wide screwdriver, lightly touching it several times, go along the internal contacts of the connectors.
Install one memory module into the appropriate slot and turn on the computer. If, after turning on, the fans rotate and do not stop, and you hear a signal from the system speaker that will consist of one long and two short beeps, this indicates that this memory module is working. Next, you need to repeat this check procedure for each of the memory modules separately, if you have several of them. Replace memory modules only when the computer's power is turned off.
If, after turning on, the computer immediately turns off or long beeps are heard, alternating with pauses, this indicates that this memory module is faulty, or the memory slot in which the memory module is installed is faulty - try installing the same memory module in another slot.
After individual testing, install all memory modules into the motherboard and turn on the computer. You should hear a signal consisting of one long and two short beeps. If this does not happen, then one of the memory slots (connectors) on the motherboard is not working. You can identify it using the method described in paragraph 6 using a known-good memory module.
Now you need to check the functionality of the video card. Before checking, we will give it preventative maintenance similar to what was carried out for RAM modules (see paragraph 6.). If the video card has a cooler, make sure that it rotates completely easily and freely. Otherwise, the cooler needs to be repaired or replaced. We insert the video card into place and try to turn on the computer.
If after turning on the computer you hear a single short beep and an image appears on the screen, then the video card is working.
If, after turning on the computer, you hear a signal that consists of one long and two short beeps, then the video card is faulty, or the video card connector on the motherboard is faulty.
If possible, you can test the video card on another computer.
If, after turning on the computer, the fans spin and stop after a few seconds, then the video card is faulty (the video chip has burned out due to overheating or overvoltage, or there is a short circuit in the video card’s power supply system). Just in case, let's check the cooling system of the video card. To do this, carefully dismantle the video card cooling system, remembering the procedure. We remove the remnants of the old thermal paste from the graphics chip and radiator, apply new thermal paste and assemble everything in the reverse order. Turn it on again. If a positive result is not achieved, such a video card will have to be replaced or sent for repair to a specialized workshop.
Note If no problems arose when checking the power supply (see point 2), and when connecting the video card to the PC, the power supply still turns off immediately after turning it on, this may still indicate that the power supply is insufficient for your video card (it may still be working properly ).
What to do if the power supply does not turn on
We found out how to turn on the power supply from a computer without the computer itself, and if it turns on, then everything is fine. You can proceed to measuring output voltages and other diagnostics. But what to do if the power supply never came to life?
There are few options here, since we initially ruled out damage to the button and motherboard by starting the computer's power supply directly. First of all, check for voltage in the outlet. As trivial as it may be, very often we forget to do this and rack our brains over a problem that is not a problem. We turn on the multimeter to measure alternating voltage with a limit of at least 400 V and simply install the probes into the outlet.
Next you need to check the power cable. It rarely breaks down, but it does happen. We inspect it, pull it out of the PC, plug it into a power outlet and, using the same multimeter, measure the voltage at the two outer contacts (the middle one is ground).
Let's check if we forgot to turn on the power switch on the power supply and if we made a mistake with the jumper. Is everything in place and correct? Let's try to disassemble the device and look for a problem.
What if it doesn't turn on?
If the computer refuses to work, you need to check the presence of power at the power supply input. If it is there, even when the computer is turned off there will be a voltage of +5V. This is easy to check by arming yourself with a multimeter and checking the ninth pin (purple wire). If it is not there, then there are technical problems. There are many of them - from a cable break to a short circuit at the output; with such a problem it is better to go to a service center.
Power supplies can rightfully be considered one of the most important components of a computer. Without them, the system will never start, which means you need to be able to handle such an important part correctly. In standard form, this is available even to those who know computer interfaces at an exclusively amateur level (probably everyone remembers that on old-style power supplies there was simply a special on/off button, which made life much easier for many). But what if, for example, we need to run an old power supply without a computer? This task will no longer be understandable and accessible to everyone, although there is nothing difficult in solving it. In this article, we will consider the features of modern power supplies and the algorithm for connecting them separately from other components of the system.
The ATX power supply is the legal successor of the AT power supply. It itself is more powerful and functional than the previous version, so it is neither possible nor meaningful to replace these two models (if only because the AT version simply does not work with ATX motherboards unless it is first prepared and modified).
Main functions of the ATX block:
● Adjustment of the mains voltage, which can be changed to the value required for computer operation;
● Voltage stabilization by controlling noise passing through its input;
● Providing the computer with the amount of electrical energy necessary for operation.
How to distinguish an ATX block from an AT standard?
If you don’t want to waste your time worrying about connecting contacts and how to start a power supply without a computer, then it’s better to immediately find out which standard unit is installed in your PC. There are two simple ways to do this.
The first is to look at the piece of paper glued to one of the walls of the power supply. There, on the very top line, the model number of your unit will be written. The number will begin with either the letters ATX or AT, by which you can understand the standard of your block model.
The second is to look at its motherboard. AT standard power supplies had smooth-shaped motherboards to which six wires were connected.
While the ATX standard motherboard is shaped more like a harmonica and has about twenty wires leading to it.
It is also worth mentioning that for some time models were produced that combine both standards, and therefore have two different motherboards.
Replacing the ATX block and repair tips
Replacing an ATX power supply is expected in the event of a breakdown of the old copy or in the case when the constituent elements of a personal computer have been replaced: more powerful video cards, processors, motherboards, more RAM. In the case of such a PC upgrade, the power supply becomes unable to supply power to all components of the PC. First of all, you need to remove the existing ATX element, install a new one and test its performance. You just need to know the basic concepts of circuit design and follow the instructions below:
- Necessary tools: standard size Phillips screwdriver.
- It is necessary to turn off the power to the personal computer - this process involves unplugging the power cord from the power supply.
- The next step is to remove the wall of the system unit; it is usually removed from the left side of the case by unscrewing several screws.
- Remove all accumulated dust from the computer components with a brush or vacuum cleaner. Please note that you should clean your computer from accumulated dust at least once every six months. Only after complete cleansing of dust can you proceed to the next steps.
- Disconnect all wires belonging to the power supply from other devices. Pay attention to the possible presence of special latches in the connectors. Do not pull out the connected wires abruptly.
- After disconnecting all the wires, unscrew the screws that secure the power supply to the computer's system power supply. This way the old power supply will be removed.
- To connect a new power supply, repeat all the steps exactly the opposite: attach it to the system unit, carefully connect all its wires to the necessary elements, connect an electrical cord with a power of 220 Volts to the power supply.
Connecting a power supply separately from the computer: reasons
Why might we need to turn on the power supply separately from the entire computer? Most often, this situation arises because we need it for some non-standard purposes, for example, we want to supply power to another foreign device. Another option is that we needed to connect several power supplies to the system at once for some purpose.
You can connect anything you want to such a powerful device, as long as you have enough imagination. For example, if you need to organize LED lighting, then the ATX model will be a very good source of energy. Or, suppose there is simply no other source in the room capable of transmitting energy (as if it were in some abstract laboratory conditions), and you want to power the entire system from the unit you have.
In a word, situations can be very different, from vitally important and critical ones to the usual desire to experiment. But the algorithm of action will still remain the same. Let's see how we should act in such cases.
Before we begin the process of explaining how to turn on an atx power supply, we would like to address one major warning.
Important point! If you decide to connect the ATX unit separately from the rest of the system, it is not advisable to leave it completely unloaded. This is fraught with breakdowns and other troubles. It's better to connect something to it, for example, a CD drive or a removable hard drive, using a molex connector for this. This way you will protect both yourself and your equipment. The power of the connected device must be at least 10% of the power of the ATX unit itself.
It should also be remembered that today two main standards are used for such power supplies:
1. ATX v.1.x (a twenty-pin connector is provided for the motherboard);
2. ATX12V 2.0 (a twenty-four-pin connector is provided for the motherboard, and an additional four pins are included in the format of a separate plug).
Knowing all of the above, determining how to start an atx power supply without a system unit is quite simple. Let us explain clearly and in Russian how this is done:
1. We find contacts number 14 and 13 (in the case when we have a 20-pin connector) or contact numbers as 17 and 16 (in the case when we have a 24-pin connector), the important thing is that one of them must be green, the other black (i.e. one is power supply, the other is grounding, you can’t do without it, otherwise our block will simply short-circuit).
2. We close them together using improvised means (for example, a metal clip or clamp);
3. Check the result.
The only surprise that can await us here is the Chinese version of the English language, in which for some reason the words “green” and “grey” are constantly confused. If you want to find the real green wire, it is better to focus on the connector number, and not on the color marking of the contact. If you still have doubts and are afraid of breaking your computer, then follow a simple rule: the black wires should always be in the center of the computer. Better yet, just find the color scheme of the ATX block connectors on the Internet and download it. It will come in handy in any case, and making connections based on it will be easier and safer.
So, we have determined how to start a power supply without a PC. We hope that you will need this information and you will not have any problems with technology in the future. The main thing to remember is that you need to approach the computer and its components logically, wisely and patiently.
Recently, I began to often encounter a malfunction of the PC power button - the Power button
. Previously, I did not give it much importance and did not pay due attention. But in vain!
It happens that there is power in the network, the power supply, when the corresponding contacts of the connector are closed, starts with half a turn and works great. The motherboard signals with its LED the presence of standby voltage, but by pressing the pwr button
Nothing happens.
The computer won't turn on
!
Of course, there can be a great many reasons for this behavior, but it’s still worth paying attention to the PC power button!
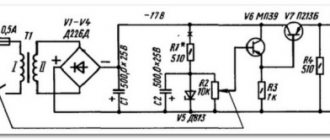
How to raise 12V line to 13.5V
The theory says, and practice flawlessly confirms, that by loading a 5V line with a low-resistance resistor of decent power, the voltage on the 12V line increases. 13.
5V on the 12V line occurs only when between the ground wire and the 5V line there is an assembly of 5 series-connected 22Ohm resistors, the total power of which is 50W.
If you do not have such resistors, then it is quite possible to load the 5V channel using an assembly of light bulbs connected in series with the corresponding power rating.
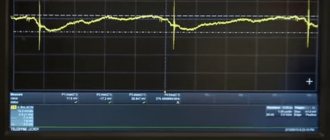
Checking the power supply voltage
Step 1.
Step 2.
Remember or, for convenience, take a photo of how the power is connected to each of the components (motherboard, hard drives, optical drive, etc.) after which they should be disconnected from the power supply.
Step 3.
Find a paper clip. We will use a paper clip to close the contacts on the power supply, and if it is not at hand, a wire similar in length and diameter to the paper clip will do.
After this, the paper clip must be bent in the shape of the Latin letter “U”.
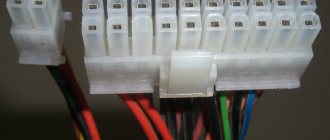
Step 4.
Find the 20/24 pin power connector. This connector is very easy to find - it is a harness of 20 or 24 wires, respectively, that come from the power supply and are connected to the PC motherboard.
Step 5.
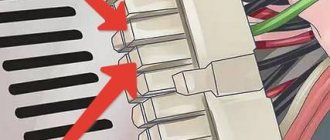
Find the green and black wire connectors on the connector. You must insert a paperclip into the connectors to which these wires are connected.
The paper clip must be securely fixed and in contact with the corresponding connectors.
Step 6.
Step 7
Checking the functionality of the power supply fan. If the device is working and conducts current, then the fan located in the power supply housing should rotate when voltage is applied.
If the fan does not rotate, check the contact of a paper clip with the green and black connectors of the 20/24-pin connector.
As mentioned above, this check does not guarantee that the device is working. This test allows you to determine that the power supply turns on.
For a more accurate diagnosis, the following test must be performed.
The motherboard has an 8-pin power connector, but the power supply has only a 4-pin
This is one of the most common situations that users encounter. Luckily, the 4-pin power connector is compatible with the 8-pin connector. And this is a completely workable solution. However, it is important to consider which processor you will be powering with the 4-pin power cable and whether it will be overclocked.
If you have a budget or energy-efficient processor whose consumption does not exceed 95–110 watts, you can safely power it with a 4-pin power cable. Why are such low CPU power ratings recommended? Because a power supply that does not have an 8-pin power cable is most likely a budget solution, where they could also save on the thickness of the wires and the quality of the connectors.
A very important point is whether the processor will be overclocked on a motherboard powered by a 4-pin power cable. Everything here is very individual and depends on the type of processor, its supply voltage and the frequency to which it will be overclocked.
For example, the Pentium G3258 can easily meet 100 watts of consumption with decent overclocking, and the Ryzen 5 2600 can exceed the 120 watt mark even if auto overclocking is accidentally activated in the motherboard.
How to start a computer without a button?
Each motherboard manufacturer may have a different pin layout. Therefore, the best search option would be to open the documentation for your motherboard and find the location of these pins there. The documentation for the motherboard must come from the store; if you lost it or the seller did not give it to you (which happens very rarely), then the documentation for the motherboard can be downloaded online from the manufacturer’s official website if you have access to the Internet!
If there is neither one nor the other, then we look for the inscriptions on the connectors. As a rule, they are signed with the letters Power Switch (PW Switch), Power ON, On-Off
, not to be confused with PWRLED.
Here are typical connector pinouts from some manufacturers:
MSI motherboard
Asrock motherboard
Asus motherboard
Biostar motherboard
Epox motherboard
Gigabyte motherboard
Foxconn motherboard
Power connector for 3.5″ drives
Another connector that is almost never found on new power supplies. Previously used to power 3.5″ drives and some expansion cards.
Pinout of power supply connectors: which line is responsible for what
Connecting the power supply wires when assembling a PC is one of the most difficult tasks that novice users face. Everyone has heard the phrase “electricity is nothing to joke with,” and you need to understand that if the wires are connected incorrectly, you can easily damage expensive components. To prevent this from happening, you need to know the pinout of the power supply connectors, the maximum load on each connector and the position of the keys that prevent you from connecting the wires incorrectly. In this article you will find all the information on this topic.
Standards for PC power supplies and their connectors have been evolving for almost 40 years, since the release of the first IBM PC . During this time, several AT and ATX standards have changed. It would seem that all possible connectors have already been invented and nothing new is required, but this fall the Nvidia GeForce RTX 3000 series video cards are expected to be released, which will bring with it a new 12-pin power connector. Manufacturers have already begun to add a 12-Pin Micro-Fit 3.0 connector to the cable sets of new power supplies. It wouldn't be surprising if this power connector complements the new ATX standards.
Before moving on to the description and pinout of all connectors in a modern power supply, I would like to remind you that the main voltages that we will encounter are +3.3 V, +5 V and +12 V. Now the main voltage that is required by both the processor and a video card is +12 V. In turn, +5 V is needed by drives, and +3.3 V is used less and less.
And if you look at the plate that is on the side of each power supply, we will see the voltages, currents and power it produces for each of the channels.
Features of turning on the power supply without a PC
As you know, the computer is turned on using the “Power” button, which, in turn, is connected to the motherboard. To run the power supply without a computer, we need to exclude the motherboard from this circuit using a method that I will describe below.
When performing this operation, remember that:
- It is necessary to turn off the PC and completely disconnect the power supply from the computer;
- You need to connect some kind of load to one of the external connectors of the power supply (any old hard drive or CD (DVD) player will do). Without such a load, various negative consequences are possible, in the form of the power supply refusing to start, its failure, and other undesirable dysfunctions;
- Be extremely careful when performing the following operations. Accidentally closing the wrong contacts can damage the device.
CPU power connectors
The power consumption of processors has increased steadily over the past 20 years, necessitating the need for additional power connectors for them. And in the ATX12V specifications, an additional 4-pin +12 V processor power connector was introduced.
8-pin processor power connector
Although the 4-pin processor power connector is rated for a maximum power of up to 288 W (using Plus HCS pins), the EPS12V specification version 1.6 introduced in 2000 introduced an 8-pin processor power connector. Initially, this connector was used in servers with serious loads on the power system, but later migrated to ordinary PCs.
Today, even on budget motherboards we find this particular connector, which theoretically can supply up to 576 W of power to the processor.
Checking the input voltage
The first method is a rough check of the power supply. We will simply determine whether voltage is supplied to a given hardware component or not. This is done as follows:
- Before you test your computer's power supply without using a motherboard, you need to make preparations. Disconnect and then turn off the power to the PC. Do not forget that the hardware module under discussion operates at a voltage of 220 volts (lethal to the human body).
- Unscrew the case cover of your PC to gain access to the components. Disconnect the hardware modules (motherboard, hard drive, etc.) from the power supply.
- Now find the power supply connector. It looks like a harness consisting of 20/24 (depending on the standard) wires. The connector goes straight from the power supply and is connected to the motherboard.
- Now find a wire or a regular paper clip. With its help we will close the contacts. Make the Latin letter “U” from a wire (paper clip).
- Find two wires on the connector: green and black. Close them using a wire (paper clip).
- Now you need to activate the power supply. We feed him food.
- Take a look at the PSU cooling system. If the cooler rotates, this indicates that the hardware module responsible for power supply is working.
The testing performed does not guarantee that the hardware module functions as intended. The above test only allows you to find out whether the power supply turns on.
SATA power connector
Standard connector for powering HDD, DVD and 2.5″ SSD drives. A reliable and convenient connector, which cannot be inserted on the other side due to the location of special protrusions. The current consumed by HDDs and SSDs is quite small and there is no need to worry about heating of such connectors.