The health of any living organism depends on how and what it eats. The same can be said about a computer - if the power supply is working well and correctly, electronic devices function “like a clock.” And vice versa: if the feeder malfunctions, working on a PC turns into torture or becomes completely impossible.
Problems with a computer power supply manifest themselves in different ways - from a lack of response to an attempt to turn it on to occasional “glitches”. Let's talk about what symptoms indicate a failure of the computer's power supply and how to check its functionality and serviceability without exposing yourself to danger.
Causes and effects of nutrition-related problems
Complete failure and malfunction of the power supply most often occur due to:
- Voltage surges in the electrical network.
- Low quality of the PSU itself.
- Inconsistencies between power supply capabilities and load consumption (computer devices).
The consequences of a malfunction of the power supply, especially in combination with low quality manufacturing, can be not only breakdowns of the PC electronics, but also electric shock to the user.
How computer power supply problems manifest themselves
Symptoms of a malfunctioning feeder are very varied. Among them:
- The PC does not turn on when you press the power button or turns on after pressing it multiple times.
- Squeaking, crackling, clicking, smoke, burning smell from the power supply.
- The mains fuse on the distribution board blows when the computer is turned on.
- Discharges of static electricity from the case and connectors of the system unit.
- Spontaneous shutdowns and restarts of the PC at any time, but more often under high loads.
- Brakes and freezing (until reboot).
- Memory errors, BSoD (blue screens of death).
- Loss of devices from the system (drives, keyboards, mice, other peripheral equipment).
- Stopping the fans.
- Overheating of devices due to ineffective operation or stopping of fans.
Operating principle of the power supply
To figure out whether the power supply is working or not, you need to understand the basic principles of its operation. In a simplified way, its function can be described as follows: converting the input AC voltage of a household electrical network into a DC output of several levels: 12 V, 5 V 5 V SB (standby voltage), 3.3 V and -12 V.
The following devices receive power from a 12-volt source:
- drives connected via SATA interface;
- optical drives;
- cooling system fans;
- processors;
- video cards.
The 12 V line wires are yellow.
Powered from 5 V and 3.3 V:
- sound, network controller and the bulk of the motherboard microcircuits;
- RAM;
- expansion boards;
- peripheral devices connected to USB ports.
According to the ATX standard, the 5 V line is indicated by red wires, 5 V SB by purple, and 3.3 V by orange.
The computer startup circuit on the motherboard receives power from a 5 V SB (standby) source. The -12 V source is designed to power COM ports, which today can only be found on very old motherboards and specialized devices (for example, cash registers).
The above voltages are produced by all ATX standard power supplies, regardless of power. The only differences are in the level of currents on each line: the more powerful the feeder, the more current it delivers to consumer devices.
Information about the currents and voltages of individual lines can be obtained from the power supply passport, which is pasted in the form of a label on one of the sides of the device. However, nominal indicators almost always differ from real ones. This does not mean anything bad: fluctuations in values within 5% are considered normal. Such minor deviations do not affect the operation of computer devices.
Among other things, a working power supply produces a Power Good or Power OK signal, which notifies the motherboard that it is working as it should and the board can start other devices. Normally, this signal has a level of 3-5.5 V and rises only when all supply voltages have reached the specified values. If the power supply does not produce Power Good, the computer will not start. If it produces too early, which is also not good, the device may turn on and turn off immediately, freeze during boot, or throw a critical error - blue screen of death.
The Power Good signal is transmitted to the motherboard via the gray wire.
What do you need to know before you start testing your computer power supply?
Testing a computer power supply involves working under voltage. You need to be very careful to avoid an accident. Before checking the computer power supply, it is necessary to inspect the integrity of the braid of each cable. Under no circumstances should parts be touched with wet, bare hands. If you do not have enough experience in carrying out such operations, it is better to contact a specialist.
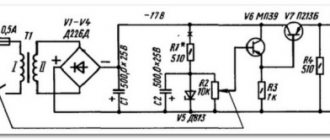
During diagnostic activities, it is important to remember that replacement diodes must be rated at 300 volts or higher. They must also carry a current of at least 1 ampere. Remember, after changing the diode bridge, you do not need to turn on the device from the network, because you need to check all the components at once.
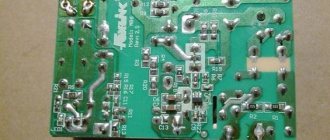
Checking the power supply occurs in several ways. The first and simplest is to visually assess the external state of the BP. If there are inflated electrolytic capacitors and varistors, then the power supply protection is broken. The parts urgently need to be replaced with new ones.
Inflated electrolytic capacitors of the power supply
If such a visual test of the power supply does not give positive answers, then you can use one of the diagnostic options - a computer program, a multimeter, a volt-ohmmeter, a special computer power supply tester (such devices sometimes show inaccurate readings).
One of the most common methods of testing a power supply is using a multimeter.
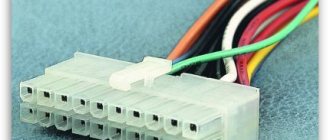
ATX main power supply connector pins
We figured out the color coding of wires 12 V, 5 V, 5 V SB, 3.3 V and 3-5.5 V Power Good. The remaining contacts have the following voltages:
- White: -5 V. Left for compatibility with older devices.
- Blue: -12 V.
- Black: 0 V. Common wire or ground.
- Green: 3-5 V. Power On. Closing this contact to ground is equivalent to pressing the power button on the computer case. Starts the power supply. At the moment of pressing, the voltage at the button contacts should drop to 0 V.
The same voltages are present on other connectors that terminate the power supply cables. That is, in the yellow wire projection there should always be 12 V, in the red wire projection - 5 V, in the orange wire projection - 3.3 V, etc.
Power supply repair
Since the question “how to repair a computer power supply” is unlikely to arise for a person who professionally owns the appropriate tool (soldering station, desoldering pump, etc.), in the future we will proceed from the minimum set of the most common devices.
Therefore, we will need
- soldering iron with a power of up to 65 W with a flat sharpened tip,
- solder,
- acid-free flux (rosin),
- tweezers and a flat screwdriver.
Excess solder can be removed using stripped stranded copper wire submerged into a drop of molten tin.
When replacing large-sized elements like capacitors, you need to sequentially heat the soldering points of their legs, remove excess solder if possible, and then either alternately warm up the legs and tilt the capacitor body from side to side to remove it, or, if the size of the soldering iron tip allows this, heat both points simultaneously solder and quickly pull the capacitor out of the holes in the board. In this case, as when working with other elements, it is important to minimize the time the soldering iron is exposed to the board and the part.
When replacing transistors and powerful diodes, they are installed in the holes on the board so that the mounting hole coincides with the threads in the radiator body. Before attaching to the radiator, the surface of the part is lubricated with thermal conductive paste (KPT-8 or its analogues).
When replacing an electrolytic capacitor or diode, you must remember that these are polar elements, and their installation must strictly correspond to the drawing on the board (for capacitors, except tantalum, the strip indicates the negative pole).
Another material about computer power supply repair
After repairing the power supply, you should not rush to install it in the computer - it is best to repeat the check described earlier.
How to Test a Power Supply Using a Multimeter
The compliance of all voltages that the feeder produces with the specified levels and the preservation of their values under any load (if they do not exceed the capabilities of the power supply) indicate that the device is operational and, most likely, in good working order. And to determine them, you will need a multimeter - an inexpensive compact device that can be purchased at almost any electrical goods store.
Multimeters (testers), of course, are different. Among them there are expensive high-precision models with a lot of additional functions, but for our purposes a simple one is enough. To check the power supply, we don’t need measurements down to thousandths of a volt; tenths and sometimes hundredths are enough.
Conditions for taking measurements
Measurements of voltages at the power supply outputs should be made under conditions where failure occurs. If the problem appears in the first seconds and minutes of PC operation, the device readings should be taken immediately after turning on. If you are working intensively, to obtain reliable results, the computer should be loaded, for example, with a heavy game or a program designed for this (for example, the OCCT utility, the Power Supply test).
To track changes in supply voltages during PC operation, measurements are best taken continuously over several minutes or tens of minutes. If for some reason this is difficult, you can take one-time measurements at certain time intervals.
The result of a single measurement during a floating fault is often not an indicator, since in the case of unstable operation of the feeder, the voltage values (or one of them) can constantly change.
The procedure for taking measurements
- Turn on the computer and bring it into the state where the problem occurs.
- Switch the multimeter to DC voltage measurement mode (the icon on the instrument panel is surrounded by a yellow frame). Set the upper scale limit to 20 V.
- Connect the black probe to any metal pad on the motherboard where the voltage is 0 V (for example, near a mounting hole), or to a pin in the connector that the black wire goes to.
- Place the red probe in the measurement area (in the connector opposite the corresponding wire). The number that you see on the tester display is the voltage indicator in Volts.
Programs for checking the power supply on Windows
To test the power supply, there are several programs that allow you to do this from under Windows. Let's look at a couple of them.
AIDA64 . The program is convenient, but for full functionality it must be purchased. However, with some restrictions, you can use the trial version. Launch the shortcut, in the top panel select “Tools” - “System stability test”
Next, check the box for “Stress GPU(s)” and confirm your actions by clicking “Yes” in the window that appears. Thus, during our test, the load on the system and power supply will be increased due to the use of the GPU in the test.
We start the test by clicking on “Start”
Go to the “Statistics” tab
In this window we are interested in “Voltage”. Here you should pay attention to the CPU voltage lines, 5V, 3.3V and 12V. The more stable the indicators in the “Minimum” and “Maximum” columns are, the better. Obvious drops in the indicators will indicate the presence of problems in the operation of the power supply.
It is also worth paying attention to “Cooling Fans” - “Power Supply” - this parameter shows the speed of the power supply fan under load during the test. The very possibility of automatic speed control is a big advantage of the power supply.
For laptop users - sometimes in the statistics tab you can only see the processor voltage. In some cases this is absolutely normal, because... The display of power lines in the program depends on the circuitry of the motherboard, the presence of certain sensors and their compatibility with the program. But this does not affect the accuracy of displaying voltage dynamics during the test.
OCCT . Let's look at the second program. It has a clear advantage over the previous one - it is completely free. Open and go to the tab indicated by the arrow
In this tab, pay attention to the following parameters:
- Test type: Auto;
- Duration: from 30 minutes to 1 hour;
- DirectX version: select the available one. If possible - 11, if not - 9;
- Resolution: usually current. It is set automatically, depending on which one you are currently using;
- Check the box for “Full screen mode”
- Check the box for “64 bit Linkpack” if you have a 64-bit system. You can find out the bit depth of your system in the OS properties;
- Check the box “Use all logical cores” (in some cases the checkbox is not available, for example, if one or more cores are blocked in the BIOS)
All. You can start the test by pressing the “ON” button
At the end of the test, a window with screenshots will open, where there will be detailed graphs of the system parameters we need. After analyzing the performance readings of the power supply during the test, we can draw conclusions about the reliability and stability of its operation.
How to check the functionality of the feeder if the computer does not turn on
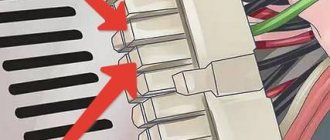
One of the common reasons why the computer does not respond to pressing the power button is precisely the malfunction of the power supply. To confirm or refute this version, all we need is a metal clip or tweezers, with which we can simulate pressing a button. Remember, a little earlier we found out that for this you need to short-circuit the green and black wires on the 24-pin connector of the power supply unit, which is connected to the motherboard? Just before that it needs to be disconnected from it.
The following is in order:
- Connect a certain load—an energy consumer—to the power supply, which is disconnected from the motherboard and computer devices. For example, an unused optical drive or light bulb. Please be aware that if the power supply is faulty, the connected device may be damaged. Therefore, use what you don't mind.
- Plug in the power supply.
- Use a paper clip to connect the 2 pins opposite the green and black wires. If the feeder shows signs of life - it starts the fan inside and turns on the connected load, then it is operational. However, performance does not mean serviceability, that is, this diagnostic method only allows you to differentiate a working device from a completely non-working one.
How to check the power supply: capacitors, power supply, cooler.
Diagnosis of a power supply always begins with its visual inspection. During the inspection, you can determine the most common causes of failure. These include cable faults. If everything is fine with them, you need to disconnect the unit from the PC case and disassemble it.
When inspecting a disassembled power supply, you need to pay special attention to the electrolytic capacitors. They may be swollen. This problem indicates a faulty power supply protection. Swollen capacitors must be urgently replaced.
The cause of the breakdown may also be a malfunctioning cooler. This problem is evidenced by strange sounds that occur during the operation of the power supply. They talk about a worn cooler bearing and the need to replace this element. Before putting the power supply back together, it is also recommended to remove dust from the power supply and lubricate the fan.
Problems with the power supply can also be caused by power problems. To verify this, you need to turn on the power supply, but connect it to the motherboard. To do this, you need to disconnect the computer from the power supply, and the power supply from other elements of the PC.
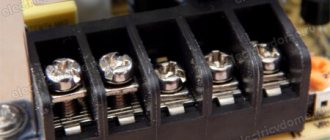
Next, you should take the motherboard power cable coming from the power supply and find the green wire. It must be shorted with any of the black cables. You can use a regular paper clip for this. As shown in the photo above.
Now you need to connect, for example, an old hard drive to the power supply. Then the unit must be connected to the power supply and put into operation. If the fan starts to rotate, then the power supply failure is not due to power supply problems.
What diagnostic methods for computer power supplies still exist?
Checking the power supply with a multimeter and a paper clip is enough to identify its malfunction in about 70-80% of cases. If you do not plan to repair it in the future, then you can limit yourself to this. In professional diagnostics of power supplies, not only these, but also other methods are used to localize the defect. Including:
- Checking the output voltage ripple using an oscilloscope. This is a rather expensive device, so it is unlikely that anyone will decide to buy it for a one-time job.
- Disassembly, inspection, checking voltages and resistances of printed circuit board elements for compliance with standards. It is dangerous to do this without special training, since power supplies accumulate household voltage in some parts. Accidentally touching any live part may result in electric shock.
- Current measurement. This is done using an ammeter built into the tester, which is connected to the break in the line being tested. To create a gap, board elements are usually desoldered.
- Testing on stands with specially selected equipment in various operating modes.
In short, there are quite a few methods for diagnosing power supplies, but not all of them are applicable or advisable at home. Except for research purposes, if, of course, the owner is interested in it.
Other articles on the site
- Is it worth buying a small (mini) computer?
- How much RAM do you need to work comfortably on your computer?
- Physical and virtual increase in computer RAM
- What is the normal processor temperature? How to measure it and, if necessary, reduce it?