Despite the fact that an electric boiler, or storage water heater, has proven itself to be a reliable and efficient device, it periodically requires maintenance or repair.
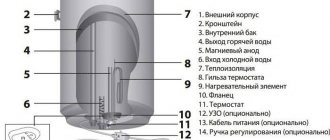
Diagram of an electric boiler.
To carry out these actions with your own hands, you need to know the main thing - how to disassemble the water heater.
How the boiler works
In turn, so that the process of preventive disassembly and assembly of the boiler proceeds without unnecessary incidents and does not harm the device, it is useful to have an idea of how an electric water heater works.
An electric boiler is a regular storage tank, enameled or made of stainless steel (different manufacturers may use different materials).
Two threaded tubes are cut into the tank: for supplying cold water and extracting hot water. The hot water sampling tube is led under the upper wall of the tank. The cold water supply tube barely protrudes above the bottom wall.
This is done so that water heated to operating temperature is selected from the boiler, which rises when heated.
The water in the boiler is heated using a tubular water heating element - a heating element, connected to a thermostat that regulates the heating temperature. To reduce aggressive effects on the heating element, a special catalyst is used - a magnesium anode.
Scheme of operation of a solar boiler.
A heating element with a thermostat and a magnesium anode are mounted on one panel, fixed in the lower plane of the tank with bolts. For this purpose, a special hole is provided in the tank.
Terminals are located at the bottom of the panel: for grounding, for connecting electrical contacts to the heating element and the light indicator of the heating element’s operation.
The panel is isolated from water in the tank with a rubber gasket.
The terminal panel is covered with a protective casing or cover.
The storage tank is placed in a metal case equipped with special fastenings - brackets for mounting the boiler to a wall or ceiling.
The space between the storage tank and the metal body is filled with thermal insulation material: polystyrene foam, mineral wool, polyurethane and other heat insulators.
All water heaters are equipped with a built-in thermometer and a cold water supply check valve with a 6 bar pressure fuse.
The storage tank of an electric water heater is designed for a pressure of 7 to 10 bar. The design pressure in the city water supply system does not exceed 4 bar.
How to disassemble a flat tank water heater
Action plan:
- the boiler is disconnected from the power supply, the water is drained and the check valve is unscrewed;
- unscrew the plug nut;
- plastic shields are dismantled;
- in the center of the plastic cover, a screw is unscrewed, which is most often sealed with a sticker;
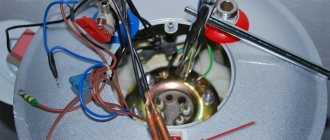
- the bottom cover is removed and access to the complex circuit of electrical components is opened (before disassembling it, it is advisable to photograph the structure, sketch and label each component, this will then help to assemble everything correctly and quickly);
- The next step in disassembling a water heater with a flat tank will be to disconnect the control board and thermal protection, for which you unscrew all the screws and nuts of the grounding bracket (you should remember that the thermal protection and electronic board are afraid of water, so it is very important to protect them from its influence);
- disconnect the connector that comes from the outer board from the electronic control board;
- to dismantle the heating element, which is attached to the flange, you should unscrew the nuts (the work can be complicated if the heating element is covered with scale; remove it slowly, with extreme caution).
Sometimes it is necessary to dismantle both the internal and external control board, which is located on the outside of the water heater body. Before removing it, remove the plastic sticker from the front panel and unscrew the bar.
It's simple. Anyone can do this kind of work with their own hands, without the help of specialists.
The best posts
- How to make a plasterboard ceiling in the kitchen with your own hands
- Painting drywall - step-by-step instructions
- How to join drywall in corners and the process of building a decorative niche
- Sealing drywall joints - recommendations from professionals
- Epoxy resin, application
- How to seal a doorway with plasterboard - installation diagram
- DIY plasterboard ceiling installation - video tutorials and installation instructions
- How and how to glue a foam plastic ceiling plinth
In what cases is it necessary to disassemble the boiler?
Gas boiler wiring diagram.
The magnesium anode in the boiler, used as a catalyst to protect against corrosion of the tank walls and aggressive effects on the heating device, must be changed periodically.
The service life of the anode depends on the quality of the water used in the boiler (it is recommended to install a special filter on the cold water supply pipe), the operating temperature of the water, and the intensity of operation of the water heater.
The standard period of use of a magnesium anode, indicated in the boiler operating instructions, does not exceed 6 months. When using the boiler in a gentle mode, the magnesium anode can last 1-1.5 years without replacement.
Along with replacing the anode, as a preventative measure for the water heater, it is necessary to thoroughly clean the inside of the tank from scale and wash the walls.
The heating element must also be cleaned using special chemicals or a regular metal dish sponge.
An additional need to disassemble the water heater arises as a result of an accident, breakdown or reaction of the boiler to non-standard operating conditions.
As a rule, the heating element fails.
Diagram of connecting the boiler to the network.
If the water from the boiler has an unpleasant odor, yellow or brownish tint, this indicates corrosion and clogging of the tank. The same is evidenced by the fact that the water takes too long to heat up and the appearance of loud extraneous sounds during operation of the heating element.
It is necessary to immediately disassemble the boiler, determine the malfunction and eliminate it. In any case, you should thoroughly rinse the boiler and make sure that both the walls of the storage tank and the heating element are clean.
If there is a leak in the boiler, you need to make sure that the rubber waterproofing gasket is reliable. If necessary, the gasket should be changed.
If the leak occurred as a result of depressurization of the storage tank itself, it is not possible to repair such a breakdown with your own hands. This may be a manufacturing defect - then the boiler must be replaced in accordance with the warranty agreements.
Sometimes, as a result of improper operation of the boiler, the walls of the storage tank may rust. In this case, the procedure for replacing the storage tank may cost more than a new water heater.
Prevention as a way to avoid problems
Not only home owners provide themselves with autonomous hot water. More and more residents of apartment buildings prefer to install instantaneous or storage water heaters. There are 2 reasons for this unconditional popularity: interruptions in hot water supply, especially in the off-season, and the high cost of hot water supply.
Italian Ariston boilers have been popular for several years now. They are distinguished by high quality, reliability, and long service life if used correctly. Nothing lasting has been invented yet, and therefore sometimes you have to do repairs yourself.
And although a water heater is a rather complex device, its regular cleaning and maintenance can be done independently in just a couple of hours. The main thing is that before you start the actual work, understand not only how the equipment works, but also how to disassemble it correctly.
The most important thing is to completely drain the water from the boiler. There are 2 pipes installed on the lower part, through one of them water flows into the boiler, through the second it is drained.
Even after the water has completely drained, some of it remains at the bottom of the tank, so before opening the lid, place a bowl to catch the remainder.
Since high-quality drainage is the key to a successful outcome of the entire operation, we will dwell on it in more detail.
The procedure depends on the features of the particular model - with a trigger, a tee or through a check valve.
- The most demanding model is considered to be the one in which a reinforcing tee is built between the pipe and the valve. You will have to unscrew it with an adjustable wrench and drain all the water.
- on those models where there is no tee, but there is a trigger - a jumper on the reverse valve. You can bend it, fix it and wait until all the water drains. This process usually takes 1.5-2 hours.
- The simplest and therefore most effective way is to unscrew the check valve counterclockwise. Before doing this, connect the hose to the water outlet pipe and drain.
If, during any manipulation, water does not flow from the return, open the hot water tap to create the necessary air flow, and do not close it until the boiler is empty.
Attention! All work is carried out only after the water heater is disconnected from the power supply!
How to properly disassemble a boiler?
For those who don’t have time to read, we have prepared video instructions on how to disassemble an Ariston water heater. Here you will learn about the features of installation, connecting to pipes, cleaning, etc.
Required Tools
- screwdriver;
- pliers;
- knife;
- hose for draining water, matching in diameter with the return pipe;
- replacement anode;
- a special cleaner for cleaning heating elements; you can also use a concentrated solution of citric acid.
Let us repeat once again, all work on disassembling the water heater is carried out only when it is completely de-energized.
Procedure
- Remove the cover from the bottom of the boiler by unscrewing the bolts around the perimeter.
- Drain the water as indicated earlier (it’s easier and faster to drain through the pipe).
- There are several bolts on the inner casing; they need to be unscrewed (don’t forget to replace the bowl, there is still about 15-20 liters of water left in the system).
- Over time, the bolts become “baked” and are very difficult to unscrew. If this happens now, it is better to remove the boiler from the wall, lay it horizontally and then unscrew it. By the way, the tightness of the twist indicates a high-quality assembly.
- Very carefully pull out the electrical unit. But in such a way that the rubber gasket remains intact - it is very easy to tear or deform. At this stage it is advisable to take photographs of everything you do. Then you will have to assemble it in reverse order and then your photos will be very useful.
- If necessary, replace the anode with a new one, and soak the heating element in a solution of citric acid. The minimum time is a day. After 24 hours, take any non-sharp object with a narrow end and carefully remove the scale from the heating element. All this should be done only if the cause of the breakdown is a burnt-out heating element or the need to replace the magnesium anode. How to find out what exactly is preventing the operation of the unit is further in the text.
- The electrical unit of the boiler is treated using a cleaning composition. Plaque can be removed with a dry, hard sponge.
Boiler disassembly sequence
To carry out scheduled disassembly and subsequent preventive cleaning of the storage water heater you will need:
Scheme of a storage water heater.
- screwdrivers: flat, small and medium Phillips;
- adjustable wrench;
- wrench 13;
- rubber hose;
- a basin or other mobile container for water;
- knife;
- soft brush and metal sponge for dishes;
- chemicals for cleaning heating elements;
- new magnesium anode;
- hairdryer
Prevention as a way to avoid problems
Not only home owners provide themselves with autonomous hot water. More and more residents of apartment buildings prefer to install instantaneous or storage water heaters. There are 2 reasons for this unconditional popularity: interruptions in hot water supply, especially in the off-season, and the high cost of hot water supply.
Italian Ariston boilers have been popular for several years now. They are distinguished by high quality, reliability, and long service life if used correctly. Nothing lasting has been invented yet, and therefore sometimes you have to do repairs yourself.
And although a water heater is a rather complex device, its regular cleaning and maintenance can be done independently in just a couple of hours. The main thing is that before you start the actual work, understand not only how the equipment works, but also how to disassemble it correctly.
The most important thing is to completely drain the water from the boiler. There are 2 pipes installed on the lower part, through one of them water flows into the boiler, through the second it is drained.
Even after the water has completely drained, some of it remains at the bottom of the tank, so before opening the lid, place a bowl to catch the remainder.
Since high-quality drainage is the key to a successful outcome of the entire operation, we will dwell on it in more detail.
The procedure depends on the features of the particular model - with a trigger, a tee or through a check valve.
If, during any manipulation, water does not flow from the return, open the hot water tap to create the necessary air flow, and do not close it until the boiler is empty.
Attention! All work is carried out only after the water heater is disconnected from the power supply!
How to properly disassemble a boiler?
For those who don’t have time to read, we have prepared video instructions on how to disassemble an Ariston water heater. Here you will learn about the features of installation, connecting to pipes, cleaning, etc.
Required Tools
- screwdriver;
- pliers;
- knife;
- hose for draining water, matching in diameter with the return pipe;
- replacement anode;
- a special cleaner for cleaning heating elements; you can also use a concentrated solution of citric acid.
Let us repeat once again, all work on disassembling the water heater is carried out only when it is completely de-energized.
Procedure
- Remove the cover from the bottom of the boiler by unscrewing the bolts around the perimeter.
- Drain the water as indicated earlier (it’s easier and faster to drain through the pipe).
- There are several bolts on the inner casing; they need to be unscrewed (don’t forget to replace the bowl, there is still about 15-20 liters of water left in the system).
- Over time, the bolts become “baked” and are very difficult to unscrew. If this happens now, it is better to remove the boiler from the wall, lay it horizontally and then unscrew it. By the way, the tightness of the twist indicates a high-quality assembly.
- Very carefully pull out the electrical unit. But in such a way that the rubber gasket remains intact - it is very easy to tear or deform. At this stage it is advisable to take photographs of everything you do. Then you will have to assemble it in reverse order and then your photos will be very useful.
- If necessary, replace the anode with a new one, and soak the heating element in a solution of citric acid. The minimum time is a day. After 24 hours, take any non-sharp object with a narrow end and carefully remove the scale from the heating element. All this should be done only if the cause of the breakdown is a burnt-out heating element or the need to replace the magnesium anode. How to find out what exactly is preventing the operation of the unit is further in the text.
- The electrical unit of the boiler is treated using a cleaning composition. Plaque can be removed with a dry, hard sponge.
How to determine that the heating element and/or anode has failed
- The device does not heat the water - if you are sure that the socket is working and there is electricity, the fault lies in the heating element.
- The water heats up very slowly - the magnesium anode needs to be replaced.
- During operation, a distinct but dull hissing is heard - excessive scale and deposits on the heating element.
How to properly clean the heating element from scale – video by a specialist:
How to disassemble Ariston?
A special feature of Ariston water heaters is the presence of an oval flange.
- disconnect the boiler from the network;
- drain the water through the return pipe;
- remove the cover from the bottom of the unit;
- carefully pull out the thermostat so as not to damage the gasket;
- gain access to the oval flange.
Before you start pulling out the flange, you need to unscrew the nuts on the bar, remove it, pull the heating element out with a twisting motion, and only after that remove the flange. Otherwise it won't be possible to do it.
In order to replace and correctly install the flange, take a photograph of its position in the neck of the water heater in advance. Otherwise, water will constantly leak.
Be sure to change the gasket! It must be a high-quality, preferably branded product, designed for 2 years of continuous use.
After the flange and gaskets have been replaced, the electrical unit, internal components, heating element are cleaned with a sponge, and the magnesium anode is replaced if necessary.
Assembly is carried out in the reverse sequential order so as not to disturb the structure and prevent its failure.
Disassembling a medium class boiler
The product range includes medium class water heaters with improved functional characteristics. The main design feature is that here the flange is secured with 4-6 bolts.
- disconnect the device from the network;
- drain the water;
- remove the cover from the bottom of the case;
- disconnect the wires from the heating element and unscrew all the nuts;
- lightly pressing the heating element inward with a slight scroll, pull it out - clean or change it;
- unscrew the nuts on the bar and remove the flange;
- change it and the gasket.
Conclusion, reviews, tips
For those who are used to solving problems on their own, it will not be difficult to disassemble the Ariston water heater and carry out its maintenance. By and large, there is nothing complicated in this operation; it only requires diligence and strict adherence to the instructions. Record all actions performed with the device so that you can later assemble everything exactly the opposite.
Boiler de-energization
The first step in disassembling the boiler is to always turn off the power to the device. It is strictly forbidden to disassemble a water heater that is not disconnected from the power supply.
It is necessary to unplug the boiler power cord from the socket. If the cord is connected to a bag machine, you need to turn off the bag switch.
Using a small Phillips screwdriver, the screws of the protective casing or cover are unscrewed, and the cover itself is removed. If the protective casing is attached to plastic latches, then they are pressed out using a knife and a flat-head screwdriver.
All wires connected to the thermostat, heating element, indicator and ground terminals are disconnected. To do this, use a medium Phillips screwdriver.
Attention! To carry out the correct re-installation of the boiler's electrical system, it is necessary to sketch or photograph the original wiring diagram.
Tools for disassembling and assembling water heaters
To disassemble the device, you will need a small number of tools; in most cases, every person has them at home, so no additional costs will be required.
Before you start disassembling the water heater, you need to prepare all the tools in advance and lay them out in front of you, so that if something happens you won’t be distracted by searching for a particular screwdriver.
We recommend: Why the RCD trips: causes of operation, malfunctions and ways to eliminate them
List of required tools:
- Indicator screwdriver.
- Phillips and flat-head screwdrivers (depending on the screws with which the parts are fastened).
- Adjustable wrench.
- Set of spanners.
- Knife and scissors.
- Tow.
- Microfiber cloth to wipe down the insides and parts.
Required Tools
Draining water from the storage tank
Diagram of the heating element device.
Using a shut-off valve, the cold water supply to the apartment is shut off. If a local valve is provided for the boiler, which shuts off only the necessary part of the apartment water supply, it should be used.
The hot water intake valve on the boiler and the cold water supply check valve are closed.
Using an adjustable wrench, the cold water supply hose to the water heater is disconnected, but the hot water extraction hose is not disconnected.
A rubber hose is placed on the boiler check valve. The second end of the rubber hose is directed into the sink, jacuzzi, bathtub. Water from the boiler will drain through it.
The boiler check valve and the hot water intake valve open. All hot water taps connected to the water heater are fully opened: in the bathroom, in the kitchen.
Atmospheric pressure is generated in the boiler storage tank, and water is pushed out through a check valve. Typically, water is discharged from the boiler in several portions as the pressure in the tank increases.
You can check that all the water has been drained by blowing into the rubber hose on the check valve. If water remains in the tank, a characteristic gurgling sound will be heard.
https://1popechi.ru/www.youtube.com/watch?v=6IrIM1KH8RA
It may happen that the pressure in the water supply system is not enough to displace all the water from the boiler. In this case, the hot water extraction hose is removed and additional pressure is pumped into the tank through the hot water extraction tube using a compressor.
Attention! The cold water supply pipe to the storage tank rises above the level of the bottom wall. Therefore, a small part of the water will remain in the boiler and will drain only through the mounting hole of the heating element panel. This factor must be taken into account when further disassembling the water heater.
Disconnecting from the electrical network
An important and main element of disassembling a water heater is to disconnect it from the electrical network. It is simply necessary to do this, since the safety of not only the one who disassembles the boiler, but also everyone nearby, depends on it, because if the boiler explodes, the losses will be significant.
Even when the device is disconnected from the power supply, it is necessary to check the presence of current in the wires using an indicator screwdriver, since draining the water may short the wires and start a fire.
Disassembling the water heater, cleaning it inside or repairing it will not be difficult if you follow the clear instructions included in a special book. If the documents for the boiler are lost, then the parsing algorithm can be found on the Internet in various forms: written, demonstrative, etc. But do not forget that there are also models of boilers that can only be penetrated by a specialist, since the developers have made the internal system difficult for ordinary people to understand.
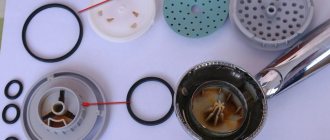
Removing the cover and panel with heating element
Using a medium Phillips screwdriver, unscrew the screws that secure the large bottom cover (not available on all models). The cover is removed.
The thermostat is removed. To do this, you need to smoothly, without pressing to the side, pull the thermostat block down.
Keeping in mind the water remaining in the tank, it is necessary to place a basin or other container for water under the boiler.
Using a 13 mm wrench or an adjustable wrench, unscrew the nuts securing the heating element panel.
The panel fasteners are removed carefully so as not to damage the waterproofing gasket.
The panel with the heating element and magnesium anode is removed.
https://1popechi.ru/www.youtube.com/watch?v=X9atNTXVKy0
To do this, the panel is pushed deep into the tank by hand, turned over and removed. If you do not turn the heating element over, then its bent part, thickened with scale, may not allow the panel to be removed out.
Water heater prevention
The boiler tank is cleaned and washed from the inside. The scale can be removed by hand; the deposits on the walls of the tank are carefully removed with a soft brush. The tank is washed and rinsed with water from a hose.
Attention! When cleaning the tank, do not damage the protective layer.
The heating element is cleaned of scale using chemicals or manually using a metal dish sponge.
The old magnesium anode is replaced with a new one. When choosing a new anode, the size of the thread on the panel is taken into account.