How to disassemble the door of a Samsung microwave?
The microwave door has a very tight spring on the latches, as a result of which the door closes very tightly.
How to disassemble the door to loosen the spring? (microwave samsung) Thanks in advance. Don't touch the door! Then there will be a big problem in the timing of the operation of the microswitches - the fuse will constantly blow when opening the microwave while it is on.
Just don't touch it. Nothing burns out for me (I loosened it) but it doesn’t fit tightly now. It won’t be possible to make it weaker and without cracks. I'll pull it back.
Andrey wrote: Then there will be a big problem in the timing of the operation of the microswitches - the fuse will constantly blow when opening the microwave while it is on.
What are these switches and where are they located? And what fuse are we talking about? Please explain in more detail.
Nolik wrote: It won't be possible to make it weaker and without cracks. I'll pull it back.
Your door probably has latches, i.e. The door opens with a handle, right? And my door has latches and opens with a button.
xtufyfirf wrote: What kind of switches are these, where are they located?
Each one is located next to the door lock handle - there are two of them and there are also two switches.
xtufyfirf wrote: And what fuse are we talking about?
About the mains fuse. If the switches do not operate synchronously, a short circuit occurs and the fuse burns out.
Andrey wrote: Each one is located next to the door lock handle - there are two of them and there are also two switches.
There may be two of them on other microwaves, but I have one switch, you can see it, it is located behind the bottom hook. And one more thing: my hooks are combined into one block and this block is pulled by one spring. Something like this:
Source
Is it possible to disassemble a microwave oven?
A microwave oven consists of a power type transformer, a winding, a capacitor, diodes (high-voltage and safety), an initial winding and a magnetron that provides heating. If malfunctions occur in its operation, first diagnose the problem, checking all the details sequentially.
They are divided into three blocks:
- heating chamber;
- waveguide;
- magnetron transformer.
To do this, disassemble the microwave oven . Doing this yourself is not recommended. Without knowledge and understanding of the operating principle of the equipment, this will not give the desired result and will lead to the final breakdown of the device.
If the user decides to disassemble and repair a household appliance with his own hands, he must remember to follow safety regulations . First, the microwave oven is disconnected from the electrical network and the voltage is removed from the high-voltage modules using an electrical protective tool.
Samsung microwave oven: DIY repair. How to repair a Samsung microwave oven
Today, such an achievement of civilization as a microwave oven is found in almost every home. It allows you to quickly, easily and conveniently heat or cook food, while maintaining the value of the product. It’s a shame and unpleasant if the microwave suddenly starts to malfunction or stops turning on. Of course, the first thought that comes to mind is a trip to a service center or the nearest workshop. If the microwave is under warranty, this is worth doing. But most breakdowns, as practice shows, have fairly simple causes. A person who has certain tools and knows how to use them can try to make simple repairs with their own hands.
Let's try to figure out why this household appliance may not work using the example of a Samsung microwave oven. Do-it-yourself repair is recommended only after the warranty period has expired. Microwave ovens of the Samsung brand have not only the usual universal functions, but also unique additional features unique to this brand. In order to independently repair a Samsung microwave oven, you need to know the structure and operating principle of a microwave oven in principle.
How to disassemble a microwave at home: step-by-step instructions and practical tips
Each model has its own characteristics . If a Phillips screwdriver is needed for one device, it may not be suitable for another.
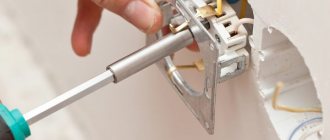
First, unscrew the fasteners from the side and rear surfaces of the equipment . Remove the device casing by sliding it back and lifting it up. Dismantle the power cord by disconnecting the leads from the filter.
Then they proceed to removing the front panel and control unit . To do this, carefully disconnect the cable from the control module. Remove the grounding fastener and the plastic fastener that secures the module, and take out the control panel. After this, remove the induction panel.
The door is dismantled . It is opened and the restrictor plate is removed using a flathead screwdriver. All actions are performed carefully so as not to damage the rubber seal. The door is then lifted and removed. During reassembly, make sure that the door is installed parallel to the frame, without gaps. If necessary, it can be adjusted.
To remove the magnetron, disconnect the cables from the transformer and capacitor . Remove the fasteners holding them to the frame. The assembly is separated until the tip extends to the end of the waveguide. After the magnetron is installed in place, the radiation level is checked. It should be no higher than 5 mW/cm².
Then remove the noise filter by disconnecting the power harnesses from it and removing the fasteners that secure the ground wire to the rear wall. Press the two plastic latches and take it out. After this, disconnect the power harnesses from the container, unscrew the screw, and fix the grounding wire of the high-voltage diode. At the next stage, the harnesses are disconnected from the current relay and the fan. Remove the fasteners and remove the fan.
If you need to get a backlight lamp , disconnect the wires from it and remove the fasteners securing the air duct to the magnetron. By pressing the air duct latches, remove the display panel.
Reference. To remove parts from the microwave, they follow the same principle: disconnect the wires, remove the fasteners and remove the part.
Assembling the equipment is carried out in reverse order . To simplify the process, it is better to record the disassembly of the device on camera or take photographs. When assembling a microwave oven, act very carefully so as not to damage it and not lead to leakage of microwave radiation.
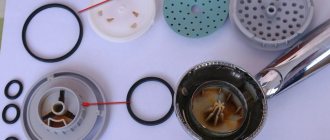
Disassembling the microwave door
It happens that malfunctions in the microwave occur because of the door. Regardless of the model, the designs have many common points . The doors have a layered structure, which includes a load-bearing (metal), protective and outer (decorative) layer. They differ from each other in the number of layers, material of manufacture and method of fastening.
Let's look at how to disassemble the microwave door :
- First, prepare the tools: a knife and 2 screwdrivers with a wide flat blade.
- The process begins by disconnecting the seal frame.
- Then the outer frame is separated, which is secured with screws or latches.
- If the door needed to be cleaned of dirt, the disassembly process is complete.
- At the next stage, carefully, so as not to break, separate the glass from the plastic trim.
- When necessary, remove the film from the inside of the door, which is attached to a metal base.
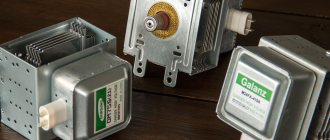
How to disassemble a microwave magnetron and replace it yourself
Most often, the magnetron of a microwave oven cannot be repaired . If the part is worn out, depressurized or the filament breaks, it is replaced with a new one. When the cap on the antenna or the feed-through capacitor fails, they are replaced if tools are available.
Before proceeding with disassembly and repair, the system is checked for functionality . First, pay attention to the power source. Low voltage causes the device to malfunction.
If it meets the standard, the microwave is disassembled:
- They inspect whether the antenna cap is burnt out, whether there is any deformation, holes or traces of burning on the housing and filter.
- If no external signs of damage are found, the magnetron is checked with a multimeter.
- Disconnect the terminals with wires.
- The tester is turned on and set to 200 Ohm.
- The probes are connected to the terminals. If the winding is intact, the multimeter will show low resistance (about 0.5 Ohms), and a squeaking or ringing sound will be heard. When the tester shows infinity, it means the filament has broken.
- To test the pass capacitor, the device is set to the highest measurement mode.
- One probe is connected to any of the contacts, the other to the body.
If everything is in order, the device will show infinity . When the capacitor capacitance is damaged, the charge penetrates the housing.
Reference. Using a multimeter for diagnostics at home does not always guarantee the accuracy of the data.
If the antenna cap or feed-through capacitor is faulty in the magnetron , the part can be disassembled and repaired.
Replacing the cap
The oven is disconnected from the network, the casing is removed and the power plug is carefully removed . Disconnect the fasteners and remove the magnetron. Check the cap. If carbon deposits have formed on it, clean it off with fine-grained sandpaper.
If the cap is electrocuted or burnt out, it must be replaced. It is removed from the antenna and the integrity is checked. If the anode is in order, install a new part. The magnetron is then returned to its place.
Replacing the capacitor
First remove the filter cover . Use pliers to bite off the throttle contacts. Using a drill with a diameter of 3 mm, make holes around the capacitor. Remove from the filter housing. To increase the length of the contact, unwind one turn at each inductor.
The contacts are cleaned with fine-grained sandpaper. Then a new capacitor is inserted in place of the old one and bolted. In this case, the contacts are connected so that they do not touch the walls of the box. Close the lid.
How to replace the magnetron in a microwave oven yourself
If the magnetron cannot be repaired, it will have to be replaced. Before purchasing a new part, study the technical characteristics of the old one. On its outside there is a sticker indicating the model, power, frequency and location of the power terminals. To obtain full compatibility, it is recommended to choose a model that matches your microwave oven.
After disassembling the equipment, the faulty part is disconnected from the wires and removed. A new one is installed in its place, securely screwed in with mounting bolts. Then connect the wires and install the furnace casing.
Microwave sparks inside
If your Samsung ME713KR/BWT equipment is broken, then before you repair the Samsung microwave oven with your own hands, do not forget to disconnect it from the network. The first thing you need to pay attention to in the event of such a breakdown is the magnetron screen. It is in most cases made of sheet mica. The magnetron screen is located on the side wall inside the microwave. It is made in the form of an overlay and is attached either with latches or self-tapping screws.
Under the screen there is a hole through which rays from the magnetron enter the microwave oven. Having removed the plate, we find traces of burnt mica on it. This is the reason why the furnace sparks. The easiest way to fix the problem is to make a new screen from sheet mica and install it in place.
In addition, you need to pay attention to the condition of the metal in the place that was covered by the screen. If the microwave worked for a long time with burnt mica, then both the metal and the magnetron cap could burn in the area where the screen was damaged. Then you will have to remove the protective cover of the microwave, get to the magnetron cap and determine whether it needs to be replaced or not.
Device and principle of operation
We will look at this issue superficially so as not to deviate from the main topic. The information will be simplified as much as possible, since not all home craftsmen have deep knowledge of electrical engineering. Let's start with a description and purpose of the main structural elements, they are presented below in the figure.
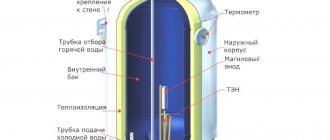
Rice. 1. Microwave device
Designations:
- Door latches serve both to secure the door and to lock the door in the open position.
- A rotating tray on which dielectric cookware is placed.
- A separator equipped with rollers that drives the pallet.
- Drive rotating the separator.
- The backlight turns on depending on the operating mode.
- Ventilation (usually forced).
- A magnetron is a microwave radiation generator; in fact, it is the main structural element. You can find out how it works and the principle of its operation by reading the article on our website dedicated to this issue.
- The waveguide ensures the movement of microwave waves to the microwave chamber. It is a hollow metal pipe of rectangular cross-section.
- High voltage diode.
- Capacitor.
- Waveguide power supply circuit transformer and control circuit.
- Control block.
We will not provide a complete schematic diagram of the device, since they can differ greatly in different models of microwave ovens. In our case, the magnetron power circuit will be sufficient. As a rule, it has a standard structure.
Typical magnetron power circuit diagram
Let us briefly describe the operating principle of the above circuit. Power to the primary winding of the transformer (I) comes from an external control circuit that regulates the power and duration of microwave radiation. One of the secondary windings (II) supplies voltage to the magnetron filament. Winding II is made of 2-4 turns of thick wire, since the current in the filament circuit can reach 10.0 A at a voltage of about 3 volts.
Another secondary winding (III), which supplies a high voltage level (up to 3.0 kV), is usually called anode. As can be seen from the figure, in this circuit, a rectifier and voltage multiplier are built on the basis of a high-voltage diode (VD1) and a capacitor (C1). In this case, VD1 is turned on so that the opening occurs at a positive half-cycle, as a result the capacitor begins to charge. When the negative half-cycle begins, diode VD1 closes and voltage is supplied to magnetron M1 together with the charge accumulated on the capacitor. This leads to a doubling of the voltage and the formation of an electric field of the required intensity in the magnetron.
Resistance R1 in this case is necessary for discharge C1. Typically, this resistor is located in the capacitor housing. As for VD2, it provides protection in the event of an increase in voltage across capacitor C1 or a short circuit occurs in magnetron M1.
Preparatory stage
Before starting repairs, it is necessary to collect as much information as possible about the failed device. Ideally, this is a service manual for a specific model. In this document, the manufacturer provides all the necessary data, starting from the assembly drawing (exploded view, literally from English explosion diagram) and ending with a troubleshooting algorithm.
Unfortunately, manufacturers are in no hurry to share this information, distributing it only among networks of certified service centers. If you manage to find technical documentation for repairs, be prepared for the fact that it will be in English.
If the documentation could not be found, and this will happen in most cases, do not be discouraged; typical microwave oven malfunctions can be determined without having a circuit diagram. It is enough to know what the main elements look like and where they can be located. A photo of a microwave with the casing removed will help you with this.
Appearance and location of the main elements in the microwave body
The intuitiveness of the process in most cases allows you to remove the casing and get to the main structural elements without an assembly drawing. But in this case, you need to remember the sequence of actions and try not to leave behind “extra” parts after reassembly.
Microwave won't turn on
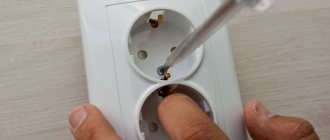
You can repair the Samsung GE83KRW-1/BW microwave oven yourself. Remove the cover and check the integrity of the network cable with a multimeter. Next, with its help, we check the integrity of the fuses in the dialing mode. If we do not find a break in the circuit, we continue checking. We call resistors and the control panel. Next, check the switches on the panel. We find a broken switch element. When the door was closed, this element did not press the button; therefore, the contact did not close, and therefore the microwave did not work. We repair a broken switch, if the quality of the plastic and glue allows it, or replace the failed element. Assembling the oven.
Faced with poor quality or dishonest service at a repair shop, some consumers are wondering how to repair a Samsung microwave oven with their own hands. It is quite possible to fix the breakdown in most cases. To do this, familiarize yourself with the structure of the microwave oven and the principle of its operation. Don't forget to take safety precautions into account when making DIY repairs.
Typical faults and methods for their elimination
Before we consider in detail the elimination of the malfunctions listed below, we consider it necessary to warn that before diagnosing and repairing, it is necessary to physically disconnect the device from the power supply, that is, pull the plug from the socket.
There is no response to the power button.
In this case, diagnostics and repairs should follow the following algorithm of actions:
- We check the presence of voltage in the power supply network. If it is not there, we solve the problem with the power supply, otherwise we move on to the next step.
- Checking the power supply of the control module. Let's start with the fuse. If it is burnt out, we replace it. After that, turn on the device and try to heat, for example, a glass of water. If everything works, the repair is complete. If the fuse blows, the problem is in the control module and should be repaired or replaced.
In order to independently repair the control module, you must have certain skills in radio electronics; without them, it is not recommended to start repairing the control module yourself.
Example of fuse location on the control module
The microwave oven does not turn off after operating the mode.
In most cases, this problem indicates a faulty door position microswitch. To fix the problem, we find, check and, if necessary, replace the switch.
If the microswitches are normal, then the problem may be related to the relay that supplies voltage to the power transformer in the magnetron power circuit. We “ring” the relay contacts with a multimeter, if they are “stuck”, we replace the electrical switch with a new one.
When no problems are found with the relay, it means that the malfunction is related to the control unit, we replace or repair it.
Low heat.
Most often, this malfunction is associated with a voltage drop in the household electrical network. If it drops below 205.0-210.0 V, a sharp decrease in the intensity of the microwave flux occurs. This problem is typical for private houses in rural areas, where overvoltage of the power grid regularly occurs, and as a result, voltage drop.
If the multimeter shows the permissible voltage level of the household network, then you should check the power circuit of the magnetron, as we will describe how to do this in the next section.
When diagnostics of the magnetron circuit do not produce results, then everything points to problems with the control module.
No heating.
Such a malfunction clearly indicates a malfunction in the magnetron power circuit. Diagnostics is carried out as follows:
- Using a multimeter, we check the presence of voltage on the primary winding T1 (see Fig. 1). If it is not there, the problem should be looked for in the control module.
- The presence of voltage indicates that it is necessary to check the high-voltage circuit fuse, transformer T1, fuse, capacitance C1, diode VD1 and the magnetron itself. Checking the listed elements is carried out with the power off!
- We “ring” the fuse with a multimeter, switching it to the mode of checking diodes or measuring resistance. If the device shows a break, replace the fuse.
- We check T1, open circuit and short circuit of the primary and secondary windings.
- We test capacitance C1; how to test a capacitor using a multimeter was described on our website.
- “Let’s call” VD If anyone is unfamiliar with diode testing technology, you can familiarize yourself with it in a previously published article.
- Checking the magnetron. There are certain features with its testing, so let’s look at this process in more detail:
- First of all, it is necessary to “ring” the filament, if the multimeter shows a resistance close to zero (see a in Fig. 6), then everything is fine with it, we continue testing. If the device shows a break, check the contact of the filter coils (marked with yellow arrows in b Fig. 6). If there are problems with the coil mounting contact, the device can be restored, otherwise, everything indicates the need to replace it.
- After testing the thread, we check the feed-through containers for breakdown. To do this, we switch the multimeter to the “continuity” mode, touch the body with one probe, and alternately touch the magnetron contacts with the second (b in Fig. 6). A normal indicator would be infinite resistance, otherwise everything indicates that the capacitance is broken, which means that the magnetron needs to be replaced.
- If the magnetron test does not produce results, it is necessary to measure the input voltages on the device. If they are below the permissible parameters, this may be caused by an interturn short circuit in a high-voltage transformer or a reduced power level in the household electrical network.
Rice.
6. Checking the magnetron Important! The magnetron must be replaced with a similar one. This is due to the fact that the parameters of the high-voltage transformer and control circuit are calculated based on the specific model of the microwave generator.
Sparking is observed.
This malfunction may be caused by the following reasons:
- Burnout of the mica plate that insulates the waveguide from splashes and pieces of food . The plate is located inside the chamber on the magnetron side. The condition is determined visually. If the problem is related to the plate, it is enough to replace it.
- During operation, the coupler cover burned out . This is a plastic cap that rotates the tray. In this case, only replacement will help. Naturally, it is necessary to install a coupler from models of the same type, since the design of such a cover can be different even from the same manufacturer.
- The “wrong” utensils are installed in the chamber . We remind you that metal utensils, as well as those with metallic dyes, cannot be used in microwave ovens.
The tray does not rotate.
First of all, you need to check that the pan is not blocked by any foreign object, whether it is installed correctly or the separator. If everything is fine, then the reason lies in the drive. This may be due to the following reasons:
- A jammed motor (detected tactilely) or a break in one of the windings (continuity check is carried out). In these cases, the drive needs to be replaced.
- Gearbox problem . In this case, everything depends on the design. In some cases, the gearbox can be repaired. But, as practice shows, it will be easier and cheaper to replace it.
No response to the control panel.
In modern electronic models, such a malfunction indicates problems with the control module. In products with an electromechanical control system, it makes sense to check the mechanical relays and/or switches and, if necessary, replace faulty parts.
When turned on, the scoreboard does not work.
If the power indicator lights up when turned on, but the digital display does not work, then everything indicates problems with the control module. It needs to be repaired or replaced.
The fuse blows when the door is closed.
A characteristic indicator of faulty microswitches on the door position. One of them is “stuck” and does not switch, resulting in a short circuit in the control circuit. Repair consists of replacing or cleaning microswitches.
An example of a step-by-step repair of an LG MB-4022G microwave oven
There can be many reasons for breakdowns and malfunctions of a microwave oven, as you have already seen above. Most often, this is a failure of the magnetron itself, due to improper operation of the device, namely the use of utensils not intended for cooking in a microwave oven. Also various metal parts that may accidentally end up inside during operation.
Failure of the magnetron can be considered the most unpleasant reason, since replacing this part is not worth proofreading. In this case, it is easier to buy a new stove.
But sometimes there are minor breakdowns that can be easily fixed without special tools and without spending a lot of money.
Below, the article will describe one of these breakdowns and a method for eliminating this malfunction. The photo shows a stove that has stopped turning on and does not respond in any way to manipulation of the control knobs.
Rice. 7. LG MB-4022G
Before removing the protective casing from the oven, you must carefully inspect the power cord and the plug itself for damage, breaks and cuts. If there are any, then the oven should be disassembled.
Microwave oven device
It is better to start any repair of household appliances by becoming familiar with its internal structure. Main functional parts:
- Control block;
- magnetron;
- waveguide;
- frame;
- cooking chamber.
- The microwave oven does not heat.
- The microwave is sparking inside.
- The microwave oven does not turn on.
- The plate does not spin.
- The microwave oven heats food poorly.
- The operation of the stove is accompanied by a strong hum.
- The touch keyboard does not work.
- No indication.